Android 自定义控件TextView点击显示更多
前言
公司的项目中用到了一个TextView 的点击加载更多,这个时候一般的Textview满足不了这个要求了就需要我们自定义TextView,今天也在这个地方总结和写一下自定义的TextView点击显示更多。
名言
想而奋进的过程,其意义远大于未知的结果。
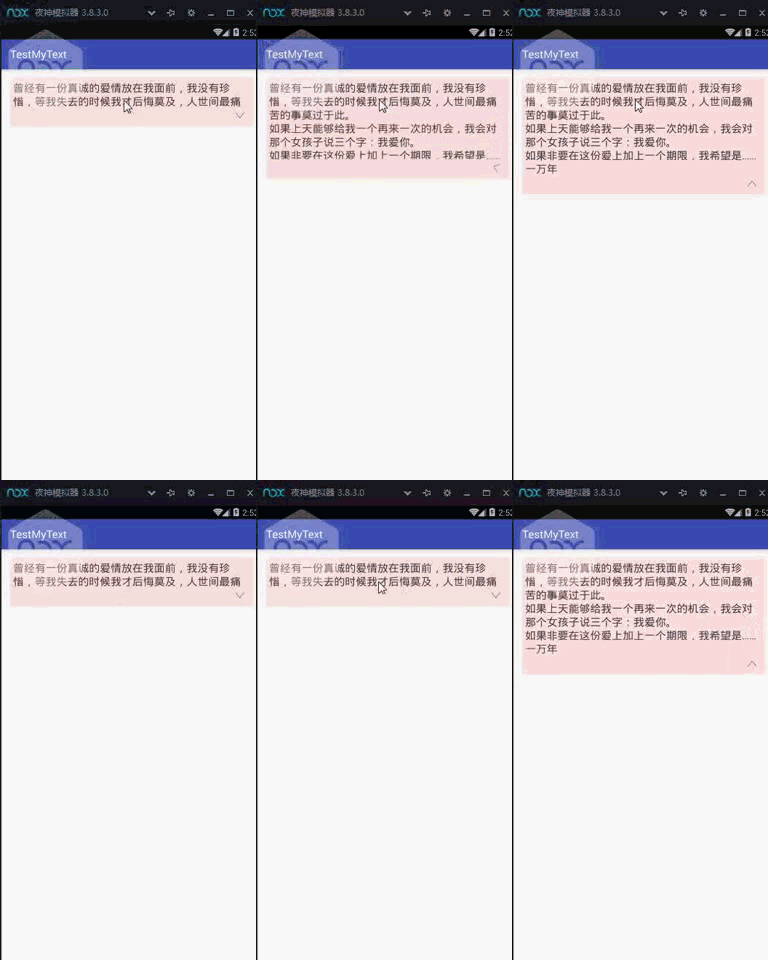
我们这里就先来看看效果图吧。
接下来我们来看看是怎么实现的,全部代码会在文章底部给出。
第一步:继承了LinearLayout重写了3个构造函数
public class MyTextview extends LinearLayout {

    public MyTextview(Context context) {
        super(context);
    }

    public MyTextview(Context context, AttributeSet attrs) {
        super(context, attrs);
    }

    public MyTextview(Context context, AttributeSet attrs, int defStyleAttr) {
        super(context, attrs, defStyleAttr);
    }
}
第二步:写出我们需要的自定义控件
public void initView() {
        setOrientation(VERTICAL);
        setGravity(Gravity.RIGHT);
        int padding = dip2px(getContext(), 10);
        textView = new TextView(getContext());
        //行间距
        textView.setLineSpacing(3f, 1f);
        addView(textView, LayoutParams.MATCH_PARENT, LayoutParams.WRAP_CONTENT);
        img = new ImageView(getContext());
        img.setPadding(padding, padding, padding, padding);
        //imageview设置图片
        img.setImageResource(R.mipmap.textimg);
        LayoutParams llp = new LayoutParams(LayoutParams.WRAP_CONTENT, LayoutParams.WRAP_CONTENT);
        addView(img, llp);
    }
第三步:自定义控件的属性
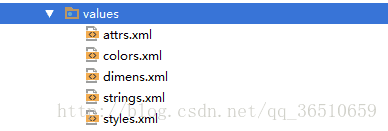
在res—>values—>创建attrs.xml
如图

然后在attrs文件中写上我们的自定义属性
textSize字体大小
textColor字体颜色
maxLine最大行数
text文字
<resources>
    <declare-styleable name="MyTextStyle">
        <attr name="textSize" format="dimension" />
        <attr name="textColor" format="color" />
        <attr name="maxLine" format="integer" />
        <attr name="text" format="string" />
    declare-styleable>
resources>
第四步:在自定义view的代码中引入自定义属性,修改构造函数
public void initAttrs(Context context, AttributeSet attrs) {
        TypedArray typedArray = context.obtainStyledAttributes(attrs, R.styleable.MyTextStyle);
        textColor = typedArray.getColor(R.styleable.MyTextStyle_textColor, defaultTextColor);
        textSize = typedArray.getDimensionPixelSize(R.styleable.MyTextStyle_textSize, defaultTextSize);
        maxLine = typedArray.getInt(R.styleable.MyTextStyle_maxLine, defaultLine);
        text = typedArray.getString(R.styleable.MyTextStyle_text);
        setMyView(textColor, textSize, maxLine, text);
        //用完 回收一下
        typedArray.recycle();
}这个地方context通过调用obtainStyledAttributes方法来获取一个TypeArray,然后由该TypeArray来对属性进行设置。设置完以后必须要回收一下typedArray.recycle();
第五步:自定义的属性引入进来了我们就要设置在我们TextView上面啊。
protected void setMyView(int color, float size, final int line, String text) {
        //文本设置颜色
        textView.setTextColor(color);
        //字体大小
        textView.setTextSize(TypedValue.COMPLEX_UNIT_PX, size);
        //设置文字
        textView.setText(text);
        //设置TextView的高度
        textView.setHeight(textView.getLineHeight() * line);
        //线程更新UI
        post(new Runnable() {
            @Override
            public void run() {
                if (textView.getLineCount() > line) {
                    img.setVisibility(VISIBLE);
                } else {
                    img.setVisibility(GONE);
                }
            }
        });
    }
看看这一段
textView.getLineHeight()* line获取textview每一行的高度*有多少行,就是我们TextView的高度
   public void run() {
         if (textView.getLineCount() > line) {
              img.setVisibility(VISIBLE);
            } else {
              img.setVisibility(GONE);
             }
      }
这个地方需要在线程中来更新UI,假如textView.getLineCount()(textview的总的行数大于了初始行数)图片就显示出来,反之不显示。
第六步:监听
protected void textListener() {
        setOnClickListener(new OnClickListener() {
            boolean isGo;

            @Override
            public void onClick(View v) {
                isGo = !isGo;
                textView.clearAnimation();
                //相差的高度
                final int deltaValue;
                //初始的高度
                final int startValue = textView.getHeight();
                //动画播放的时间
                int duration = 1000;
                if (isGo) {
                    //Image图片打开的动画
                    deltaValue = textView.getLineHeight() * textView.getLineCount() - startValue;
                    RotateAnimation animation = new RotateAnimation(0, 180, Animation.RELATIVE_TO_SELF, 0.5f, Animation.RELATIVE_TO_SELF, 0.5f);
                    animation.setDuration(duration);
                    animation.setFillAfter(true);
                    img.startAnimation(animation);
                } else {
                    //Image图片关闭的动画
                    deltaValue = textView.getLineHeight() * maxLine - startValue;
                    RotateAnimation animation = new RotateAnimation(180, 0, Animation.RELATIVE_TO_SELF, 0.5f, Animation.RELATIVE_TO_SELF, 0.5f);
                    animation.setDuration(duration);
                    animation.setFillAfter(true);
                    img.startAnimation(animation);
                }
                //打开或者关闭的时候textview下面的展开动画
                Animation animation = new Animation() {
                    protected void applyTransformation(float interpolatedTime, Transformation t) {
                        textView.setHeight((int) (startValue + deltaValue * interpolatedTime));
                    }
                };
                //这里给这个设置了一个回弹效果
                animation.setInterpolator(new BounceInterpolator());
                animation.setDuration(duration);
                textView.startAnimation(animation);
            }
        });
    }
第七步:把设置文字暴露外部
public void setText(CharSequence charSequence) {
        textView.setText(charSequence);
    }
这里就差不多就完成了,然后我们再来看看xml文件中
  <com.example.beiduo.testmytext.MyTextview
  xmlns:more="http://schemas.android.com/apk/res-auto"
        android:background="#ffdfdf"
        android:id="@+id/tv"
        android:padding="5dp"
        android:layout_width="match_parent"
        android:layout_height="wrap_content"
        more:maxLine="2"
        more:text=""
        more:textColor="#434343"
        more:textSize="20sp">com.example.beiduo.testmytext.MyTextview>
xmlns:more="http://schemas.android.com/apk/res-auto"这句话是相当重要的,没有这句话你是用不起你自己自定义的属性的more可以随你自己改,想改什么改什么。more:maxLine="2" maxline是初始的最大行数MainActivity中
public class MainActivity extends AppCompatActivity {

    private MyTextview myTextview = null;

    private String str = "曾经有一份真诚的爱情放在我面前,我没有珍惜,等我失去的时候我才后悔莫及,人世间最痛苦的事莫过于此。 \n" +
            "如果上天能够给我一个再来一次的机会,我会对那个女孩子说三个字:我爱你。 \n" +
            "如果非要在这份爱上加上一个期限,我希望是…… \n" +
            "一万年";

    @Override
    protected void onCreate(Bundle savedInstanceState) {
        super.onCreate(savedInstanceState);
        setContentView(R.layout.activity_main);
        myTextview = (MyTextview) findViewById(R.id.tv);
        myTextview.setText(str);
    }
}
这样就搞定了。
然后我给出自定义控件的所有代码
public class MyTextview extends LinearLayout {
    private TextView textView = null;
    private ImageView img = null;

    //字体颜色
    protected int textColor;
    //字体大小
    protected float textSize;
    //最大行数
    protected int maxLine;
    //文字
    protected String text;

    //默认颜色
    public int defaultTextColor = Color.BLACK;
    //默认字体大小
    public int defaultTextSize = 14;
    //默认行数
    public int defaultLine = 2;


    public MyTextview(Context context) {
        super(context);
        initView();
    }

    public MyTextview(Context context, AttributeSet attrs) {
        super(context, attrs);
        initView();
        initAttrs(context, attrs);
        textListener();
    }

    public MyTextview(Context context, AttributeSet attrs, int defStyleAttr) {
        super(context, attrs, defStyleAttr);
        initView();
        initAttrs(context, attrs);
        textListener();
    }

    public void initAttrs(Context context, AttributeSet attrs) {
        TypedArray typedArray = context.obtainStyledAttributes(attrs, R.styleable.MyTextStyle);
        textColor = typedArray.getColor(R.styleable.MyTextStyle_textColor, defaultTextColor);
        textSize = typedArray.getDimensionPixelSize(R.styleable.MyTextStyle_textSize, defaultTextSize);
        maxLine = typedArray.getInt(R.styleable.MyTextStyle_maxLine, defaultLine);
        text = typedArray.getString(R.styleable.MyTextStyle_text);
        setMyView(textColor, textSize, maxLine, text);
        //用完 回收一下
        typedArray.recycle();
    }

    public void initView() {
        setOrientation(VERTICAL);
        setGravity(Gravity.RIGHT);
        int padding = dip2px(getContext(), 10);
        textView = new TextView(getContext());
        //行间距
        textView.setLineSpacing(3f, 1f);
        addView(textView, LayoutParams.MATCH_PARENT, LayoutParams.WRAP_CONTENT);
        img = new ImageView(getContext());
        img.setPadding(padding, padding, padding, padding);
        //imageview设置图片
        img.setImageResource(R.mipmap.textimg);
        LayoutParams llp = new LayoutParams(LayoutParams.WRAP_CONTENT, LayoutParams.WRAP_CONTENT);
        addView(img, llp);
    }


    protected void setMyView(int color, float size, final int line, String text) {
        //文本设置颜色
        textView.setTextColor(color);
        //字体大小
        textView.setTextSize(TypedValue.COMPLEX_UNIT_PX, size);
        //设置文字
        textView.setText(text);
        //设置TextView的高度
        textView.setHeight(textView.getLineHeight() * line);

        //线程更新UI
        post(new Runnable() {
            @Override
            public void run() {
                if (textView.getLineCount() > line) {
                    img.setVisibility(VISIBLE);
                } else {
                    img.setVisibility(GONE);
                }
            }
        });
    }


    protected void textListener() {
        setOnClickListener(new OnClickListener() {
            boolean isGo;

            @Override
            public void onClick(View v) {
                isGo = !isGo;
                textView.clearAnimation();
                //相差的高度
                final int deltaValue;
                //初始的高度
                final int startValue = textView.getHeight();
                //动画播放的时间
                int duration = 1000;
                if (isGo) {
                    //Image图片打开的动画
                    deltaValue = textView.getLineHeight() * textView.getLineCount() - startValue;
                    RotateAnimation animation = new RotateAnimation(0, 180, Animation.RELATIVE_TO_SELF, 0.5f, Animation.RELATIVE_TO_SELF, 0.5f);
                    animation.setDuration(duration);
                    animation.setFillAfter(true);
                    img.startAnimation(animation);
                } else {
                    //Image图片关闭的动画
                    deltaValue = textView.getLineHeight() * maxLine - startValue;
                    RotateAnimation animation = new RotateAnimation(180, 0, Animation.RELATIVE_TO_SELF, 0.5f, Animation.RELATIVE_TO_SELF, 0.5f);
                    animation.setDuration(duration);
                    animation.setFillAfter(true);
                    img.startAnimation(animation);
                }
                //打开或者关闭的时候textview下面的展开动画
                Animation animation = new Animation() {
                    protected void applyTransformation(float interpolatedTime, Transformation t) {
                        textView.setHeight((int) (startValue + deltaValue * interpolatedTime));
                    }
                };
                animation.setInterpolator(new BounceInterpolator());
                animation.setDuration(duration);
                textView.startAnimation(animation);
            }
        });
    }


    public TextView getTextView() {
        return textView;
    }

    public void setText(CharSequence charSequence) {
        textView.setText(charSequence);
    }

    public static int dip2px(Context context, float dipValue) {
        final float scale = context.getResources().getDisplayMetrics().density;
        return (int) (dipValue * scale + 0.5f);
    }
}