概述
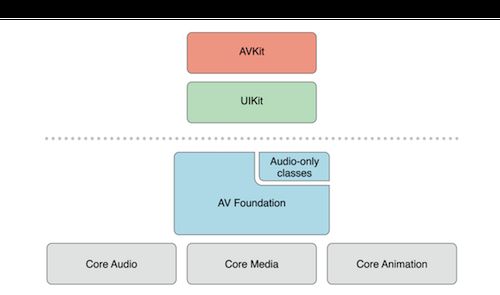
AVFoundation 是一个可以用来使用和创建基于时间的视听媒体数据的框架。AVFoundation 的构建考虑到了目前的硬件环境和应用程序,其设计过程高度依赖多线程机制。充分利用了多核硬件的优势并大量使用block和GCD机制,将复杂的计算机进程放到了后台线程运行。会自动提供硬件加速操作,确保在大部分设备上应用程序能以最佳性能运行。该框架就是针对64位处理器设计的,可以发挥64位处理器的所有优势。
切换摄像头
一般来说iPhone都具有前后两个摄像头,在做相机应用的时候一个基本的需求就是前后摄像头的切换。在切换相机的时候我们需要注意的是我们都需要判断当前设备支不支持相机切换、用户是否开启了相应的权限、以及设置的图片尺寸前后摄像头是否支持这样的尺寸。
#pragma mark - 切换摄像头
- (AVCaptureDevice *)deviceWithPostion:(AVCaptureDevicePosition)position
{
    NSArray *devices = [AVCaptureDevice devicesWithMediaType:AVMediaTypeVideo];
    for (AVCaptureDevice *device in devices) {
        if (device.position == position) {
            return device;
        }
    }
    return nil;
}

- (BOOL)canSwitchCamera
{
    return [[AVCaptureDevice devicesWithMediaType:AVMediaTypeVideo] count] > 1;
}

- (void)switchCamera
{
    if (![self canSwitchCamera]) {
        return;
    }

    AVCaptureDevicePosition devicePosition;
    if (self.deviceInput.device.position == AVCaptureDevicePositionBack) {
        devicePosition = AVCaptureDevicePositionFront;
    }else {
        devicePosition = AVCaptureDevicePositionBack;
    }

    [self.captureSession beginConfiguration];
    [self.captureSession removeInput:_deviceInput];
    NSError *error;
    AVCaptureDevice *device = [self deviceWithPostion:devicePosition];
    self.deviceInput = [AVCaptureDeviceInput deviceInputWithDevice:device error:&error];
    if (!self.deviceInput) {
        [self.captureSession commitConfiguration];
        return;
    }
    [self.captureSession addInput:self.deviceInput];
    [self.captureSession commitConfiguration];
}
调整焦距
iOS设备大多都支持基于给定的兴趣点设置对焦,我们只需要传入一个位置,系统就会自动在当前位置进行对焦。 需要注意的是,定要先设置位置,再设置曝光模式。需要注意的是,要先设置位置,再设置对焦模式。这里的 CGPoint 取值范围是取景框左上角(0,0)到取景框右下角(1,1)之间。
#pragma mark - 自动对焦
- (void)autoFocus
{
    if (!self.deviceInput.device) {
        return;
    }

    if ([self.deviceInput.device isFocusModeSupported:AVCaptureFocusModeAutoFocus]) {
        NSError *error;
        if ([self.deviceInput.device lockForConfiguration:&error]) {
            self.deviceInput.device.focusMode = AVCaptureFocusModeAutoFocus;
            [self.deviceInput.device unlockForConfiguration];
        }
    }
}

#pragma mark - 调整焦距
- (BOOL)canTapFoucus
{
    return [self.deviceInput.device isFocusPointOfInterestSupported];
}

- (void)focusAtPoint:(CGPoint)point
{
    if (![self canTapFoucus]) {
        return;
    }

    if ([self.deviceInput.device isFocusModeSupported:AVCaptureFocusModeAutoFocus]) {
        NSError *error;
        if ([self.deviceInput.device lockForConfiguration:&error]) {
            self.deviceInput.device.focusPointOfInterest = point;
            self.deviceInput.device.focusMode = AVCaptureFocusModeAutoFocus;
            [self.deviceInput.device unlockForConfiguration];
        }
    }
}
曝光
iOS设备大多都支持基于给定的兴趣点设置曝光数据,我们只需要传入一个位置,系统就会自动在当前位置进行曝光。 需要注意的是,定要先设置位置,再设置曝光模式。这里的 CGPoint 取值范围是取景框左上角(0,0)到取景框右下角(1,1)之间。
#pragma mark - 曝光
- (BOOL)canTapExpose
{
    return [self.deviceInput.device isExposurePointOfInterestSupported];
}

- (void)exposeAtPoint:(CGPoint)point
{
    if (![self canTapExpose]) {
        return;
    }

    if ([self.deviceInput.device isExposureModeSupported:AVCaptureExposureModeAutoExpose]) {
        NSError *error;
        if ([self.deviceInput.device lockForConfiguration:&error]) {
            self.deviceInput.device.exposurePointOfInterest = point;
            self.deviceInput.device.exposureMode = AVCaptureExposureModeAutoExpose;
            [self.deviceInput.device unlockForConfiguration];
        }
    }
}
闪光灯
闪光灯的使用比较简单,有以下几个模式:AVCaptureFlashModeOff 、AVCaptureFlashModeOn、AVCaptureFlashModeAuto。
#pragma mark - 闪光灯
- (BOOL)haveFlash
{
    return [self.deviceInput.device hasFlash];
}

- (AVCaptureFlashMode)currentFlashMode
{
    return self.deviceInput.device.flashMode;
}

- (void)setFlashModel:(AVCaptureFlashMode)flashModel
{
    if (self.deviceInput.device.flashMode == flashModel) {
        return;
    }

    if ([self.deviceInput.device isFlashModeSupported:flashModel]) {
        NSError *error;
        if ([self.deviceInput.device lockForConfiguration:&error]) {
            self.deviceInput.device.flashMode = flashModel;
            [self.deviceInput.device unlockForConfiguration];
        }
    }
}
手电筒
手电筒的使用比较简单,有以下几个模式:AVCaptureTorchModeOff,AVCaptureTorchModeOn,AVCaptureTorchModeAuto 。
#pragma mark - 手电筒
- (BOOL)haveTorch
{
    return [self.deviceInput.device hasTorch];
}

- (AVCaptureTorchMode)currentTorchMode
{
    return self.deviceInput.device.torchMode;
}

- (void)setTorchModel:(AVCaptureTorchMode)torchModel
{
    if (self.deviceInput.device.torchMode == torchModel) {
        return;
    }

    if ([self.deviceInput.device isTorchModeSupported:torchModel]) {
        NSError *error;
        if ([self.deviceInput.device lockForConfiguration:&error]) {
            self.deviceInput.device.torchMode = torchModel;
            [self.deviceInput.device unlockForConfiguration];
        }
    }
}

- (void)setTorchLevel:(float)torchLevel
{
    if ([self.deviceInput.device isTorchActive]) {
        NSError *error;
        if ([self.deviceInput.device lockForConfiguration:&error]) {
            [self.deviceInput.device setTorchModeOnWithLevel:torchLevel error:&error];
            [self.deviceInput.device unlockForConfiguration];
        }
    }
}
保存图片
使用ALAssetsLibrary,我们可以很方便地将照片或视频写入用户的资源库中。在使用的时候需要注意用户权限的控制。
#pragma mark - 保存图片
- (void)writeImageToPhotosAlbum:(UIImage *)image
{
    ALAssetsLibrary *assetsLib = [[ALAssetsLibrary alloc] init];
    [assetsLib writeImageToSavedPhotosAlbum:image.CGImage
                                orientation:(NSInteger)image.imageOrientation
                            completionBlock:^(NSURL *assetURL, NSError *error) {
        NSLog(@"%@", assetURL);
    }];
}
视频缩放
缩放的属性是videoMaxZoomFactor,它的最小值是1.0(不进行缩放),最大值由videoMaxZoomFactor确定。
#pragma mark - 视频缩放
- (BOOL)videoCanZoom
{
    return self.deviceInput.device.activeFormat.videoMaxZoomFactor > 1.0f;
}

- (float)videoMaxZoomFactor
{
    return MIN(self.deviceInput.device.activeFormat.videoMaxZoomFactor, 4.0f);
}

- (void)setVideoZoomFactor:(float)factor
{
    if (self.deviceInput.device.isRampingVideoZoom) {
        return;
    }

    NSError *error;
    if ([self.deviceInput.device lockForConfiguration:&error]) {
        self.deviceInput.device.videoZoomFactor = pow([self videoMaxZoomFactor], factor);
        [self.deviceInput.device unlockForConfiguration];
    }
}

- (void)rampZoomToFactor:(float)factor
{
    if (self.deviceInput.device.isRampingVideoZoom) {
        return;
    }

    NSError *error;
    if ([self.deviceInput.device lockForConfiguration:&error]) {
        [self.deviceInput.device rampToVideoZoomFactor:pow([self videoMaxZoomFactor], factor) withRate:1.0f];
        [self.deviceInput.device unlockForConfiguration];
    }
}
CoreVideo渲染
为什么要用快速纹理上传,相比OpenGLES快速纹理上传大大加快了纹理上传的速度。这也是GPUImage中为什么优先使用快速纹理上传的原因。在阅读GPUImage源码的时候你可以看到这样的注释:// Note: the fast texture caches speed up 640x480 frame reads from 9.6 ms to 3.1 ms on iPhone 4S
详见框架中的 GPUImageRawDataOutput.m 文件
- (void)setupOpenGLTextureCache
{
    CVReturn statuts = CVOpenGLESTextureCacheCreate(kCFAllocatorDefault,
                                                    NULL,
                                                    _context,
                                                    NULL,
                                                    &_openGLESTextureCache);
    if (statuts != kCVReturnSuccess) {
        exit(0);
    }
}

#pragma mark - GLTexture
- (void)genTetureFromImage:(CVImageBufferRef)imageRef
{
    CVOpenGLESTextureCacheCreateTextureFromImage(kCFAllocatorDefault,
                                                _openGLESTextureCache,
                                                imageRef,
                                                NULL,
                                                GL_TEXTURE_2D,
                                                GL_RGBA,
                                                (GLsizei)CVPixelBufferGetWidth(imageRef),
                                                (GLsizei)CVPixelBufferGetHeight(imageRef),
                                                GL_BGRA,
                                                GL_UNSIGNED_BYTE,
                                                0,
                                                &_openGLESTexture);

    glBindTexture(GL_TEXTURE_2D, CVOpenGLESTextureGetName(_openGLESTexture));
    glTexParameterf(GL_TEXTURE_2D, GL_TEXTURE_WRAP_S, GL_CLAMP_TO_EDGE);
    glTexParameterf(GL_TEXTURE_2D, GL_TEXTURE_WRAP_T, GL_CLAMP_TO_EDGE);
    glUniform1i(glGetUniformLocation(_program, "image"), 0);

    if (_openGLESTexture) {
        CFRelease(_openGLESTexture);
        _openGLESTexture = NULL;
        CVOpenGLESTextureCacheFlush(_openGLESTextureCache, 0);
    }
}
在这里不再介绍如何实时渲染相机视频,当前在本文的例子中完成了相机视频的实时渲染,具体请参考之前的文章或本文的相关示例。
参考
AVFoundation开发秘籍:实践掌握iOS & OSX应用的视听处理技术
源码地址:AVFoundation开发 https://github.com/QinminiOS/AVFoundation