C#开发B/S方式ActiveX控件
1. 概念
ActiveX 是一个开放的集成平台,为开发人员、 用户和 Web生产商提供了一个快速而简便的在 Internet 和 Intranet 创建程序集成和内容的方法。使用 ActiveX, 可轻松方便的在 Web页中插入多媒体效果、 交互式对象、以及复杂程序,创建用户体验相当的高质量多媒体CD-ROM 。
2. 开发工具及使用环境
本文使用的是Microsoft Visual Studio 2010作为开发工具,刚开始我是使用VS2012版,但发现2012版制作安装时有点麻烦,所以才改为VS2010版作为开发工具。
VS2010下载地址:http://pan.baidu.com/s/1pJRoVAb
操作系统:windows7。
浏览器:IE8以上。
3. 开发项目实例
这里我们用一个实例来贯穿全文。
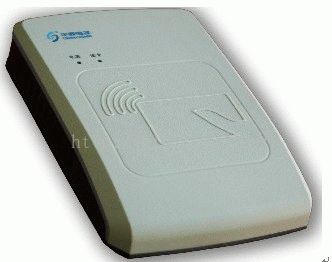
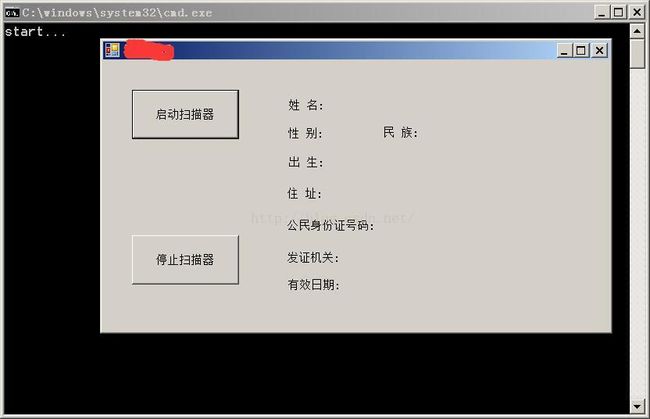
3.1项目开发实例:开发华视CVR100U-V3身份证扫描器的ActiveX控件,如下图:
3.2开发所需要的DLL库下载地址:http://pan.baidu.com/s/1c1rZJdm
3.3 DLL对应的API下载地址:http://pan.baidu.com/s/1kTNtpsz
3.4 例子:http://pan.baidu.com/s/1i4kyabV
细心的读者会问还有驱动程序呢?这里你没有必要知道驱动程序,如果你是买着机器,自然卖家就给你了,而我们的重点是如何用C#开发ActiveX控件。
所以我们主要的需要的是DLL和API就够了,有了这两样,我们就可以针对相应的机器开发ActiveX控件了。
4. 新建工程
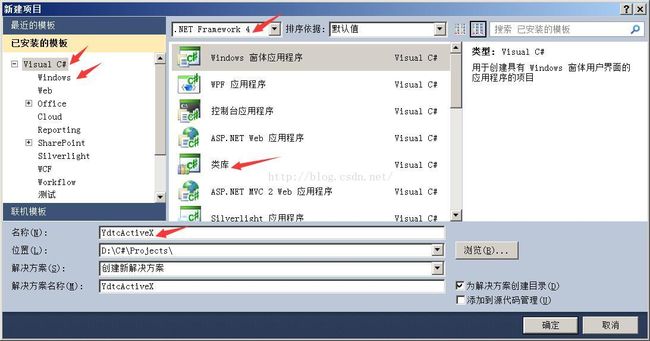
打开VS2010,文件 > 新建 > 项目,打开新建项目面板,如下图:
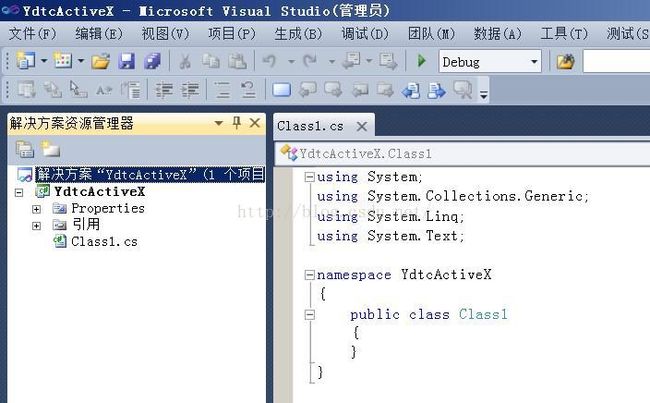
我们选择.NET Framework 4,并创建类库,这样就创建了一个名为YdtcActiveX类库工程项目,这就是我们的ActiveX项目,如下图:
此时项目就只有一个名为Class1的C#类,此项目不能够执行,因为没有主函数,而且我们当前的项目性质是类库项目,类库的项目是不能够单独执行。我们修改项目的属性,选择项目右键属性,打开项目属性设置,如下:
修改输出类型:控制台应用程序。有些人会问,为啥不直接创建“控制台应用程序”呢?因为我们现在开发的不是能直接自己运行的应用程序呀,所以选择了类库项目,也就是指创建DLL呀,然后提供给浏览器使用呀,由浏览器永远程序来启动我们的控件程序,说白了我们就是提供DLL给浏览器使用。DLL就是程序集。当然你也可以创建控制台应用程序项目也行。
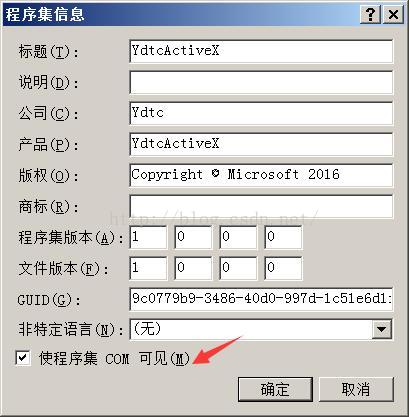
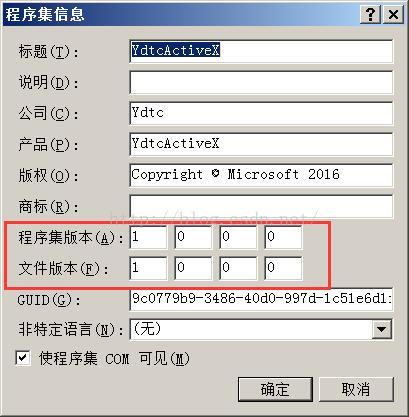
还有一个重点,设置ActiveX控件程序集COM可见,打开“程序集信息”框,勾选“使程序集对COM可见(M)”选项,如下:
别问我为啥要使程序集对COM可见(M),COM是啥,为啥对它可见,我也不知道为啥?哈哈。
ActiveX类库内容大致分为两部分,IObjectSafety接口和实现IObjectSafety接口的控件类,考虑到所有控件类都要实现IObjectSafety接口,可将该接口的实现抽象为一个控件基类
4.1 IObjectSafety接口
为了让ActiveX控件获得客户端的信任,控件类需要实现一个名为“IObjectSafety”接口,我们先在项目里创建这个接口,为了区分其他程序集,所以我新建一个明文“”的文件夹来管理所创建的接口,需要注意:IObjectSafety接口的GUID值不能修改,接口代码如下:
using System;
using System.Collections.Generic;
using System.Linq;
using System.Text;
using System.Runtime.InteropServices;
namespace YdtcActiveX
{
    [ComImport, Guid("A51D26F2-9057-4008-B910-9C21BE65D1E3")]
    [InterfaceTypeAttribute(ComInterfaceType.InterfaceIsIUnknown)]
    public interface IObjectSafety
    {
        [PreserveSig]
        int GetInterfaceSafetyOptions(ref Guid riid,
            [MarshalAs(UnmanagedType.U4)] ref int pdwSupportedOptions,
            [MarshalAs(UnmanagedType.U4)] ref int pdwEnabledOptions);

        [PreserveSig()]
        int SetInterfaceSafetyOptions(ref Guid riid,
            [MarshalAs(UnmanagedType.U4)] int dwOptionSetMask,
            [MarshalAs(UnmanagedType.U4)] int dwEnabledOptions);
    }
}
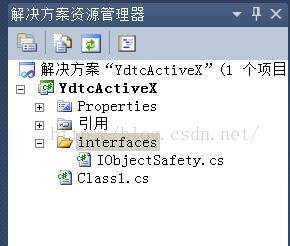
现在工程目录是:
4.2控件基类ActiveXControl.cs
我们也要创建一个文件夹来管理,文件夹名字是“impl”,代码如下:
using System;
using System.Collections.Generic;
using System.Linq;
using System.Text;
using YdtcActiveX.interfaces;

namespace YdtcActiveX
{
    public abstract class ActiveXControl : IObjectSafety
    {
        #region IObjectSafety 成¨¦员¡À
        private const string _IID_IDispatch = "{00020400-0000-0000-C000-000000000046}";
        private const string _IID_IDispatchEx = "{a6ef9860-c720-11d0-9337-00a0c90dcaa9}";
        private const string _IID_IPersistStorage = "{0000010A-0000-0000-C000-000000000046}";
        private const string _IID_IPersistStream = "{00000109-0000-0000-C000-000000000046}";
        private const string _IID_IPersistPropertyBag = "{37D84F60-42CB-11CE-8135-00AA004BB851}";

        private const int INTERFACESAFE_FOR_UNTRUSTED_CALLER = 0x00000001;
        private const int INTERFACESAFE_FOR_UNTRUSTED_DATA = 0x00000002;
        private const int S_OK = 0;
        private const int E_FAIL = unchecked((int)0x80004005);
        private const int E_NOINTERFACE = unchecked((int)0x80004002);

        private bool _fSafeForScripting = true;
        private bool _fSafeForInitializing = true;
        public int GetInterfaceSafetyOptions(ref Guid riid, ref int pdwSupportedOptions,refint pdwEnabledOptions)
        {
            int Rslt = E_FAIL;

            string strGUID = riid.ToString("B");
            pdwSupportedOptions = INTERFACESAFE_FOR_UNTRUSTED_CALLER | INTERFACESAFE_FOR_UNTRUSTED_DATA;
            switch (strGUID)
            {
                case _IID_IDispatch:
                case _IID_IDispatchEx:
                    Rslt = S_OK;
                    pdwEnabledOptions = 0;
                    if (_fSafeForScripting ==true)
                        pdwEnabledOptions = INTERFACESAFE_FOR_UNTRUSTED_CALLER;
                    break;
                case _IID_IPersistStorage:
                case _IID_IPersistStream:
                case _IID_IPersistPropertyBag:
                    Rslt = S_OK;
                    pdwEnabledOptions = 0;
                    if (_fSafeForInitializing ==true)
                        pdwEnabledOptions = INTERFACESAFE_FOR_UNTRUSTED_DATA;
                    break;
                default:
                    Rslt = E_NOINTERFACE;
                    break;
            }

            return Rslt;
        }

        public int SetInterfaceSafetyOptions(ref Guid riid, int dwOptionSetMask, int dwEnabledOptions)
        {
            int Rslt = E_FAIL;

            string strGUID = riid.ToString("B");
            switch (strGUID)
            {
                case _IID_IDispatch:
                case _IID_IDispatchEx:
                    if (((dwEnabledOptions & dwOptionSetMask) == INTERFACESAFE_FOR_UNTRUSTED_CALLER) &&
                            (_fSafeForScripting == true))
                        Rslt = S_OK;
                    break;
                case _IID_IPersistStorage:
                case _IID_IPersistStream:
                case _IID_IPersistPropertyBag:
                    if (((dwEnabledOptions & dwOptionSetMask) == INTERFACESAFE_FOR_UNTRUSTED_DATA) &&
                            (_fSafeForInitializing == true))
                        Rslt = S_OK;
                    break;
                default:
                    Rslt = E_NOINTERFACE;
                    break;
            }

            return Rslt;
        }
        #endregion
    }
}
这个类实现了IObjectSafety接口,是作为接下来我们要编写的类的基础类,也就是我们接下来写的类都继承它了。
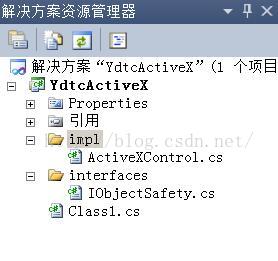
现在我们的工程目录是:
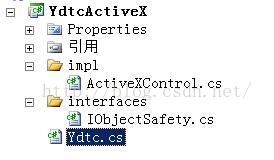
接下来就是我们的代码了,就是提供给浏览器使用的方法类,因为我们写的是华视CVR100U-V3身份证扫描器的ActiveX控件,所以就会用到华视的dll动态库和API,下面我们把创建工程开始就有的类Class1.cs改名,改为你需要的名字,我该为“Ydtc.cs”
工程目录现在如下:
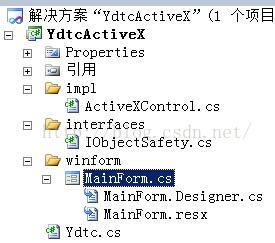
为了使程序有个好看的界面能显示我们扫描的身份证信息,我添加了一个窗体,同样建文件夹“winform”,现在工程目录如下:
Ydtc.cs代码如下:
using System;
using System.Collections.Generic;
using System.Linq;
using System.Text;
using System.Runtime.InteropServices;
using System.Threading;
using System.Windows.Forms;
using System.IO;
/** 提供客户和程序员使用
 ------------------------*/
namespace YdtcActiveX
{
    [Guid("BAC91DFC-CB54-49D0-B9D1-B9A06EAF520F")]
    public class Ydtc : ActiveXControl
    {
        public static void Main()
        {
            Console.WriteLine("start...");
            Application.EnableVisualStyles();
            Application.SetCompatibleTextRenderingDefault(false);
            Application.Run(new MainForm());
            Console.WriteLine("end...");
        }
        private bool runStatus = false;
        private Thread runThread = null;
        public string getTest()
        {
            return "hello IDCardScanner!";
        }
        //启动身份证扫描器
        public bool startIDCardScanner()
        {
            int resultUSB = 0;
            int resultCOM = 0;
            bool result = false;
            try
            {
                //连接USB接口
                int port;
                for (port = 1001; port <= 1016; port++)
                {
                    resultUSB = CVR_InitComm(port);
                    if (resultUSB == 1)
                    {
                        break;
                    }
                }
                if (resultUSB != 1)
                {
                    for (port = 1; port <= 4; port++)
                    {
                        resultCOM = CVR_InitComm(port);
                        if (resultCOM == 1)
                        {
                            break;
                        }
                    }
                }
                if (resultUSB == 1 || resultCOM == 1)
                {
                    Console.WriteLine("初始化成功......");
                    this.runStatus = true;
                    if (this.runThread == null)
                    {
                        Console.WriteLine("启动线程......");
                        this.runThread = new Thread(new ThreadStart(clickIDCardScanner));
                        this.runThread.Start();
                    }
                    result = true;
                }
                else
                {
                    result = false;
                }
            }
            catch (Exception ex)
            {
                Console.WriteLine(ex.ToString());
                return false;
            }
            return result;
        }
        //监听读卡
        private void clickIDCardScanner()
        {
            while (this.runStatus)
            {
                //链接成功
                Thread.Sleep(1000);//认证间隔
                if (runStatus == false)
                {
                    Console.WriteLine("退出扫描...");
                    break;
                }
                Console.WriteLine("正在进行扫描...");
                if (CVR_Authenticate() == 1)
                {
                    //通过认证
                    Console.WriteLine("正在读卡");
                    int result = CVR_Read_Content(1);//正在读卡
                    if (result == 1)
                    {
                        Console.WriteLine("读卡正确");
                    }
                    else
                    {
                        Console.WriteLine("读卡出错");
                    }
                }
            }
            return;
        }
        //停止身份证扫描器
        public bool stopIDCardScanner()
        {
            int result = CVR_CloseComm();
            if (result != 1)
            {
                Console.WriteLine("关闭失败");
                return false;
            }
            this.runThread = null;
            this.runStatus = false;
            return true;
        }

        //获取名字
        public String getName()
        {
            byte[] name = new byte[30];
            int length = 30;
            GetPeopleName(ref name[0], ref length);
            return System.Text.Encoding.GetEncoding("GB2312").GetString(name).Replace("\0", "").Trim();
        }
        //获取身份证号码
        public String getIDCardNo()
        {
            byte[] number = new byte[30];
            int length = 36;
            GetPeopleIDCode(ref number[0], ref length);
            return System.Text.Encoding.GetEncoding("GB2312").GetString(number).Replace("\0", "").Trim();
        }
        //获取民族
        public String getNationality()
        {
            byte[] people = new byte[30];
            int length = 3;
            GetPeopleNation(ref people[0], ref length);
            return System.Text.Encoding.GetEncoding("GB2312").GetString(people).Replace("\0", "").Trim();

        }

        //生日
        public String getBirthday()
        {
            byte[] birthday = new byte[30];
            int length = 16;
            GetPeopleBirthday(ref birthday[0], ref length);
            return System.Text.Encoding.GetEncoding("GB2312").GetString(birthday).Replace("\0", "").Trim();
        }
        //住址
        public String getAddress()
        {
            byte[] address = new byte[140];
            int length = 140;
            GetPeopleAddress(ref address[0], ref length);
            return System.Text.Encoding.GetEncoding("GB2312").GetString(address).Replace("\0", "").Trim();
        }
        //有效开始日期
        public String getValidityOfStart()
        {
            byte[] validtermOfStart = new byte[30];
            int length = 16;
            GetStartDate(ref validtermOfStart[0], ref length);
            return System.Text.Encoding.GetEncoding("GB2312").GetString(validtermOfStart).Replace("\0", "").Trim();
        }
        //有效截止日期
        public String getValidityOfEnd()
        {
            byte[] validtermOfEnd = new byte[30];
            int length = 16;
            GetEndDate(ref validtermOfEnd[0], ref length);
            return System.Text.Encoding.GetEncoding("GB2312").GetString(validtermOfEnd).Replace("\0", "").Trim();
        }
        //发证机关信息
        public String getInstitution()
        {
            byte[] signdate = new byte[30];
            int length = 30;
            GetDepartment(ref signdate[0], ref length);
            return System.Text.Encoding.GetEncoding("GB2312").GetString(signdate).Replace("\0", "").Trim();
        }
        //性别
        public String getSex()
        {
            byte[] sex = new byte[30];
            int length = 3;
            GetPeopleSex(ref sex[0], ref length);
            return System.Text.Encoding.GetEncoding("GB2312").GetString(sex).Replace("\0", "").Trim();
        }
        //安全模块号码
        public String getSamid()
        {
            byte[] samid = new byte[32];
            CVR_GetSAMID(ref samid[0]);
            return System.Text.Encoding.GetEncoding("GB2312").GetString(samid).Replace("\0", "").Trim();
        }
        //图片地址
        public string getBmpPath()
        {
            return Application.StartupPath + "\\zp.bmp";
        }
        public string getTxtPath()
        {
            return Application.StartupPath + "\\wz.txt";
        }
        public bool deleteMessage()
        {
            try
            {
                FileInfo file = new FileInfo("/Windows/zp.bmp");
                file.Delete();
            }
            catch (Exception)
            {
                Console.WriteLine("删除照片失败");
                return false;
            }
            try
            {
                FileInfo file = new FileInfo("/Windows/wz.txt");
                file.Delete();
            }
            catch (Exception)
            {
                Console.WriteLine("删除文件失败");
                return false;
            }
            return true;
        }
        public bool deleteFile(string path)
        {
            try
            {
                if (File.Exists(@path))
                {
                    FileInfo file = new FileInfo(path);
                    file.Delete();
                    return true;
                }
                else
                {
                    return false;
                }
            }
            catch (Exception)
            {
                Console.WriteLine("删除照片失败");
                return false;
            }
        }
        //获取图片地址
        public string getPicturePath()
        {
            return "C:/Windows/zp.bmp";
        }
        /**文件复制
         @sourcePath 源文件
         @targetPath 目标文件
         @isrewrite 是否覆盖*/
        public bool copyFile(String sourcePath, String targetPath, bool isrewrite)
        {
            if (File.Exists(@sourcePath))
            {
                //存在
                try
                {
                    System.IO.File.Copy(sourcePath, targetPath, isrewrite);
                }
                catch (Exception e)
                {
                    Console.WriteLine(e.StackTrace);
                    return false;
                }
                Console.WriteLine("复制成功!");
            }
            else
            {
                Console.WriteLine("源文件不存在!");
                return false;
            }
            return true;
        }
        //读取图片
        public static byte[] getPicture()
        {
            long length = new FileInfo("C:/Windows/zp.bmp").Length;
            byte[] data = new byte[length];
            try
            {
                StreamReader reader = new StreamReader("C:/Windows/zp.bmp");
                reader.BaseStream.Read(data, 0, (int)length);
                reader.Close();
            }
            catch (Exception)
            {
                Console.WriteLine("读取照片失败");
            }
            return data;
        }


        [DllImport("termb.dll", EntryPoint = "CVR_InitComm", CharSet = CharSet.Auto, SetLastError = false)]
        public static extern int CVR_InitComm(int Port);//声明外部的标准动态库, 跟Win32API是一样的
        [DllImport("termb.dll", EntryPoint = "CVR_CloseComm", CharSet = CharSet.Auto, SetLastError = false)]
        public static extern int CVR_CloseComm();
        [DllImport("termb.dll", EntryPoint = "CVR_Authenticate", CharSet = CharSet.Auto, SetLastError = false)]
        public static extern int CVR_Authenticate();
        [DllImport("termb.dll", EntryPoint = "CVR_Read_Content", CharSet = CharSet.Auto, SetLastError = false)]
        public static extern int CVR_Read_Content(int Active);
        [DllImport("termb.dll", EntryPoint = "GetPeopleName", CharSet = CharSet.Ansi, SetLastError = false)]
        public static extern int GetPeopleName(ref byte strTmp, ref int strLen);
        [DllImport("termb.dll", EntryPoint = "GetPeopleNation", CharSet = CharSet.Ansi, SetLastError = false)]
        public static extern int GetPeopleNation(ref byte strTmp, ref int strLen);
        [DllImport("termb.dll", EntryPoint = "GetPeopleBirthday", CharSet = CharSet.Ansi, SetLastError = false, CallingConvention = CallingConvention.StdCall)]
        public static extern int GetPeopleBirthday(ref byte strTmp, ref int strLen);
        [DllImport("termb.dll", EntryPoint = "GetPeopleAddress", CharSet = CharSet.Ansi, SetLastError = false, CallingConvention = CallingConvention.StdCall)]
        public static extern int GetPeopleAddress(ref byte strTmp, ref int strLen);
        [DllImport("termb.dll", EntryPoint = "GetPeopleIDCode", CharSet = CharSet.Ansi, SetLastError = false, CallingConvention = CallingConvention.StdCall)]
        public static extern int GetPeopleIDCode(ref byte strTmp, ref int strLen);
        [DllImport("termb.dll", EntryPoint = "GetDepartment", CharSet = CharSet.Ansi, SetLastError = false, CallingConvention = CallingConvention.StdCall)]
        public static extern int GetDepartment(ref byte strTmp, ref int strLen);
        [DllImport("termb.dll", EntryPoint = "GetStartDate", CharSet = CharSet.Ansi, SetLastError = false, CallingConvention = CallingConvention.StdCall)]
        public static extern int GetStartDate(ref byte strTmp, ref int strLen);
        [DllImport("termb.dll", EntryPoint = "GetEndDate", CharSet = CharSet.Ansi, SetLastError = false, CallingConvention = CallingConvention.StdCall)]
        public static extern int GetEndDate(ref byte strTmp, ref int strLen);
        [DllImport("termb.dll", EntryPoint = "GetPeopleSex", CharSet = CharSet.Ansi, SetLastError = false, CallingConvention = CallingConvention.StdCall)]
        public static extern int GetPeopleSex(ref byte strTmp, ref int strLen);
        [DllImport("termb.dll", EntryPoint = "CVR_GetSAMID", CharSet = CharSet.Ansi, SetLastError = false, CallingConvention = CallingConvention.StdCall)]
        public static extern int CVR_GetSAMID(ref byte strTmp);
        [DllImport("termb.dll", EntryPoint = "GetManuID", CharSet = CharSet.Ansi, SetLastError = false, CallingConvention = CallingConvention.StdCall)]
        public static extern int GetManuID(ref byte strTmp);
    }
}
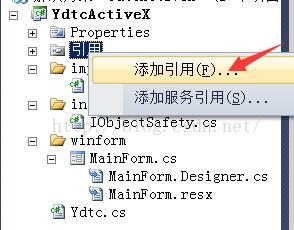
到这,我们写的代码完成了,当然这只是代码有了而已,还有安装、发布呢!从Ydt.cs代码中就可以看到有程序入口Main函数,而且我们要开启了窗体程序,Ydt.cs类用了几个DLL,就是上面我们说的DLL,这些DLL只能通过DllImport引用,不能直接引用,如下:
我们把用到的DLL 放在Debug路径下,就能通过工程启动程序了。启动如下图:不过这只是界面应用程序,我们的目标是要给浏览器使用。所以要打包成.CAB文件。
5. 制作安装包
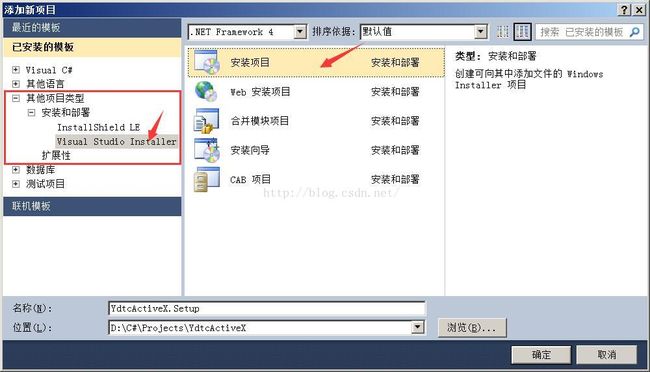
在解决方案中添加一个安装项目,文件 > 添加,打开“添加新项目”面板,如下图:
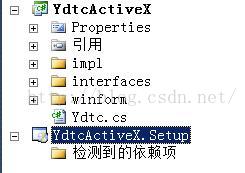
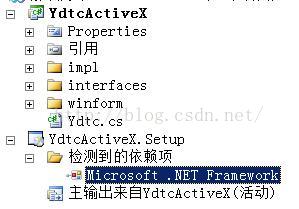
添加名为“YdtcActiveX.Setup”安装项目,现在可以说说上面我为什么选择VS2010作为开发工具了,因为VS2010还保留微软自己的安装制作工具 Visual Studio Installer,而之后的那些版本都用别家的安装工具了,自己的东西不用,非得用别人的,真不理解为啥。“确定”之后就在当前工程添加了一个安装项目,如下图:
选择新添加的安装项目,右键添加 > 项目输出,如下:
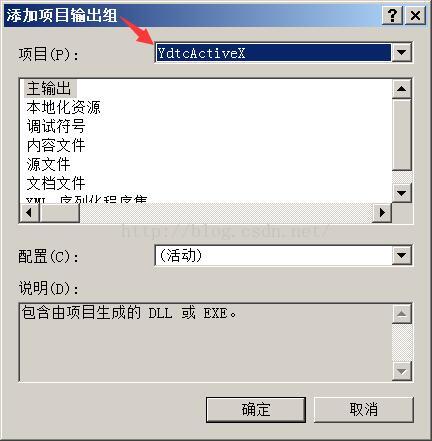
选择“YdtcActiveX”作为输出项目。确定后,就会自动检测到依赖Microsoft.NET Framework
5.1查看依赖包版本
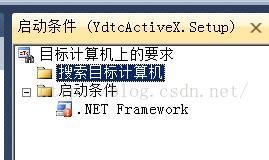
单击“Microsoft.NET Framework”,打开启动条件页(右边),如下图:
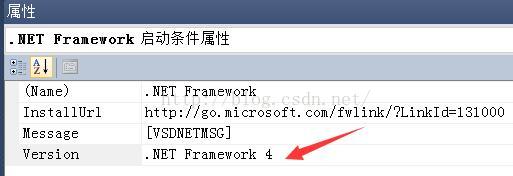
选到“.NET Framework”按F4打开属性窗口,如下图:
选择工程使用的依赖程序版本,Version:.NET Framework 4。
5.2设置“主输出来着YdtcActiveX(活动)”的属性
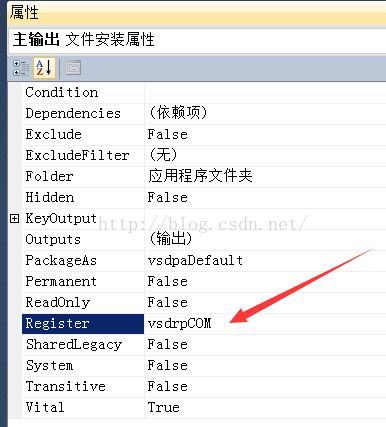
下一步设置“主输出来着YdtcActiveX(活动)”的属性,单击“主输出来着YdtcActiveX(活动)”,看右边属性设置,设置Register的值为:vsdrpCOM。
5.3设置安装项目注册表版本
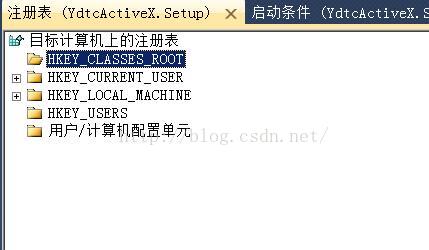
选中安装项目YdtcActiveX.Setup,右键“视图”>“注册表”,打开如图:
在“HKEY_CLASSES_ROOT”下添加键“CLSID”和“{GUID值}”(你的类的GUID,这里是Ydct.cs的GUID),还有“InstalledVersion”,右键新建“字符串值”,写上版本,注意,版本用逗号“,”不是“.”号。如下图所示:
InstalledVersion这个版本号要和以下三处设置一致:
(1)、是YdtcActiveX工程属性的“程序集信息”一样,如下:
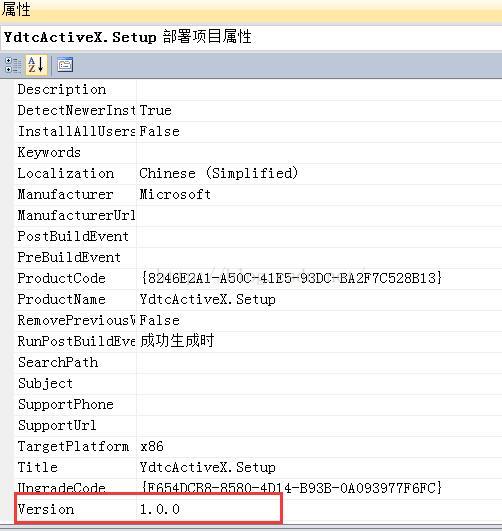
(2)和安装项目YdtcActiveX.Setup的属性一样
选中YdtcActiveX.Setup 按F4,如下:
以上都设置好之后就可以生成.msi和.EXE文件了,选中“YdtcActiveX.Setup”右键 > 生成。在YdtcActiveX.Setup\Debug下就能看到了,如图:
双击exe或者msi就可以在你电脑上安装你写的ActiveX控件,可是我们不能让客户来做这个,我们要让客户的浏览器来提示下载安装,所以下一步要制作CAB文件,这个文件会被发布到服务器项目上,浏览器通过
6. 制作CAB
制作CAB需要以下文件:
(1)YdtcActiveX.Setup.msi(改名为YdtcActiveX.msi)
(2)华视提供的DLL(3个分别是:sdtapi.dll、UnPack.dll、termb.dll)
(3)makecab.exe工具
(4)installer.inf和cab.ddf配置文件
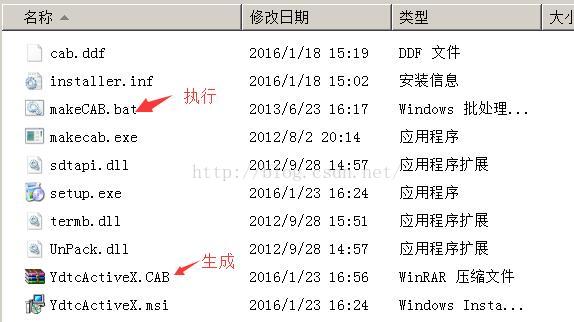
最后写一个bat文件进行制作,只要点bat文件就会自动制作CAB文件,这些文件我们都拷贝到安装目录的YdtcActiveX.Setup\Debug路径下,如图:
打开YdtcActiveX.CAB文件,你就会看到以下图:
就是把这些文件都一起打包了,这些文件我的代码我会提供。制作CAB的教程网上有很多。下面我把这些文件的内容贴出来
安装配置文件installer.inf代码如下:
[Version]
Signature= "$CHICAGO$"
AdvancedInf=1.0

[Add.Code]
sdtapi.dll=sdtapi.dll
UnPack.dll=UnPack.dll
termb.dll=termb.dll

[sdtapi.dll]
file-win32-x86=thiscab
RegisterServer=no
DestDir=10

[UnPack.dll]
file-win32-x86=thiscab
RegisterServer=no
DestDir=10

[termb.dll]
file-win32-x86=thiscab
RegisterServer=no
DestDir=10

[Setup Hooks]
hook1=hook1

[hook1]
run=msiexec /i %EXTRACT_DIR%\YdtcActiveX.msi /qn
cab.ddf文件代码如下:
.OPTION   EXPLICIT
.Set Cabinet=on
.Set Compress=on
.Set MaxDiskSize=CDROM
.Set ReservePerCabinetSize=6144
.Set DiskDirectoryTemplate="."
.Set CompressionType=MSZIP
.Set CompressionLevel=7
.Set CompressionMemory=21
.Set CabinetNameTemplate="YdtcActiveX.CAB"
"installer.inf"
"YdtcActiveX.msi"
makeCAB.bat文件的代码如下:
| makecab.exe /f "cab.ddf" del "setup.inf" del "setup.rpt" |
到这里C# 开发ActiveX控件就制作好了,下面就是发布、和使用。
7. 发布CAB
就是将YdtcActiveX.CAB发布到你的系统中,下一个html页面使用这个文件,浏览器访问这个页面时,就会提示下载安装YdtcActiveX.CAB控件。
页面的主要代码是
| codebase="YdtcActiveX.CAB#version=1,0,8" style="display: none;">
|
Classid就是Ydtc.cs中的GUID,version就是上面所说的5(3)所说的了。
脚本使用,
| function getTest(){ var activeX = document.getElementById("YdtcActiveX"); var result = activeX.getTest(); } |
就是调用了Ydtc.cs中的函数getTest();
当然,我们要对浏览器进行设置才能够安装我们的控件,或则你就制作证书浏览器才能安装此插件。
8. 浏览器设置
请看YdtcActiveX.CAB安装文档:http://pan.baidu.com/s/1skyvRTb
此文档的代码:http://pan.baidu.com/s/1gevszFd
9.参考资料
参考资料:http://pan.baidu.com/s/1bnL8V2f
参考的文档:http://pan.baidu.com/s/1nub32BZ
