Linux 0.11 实验环境搭建与调试
缘起
之前我写过一篇博文:Linux 0.11 实验环境搭建
本以为有了这个环境(gcc-3.4 & gdb-6.8),就可以调试无忧了。谁知遇到了以下问题:
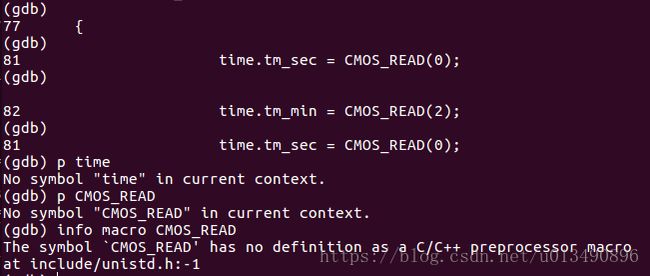
(1)用 gdb 调试 main 函数的时候,无法输出变量的值。总是提示:
No symbol “XXX” in current context.
(2)虽然在编译时为 gcc 加上了-gdwarf-2 -g3这两个选项,但仍然无法查看宏的定义。
如下图所示:
对于(1),因为有-g选项,所以 gcc 编译后确实生成了相关符号,但为什么 gdb 总说找不到符号呢?因为 gdb 版本过低,对于较高版本的 gcc 产生的符号表,它根本不认识,所以说找不到符号。解决办法就是升级 gdb.
对于(2),我本以为原因同(1)。把 gdb 升级到 8.1 还是不行,看来另有原因。
我写了一个小程序,gcc-5.4.0 配合 gdb-8.1,调试时可以打印宏的值,info macro xxx等命令没有问题。所以,我打算用高版本的 gcc 编译 Linux-0.11.
问题来了,Linux-0.11 已经是很古老的代码了,用高版本的 gcc 根本编译不过,怎么办呢?好在有很多前辈勇于探索,修改了源码和 Makefile,使得 Linux-0.11 可以被高版本的 gcc 编译通过。
环境搭建
他山之石,可以攻玉。搜了一波后,发现了一个叫“泰晓科技”的网站,其官网是http://tinylab.org/,官方代码仓库是 https://github.com/tinyclub
代码仓库里面有个项目——Linux 0.11 Lab
下载源码
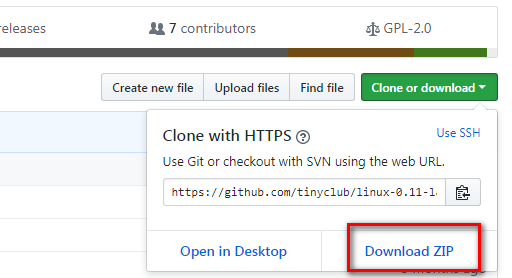
得到linux-0.11-lab-master.zip文件,解压后进入目录linux-0.11-lab-master,如下图:

用make help命令可以查看帮助信息。
—– Linux 0.11 Lab (http://tinylab.org/linux-0.11-lab) —–
:: Compile ::
make –generate a kernel floppy Image with a fs on hda1
make clean – clean the object files
make distclean – only keep the source code files
:: Test ::
make start – start the kernel in vm (qemu/bochs)
make start-fd – start the kernel with fs in floppy
make start-hd – start the kernel with fs in hard disk
make start-hd G=0 – start with curses based terminal, instead of SDL
:: Debug ::
make debug – debug the kernel in qemu/bochs & gdb at port 1234
make debug-fd – debug the kernel with fs in floppy
make debug-hd – debug the kernel with fs in hard disk
make debug DST=boot/bootsect.sym – debug bootsect
make debug DST=boot/setup.sym – debug setup
make boot BOCHS=bochs-debugger VM=bochs – debug with bochs internal debugger
make switch – switch the emulator: qemu and bochs
make boot VM=qemu|bochs – switch the emulator: qemu and bochs
:: Read ::
make cscope – genereate the cscope index databases
make tags – generate the tag file
make cg – generate callgraph of the default main entry
make cg f=func d=dir|file b=browser – generate callgraph of func in file/directory
:: More ::
>>> README.md <<<
~ Enjoy It ~
—–Linux 0.11 Lab (http://tinylab.org/linux-0.11-lab)—–
—> Linux Kernel Lab (http://tinylab.org/linux-lab) <—
安装一些软件
这里以 Linux Ubuntu 操作系统为例。作者推荐用 docker.
The docker install method is recommended for all systems, including Linux, Windows and Mac OS.
不过我没有用 docker,还是用比较原始的办法。
Here is the deprecated method:
The Linux distributions: debian and ubuntu (>= 14.04) are recommended
Install basic tools
$ sudo apt-get install vim cscope exuberant-ctags build-essential qemu lxterminalOptional
$ sudo apt-get install bochs vgabios bochsbios bochs-doc bochs-x >libltdl7 bochs-sdl bochs-term
$ sudo apt-get install graphviz cflow
编译
在linux-0.11-lab-master目录下,运行make命令.

运行
$ make start采用 qemu 或者 bochs 模拟器运行 Linux-0.11,如果想切换模拟器,可以用
$ make switch
调试
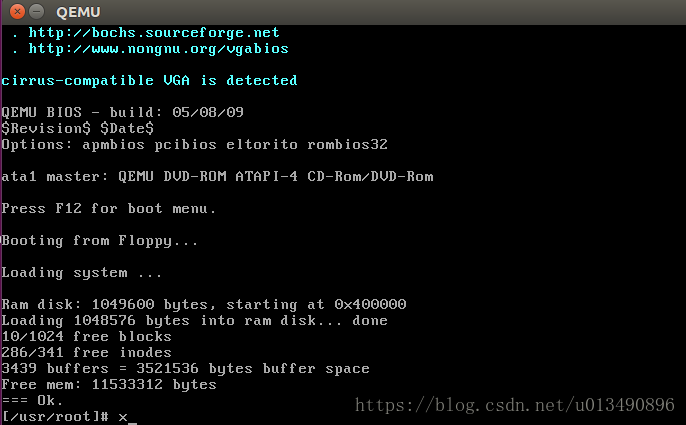
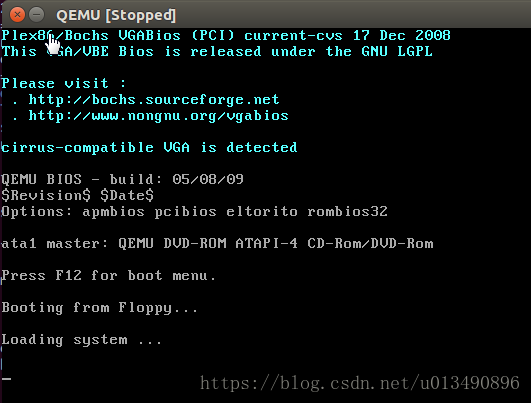
$ make debug运行后出现如下界面:

再开一个终端,还是在linux-0.11-lab-master目录下,运行命令
$ gdb --quiet src/kernel.sym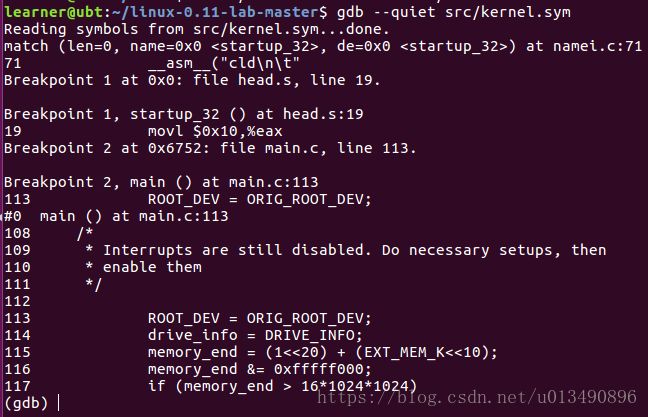
这时候,就可以用 gdb 的各种命令进行调试了。

如何查看宏
正如 GDB 官网上说:
We pass the
-gdwarf-2and-g3flags to ensure the compiler includes information about preprocessor macros in the debugging information.
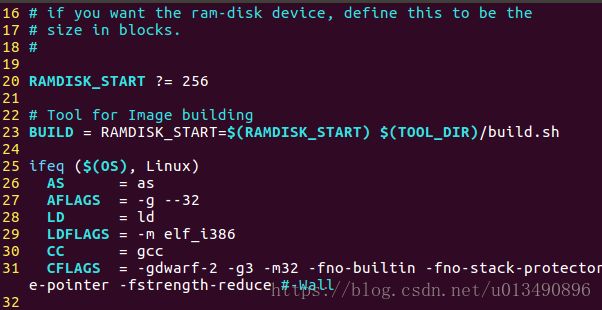
所以,先要给 gcc 添加 -gdwarf-2 和-g3 选项。对于本实验环境,就是修改src 目录下的 Makefile.head 文件。为第 29 行的CFLAGS加上 -gdwarf-2 -g3 。
如图:
之后重新编译,再次调试。
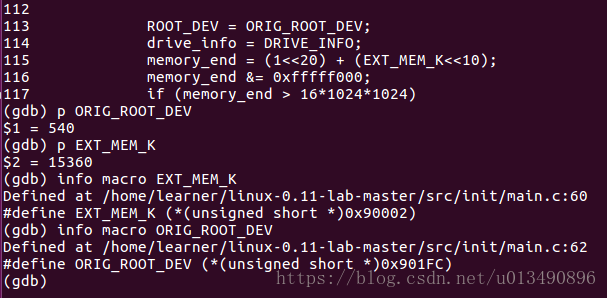
在调试的时候,可以用p(print)命令查看宏的值,还可以用
info macro 宏名
例如:
【参考资料】
https://sourceware.org/gdb/onlinedocs/gdb/Macros.html
https://github.com/tinyclub/linux-0.11-lab/blob/master/README.md