Android 8.1 【FriendlyARM】读取 BMP180 温度和压力 HAL 开发
接上一节我们已经将 BMP180 驱动开发完成,现在继续完成 HAL 开发,Android 8 版本新增的 HAL 一般采用 binder 的方式,使用 HIDL 语言进行开发。实际开发除了代码完成,绕不开 SEAndroid。下面分几个步骤介绍。
- HAL 开发
- HAL 验证
- Bmp180Service 服务开发
- APP 开发
- 处理 SEAndroid
一、HAL 开发
在 Android 8.0 及更高版本中,较低级别的层已重新编写以采用更加模块化的新架构。搭载 Android 8.0 或更高版本的设备必须支持使用 HIDL 语言编写的 HAL。Android R 也支持使用 AIDL 编写的 HAL。所有 AIDL HAL 均为绑定式。
-
绑定式 HAL。以 HAL 接口定义语言 (HIDL) 或 Android 接口定义语言 (AIDL) 表示的 HAL。这些 HAL 取代了早期 Android 版本中使用的传统 HAL 和旧版 HAL。在绑定式 HAL 中,Android 框架和 HAL 之间通过 Binder 进程间通信 (IPC) 调用进行通信。所有在推出时即搭载了 Android 8.0 或更高版本的设备都必须只支持绑定式 HAL。
-
直通式 HAL。以 HIDL 封装的传统 HAL 或旧版 HAL。这些 HAL 封装了现有的 HAL,可在绑定模式和 Same-Process(直通)模式下使用。升级到 Android 8.0 的设备可以使用直通式 HAL。
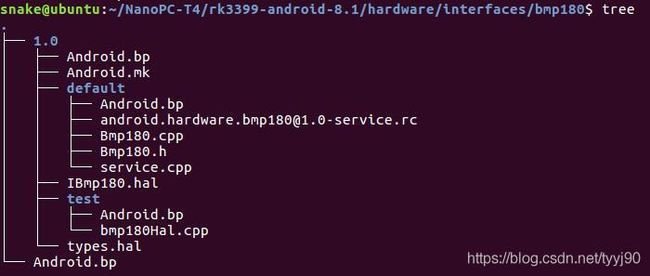
因为我们是在 Android 8 新增加 BMP180 HAL,因此只能采用绑定式 HAL。下面是整个 BMP180 的 HAL 目录。
1.1 HIDL 定义
首先在 hardware/interfaces 目录下新建 bmp180 目录,接着在 hardware/interfaces/bmp180 目录下新建 1.0 目录,代表 BMP180 1.0 版本 HAL。
接着在 1.0 目录下新建 IBmp180.hal 和 types.hal 文件。
IBmp180.hal
package [email protected];

interface IBmp180 {
    open() generates (bool isSucceed);
    close();
    getTemperatureAndPressure() generates (BMP180TemperatureAndPressure bmp180TAndP);

};
types.hal
package [email protected];

struct BMP180TemperatureAndPressure {
    uint64_t temperature;
    uint64_t pressure;
};
IBmp180 接口中定义了 open、close BMP180 驱动节点的方法,另外也定义了一个获取温度和压力的方法 getTemperatureAndPressure,其返回值是 BMP180TemperatureAndPressure 结构,这个结构定义在 types.hal 文件中。
1.2 hidl-gen 工具使用
利用 hidl-gen 工具生成 Android.bp、源代码等文件需要源码至少全部编译过一次。
先来生成顶级目录下的 Android.bp 等。
snake@ubuntu:~/NanoPC-T4/rk3399-android-8.1$ hardware/interfaces/update-makefiles.sh
现在在 hardware/interfaces/bmp180/1.0 目录下新建 default 目录。马上使用 hidl-gen 工具生成接口 cpp 文件。
- 设置临时变量
snake@ubuntu:~/NanoPC-T4/rk3399-android-8.1$ [email protected]
snake@ubuntu:~/NanoPC-T4/rk3399-android-8.1$ LOC=hardware/interfaces/bmp180/1.0/default
- 使用 hidl-gen 生成 default 目录里的 cpp 文件
snake@ubuntu:~/NanoPC-T4/rk3399-android-8.1$ hidl-gen -o $LOC -Lc+±impl -randroid.hardware:hardware/interfaces -randroid.hidl:system/libhidl/transport $PACKAGE
- 使用 hidl-gen 生成 default 目录里的 Android.bp 文件
snake@ubuntu:~/NanoPC-T4/rk3399-android-8.1$ hidl-gen -o $LOC -Landroidbp-impl -randroid.hardware:hardware/interfaces -randroid.hidl:system/libhidl/transport $PACKAGE
- 添加接口哈希值
snake@ubuntu:~/NanoPC-T4/rk3399-android-8.1$ hidl-gen -L hash -r android.hardware:hardware/interfaces -r android.hidl:system/libhidl/transport [email protected]::types
hardware/interfaces/current.txt
......
8e4a9ff11ad75acf15c8919fa1e751ca3c51248e670805e41a507111aa4b88a5 [email protected]::types
现在 hardware/interfaces/bmp180/1.0/default 目录下存在 Bmp180.h、Bmp180.cpp 和 Android.bp 三个文件。由于我们会修改 Bmp180.cpp 文件的内容,因此相应的要把依赖的库手动添加到 Android.bp 中。
Bmp180.h
#ifndef ANDROID_HARDWARE_BMP180_V1_0_BMP180_H
#define ANDROID_HARDWARE_BMP180_V1_0_BMP180_H
#include Bmp180.cpp 文件中我们会实现具体方法,这些代码的用法是参照验证驱动编写的应用程序,具体可以参见上一节。
Bmp180.cpp
#define LOG_TAG "Bmp180Hal"
#include 这是修改后的 Android.bp 文件,最终版。
Android.bp
cc_library_shared {
    name: "[email protected]",
    relative_install_path: "hw",
    proprietary: true,
    srcs: [
        "Bmp180.cpp",
    ],
    shared_libs: [
        "liblog",
        "libcutils",
        "libdl",
        "libbase",
        "libutils",
        "libhardware",
    ] + [
        "libhidlbase",
        "libhidltransport",
        "[email protected]",
    ],
}

cc_binary {
    relative_install_path: "hw",
    defaults: ["hidl_defaults"],
    vendor: true,
    proprietary: true,
    name: "[email protected]",
    init_rc: ["[email protected]"],
    srcs:
        ["Bmp180.cpp",
        "service.cpp"],

    shared_libs: [
        "liblog",
        "libcutils",
        "libdl",
        "libbase",
        "libutils",
        "libhardware",
    ] + [
        "libhidlbase",
        "libhidltransport",
        "[email protected]",
    ],

}
1.3 编写 service.cpp
这是为了在系统启动的时候就把我们的 HAL 服务拉起来,以便后面 framework、app 访问。
在 hardware/interfaces/bmp180/1.0/default 目录下继续新建 service.cpp 和 [email protected]。
service.cpp
#define LOG_TAG "[email protected]"
#include 现在来看 rc 脚本,我们知道这是在 init 进程中进行解析的,最后会把 class 为 hal 的所有 service 拉起来。
service bmp180-hal-1-0 /vendor/bin/hw/[email protected]
    class hal
    user system
    group system
现在整个 BMP180 HAL 就算开发完成了。编译一下,编译通过的话,就能接着进行下一步的工作。
snake@ubuntu:~/NanoPC-T4/rk3399-android-8.1/hardware/interfaces/bmp180$ mm
没有报错说明没有问题,实际开发总是会遇到问题的,有问题根据实际情况和报错 Log 修改代码,直到没有错误。
将 android.hardware.bmp180 添加到 manifest.xml。追加以下内容到 manifest.xml。
device/rockchip/rk3399/manifest.xml
        android.hardware.bmp180
        hwbinder
        1.0

            IBmp180
            default
继续添加 android.hardware.bmp180 到 nanopc_t4.mk。
device/rockchip/rk3399/nanopc_t4.mk
PRODUCT_PACKAGES += \
    ...
    [email protected] \
    [email protected] \
二、HAL 验证
怎么保证你开发的 HAL 代码没有问题,那就需要验证 HAL 代码是否存在问题,需要写一个客户端调用 BMP180 HAL 服务。分层验证是非常必要的,不然上面的架子搭起来以后再来一次验证出了问题也不好排查。
在 hardware/interfaces/bmp180/1.0 目录下新建 test 目录,里面写一些调用 BMP180 HAL 远端服务的代码进行验证。
在 hardware/interfaces/bmp180/1.0/test 目录下新建 bmp180Hal.cpp 和 Android.bp 文件。
bmp180Hal.cpp
#define LOG_TAG "Bmp180HalClient"
#include Android.bp
cc_binary {
    relative_install_path: "hw",
    defaults: ["hidl_defaults"],
    name: "bmp180Hal",
    proprietary: true,
    srcs: ["bmp180Hal.cpp"],

    shared_libs: [
        "liblog",
        "libcutils",
        "libdl",
        "libbase",
        "libutils",
        "libhardware",
    ] + [
        "libhidlbase",
        "libhidltransport",
        "[email protected]",
    ],

}
最后在 hardware/interfaces/bmp180/Android.bp 文件中添加 1.0/test 目录。
Android.bp
// This is an autogenerated file, do not edit.
subdirs = [
    "1.0",
    "1.0/default",
    "1.0/test",
]
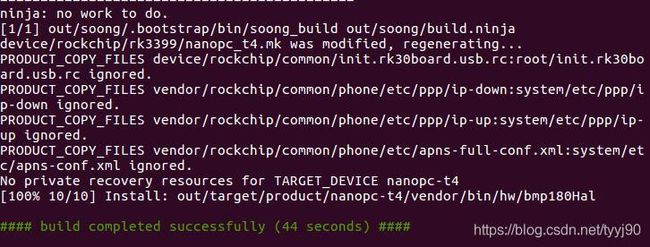
现在再来编译一次 BMP180 HAL 代码。
snake@ubuntu:~/NanoPC-T4/rk3399-android-8.1/hardware/interfaces/bmp180$ mm
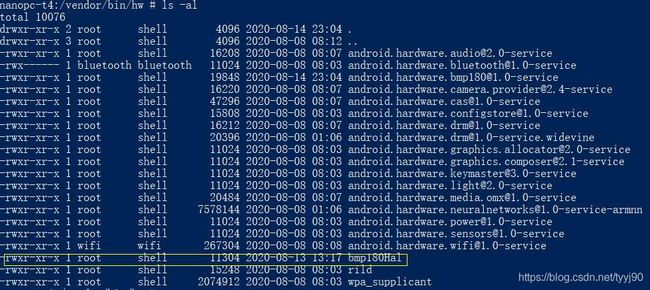
bmp180Hal 二进制文件这时候也会生成到 /vendor/bin/hw 下。
全编一次代码,烧写镜像到机器进行验证。
运行 ./bmp180Hal 查看 logcat 输出,很不巧 fd = -1。
2020-08-15 17:04:00.455 265-265/? I/Bmp180Hal: Bmp180::open() fd=-1
2020-08-15 17:04:00.455 265-265/? E/Bmp180Hal: open /dev/bmp180 failed
仔细分析一下,dev/bmp180 节点权限仅仅为 crw-------。BMP180 HAL service 跑起来以后实际上我们在 rc 内配置了 user 和 group 都是 system。
既然定位到是权限问题,先手动赋予 777 看看效果。可以正常获取到温度和压力了。
2020-08-15 17:09:07.882 3313-3313/? D/Bmp180HalClient: service->open()...
2020-08-15 17:09:07.885 265-265/? I/Bmp180Hal: Bmp180::open() fd=7
2020-08-15 17:09:07.885 3313-3313/? I/Bmp180HalClient: service->getTemperatureAndPressure()...
2020-08-15 17:09:07.885 265-265/? I/Bmp180Hal: open bmp180 driver succeed, chip ID:[0x55]
2020-08-15 17:09:07.898 265-265/? I/Bmp180Hal: Temperature:[34.1 C],Pressure:[99860 Pa]
2020-08-15 17:09:07.898 3313-3313/? I/Bmp180HalClient: service->getTemperatureAndPressure()...T=341 P=99860
2020-08-15 17:09:07.898 3313-3313/? I/Bmp180HalClient: service->close()...
2020-08-15 17:09:07.898 265-265/? I/Bmp180Hal: Bmp180::close()
现在我们在 system/core/rootdir/ueventd.rc 中配置权限相关。追加一行内容:
/dev/bmp180 0660 root system
到这里整个 HAL 层工作就算完成了。后面继续介绍 Bmp180Service 服务开发、APP 开发和处理 SEAndroid。