Spring Boot学习笔记(十七)整合 mysql、mybatis-plus 使用redis进行缓存(带工程源码)
工程源码:
- 百度云链接 提取码:5o0z
- csdn 下载链接
文章目录
- 1. 给springboot 工程添加pom依赖
- 2. 在application中进行配置
- 3. 启用缓存机制
- 4. 开发缓存注解
- 4.1 编写实体类SpringBootUser
- 4.2 编写mybatis-plus相关文件
- 4.3 添加redis配置
- 4.4 编写调用方法
- 5. 测试
- 6. 讲解
- 6.1 注解
- 6.2 注意要点
- 6.3 脏数据的处理
1. 给springboot 工程添加pom依赖
        <dependency>
            <groupId>mysqlgroupId>
            <artifactId>mysql-connector-javaartifactId>
            <scope>runtimescope>
        dependency>

        <dependency>
            <groupId>com.baomidougroupId>
            <artifactId>mybatis-plus-boot-starterartifactId>
            <version>3.1.0version>
        dependency>
        <dependency>

        <dependency>
            <groupId>org.springframework.bootgroupId>
            <artifactId>spring-boot-starter-cacheartifactId>
        dependency>

        <dependency>
            <groupId>org.springframework.bootgroupId>
            <artifactId>spring-boot-starter-data-redisartifactId>
            <exclusions>
                <exclusion>
                    <groupId>io.lettucegroupId>
                    <artifactId>lettuce-coreartifactId>
                exclusion>
            exclusions>
        dependency>
        <dependency>
            <groupId>redis.clientsgroupId>
            <artifactId>jedisartifactId>
        dependency>
此处的redis不使用 lettuce,使用jedis
2. 在application中进行配置
我使用的是默认的application.properties,若使用yml则自行调整即可
# 服务端口配置
server.port=8081

#配置连接池属性
spring.redis.jedis.pool.min-idle=5
spring.redis.jedis.pool.max-active=10
spring.redis.jedis.pool.max-idle=10
spring.redis.jedis.pool.max-wait=2000

#设置日志级别
logging.level.root=DEBUG
logging.level.org.springframework=DEBUG

# 数据库设置
spring.datasource.driver-class-name=com.mysql.cj.jdbc.Driver
spring.datasource.url=jdbc:mysql://127.0.0.1:3306/jdbclearn?serverTimezone=UTC&useUnicode=true&characterEncoding=utf8
spring.datasource.username=root
spring.datasource.password=123456

# mybatis的配置
# 若想要定义在工程中,则为 com/example/redis/mappers/*.xml
# 若使用xml,则需要配置前两项
mybatis-plus.mapper-locations=classpath:/mappers/*.xml
mybatis-plus.type-aliases-package=com.example.redis.entity
mybatis-plus.configuration.cache-enabled=true

#配置redis服务器属性
spring.redis.port=6379
spring.redis.host=127.0.0.1
#spring.redis.password=123456

#缓存配置
spring.cache.type=REDIS
下图是于缓存相关的配置,若使用Redis,则只需要关注加粗部分的配置项

3. 启用缓存机制
我们需要在启动类中加上注解:@EnableCaching
@SpringBootApplication
@EnableCaching
public class BootRedisApplication {
	...
}
4. 开发缓存注解
4.1 编写实体类SpringBootUser
此处的@Data为lombok的注解,可以自动重写 getter\setter\toString\hashCode 等方法,
注意一定需要继承序列化接口Serializable ,这样才可以写入redis缓存
@Data
public class SpringBootUser implements Serializable {
    private static final long serialVersionUID = 1L;
    private Long id;
    private String userName;
    private String note;
}
4.2 编写mybatis-plus相关文件
由于我们使用的是mybatis-plus,所以按照工程习惯创建以下几个文件

从上到下的顺序,代码如下所示,若不明白可学习mybatis-plus或者用其他方法实现service功能。
SpringBootUserMapper 代码如下所示:
@Mapper
public interface SpringBootUserMapper extends BaseMapper<SpringBootUser> {
}
SrpingBootUserServiceImpl 代码如下所示:
@Service
public class SrpingBootUserServiceImpl extends ServiceImpl<SpringBootUserMapper, SpringBootUser> {
}
SpringBootUserService 代码如下所示:
public interface SpringBootUserService extends IService<SpringBootUser> {
}
4.3 添加redis配置
若不添加此配置,仍可以运行,但是由于没有配置serializeKeysWith、serializeValuesWith,则默认会使用 jdk 序列化方式对齐进行处理,所以要将其改为 string序列化方式、jackson2JsonRedis序列化方式
@Configuration
public class RedisConfig {
	@Bean(name="redisTemplate")
	public RedisTemplate<String, String> redisTemplate(RedisConnectionFactory factory) {

		RedisTemplate<String, String> template = new RedisTemplate<>();

		template.setConnectionFactory(factory);
		//key序列化方式
		template.setKeySerializer(RedisSerializer.string());
		//value序列化
		template.setValueSerializer(RedisSerializer.json());
//		//value hashmap序列化
		template.setHashValueSerializer(RedisSerializer.json());

		return template;
	}

	@Bean
	public CacheManager cacheManager(RedisConnectionFactory factory) {
		// 配置序列化
		RedisCacheConfiguration config = RedisCacheConfiguration.defaultCacheConfig();
		RedisCacheConfiguration redisCacheConfiguration = config.serializeKeysWith(RedisSerializationContext.SerializationPair.fromSerializer(RedisSerializer.string()))
				.serializeValuesWith(RedisSerializationContext.SerializationPair.fromSerializer(RedisSerializer.json()));


		RedisCacheManager cacheManager = RedisCacheManager.builder(factory)
				.cacheDefaults(redisCacheConfiguration)
				.build();
		return cacheManager;
	}
}
4.4 编写调用方法
@RestController
@RequestMapping("/redis")
public class RedisController {
    @Autowired
    private SrpingBootUserServiceImpl srpingBootUserService;

    // 插入用户,最后会回填id,用结果id缓存用户
    @PostMapping("/insertUser")
    @CachePut(value="myRedisCache", key = "'redis_user_' + #result.id")
    public SpringBootUser instertUser(SpringBootUser user) {
        boolean save = srpingBootUserService.save(user);
        return user;
    }

    // 获取id,取参数id缓存用户
    @GetMapping("/findUserByUser")
    @Cacheable(value="myRedisCache", key = "'redis_user_' + #id")
    public SpringBootUser findUser(Long id) {
        System.out.println("获取到了 id: " + id + ",类型是 + " + id.getClass().toString());
        return srpingBootUserService.getById(id);
    }

    // 更新数据后,更新缓存,如果condition配置项使结果返回为null,则不缓存
    @PostMapping("updaterUser")
    @Cacheable(value = "myRedisCache",
            condition="#result != 'null'",
            key = "'redis_user_' + #id")
    public SpringBootUser updateUser(SpringBootUser user) {
//        此处调用上面写好的findUser方法,此方法焕春注解失败,
//        所以此时还会执行SQL 查询到最新的数据库数据
        SpringBootUser springBootUser = this.findUser(user.getId());
        if (springBootUser == null) {
            return null;
        }
        srpingBootUserService.updateById(user);
        return user;
    }

    //命中率低,所以不采用缓存机制
    @GetMapping("findUsers")
    public List<SpringBootUser> findUsers(String userName, String note)  {
        LambdaQueryChainWrapper<SpringBootUser> wrapper = srpingBootUserService.lambdaQuery().like(SpringBootUser::getUserName, userName).like(SpringBootUser::getNote, note);
        List<SpringBootUser> list = srpingBootUserService.list(wrapper);
        return list;
    }

    // 移除缓存
    @CacheEvict(value = "myRedisCache", key = "'redis_user_' + #id", beforeInvocation = false)
    public boolean deleteUser(Long id) {
        boolean remove = srpingBootUserService.removeById(id);
        return remove;
    }
}
5. 测试
我们使用postman插入用户,发现正确返回

我们用redis查看工具进行查看(我使用的是redisview)进行查看,发现已经将数据存入了redis中

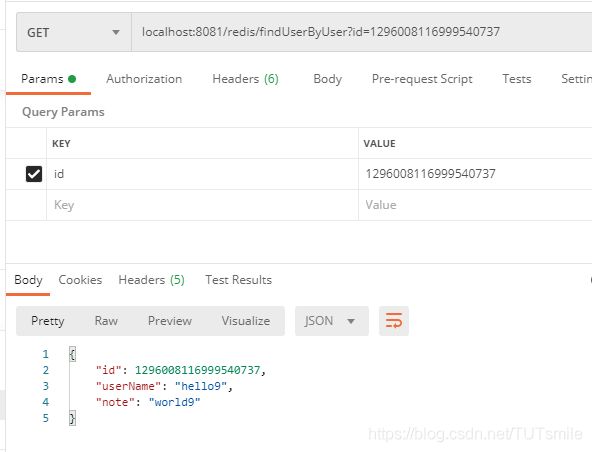
我们调用查询接口,进行查询成功获取到了信息

我们清空数据库中的信息

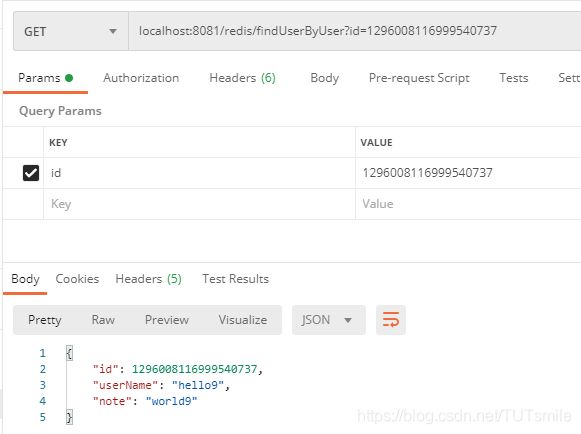
再次调用查询,发现仍然成功,证明此时是从redis中获取的

6. 讲解
6.1 注解

应该有注意到,我们给每个注解都添加了value=“myRedisCache”,键的配置项为'redis_user_' + #id,或者是'redis_user_' + #result.id

我们在 @CachePut 中添加了 condition 配置项,表达式为#result != ‘null’,就是若返回为null,则不进行缓存,@Cacheable 和 @CacheEvict 也有统一的配置项。
6.2 注意要点
缓存会有脏数据的风险,上面的测试中也给出了例子,我们删除了数据库的信息后,调用查询仍可查询到,因为缓存还没有删除。
所以更新的时候需要谨慎一些,尽量避免读取缓存数据,所以我们在updateUser中,使用了方法
SpringBootUser springBootUser = this.findUser(user.getId());
这样调用的时候,findUser 方法的 @Cacheable 失效了,所以不会读取缓存数据,之所以此处不会产生脏数据,是因为 Spring 的缓存机制是基于 Spring AOP 的原理,而 Sping 的 AOP 是通过动态代理技术实现的,这里的 updaateUser 方法调用 findUser() 是类内部的自调用,不存在代理对象的调用,这样便不会出现AOP。
当然,如果你想要 findUser() 能够触发缓存机制,可以考虑使用两个Service类互相调用,或者直接从Sping IoC容器中获取代理对象来操作(@Autowired注入)。
6.3 脏数据的处理
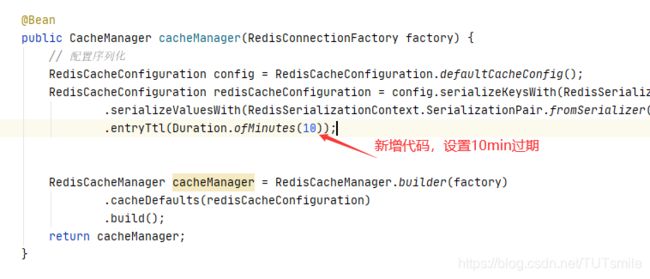
如果数据永久保存于redis中,则查出来的数据很有可能是脏数据,这样我们设置缓存的过期时间就可以了
在我们的 RedisConfig 文件中添加一行代码即可
