本组件基于vuejs框架, 使用ES6基本语法, css预编译采用的scss, 图片裁剪模块基于cropperjs,拍照时的图片信息获取使用exif, 图片上传使用XMLHttpRequest
该组件已单独部署上线, 线上地址:http://upload-img.sufaith.com/, 图片最终是传至我个人的七牛云, 获取七牛云上传凭证token的接口是我单独做的一个nodejs服务, 可在PC或移动端打开测试下效果.
涉及到的知识点整理如下:
vuejs介绍 — Vue.js
scssSass世界上最成熟、稳定和强大的CSS扩展语言 | Sass中文网
cropperjshttps://github.com/fengyuanchen/cropperjs
exifhttps://github.com/exif-js/exif-js
XMLHttpRequest XMLHttpRequest()
整体项目分成3个文件:
1. uploadAvator.vue (父组件,用于选择图片,接收crop回调,执行上传)
2. crop.vue (裁剪组件, 用于裁剪,压缩,回调裁剪结果给uploadAvator.vue)
3. image.js (封装了基本的base64转换blob、获取图片url、xhr上传、图片压缩等方法)
整体流程如下:
input选择图片
调用cropperjs裁剪
修正方向, 压缩
上传
具体实现步骤:
一. 实现input选择文件
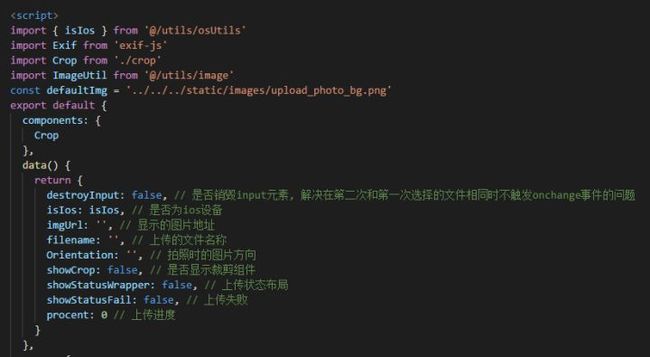
1. 定义一个隐形样式的输入框,用于选择图片文件 (imgUrl初始化为默认图片地址)
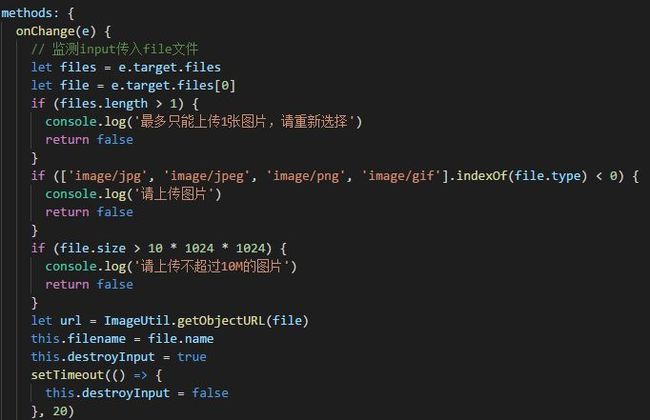
2. 对input选择图片做一些优化
(1) 每次点击input选择图片时, 弹出选择文件的弹窗很慢,有些延迟
解决方案: 明确定义input的accept属性对应的图片类型
(2) 在ios设备下input若含有capture属性, 则只能调起相册,而安卓设备下input若不含capture属性,则只能调起相册
解决方案: 判断是否为ios设备, 创建对应属性的input
const UA = navigator.userAgent
const isIpad = /(iPad).*OS\s([\d_]+)/.test(UA)
const isIpod = /(iPod)(.*OS\s([\d_]+))?/.test(UA)
const isIphone = !isIpad && /(iPhone\sOS)\s([\d_]+)/.test(UA)
const isIos = isIpad || isIpod || isIphone
(3) 再次点击input选择图片时, 若选择的图片和上一次选择的图片相同时,则不会触发onchange事件
解决方案: 在每次接收到onchange事件时先销毁当前input, 再重新创建一个input, 此时可利用vue的v-if指令,轻松销毁或重建
data() {
return {
destroyInput: false, // 是否销毁input元素, 解决在第二次和第一次选择的文件相同时不触发onchange事件的问题
isIos: isIos // 是否为ios设备
}
},
二. 调用cropperjs裁剪
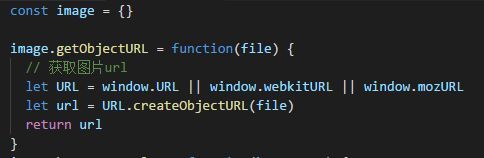
1. 获取选择的图片的url (用于裁剪)
2. 获取拍照时的Orientation信息,解决拍出来的照片旋转问题
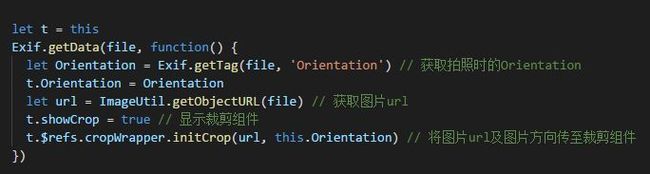
3.显示裁剪组件并初始化
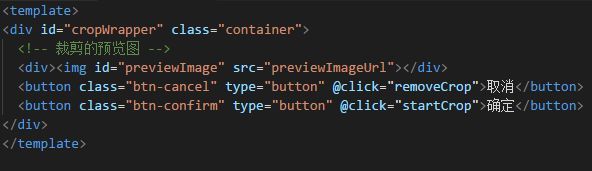

4. 取消裁剪和开始裁剪
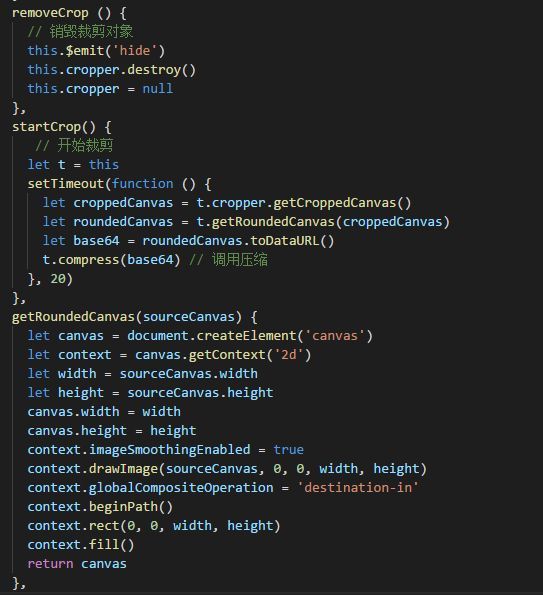
三. 修正方向, 压缩并将base64回调给父组件

const image = {}
image.compress = function(img, Orientation) {
// 图片压缩
// alert('图片的朝向' + Orientation)
let canvas = document.createElement('canvas')
let ctx = canvas.getContext('2d')
// 瓦片canvas
let tCanvas = document.createElement('canvas')
let tctx = tCanvas.getContext('2d')
let initSize = img.src.length
let width = img.width
let height = img.height
// 如果图片大于四百万像素,计算压缩比并将大小压至400万以下
let ratio
if ((ratio = width * height / 4000000) > 1) {
console.log('大于400万像素')
ratio = Math.sqrt(ratio)
width /= ratio
height /= ratio
} else {
ratio = 1
}
canvas.width = width
canvas.height = height
// 铺底色
ctx.fillStyle = '#fff'
ctx.fillRect(0, 0, canvas.width, canvas.height)
// 如果图片像素大于100万则使用瓦片绘制
let count
if ((count = width * height / 1000000) > 1) {
count = ~~(Math.sqrt(count) + 1) // 计算要分成多少块瓦片
// 计算每块瓦片的宽和高
let nw = ~~(width / count)
let nh = ~~(height / count)
tCanvas.width = nw
tCanvas.height = nh
for (let i = 0; i < count; i++) {
for (let j = 0; j < count; j++) {
tctx.drawImage(img, i * nw * ratio, j * nh * ratio, nw * ratio, nh * ratio, 0, 0, nw, nh)
ctx.drawImage(tCanvas, i * nw, j * nh, nw, nh)
}
}
} else {
ctx.drawImage(img, 0, 0, width, height)
}
// 修复ios上传图片的时候 被旋转的问题
if (Orientation && Orientation !== '' && Orientation !== 1) {
switch (Orientation) {
case 6: // 需要顺时针(向左)90度旋转
image.rotateImg(img, 'left', canvas)
break
case 8: // 需要逆时针(向右)90度旋转
image.rotateImg(img, 'right', canvas)
break
case 3: // 需要180度旋转
image.rotateImg(img, 'right', canvas) // 转两次
image.rotateImg(img, 'right', canvas)
break
}
}
// 设置jpegs图片的质量
let ndata = canvas.toDataURL('image/jpeg', 1)
console.log(`压缩前:${initSize}`)
console.log(`压缩后:${ndata.length}`)
console.log(`压缩率:${~~(100 * (initSize - ndata.length) / initSize)}%`)
tCanvas.width = tCanvas.height = canvas.width = canvas.height = 0
return ndata
}
image.rotateImg = function(img, direction, canvas) {
// 图片旋转
// 最小与最大旋转方向,图片旋转4次后回到原方向
const minStep = 0
const maxStep = 3
if (img == null) return
// img的高度和宽度不能在img元素隐藏后获取,否则会出错
let height = img.height
let width = img.width
let step = 2
if (step == null) {
step = minStep
}
if (direction === 'right') {
step++
// 旋转到原位置,即超过最大值
step > maxStep && (step = minStep)
} else {
step--
step < minStep && (step = maxStep)
}
// 旋转角度以弧度值为参数
let degree = step * 90 * Math.PI / 180
let ctx = canvas.getContext('2d')
switch (step) {
case 0:
canvas.width = width
canvas.height = height
ctx.drawImage(img, 0, 0)
break
case 1:
canvas.width = height
canvas.height = width
ctx.rotate(degree)
ctx.drawImage(img, 0, -height)
break
case 2:
canvas.width = width
canvas.height = height
ctx.rotate(degree)
ctx.drawImage(img, -width, -height)
break
case 3:
canvas.width = height
canvas.height = width
ctx.rotate(degree)
ctx.drawImage(img, -width, 0)
break
}
}
export default image
四. 上传图片
1. base64转换为文件

2. XMLHttpRequest上传
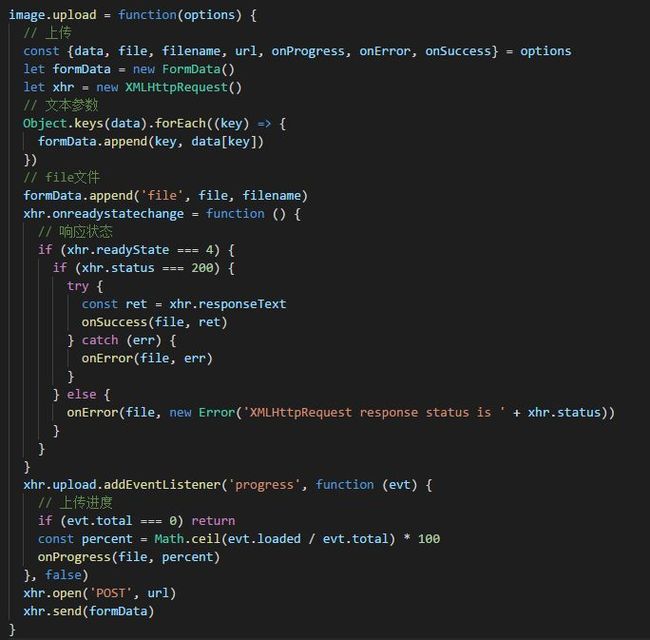
3. 定义上传状态的样式,包括上传进度和上传失败的标识
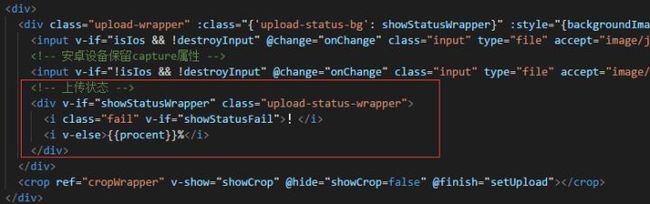
4.父组件接收到裁剪组件的回调的base64后,执行上传
!
{{procent}}%