CUDA学习笔记(3) NVRTC编译库
注意,NVRTC可以高速地编译代码,但是NVRTC并不支持C++且对代码的优化也不如NVCC,在配置较差的电脑上可以用它替代NVCC作为学习用的工具,大型工程尽量避免使用。
我们在编译CUDA工程时,会发现比C++代码的编译慢上许多,这是由于NVCC(CUDA/C++编译器)造成的,它可以兼容地编译C++代码与CUDA-C代码,但是十分低效。

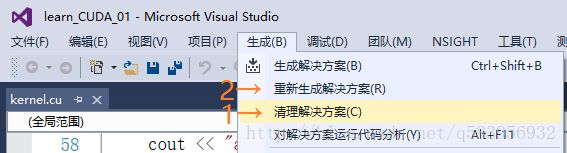
我们可以用CUDA学习笔记(1)中的代码实验一下,对“kernel.cu”右键→属性,可以看到编译器是“CUDA C/C++”,然后先“清理解决方案”再“重新生成解决方案”,发现这时候会等待一段不短的时间。(在我的电脑上接近30秒)显然,这大大降低了我们的编程效率!
相对于C++编译器,它可以编译核函数,并且编译地很慢!当我们不使用核函数时,完全没必要用他。

现在我们将编译器换成“C/C++ 编译器”,重复先“清理解决方案”再“重新生成解决方案”的步骤,编译几乎瞬间完成!
那么有没有什么方法可以不使用“CUDA C/C++ 编译器”,又能高效地编译CUDA C的核函数呢? NVIDIA公司为此推出了NVRTC编译函数库。那么这个NVRTC比CUDA C编译器都有什么优点呢,NVIDIA的原话是:
NVRTC is a runtime compilation library for CUDA C++. It accepts CUDA C++ source code in character string form and creates handles that can be used to obtain the PTX. The PTX string generated by NVRTC can be loaded by cuModuleLoadData and cuModuleLoadDataEx, and linked with other modules by cuLinkAddData of the CUDA Driver API. This facility can often provide optimizations and performance not possible in a purely offline static compilation.
In the absence of NVRTC (or any runtime compilation support in CUDA), users needed to spawn a separate process to execute nvcc at runtime if they wished to implement runtime compilation in their applications or libraries, and, unfortunately, this approach has the following drawbacks:
The compilation overhead tends to be higher than necessary, and End users are required to install nvcc and related tools which make it complicated to distribute applications that use runtime compilation.
NVRTC addresses these issues by providing a library interface that eliminates overhead associated with spawning separate processes, disk I/O, etc., while keeping application deployment simple.
简单地说,我们可以用NVRTC编译库中的库函数来编译CUDA的核函数,这样就可以避免使用“CUDA C/C++ 编译器”,从而提高编译速度和编程效率。
现在我们将CUDA学习笔记(2)中的内容以C++调用NVRTC编译库的形式实现。
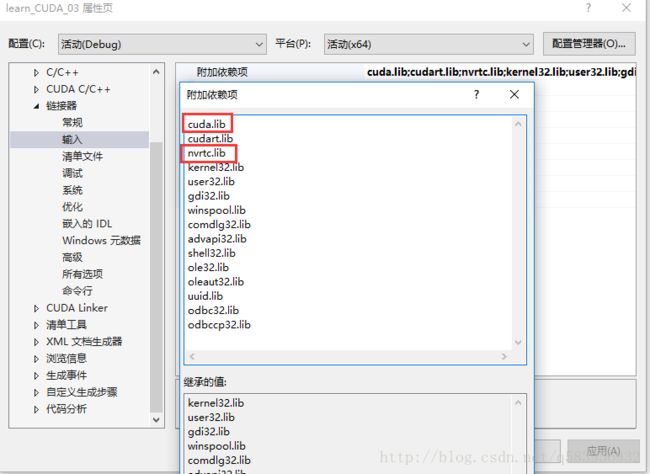
新建一个CUDA工程,必须添加对应的包含目录“CUDA安装目录\CUDA Samples\v9.0\common\inc”以及附加依赖项“cuda.lib”和“nvrtc.lib”。
我们在工程下添加两个文件,“main_code.cpp”和“kernel.cu”。
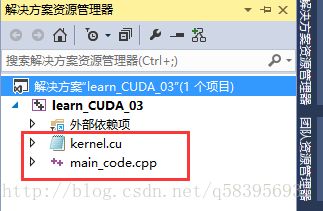
然后编辑这两个文件的属性,将“kernel.cu”设置为“不参与生成”,将“main_code.cpp”设置为“C/C++编译器”。


- “kernel.cu”中仅存放核函数的代码,且不参与工程编译!
- “main_code.cpp”中编写我们的C++代码,通过调用NVRTC编译库函数读取、编译核函数代码,并完成显存管理、重置GPU等操作。由C/C++编译器编译。
我们在“main_code.cpp”代码中包含对应的头文件。
// C/C++ IO
#include 在main()函数中,先定义数据的指针以及它们的大小。
    // Host变量(内存变量)
    const int ARRAY_LENGTH = 3 * 2 * 64;
    int *thread_index, *warp_index, *block_index;

    // Device变量(显存变量)
    CUdeviceptr dev_thread_index, dev_warp_index, dev_block_index;
先用“inline char *sdkFindFilePath(const char *filename, const char *executable_path)”找到核函数的“.cu”文件所在路径。
- 第一个参数“const char *filename”是存放核函数的“.cu”文件名称。
- 第二个参数“const char *executable_path”是程序执行的路径。
- 返回值是核函数“.cu”文件所在路径。
然后用“void compileFileToPTX(char *filename, int argc, char **argv, char **ptxResult, size_t *ptxResultSize, int requiresCGheaders)”来编译核函数代码。
- 第一个参数“char *filename”是“.cu”文件所在路径。
- 第二、三个参数“int argc”、“char **argv”没有作用。(我在“nvrtc_helper.h”源代码中发现这两个参数未被使用)
- 第四个参数“char **ptxResult”一个二重指针,用于存放编译好的PTX字符串数组(全称Parallel Thread Execution,相当于是GPU的汇编,详见NVIDIA官方手册),可以理解为一个字符串的数组,每个数组元素存放一个字符串首地址,内容对应一行PTX代码。
- 第五个参数“size_t *ptxResultSize”用于返回PTX代码的大小。
- 第六个参数“int requiresCGheaders”用于多GPU联合计算(cooperative groups),一般写0就好。
    // 读取、编译、加载CUDA核函数
    char *ptx, *kernel_file;
    size_t ptxSize;

    // 打开核函数的 .cu 文件 并编译为PTX
    kernel_file = sdkFindFilePath("kernel.cu", argv[0]);
    // 如果找不到 kernel_file 会报错:error: unable to open ./xxxx.cu for reading!
    compileFileToPTX(kernel_file, NULL, NULL, &ptx, &ptxSize, 0);
接着用“loadPTX(char *ptx, int argc, char **argv)”初始化GPU。
再用“cuModuleGetFunction(CUfunction *hfunc, CUmodule hmod, const char *name);”载入核函数的PTX到我们的Host(主机即内存)变量中。
- 第一个参数“CUfunction *hfunc”用于传递核函数的句柄(相当于一般函数的地址/指针)。
- 第二个参数“CUmodule hmod”传入我们GPU的当前状态。
- 第三个参数“const char *name”传入核函数的函数名,注意它必须和“kernel.cu”中的核函数名字一模一样!
    // 选择GPU设备,加载核函数到GPU设备
    CUmodule module = loadPTX(ptx, argc, argv);
    CUfunction kernel_addr;
    checkCudaErrors(cuModuleGetFunction(&kernel_addr, module, "kernel_func"));
至此,对核函数的编译工作已经全部完成了。
接下来就是对内存与显存的分配。“CUresult CUDAAPI cuMemAlloc(CUdeviceptr *dptr, size_t bytesize)”函数用于显存的分配。
- 第一个参数“CUdeviceptr *dptr”显存数据指针的地址。
- 第二个参数“size_t bytesize”是分配的显存大小,单位是字节。
    thread_index = (int*)malloc(ARRAY_LENGTH * sizeof(int));
    warp_index = (int*)malloc(ARRAY_LENGTH * sizeof(int));
    block_index = (int*)malloc(ARRAY_LENGTH * sizeof(int));

    checkCudaErrors(cuMemAlloc(&dev_thread_index, ARRAY_LENGTH * sizeof(int)));
    checkCudaErrors(cuMemAlloc(&dev_warp_index, ARRAY_LENGTH * sizeof(int)));
checkCudaErrors(cuMemAlloc(&dev_block_index, ARRAY_LENGTH * sizeof(int)));在调用核函数前,我们按照编程的一般思路,先在“kernel.cu”中编写它,代码和CUDA学习笔记(2)中的代码完全一样。只是在“__global__”的前面加上“extern “C””,表示这下面的代码是“C扩展代码”。
// CUDA kernel fucntion file !

extern "C" __global__ void kernel_func(int * thread_index_array, int * warp_index_array, int * block_index_array)
{
    int block_index = blockIdx.x + blockIdx.y * gridDim.x + blockIdx.z * gridDim.x * gridDim.y;
    int thread_index = block_index * blockDim.x * blockDim.y * blockDim.z + \
        threadIdx.x + threadIdx.y * blockDim.x + threadIdx.z * blockDim.x * blockDim.y;

    thread_index_array[thread_index] = thread_index;
    warp_index_array[thread_index] = thread_index / warpSize;
    block_index_array[thread_index] = block_index;
}
然后我们就继续可以在“main_code.cpp”中编译、使用它了。我们可以调用“cuLaunchKernel”来启动核函数在GPU中运行,它的参数很多,但其实很好理解:
- 第一个参数是我们之前得到的核函数的句柄。
- 第二到四个参数是线程网格(Grid)单个单元的大小。
- 第五到七个参数是线程块(Block)单个单元的大小。
- 第八个参数是每个流处理器组(Stream Multiprocessor)共享内存的大小。
- 第九个参数是流(Stream)的ID。
- 第十个参数最为重要!他是一个数组,其中的元素存放的是显存中变量的地址。例如下面代码中的“void *arr[]”。
- 第十一个参数是操作选项,一般设为0。
// 定义网格的大小(block_rect)、块的大小(thread_rect)
    dim3 block_rect(3, 2, 1), thread_rect(64, 1, 1);
    cout << "block_rect :\t" << block_rect.x << "\t" << block_rect.y << "\t" << block_rect.z << "\t" << endl;
    cout << "thread_rect :\t" << thread_rect.x << "\t" << thread_rect.y << "\t" << thread_rect.z << "\t" << endl;

    void *arr[] = { (void *)&dev_thread_index, (void *)&dev_warp_index, (void *)&dev_block_index};

    // 启动核函数
    checkCudaErrors(cuLaunchKernel(kernel_addr, \
        block_rect.x, block_rect.y, block_rect.z, \
        thread_rect.x, thread_rect.y, thread_rect.z, \
        0, 0,\
        &arr[0],0));

    // 同步,检查核函数计算过程
    checkCudaErrors(cuCtxSynchronize());
至此,GPU的计算已经完成了,我们可以将数据从显存拷贝回内存。用“cuMemcpyDtoH(void *dstHost, CUdeviceptr srcDevice, size_t ByteCount)”拷贝显存中的数据,并将其输出。
- 第一个参数“void *dstHost”即内存中存放数据的地址(指针)。
- 第二个参数“CUdeviceptr srcDevice”是显存中该数据的地址。
- 第三个参数“size_t ByteCount”是数据的大小,单位是字节。
    checkCudaErrors(cuMemcpyDtoH(thread_index, dev_thread_index, ARRAY_LENGTH * sizeof(int)));
    checkCudaErrors(cuMemcpyDtoH(warp_index, dev_warp_index, ARRAY_LENGTH * sizeof(int)));
    checkCudaErrors(cuMemcpyDtoH(block_index, dev_block_index, ARRAY_LENGTH * sizeof(int)));

    for (int i = 0; i < ARRAY_LENGTH; i++)
    {
        printf("thread index \t: %d\t", thread_index[i]);
        printf("warp flag \t: %d\t", warp_index[i]);
        printf("block index \t: %d\t\r\n", block_index[i]);
    }
最后,释放内存、显存。
    // 释放显存
    checkCudaErrors(cuMemFree(dev_thread_index));
    checkCudaErrors(cuMemFree(dev_warp_index));
    checkCudaErrors(cuMemFree(dev_block_index));
    // 释放内存
    free(thread_index);
    free(block_index);
    free(warp_index);
补充:
NVRTC库函数中“checkCudaErrors”可以返回CUDA错误发生的文件名及行数,以及错误信息,可以极大的方便我们Debug。源码如下:
#define checkCudaErrors(err)  __checkCudaErrors (err, __FILE__, __LINE__)

// These are the inline versions for all of the SDK helper functions
inline void __checkCudaErrors(CUresult err, const char *file, const int line)
{
    if (CUDA_SUCCESS != err)
    {
        fprintf(stderr, "checkCudaErrors() Driver API error = %04d \"%s\" from file <%s>, line %i.\n",
                err, getCudaDrvErrorString(err), file, line);
        exit(EXIT_FAILURE);
    }
}其中“__FILE__”和“__LINE__”在Debug下,可以获得执行这个函数时,所在源码的文件名及行数。
我的“main_code.cpp”代码:
// C/C++ IO
#include 我的“kernel.cu”代码:
// CUDA kernel fucntion file !

extern "C" __global__ void kernel_func(int * thread_index_array, int * warp_index_array, int * block_index_array)
{
    int block_index = blockIdx.x + blockIdx.y * gridDim.x + blockIdx.z * gridDim.x * gridDim.y;
    int thread_index = block_index * blockDim.x * blockDim.y * blockDim.z + \
        threadIdx.x + threadIdx.y * blockDim.x + threadIdx.z * blockDim.x * blockDim.y;

    thread_index_array[thread_index] = thread_index;
    warp_index_array[thread_index] = thread_index / warpSize;
    block_index_array[thread_index] = block_index;
}
运行结果:

参考:
1.NVIDIA官方NVRTC说明文档
2.CUDA Toolkit Documation