简介
推送基本上是每一个APP必备的功能,而iOS 10新增了UserNotificationKit框架,整合了之前的通知,而且新增了很多特性。
1.通知内容更加丰富
- 由之前的alert到现在的title,subTitle,body。
- 为推送增加了附件,包括符合格式和大小的图片、音频和视频。
2.方便对推送的周期进行管理
- 更新推送
- 删除推送
- 查看推送
新框架
#ifdef NSFoundationVersionNumber_iOS_9_x_Max
#import
#endif
通过UNUserNotificationCenter来管理本地和远程通知。
1.首先打开推送开关
2. 获取权限
我们需要在 - (BOOL)application:(UIApplication *)application didFinishLaunchingWithOptions:(NSDictionary *)launchOptions注册通知,代码如下
    UNUserNotificationCenter *notifiCenter = [UNUserNotificationCenter currentNotificationCenter];
    UNAuthorizationOptions options = UNAuthorizationOptionNone | UNAuthorizationOptionBadge| UNAuthorizationOptionSound | UNAuthorizationOptionAlert;
    [notifiCenter requestAuthorizationWithOptions:options completionHandler:^(BOOL granted, NSError * _Nullable error) {

    }];
[[UIApplication sharedApplication] registerForRemoteNotifications];
3. 注册APNS,获取deviceToken
- (void)application:(UIApplication *)application didRegisterForRemoteNotificationsWithDeviceToken:(NSData *)deviceToken {

    [JPUSHService registerDeviceToken:deviceToken];
}
- (void)application:(UIApplication *)application didFailToRegisterForRemoteNotificationsWithError:(NSError *)error {

    NSLog(@"did Fail To Register For Remote Notifications With Error: %@", error);
}
4. iOS7以后如果想要在后台做一些操作
- 需要在APNS增加字段
"content-available":1,"mutable-content":1 -
需要在Background Modes中增加Remote notifications
5. 收到推送调用的方法
- 这是应用处于前台时 收到推送触发
- (void)jpushNotificationCenter:(UNUserNotificationCenter *)center willPresentNotification:(UNNotification *)notification withCompletionHandler:(void (^)(NSInteger))completionHandler {
    NSDictionary * userInfo = notification.request.content.userInfo;

    UNNotificationRequest *request = notification.request; // 收到推送的请求
    UNNotificationContent *content = request.content; // 收到推送的消息内容

    NSNumber *badge = content.badge;  // 推送消息的角标
    NSString *body = content.body;    // 推送消息体
    UNNotificationSound *sound = content.sound;  // 推送消息的声音
    NSString *subtitle = content.subtitle;  // 推送消息的副标题
    NSString *title = content.title;  // 推送消息的标题

    if([notification.request.trigger isKindOfClass:[UNPushNotificationTrigger class]]) {
        [JPUSHService handleRemoteNotification:userInfo];
        NSLog(@"iOS10 前台收到远程通知");
  }
    else {
        // 判断为本地通知
        NSLog(@"iOS10 前台收到本地通知:{\nbody:%@,\ntitle:%@,\nsubtitle:%@,\nbadge:%@,\nsound:%@,\nuserInfo:%@\n}",body,title,subtitle,badge,sound,userInfo);
    }
    completionHandler(UNNotificationPresentationOptionAlert); // 需要执行这个方法,选择是否提醒用户,有Badge、Sound、Alert三种类型可以设置
}
操作的回调方法:不管应用在前台、后台还是被手动划掉,下面三种情况将触发该方法。
- 点击通知进入应用
2.点击action
- 清除了category是UNNotificationCategoryOptionCustomDismissAction的通知
- (void)jpushNotificationCenter:(UNUserNotificationCenter *)center didReceiveNotificationResponse:(UNNotificationResponse *)response withCompletionHandler:(void (^)())completionHandler {

    NSDictionary * userInfo = response.notification.request.content.userInfo;
    UNNotificationRequest *request = response.notification.request; // 收到推送的请求
    UNNotificationContent *content = request.content; // 收到推送的消息内容

    NSNumber *badge = content.badge;  // 推送消息的角标
    NSString *body = content.body;    // 推送消息体
    UNNotificationSound *sound = content.sound;  // 推送消息的声音
    NSString *subtitle = content.subtitle;  // 推送消息的副标题
    NSString *title = content.title;  // 推送消息的标题

    if([response.notification.request.trigger isKindOfClass:[UNPushNotificationTrigger class]]) {
        [JPUSHService handleRemoteNotification:userInfo];
        NSLog(@"iOS10 收到远程通知");
    }
    else {
        // 判断为本地通知
        NSLog(@"iOS10 收到本地通知:{\nbody:%@,\ntitle:%@,\nsubtitle:%@,\nbadge:%@,\nsound:%@,\nuserInfo:%@\n}",body,title,subtitle,badge,sound,userInfo);
    }

    completionHandler();  // 系统要求执行这个方法
}
收到远程推送的回调方法:APNS带有"content-available":1字段,并且应用在前台或者后台时收到远程推送,将触发该方法。(注意:应用被手动划掉将无法触发)
可以在这个方法里做一些后台操作(下载数据,更新UI等),记得修改Background Modes。
- (void)JPush_application:(UIApplication *)application didReceiveRemoteNotification:(NSDictionary *)userInfo fetchCompletionHandler:(void (^)(UIBackgroundFetchResult))completionHandler {

    [JPUSHService handleRemoteNotification:userInfo];

    completionHandler(UIBackgroundFetchResultNewData);
}
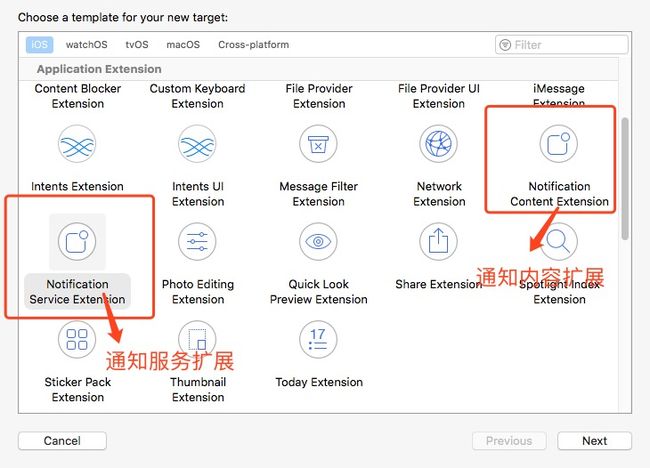
UNNotificationContentExtension - 通知内容扩展
通知内容扩展需要新建一个 UNNotificationContentExtension Target,之后只需在 viewcontroller 的中实现相应的接口,即可以对 app 的通知页面进行自定义扩展,扩展主要用于自定义 UI。
UNNotificationServiceExtension - 通知服务扩展
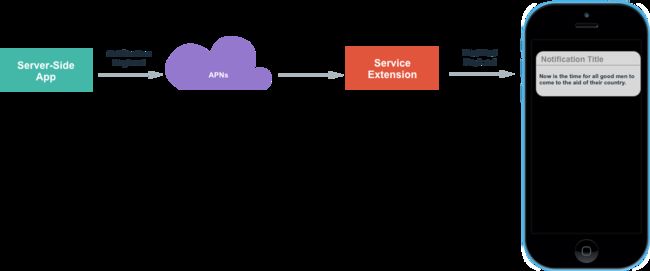
UNNotificationServiceExtension 提供在远程推送将要被 push 出来前,处理推送显示内容的机会。此时可以对通知的 request.content 进行内容添加,如添加附件,userInfo 等。
使用UNNotificationServiceExtension,你有30秒的时间处理这个通知,可以同步下载图像和视频到本地,然后包装为一个UNNotificationAttachment扔给通知,这样就能展示用服务器获取的图像或者视频了。这里需要注意:如果数据处理失败,超时,extension会报一个崩溃信息,但是通知会用默认的形式展示出来,app不会崩溃。
新建通知扩展
Xcode File ->New ->Target
然后写名字,下一步,就可以了
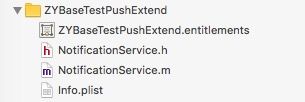
此时我们的目录结构里面,已经多出了一个文件夹了
注意看上图,这里的bundleID是你的工程名字的bundleID加上通知扩展的名称。
不要修改,系统创建的时候就创建好了,不过我还是给大家说一下这个格式
如果你的工程的BundleID是comTaoShengyijiu.pushDemo,则这个扩展的BundleID就是comTaoShengyijiu.ZYBaseTestPushExtend, 最后的后缀是看咱们创建服务扩展时候的名字。其他的小细节,大家可以看看。
到这一步,我们就新建了一个服务通知类的扩展。
因为我们公司的APP是一款类似于支付宝的理财工具,产品的需求就是类似于支付宝收钱吧一类,只要APP收到一笔款,就要能实时播报出来,无论程序处于前台、后台还是杀死的情况下都要能正常播报。所以我在通知扩展中就是启动系统自带的音频服务读出推送内容。
普及知识时间
- (void)didReceiveNotificationRequest:(UNNotificationRequest *)request withContentHandler:(void (^)(UNNotificationContent * _Nonnull))contentHandler
这个函数是通知扩展类的最为核心的函数了,你可以理解为这个就是接受到苹果APNS 通知的一个钩子函数,每次当推送一条通知过来,都会执行到这个函数体内,所以说我们的语音播报逻辑也是在这个钩子函数中进行处理的。
先来说下苹果通知的通知栏问题
在苹果通知中,当来一条通知时,我们的手机会叮一下,然后手机通知栏弹出通知。这里大家注意下,其实这个叮一下出来的通知栏也是有生命周期的。从通知栏被弹出来,到通知栏最终被收起,其实中间苹果给了限制时间,大概就6秒左右的时长(注意,如果你要播报的内容超过6秒,你就要去控制什么时候弹出通知栏了,要不然会出现语音无法全部播报出来的情况)。
说到6秒左右的时长,对于那些多条通知同时到达,需要串行来逐一播报,但是很多小伙伴们会遇到这样一个问题:就是当同时来了多条通知,总是只能播报2-3条,然后就语音中断了,后面的通知不会播报了,遇到这些问题的小伙伴们有没有注意到,其实只能播报2-3条,这个时间差其实就是6秒左右,也就是通知栏的生命周期时长。
出现上面的问题的原因就是:当第一条通知来了,弹出通知栏,然后开始播报第一条语音,第一条播报完了,开始播报第二条语音,可能当第二条语音播报到一半了,但是这个时候,通知栏周期的时间到了,这时通知栏就会收起,注意:当通知栏收起时,扩展类里面的代码就会终止执行,导致后面的语音播报终端。
上面说到当通知栏收起时,扩展类的代码会终止执行,这里又引出了另一个注意点:就是我们创建的这个扩展类也是有生命周期的,并且这个生命周期和通知栏的生命周期他们是有依赖关系的。即:当通知栏收起时,扩展类就会被系统终止,扩展内里面的代码也会终止执行,只有当下一个通知栏弹出来,扩展类就恢复功能
上面说到通知栏的出现和收起能够影响到扩展类的功能,那我们是不是控制好通知栏的显示和隐藏,就能解决多条串行问题呢?
是的,我们只要控制好通知栏,就可以解决上面的棘手问题,那么问题又来了,我们怎么才能控制通知栏的显示和隐藏呢?感觉我们平时使用苹果的推送,从来没有关心过处理通知栏的显示与隐藏,感觉从来没有这样用过,是的,对应普通的需求,我们确实不需要关系通知栏显示隐藏,感觉这些苹果系统自己已经处理好了,通知来了就显示通知栏,等5秒左右,周期结束就隐藏通知栏。
其实啊,在扩展类里面中,苹果已经给我们指出了如何控制通知栏的显示和隐藏,核心就是这行代码:self.contentHandler(self.bestAttemptContent),当我们调用到这行代码,就是用来弹出通知栏的,通知栏的隐藏不需要我们来控制了,因为5秒左右的生命周期结束后,它会自动隐藏。
是不是对这样代码既熟悉有陌生啊,熟悉是因为你的扩展类文件中确实有这行代码,陌生是因为你之前从来都没有用过这行代码,不知道这行代码是用来干啥的。
好了,既然self.contentHandler(self.bestAttemptContent) 这行核心代码引用出来了,我们就回到最开始的问题,在没有做任何处理时,为什么当同时来多条通知是,语音播报就不能逐一播报呢,其实就是因为当每一条通知到达都会执行这个函数- (void)didReceiveNotificationRequest:(UNNotificationRequest *)request withContentHandler:(void (^)(UNNotificationContent * _Nonnull))contentHandler 有没有发现,这个函数体里面 默认就是 执行了 self.contentHandler(self.bestAttemptContent)这行代码。
假设一次性同时来了10条 通知,就会一次性调用了 10次 didReceiveNotificationRequest这个函数, 也就执行了 10次 self.contentHandler(self.bestAttemptContent)。 按照上面的说法,同时执行10次,不就是同时弹出10次的通知栏吗,这里我调试时发现,当同时来10条通知时,通知栏并没有同时弹出来10次,可能只弹出来1-2次。也就只能在这1-2次的时间长度中进行语音播报了。
上面解释这么多,那么我们到底该如何做呢,细心的同学发现了,我们上面 贴出来的 .m 代码中,我们新增了一个 AVSpeechSynthesizer 类的代理函数,就是语音播报完成的函数,我们将 呼出通知栏的代码 self.contentHandler(self.bestAttemptContent)添加到这个代理函数中。意思就是:当第一条语音播放完成了,这时我们呼出通知栏显示播放的内容(通知栏的周期时间大概6秒左右),正好这时可以播放第二条语音,等第二条语音播放完成了,呼出第二个通知的通知栏,继续播放第三天语音,以此类推。
看到这里,想必大家应该都理解了为啥之前总是语音播报中断的问题。
还有一个很重要的函数:- (void)serviceExtensionTimeWillExpire{},我们上面只是提了下,具体他具体有什么功能呢?
我们发现serviceExtensionTimeWillExpire函数中,也调用了 self.contentHandler(self.bestAttemptContent)这行代码,它为啥也要调用这行代码呢?
这是因为:当我们在接受通知的钩子函数中(didReceiveNotificationRequest)没有调用self.contentHandler(self.bestAttemptContent)这行代码,这时就会出现一个现象:就是通知收到了,但是没有通知栏出现,这时苹果就不允许了。苹果规定,当一条通知达到后,如果在30秒内,还没有呼出通知栏,我就系统强制调用self.contentHandler(self.bestAttemptContent) 来呼出通知栏。 这时想必大家都知道 serviceExtensionTimeWillExpire函数的用途了吧。
小编自己Demo里的代码来了
#import "NotificationService.h"
#import

@interface NotificationService ()

@property (nonatomic, strong) void (^contentHandler)(UNNotificationContent *contentToDeliver);

@property (nonatomic, strong) UNMutableNotificationContent *bestAttemptContent;

/** 语音合成引擎 */
@property (nonatomic, strong) AVSpeechSynthesizer *voiceSpeaker;

/** 弹框是否已经展示 */
@property (nonatomic, assign) BOOL alertIsDisplayed;

@end
PS:这里通过判断文字个数来控制通知栏什么时候显示
/** 文字限制长度 暂定为15字*/
static int contentLengthLimit = 18;
- (void)didReceiveNotificationRequest:(UNNotificationRequest *)request withContentHandler:(void (^)(UNNotificationContent * _Nonnull))contentHandler {
    self.contentHandler = contentHandler;
    self.bestAttemptContent = [request.content mutableCopy];

    NSError *activeErr = nil;
    NSError *cateroyErr = nil;

    [[AVAudioSession sharedInstance] setCategory:AVAudioSessionCategoryPlayback error:&cateroyErr];
    [[AVAudioSession sharedInstance] setActive:YES error:&activeErr];

    self.alertIsDisplayed = NO;

    // Modify the notification content here...
    self.bestAttemptContent.title = [NSString stringWithFormat:@"%@By涛声", self.bestAttemptContent.title];

    [self speakStringFromServer:self.bestAttemptContent.body];
}
#pragma mark - 处理并播放服务器返回的内容
- (void)speakStringFromServer:(NSString *)string {

    if (string.length == 0) {

        // 如果字符串长度为0,则直接弹出通知Alert,不执行任何操作 通知栏的隐藏不需要我们来控制,因为5秒左右的生命周期结束后,它会自动隐藏
        self.alertIsDisplayed = YES;
        self.contentHandler(self.bestAttemptContent);

        return;
    }

    // 如果文字过长的话,会导致文字播放到一半时出现通知的声音,故将通知声音关闭
    self.bestAttemptContent.sound = nil;

    if (string.length <= contentLengthLimit) {

        // 如果文字长度较短的话则直接弹出通知栏并且开启通知声音
        self.bestAttemptContent.sound = [UNNotificationSound defaultSound];

        // 如果需要播放的内容长度小于限制长度,5秒时间足以播放完毕,则直接弹出Alert。
        self.alertIsDisplayed = YES;
        self.contentHandler(self.bestAttemptContent);
    }

    NSString *needStr = [self getNumberFromString:string];

    [needStr stringByAppendingString:@""];

    NSString *tempStr = [NSString stringWithFormat:@",%@", needStr];

    NSString *finalStr = [string stringByReplacingOccurrencesOfString:needStr withString:tempStr];

    [self speakString:finalStr];

}

- (void)speakString:(NSString *)string {

    if (self.voiceSpeaker) {

        AVSpeechUtterance *aUtterance = [AVSpeechUtterance speechUtteranceWithString:string];

        [aUtterance setVoice:[AVSpeechSynthesisVoice voiceWithLanguage:@"zh-TW"]];

        aUtterance.rate = 0.5; //设置语速

        aUtterance.volume = 1;  //设置音量(0.0~1.0)默认为1.0

        aUtterance.pitchMultiplier = 1;  //设置语调 (0.5-2.0)

        [self.voiceSpeaker speakUtterance:aUtterance];
    }
}

#pragma mark - 获取字符串中的数字 以便在数值处特意停顿一下
- (NSString *)getNumberFromString:(NSString *)string {

    NSScanner *scanner = [NSScanner scannerWithString:string];

    [scanner scanUpToCharactersFromSet:[NSCharacterSet decimalDigitCharacterSet] intoString:nil];

    float num ;

    [scanner scanFloat:&num];

    NSString *tempStr = [NSString stringWithFormat:@"%.2f", num];

    NSDecimalNumber *resultNum = [NSDecimalNumber decimalNumberWithString:tempStr];

    NSString *resultStr = [NSString stringWithFormat:@"%@", resultNum];

    return resultStr;
}
#pragma mark - AVSpeechSynthesizerDelegate
- (void)speechSynthesizer:(AVSpeechSynthesizer *)synthesizer didStartSpeechUtterance:(AVSpeechUtterance *)utterance
{
    NSLog(@"开始");
}

- (void)speechSynthesizer:(AVSpeechSynthesizer *)synthesizer didFinishSpeechUtterance:(AVSpeechUtterance *)utterance
{
    NSLog(@"结束");
}

- (void)speechSynthesizer:(AVSpeechSynthesizer *)synthesizer didPauseSpeechUtterance:(AVSpeechUtterance *)utterance
{
    NSLog(@"暂停");
}

- (void)speechSynthesizer:(AVSpeechSynthesizer *)synthesizer didContinueSpeechUtterance:(AVSpeechUtterance *)utterance
{
    NSLog(@"继续");
}

- (void)speechSynthesizer:(AVSpeechSynthesizer *)synthesizer didCancelSpeechUtterance:(AVSpeechUtterance *)utterance
{
    NSLog(@"取消");
    self.alertIsDisplayed = YES;
    self.contentHandler(self.bestAttemptContent);
}

- (void)speechSynthesizer:(AVSpeechSynthesizer *)synthesizer willSpeakRangeOfSpeechString:(NSRange)characterRange utterance:(AVSpeechUtterance *)utterance {

    if (self.alertIsDisplayed == NO) {

        if (characterRange.location >= utterance.speechString.length / 4) {

            // 如果文字长度大于限制,则可能通知栏弹出5秒内无法播放完毕,则暂定为播放到1/4时再弹出状态栏
            self.alertIsDisplayed = YES;
            self.contentHandler(self.bestAttemptContent);
        }
    }
}
- (void)serviceExtensionTimeWillExpire {
    // Called just before the extension will be terminated by the system.
    // Use this as an opportunity to deliver your "best attempt" at modified content, otherwise the original push payload will be used.

    // 当一条通知达到后,如果在30秒内,还没有呼出通知栏,系统就强制调用来呼出通知栏
    self.alertIsDisplayed = YES;
    self.contentHandler(self.bestAttemptContent);
}
#pragma mark - 懒加载
- (AVSpeechSynthesizer *)voiceSpeaker {

    if (!_voiceSpeaker) {

        _voiceSpeaker = [[AVSpeechSynthesizer alloc] init];

        _voiceSpeaker.delegate = self;
    }

    return _voiceSpeaker;
}
可能遇见的一些问题
-
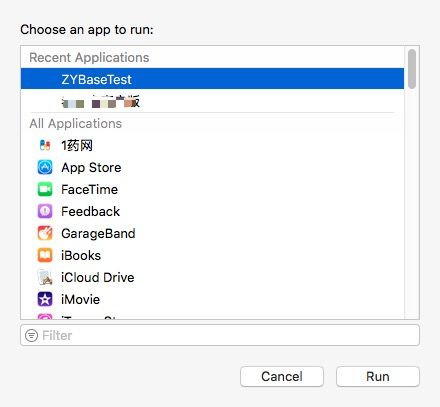
Q.调试这个通知扩展类,为什么我跑程序的时候,打断点无反应?
A. 因为你选择的这是因为你跑的target不对,正确的做法是,跑正确的 target,具体如下图
这个时候再打断点调试,就OK了。


