Raft一致性框架_Copycat基础学习(一)
Copycat is a fault-tolerant state machine replication framework. Built
on the Raft consensus algorithm, it handles replication and
persistence and enforces strict ordering of inputs and outputs,
allowing developers to focus on single-threaded application logic. Its
event-driven model allows for efficient client communication with
replicated state machines, from simple key-value stores to wait-free
locks and leader elections. You supply the state machine and Copycat
takes care of the rest, making it easy to build robust, safe
distributed systems.
上面一段摘录于Copycat官网的介绍(http://atomix.io/copycat/),那么Copycat 是一个基于Raft一致性算法的编程框架,它能够为分布式应用中的状态提供一致性。本文主要基于Copycat官网给的示例进行学习.
1.首先在IDE里面创建一个maven工程,并在pom文件中加入依赖:
<dependency>
    <groupId>io.atomix.copycatgroupId>
    <artifactId>copycat-serverartifactId>
    <version>1.1.4version>
dependency>
<dependency>
    <groupId>io.atomix.copycatgroupId>
    <artifactId>copycat-clientartifactId>
    <version>1.1.4version>
dependency>
<dependency>
    <groupId>io.atomix.catalystgroupId>
    <artifactId>catalyst-nettyartifactId>
    <version>1.1.1version>
dependency>
2.自定义StateMachine以及Command
//自定了MapstateMachine,它继承框架提供的StateMachine类,MapstateMachine主要处理来自客户端的操作,如示例建的这个类,用于处理两个操作,put和get.put用于向map中写入键值,get用于获取值
public class MapstateMachine extends StateMachine implements Snapshottable {
    //此为copycat-server需要维护的一致性数据结构,本例使用的是MAP
    private Map map = new HashMap<>();

    //定义对map的put操作
    public Object put(Commit commit) {
        try {
            map.put(commit.operation().key(), commit.operation().value());
        } finally {
            commit.close();
        }
        return null;
    }
    //定义对map的get操作
    public Object get(Commit commit) {
        try {
            return map.get(commit.operation().key());
        } finally {
            commit.close();
        }
    }

    //以下两个方法来自于实现Snapshottable的接口,实现这个接口是用于copycat-server能够对本地状态日志进行压缩,并形成snapshot(快照),当copycat-server重启后,可以从快照恢复状态,如果有其它的server加入进来,可以将快照复制到其它server上.
    @Override
    public void snapshot(SnapshotWriter writer) {
        writer.writeObject(map);
    }

    @Override
    public void install(SnapshotReader reader) {
        map = reader.readObject();
    }
}
GetQuery类
package com.xkx.common;

import io.atomix.copycat.Query;

//定义对MapstateMachine查询的命令
public class GetQuery implements Query<Object> {

    private final Object key;

    public GetQuery(Object key){
        this.key = key;
    }

    public Object key(){
        return key;
    }
}
PutCommand类
package com.xkx.common;
import io.atomix.copycat.Command;
public class PutCommand implements CommandPutCommand和GetQuery类都实现Command接口.
3.最后定义服务器端和客户端,copycat_server这里我们实现3个,copyCat_server-1,copyCat_server-2,copyCat_server-3。它们共同组成一个cluster.这里我们通过copyCat_server-2,copyCat_server-3 join到copyCat_server-1的方式形成cluseter
copyCat_server-1 实现
package com.xkx.myCopycat;

import com.xkx.common.GetQuery;
import com.xkx.common.MapstateMachine;
import com.xkx.common.PutCommand;
import io.atomix.catalyst.transport.Address;
import io.atomix.catalyst.transport.netty.NettyTransport;
import io.atomix.copycat.server.CopycatServer;
import io.atomix.copycat.server.storage.Storage;
import io.atomix.copycat.server.storage.StorageLevel;

import java.io.File;
import java.util.concurrent.CompletableFuture;

public class Main {

    public static void main(String[] args){

        //设置server_1的地址和端口
        Address address = new Address("127.0.0.1", 5000);
        //通过chain的方式创建copy_cat server
        CopycatServer server = CopycatServer.builder(address)
                .withStateMachine(MapstateMachine::new)
                .withTransport(NettyTransport.builder()
                        .withThreads(4)
                        .build())
                .withStorage(Storage.builder()
                        .withDirectory(new File("logs"))
                      .withStorageLevel(StorageLevel.DISK)
                        .build())
                .build();
        //注册putCommand和GetQuery命令类
        server.serializer().register(PutCommand.class);
        server.serializer().register(GetQuery.class);

        //启动服务器
        CompletableFuture future = server.bootstrap();
        future.join();

    }

}
copyCat_server-2 实现
package com.xkx.myCopycat2;

import com.xkx.common.GetQuery;
import com.xkx.common.MapstateMachine;
import com.xkx.common.PutCommand;
import io.atomix.catalyst.transport.Address;
import io.atomix.catalyst.transport.netty.NettyTransport;
import io.atomix.copycat.server.CopycatServer;
import io.atomix.copycat.server.storage.Storage;
import io.atomix.copycat.server.storage.StorageLevel;

import java.io.File;
import java.util.Collection;
import java.util.Collections;

public class Main2 {

    public static void main(String[] args){

        Address address = new Address("127.0.0.1", 5001);

        CopycatServer server = CopycatServer.builder(address)
                .withStateMachine(MapstateMachine::new)
                .withTransport(NettyTransport.builder()
                        .withThreads(4)
                        .build())
                .withStorage(Storage.builder()
                        .withDirectory(new File("logs"))
                        .withStorageLevel(StorageLevel.DISK)
                        .build())
                .build();

        server.serializer().register(PutCommand.class);
        server.serializer().register(GetQuery.class);

        //这里通过join到copyCat-server-1实现cluster
        Collection cluster = Collections.singleton(new Address("127.0.0.1", 5000));
        server.join(cluster).join();

    }

}
这里只给出copyCat-server-1和copyCat_server-2 的实现,copyCat-server-3跟copyCat_server-2 实现相同,只是改变了下IP地址和端口.
copycat-client实现
package com.xkx.client;

import com.xkx.common.GetQuery;
import com.xkx.common.PutCommand;
import io.atomix.catalyst.transport.Address;
import io.atomix.catalyst.transport.netty.NettyTransport;
import io.atomix.copycat.client.CopycatClient;

import java.util.Arrays;
import java.util.Collection;
import java.util.concurrent.CompletableFuture;

public class ClientMain {

    public static void main(String[] args){

        CopycatClient.Builder builder = CopycatClient.builder();

        builder.withTransport(NettyTransport.builder()
                .withThreads(2)
                .build());

        CopycatClient client = builder.build();

        //客户端注册命令
        client.serializer().register(PutCommand.class);
        client.serializer().register(GetQuery.class);


        //集群的ip以及端口
        Collection cluster = Arrays.asList(
                new Address("127.0.0.1", 5000),
                new Address("127.0.0.1", 5001),
                new Address("127.0.0.1", 5002)
        );

        CompletableFuture future = client.connect(cluster);
        future.join();

        //使用PutCommand提交三个键值对
        CompletableFuture[] futures = new CompletableFuture[3];
        futures[0] = client.submit(new PutCommand("foo", "Hello world!"));
        futures[1] = client.submit(new PutCommand("bar", "Hello world!"));
        futures[2] = client.submit(new PutCommand("baz", "Hello world!"));

        //等待集群完成一致性的复制后,打印完成的结果
        CompletableFuture.allOf(futures).thenRun(() -> System.out.println("Commands completed!"));

        //客户端提交查询
        client.submit(new GetQuery("foo")).thenAccept(result -> {
            System.out.println("foo is: " + result);
        });
    }

}
java项目工程结构:
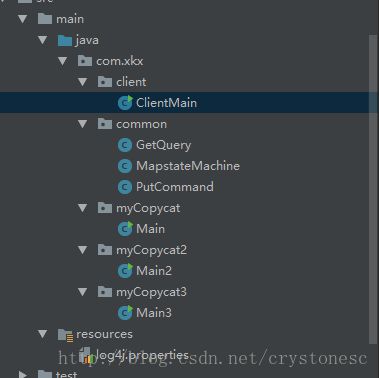
注意copyCat-server 和 copyCat-client都应该使用相同的GetQuery,MapstateMachine,PutCommand类,所以放在了common目录下,也就说他们都需要应用相同的类。
实验结果:
copyCat-server-1 console内容:

copyCat-server-2 console内容:

copyCat-server-3 console内容:

copyCat-client console内容:

可以看到三台server中copyCat-server-1被选举为Leader,另外两台为Follower,所有请求都会到copyCat-server-1来处理,并通过Raft算法复制到另外两台server。