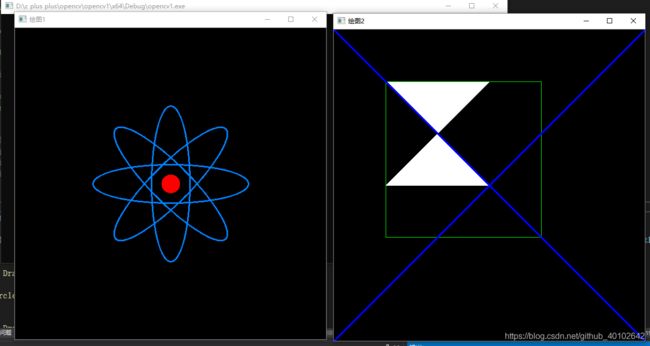
每天一个opencv函数:图形的绘制
在进行图像处理的过程中经常需要在图像上标注出识别的区域,这样就需要进行图形的绘制。
这里介绍一下圆、椭圆、直线、正方形的绘制
函数原型
圆:
void circle(Mat img, Point center, int radius, Scalar color, int thickness=1, int lineType=8, int shift=0)
- img为源图像
- center为画圆的圆心坐标
- radius为圆的半径
- color为设定圆的颜色,规则根据B(蓝)G(绿)R(红)
- thickness 如果是正数,表示组成圆的线条的粗细程度。否则,表示圆是否被填充
- line_type 线条的类型。默认是8
- shift 圆心坐标点和半径值的小数点位数
椭圆:
void ellipse(InputOutputArray img, Point center, Size axes, double angle, double startAngle, double endAngle, const Scalar& color, int thickness = 1, int lineType = LINE_8, int shift = 0);
- img:图像。
- center:椭圆圆心坐标。
- axes:轴的长度。
- angle:偏转的角度。
- start_angle:圆弧起始角的角度。
- end_angle:圆弧终结角的角度。
- color:线条的颜色。
- thickness:线条的粗细程度。
- line_type:线条的类型,见CVLINE的描述。
- shift:圆心坐标点和数轴的精度。
直线:
void line(InputOutputArray img, Point pt1, Point pt2, const Scalar& color,int thickness = 1, int lineType = LINE_8, int shift = 0);
- img:图像.
- pt1:线条起点.
- pt2:线条终点.
- color:线条颜色.
- thickness:线条宽度.
- lineType:线型
矩形:
void rectangle(Mat& img,Rect rec, const Scalar&color, intthickness=1, intlineType=8,intshift=0 )
- img:图像。
- rec:表征矩形的位置和长宽。
- color:线条颜色 (RGB) 或亮度(灰度图像 )(grayscale image)。
- thickness:组成矩形的线条的粗细程度。取负值时(如CV_FILLED)函数绘制填充了色彩的矩形。
- line_type:线条的类型。见cvLine的描述
- shift:坐标点的小数点位数。
void rectangle(Mat& img, Point pt1,Point pt2,const Scalar& color, int thickness=1, int lineType=8, int shift=0)
- img:图像。
- pt1:矩形左上角的点
- pt2: 矩形右下脚的点
- color:线条颜色 (RGB) 或亮度(灰度图像 )(grayscale image)。
- thickness:组成矩形的线条的粗细程度。取负值时(如CV_FILLED)函数绘制填充了色彩的矩形。
- line_type:线条的类型。见cvLine的描述
- shift:坐标点的小数点位数。
示例
//绘制椭圆、圆、直线、多边形等
#define WINDOWS_WIDTH 600
#define WINDOWS_NAME_1 "绘图1"
#define WINDOWS_NAME_2 "绘图2"

void DrawEllipse(Mat image, double angle)
{
  int thickness = 2;

  ellipse(image, Point(WINDOWS_WIDTH / 2, WINDOWS_WIDTH / 2), Point(WINDOWS_WIDTH / 4.0, WINDOWS_WIDTH / 16.0), angle, 0, 360, Scalar(255, 129, 0), thickness);
}

void DrawFilledCircle(Mat image, Point center)
{
  circle(image, center, WINDOWS_WIDTH / 32, Scalar(0, 0, 255), -1);
}

void DrawPolygon(Mat image)
{
  Point p[4];
  p[0] = Point(WINDOWS_WIDTH / 6, WINDOWS_WIDTH / 6);
  p[1] = Point(WINDOWS_WIDTH / 2, WINDOWS_WIDTH / 6);
  p[2] = Point(WINDOWS_WIDTH / 6, WINDOWS_WIDTH / 2);
  p[3] = Point(WINDOWS_WIDTH / 2, WINDOWS_WIDTH / 2);

  const Point* pp[1] = { p };
  int npp[] = { 4 };

  fillPoly(image, pp, npp, 1, Scalar(255, 255, 255));
}

void DrawLine(Mat image, Point start, Point end)
{
  line(image, start, end, Scalar(255, 0, 0), 2);
}

int main()
{
  Mat atomImage = Mat::zeros(WINDOWS_WIDTH, WINDOWS_WIDTH, CV_8UC3);
  Mat rookImage = Mat::zeros(WINDOWS_WIDTH, WINDOWS_WIDTH, CV_8UC3);

  DrawEllipse(atomImage, 90);
  DrawEllipse(atomImage, 0);
  DrawEllipse(atomImage, 45);
  DrawEllipse(atomImage, -45);
  DrawFilledCircle(atomImage, Point(WINDOWS_WIDTH / 2, WINDOWS_WIDTH / 2));

  DrawPolygon(rookImage);
  rectangle(rookImage, Point(400, 400), Point(100, 100), Scalar(0, 255, 0), 1, 8);
  DrawLine(rookImage, Point(0, 0), Point(600, 600));
  DrawLine(rookImage, Point(0, 600), Point(600, 0));

  imshow(WINDOWS_NAME_1, atomImage);
  imshow(WINDOWS_NAME_2, rookImage);


  waitKey(0);
  return 0;
}
