NodeMCU实现温湿度数据采集并发送至手机App
NodeMCU实现温湿度数据采集并发送至手机App
由于是之前Arduino项目中的一个分支,又刚巧看到了NodeMCU这款小型WiFi开发板,于是就有了这篇文章。
硬件清单
- NodeMCU开发板
- DHT11温湿度传感器
- LCD1602
- 安卓手机
软件清单
- ArduinoIDE
- Android Studio
一些重要的知识
NodeMCU
基于乐鑫 ESP8266 的 NodeMCU 开发板,具有 GPIO、PWM、I2C、1-Wire、ADC 等功能,结合 NodeMCU 固件为您的原型开发提供最快速的途径。

ESP8266EX 共有 17 个 GPIO 管脚,通过配置适当的寄存器器可以给它们分配不不同的功能。每个 GPIO 都可以配置为内部上拉/下拉,或者配置为⾼高阻。当被配置为输⼊入时,可通过读取寄存器器获取输⼊入值;输⼊入也可以被设置为边缘触发或电平触发来产⽣生 CPU 中断。简⾔言之,IO 管脚是双向、⾮非反相和三态的,带有三态控制的输⼊入和输出缓冲器器。这些管脚可以与其他功能复⽤用,例如 I2C、I2S、UART、PWM、IR 遥控、LED Light 和Button 接⼝口等。在低功耗模式下,GPIO 可被设定为保持状态。例例如,当芯⽚片断电,所有输出使能信号都可以被设定为保持低功耗状态。选择性的保持功能可以应需植⼊入 IO 中。当 IO 不不由内外部电路路驱动时,保持功能可以被⽤用于保持上次的状态。保持功能给管脚引⼊入⼀一些正反馈。因此,管脚的外部驱动必须强于正反馈。脱离保持状态所需的驱动⼒力力很⼩小,在 5 μA 之内。
IIC
LCD1602与NodeMCU之间采用的是IIC串口通信,该通信方式位同步通信半双工通信方式
开始信号,结束信号和应答信号。这些信号中,起始信号是必须的,结束信号和必答信号可以不要。
- 空闲状态:当IIC总线的数据线SDA和时钟线SCL两条信号线同时处于高电平时,规定位总线的空闲状态
- 起始信号:当时钟线SCL处于高电平,数据线SDA从高电平跳到低电平
- 停止信号:当时钟线SCL处于高电平,数据线SDA从低电平跳到高电平
WiFi
WiFi是无线电波传输,采用2.4G频段,实现基站与终端的点到点无线通讯,链路层采用以太网协议为核心,以实现信息传输的寻址和校验。物联网设备通过路由器连接到广域网,然后在一个网络中可以对设备进行远程控制。WiFi的优势是普及面比较广,基本每家都有路由器设备,成本低。WiFi组网方便,协议统一采用TCP/IP协议。缺点:安全性低,稳定性差,对硬件要求比较高,最多只能连接几十台设备,功耗大,延迟大.
ESP8266
包含三种模式
1:STA 模式:ESP8266模块通过路由器连接互联网,手机或电脑通过互联网实现对设备的远程控制。
2:AP 模式:ESP8266模块作为热点,实现手机或电脑直接与模块通信,实现局域网无线控制。
3:STA+AP 模式:两种模式的共存模式,即可以通过互联网控制可实现无缝切换,方便操作。
TCP/IP
TCP 被称为是面向连接的( connection- oriented) ,这是因为在一个应用进程可以开始向另一个应用进程发送数据之前,这两个进程必须先相互"握手",即它们必须相互发送某些预备报文段,以建立确保数据传输的参数。作为TCP 连接建立的一部分,连接的双方都将初始化与TCP 连接相关的许多TCP 状态变量。
- TCP三次握手: 在第一次消息发送中,A随机选取一个序列号作为自己的初始序列号发送给B,此时SYN=1。第二次消息B使用ack对A的数据包确认,因为已接收到A的包,准备x+1接收序列包,所以ack=1,同时B告诉A自己的初始序列号为seq=Y。在第三次消息中,A告诉B收到了B的确认信息并准备建立连接,seq=x+1,ack=Y+1表示A正准备接收B序列号为Y+1的包。
- TCP四次握手:当一方完成数据发送后,发送一个FIN终止这一方向的连接
- Client发送一个FIN,用来关闭Client和Server的数据传送,Client进入FIN_WAIT状态
- Server收到FIN,发哦是那个一个ACK给Client,确认序号为收到序号+1,Server进入Close_WAIT状态
- Server发送FIN,用来关闭Server-Client连接,Server进入LAST——ACK状态
- Client收到FIN,Client进入TIME_WAIT状态,接着发送一个ACK给Server,确认信号+1,Server关闭。
TCP Socket通信
Socket套接字是独立于具体协议的网络接口,Socket接口定义了许多函数或例程,程序员可以用它们来开发TCP/IP网络上的应用程序。
Socket实质上提供了进程通信的端点。进程通信之前,双方首先必须各自创建一个端点,否则是没有办法建立联系并相互通信的。套接字之间的连接过程可以分为三个步骤:服务器监听,客户端请求,连接确认。
1、服务器监听:是服务器端套接字并不定位具体的客户端套接字,而是处于等待连接的状态,实时监控网络状态。
2、客户端请求:是指由客户端的套接字提出连接请求,要连接的目标是服务器端的套接字。为此,客户端的套接字必须首先描述它要连接的服务器的套接字,指出服务器端套接字的地址和端口号,然后就向服务器端套接字提出连接请求。
3、连接确认:是指当服务器端套接字监听到或者说接收到客户端套接字的连接请求,它就响应客户端套接字的请求,建立一个新的线程,把服务器端套接字的描述发给客户端,一旦客户端确认了此描述,连接就建立好了。而服务器端套接字继续处于监听状态,继续接收其他客户端套接字的连接请求。
开发前的准备
Step1 NodeMCU驱动安装
这里就不做过多的阐述啦,有需要的朋友可以参考这篇文章
使用windows系统
NodeMCU驱动,有需要的朋友可以 点击这里 提取码:fcpw
Step2 NodeMCU 搭建ArduinoIDE开发环境配置
这里直接看我写的另一篇文章即可,传送门
硬件电路搭建
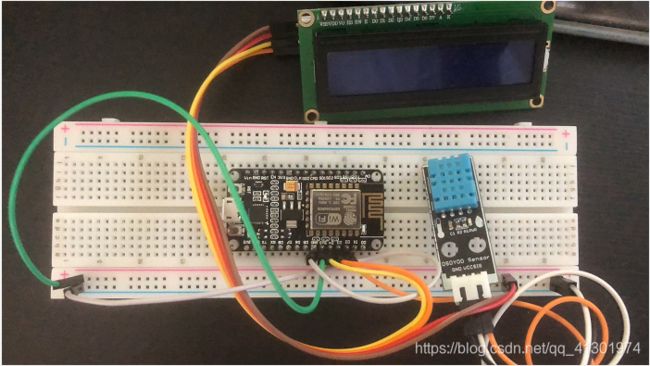
DHT11的数据位连接NodeMCU的D2即GPIO4,LCD1602的SDA连接D4,SCL连接D3,如下图
Arduino软件编写
注释写的蛮清楚的,大家有什么问题可以私信我
#include Android Studio编写APP
Step1 布局activity_main.xml
<androidx.constraintlayout.widget.ConstraintLayout xmlns:android="http://schemas.android.com/apk/res/android"
    xmlns:app="http://schemas.android.com/apk/res-auto"
    xmlns:tools="http://schemas.android.com/tools"
    android:layout_width="match_parent"
    android:layout_height="match_parent"
    tools:context=".MainActivity"
    android:id="@+id/rl_loginactivity_top"
    android:background="@color/colorPrimary">

    <LinearLayout
        android:id="@+id/ll_connectactivity_two"
        android:layout_width="412dp"
        android:layout_height="734dp"
        android:layout_below="@+id/rl_loginactivity_top"
        android:orientation="vertical"
        tools:ignore="MissingConstraints"
        tools:layout_editor_absoluteX="0dp"
        tools:layout_editor_absoluteY="0dp">

        <TextView
            android:id="@+id/textView9"
            android:layout_width="wrap_content"
            android:layout_height="wrap_content"
            android:layout_marginStart="56dp"
            android:layout_marginLeft="56dp"
            android:text="湿度"
            android:textSize="30sp"
            app:layout_constraintStart_toStartOf="parent"
            tools:layout_editor_absoluteY="155dp"
            tools:ignore="MissingConstraints" />
        <TextView
            android:id="@+id/tv_hum"
            android:textSize="30sp"
            android:layout_width="339dp"
            android:layout_height="42dp"
            android:layout_marginStart="56dp"
            android:layout_marginLeft="56dp"
            android:layout_marginTop="8dp"
            android:background="#416B6868"
            app:layout_constraintStart_toStartOf="parent"
            app:layout_constraintTop_toBottomOf="@+id/textView9" />


        <TextView
            android:id="@+id/textView10"
            android:layout_width="wrap_content"
            android:layout_height="wrap_content"
            android:layout_marginStart="56dp"
            android:layout_marginLeft="56dp"
            android:layout_marginTop="36dp"
            android:text="温度"
            android:textFontWeight="50"
            android:textSize="30sp"
            app:layout_constraintStart_toStartOf="parent"
            app:layout_constraintTop_toBottomOf="@+id/tv_hum" />

        <TextView
            android:id="@+id/tv_temp"
            android:layout_width="339dp"
            android:layout_height="42dp"
            android:layout_marginStart="56dp"
            android:layout_marginLeft="56dp"
            android:layout_marginTop="8dp"
            android:background="#416B6868"
            android:textSize="30sp"
            app:layout_constraintStart_toStartOf="parent"
            app:layout_constraintTop_toBottomOf="@+id/textView10" />

    LinearLayout>
androidx.constraintlayout.widget.ConstraintLayout>
其中我的背景色为自定义的蓝色,这里提供一个自定义的颜色文件,该文件在res/values中,文件名为colors.xml
<resources>
    <color name="colorPrimary">#1E90FFcolor>
resources>
创建线程SendThread
class SendThread implements Runnable {

    private String ip;
    private int port;
    BufferedReader in;
    PrintWriter out;      //打印流
    Handler mainHandler;
    Socket s;
    private String receiveMsg;

    ArrayList<String> list = new ArrayList<String>();

    public SendThread(String ip,int port, Handler mainHandler) {     //IP,端口,数据
        this.ip = ip;
        this.port=port;
        this.mainHandler = mainHandler;
    }

    /**
     * 套接字的打开
     */
    void open(){
        try {
            s = new Socket(ip, port);
            //in收单片机发的数据
            in = new BufferedReader(new InputStreamReader(s.getInputStream()));
            out = new PrintWriter(new BufferedWriter(new OutputStreamWriter(
                    s.getOutputStream())), true);
        } catch (IOException e) {
            e.printStackTrace();
        }
    }

    /**
     * 套接字的关闭
     */
    void close(){
        try {
            s.close();
        } catch (IOException e) {
            e.printStackTrace();
        }
    }

    @Override
    public void run() {

        //创建套接字
        open();

        //BufferedReader
        Thread thread = new Thread(new Runnable() {
            @Override
            public void run() {
                while (true) {
                    try {
                        Thread.sleep(200);
                        close();
                        open();
                    } catch (InterruptedException e1) {
                        e1.printStackTrace();
                    }
                    if (!s.isClosed()) {
                        if (s.isConnected()) {
                            if (!s.isInputShutdown()) {
                                try {
                                    Log.i("mr", "等待接收信息");
                                    Message msg=mainHandler.obtainMessage();
                                    char[] chars = new char[1024];					//byte[] bys = new byte[1024];
                                    int len = 0;							//int len = 0;
                                    while((len = in.read(chars)) != -1){
                                        receiveMsg = new String(chars, 0, len);
                                        msg.what=0x00;
                                        msg.obj=receiveMsg;
                                        mainHandler.sendMessage(msg);
                                    }
                                } catch (IOException e) {
                                    Log.i("mr", e.getMessage());
                                    try {
                                        s.shutdownInput();
                                        s.shutdownOutput();
                                        s.close();
                                    } catch (IOException e1) {
                                        e1.printStackTrace();
                                    }
                                    e.printStackTrace();
                                }
                            }
                        }
                    }
                }
            }

        });
        thread.start();

        while (true) {

            //连接中
            if (!s.isClosed()&&s.isConnected()&&!s.isInputShutdown()) {

                // 如果消息集合有东西,并且发送线程在工作。
                if (list.size() > 0 && !s.isOutputShutdown()) {
                    out.println(list.get(0));
                    list.remove(0);
                }

                Message msg=mainHandler.obtainMessage();
                msg.what=0x01;
                mainHandler.sendMessage(msg);
            } else {
                //连接中断了
                Log.i("mr", "连接断开了");
                Message msg=mainHandler.obtainMessage();
                msg.what=0x02;
                mainHandler.sendMessage(msg);
            }
            try {
                Thread.sleep(200);
            } catch (InterruptedException e) {
                try {
                    out.close();
                    in.close();
                    s.close();
                } catch (IOException e1) {
                    e1.printStackTrace();
                }
                e.printStackTrace();
            }
        }

    }

    public void send(String msg) {
        System.out.println("msg的值为:  " + msg);
        list.add(msg);
    }

}
MainActivity.java
package com.example.demoth;

import androidx.appcompat.app.AppCompatActivity;
import androidx.fragment.app.Fragment;
import androidx.fragment.app.FragmentManager;
import androidx.fragment.app.FragmentPagerAdapter;

import android.content.Intent;
import android.graphics.Color;
import android.os.Bundle;
import android.os.Handler;
import android.os.Message;
import android.util.Log;
import android.view.View;
import android.widget.Button;
import android.widget.TextView;

public class MainActivity extends AppCompatActivity {

    /*接收发送定义的常量*/
    private String mIp= "192.168.0.11"; //这里是NodeMCU的IP Address,我们可以通过打开Arduino的串口监视器获取IP Address
    private int mPort = 80; //WiFiServer server(80);建立网络服务器对象,监听端口(80)这里的80是自定义的,只要与Android中的socket一致就好。
    private SendThread sendthread;
    String receive_Msg;
    String l;
    String total0,total1,total2,total3;
    private Button button0;
    public TextView tv_hum;
    public TextView tv_temp;

    /*****************************/

    @Override
    protected void onCreate(Bundle savedInstanceState) {
        super.onCreate(savedInstanceState);
        setContentView(R.layout.activity_main);
        tv_hum = findViewById(R.id.tv_hum);
        tv_temp = findViewById(R.id.tv_temp);

        /***************连接*****************/
        sendthread = new SendThread(mIp, mPort, mHandler);
        Thread1();
        new Thread().start();
        /**********************************/
    }
    /*接收线程*******************************************************************************/
    /**
     * 开启socket连接线程
     */
    void Thread1(){
        new Thread(sendthread).start();//创建一个新线程
    }

    Handler mHandler = new Handler()
    {
        public void handleMessage(Message msg)
        {
            super.handleMessage(msg);
            if (msg.what == 0x00) {
                Log.i("mr_收到的数据: ", msg.obj.toString());
                receive_Msg = msg.obj.toString();
                if(receive_Msg.indexOf("Humidity:")!=-1) {
                    String[] strArray = receive_Msg.split(" "); //处理接受到的数据并将他们显示在TextView中
                    tv_temp.setText(strArray[3] + "C");
                    tv_hum.setText(strArray[1] + "%rh");
                }
            }
        }
    };
}
最终效果图
有一张图和一个视频上传总是失败,有兴趣的小伙伴可以私信我看哦。
NodeMCU实现温湿度数据采集并发送至手机App


