Gitlab备份、迁移、恢复和升级
自建的Gitlab服务器常常会因为使用时间的增长,其空间容量等硬件需求都需要升级,或者迁移至更高配置的服务器上。备份、迁移、恢复、升级过程如下
1、gitlab备份
备份前gitlab的项目如图所示
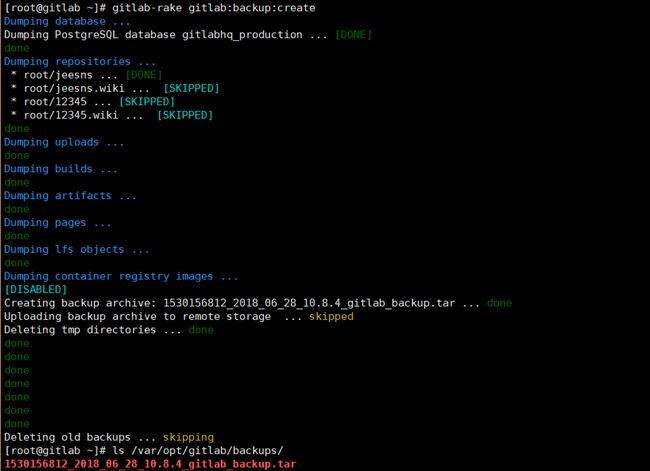
备份时需要保持gitlab处于正常运行状态,直接执行gitlab-rake gitlab:backup:create进行备份
使用以上命令会在/var/opt/gitlab/backups目录下创建一个名称类似为1530156812_2018_06_28_10.8.4_gitlab_backup.tar的压缩包, 这个压缩包就是Gitlab整个的完整部分, 其中开头的1530156812_2018_06_28_10.8.4是备份创建的日期
/etc/gitlab/gitlab.rb 配置文件须备份
/var/opt/gitlab/nginx/conf nginx配置文件
/etc/postfix/main.cfpostfix 邮件配置备份
1.1 修改备份文件目录
可以通过/etc/gitlab/gitlab.rb配置文件来修改默认存放备份文件的目录
gitlab_rails['backup_path'] = "/var/opt/gitlab/backups"
修改完成之后使用gitlab-ctl reconfigure命令重载配置文件即可
1.2 设置备份过期时间
[root@gitlab ~]# vim /etc/gitlab/gitlab.rb
gitlab_rails['backup_keep_time'] = 604800 #以秒为单位
1.3 gitlab自动备份
创建定时任务
[root@gitlab ~]# crontab -e
0 2 * * * /opt/gitlab/bin/gitlab-rake gitlab:backup:create
2、gitlab迁移
迁移的整体思路是:
1、在新服务器上安装相同版本的gitlab
2、将备份生成的备份文件发送到新服务器的相同目录下
这里在10.0.0.6的机器上安装了相同版本的gitlab并能正常运行使用
在老服务器上将备份文件发送至新服务器的相应目录下
[root@gitlab ~]# scp /var/opt/gitlab/backups/1530156812_2018_06_28_10.8.4_gitlab_backup.tar [email protected]:/var/opt/gitlab/backups/
3、gitlab恢复
[root@gitlab ~]# gitlab-ctl stop unicorn #停止相关数据连接服务
[root@gitlab ~]# gitlab-ctl stop sidekiq
[root@gitlab-new ~]# chmod 777 /var/opt/gitlab/backups/1530156812_2018_06_28_10.8.4_gitlab_backup.tar
#修改权限,如果是从本服务器恢复可以不修改
[root@gitlab ~]# gitlab-rake gitlab:backup:restore BACKUP=1530156812_2018_06_28_10.8.4
#从1530156812_2018_06_28_10.8.4编号备份中恢复
按照提示输入两次yes并回车
[root@gitlab ~]# gitlab-ctl start #启动gitlab
浏览器访问新服务器的地址进行查看,迁移成功
在实际情况中访问gitlab可能是用域名访问,我们可以修改gitlab配置文件中的url再进行备份,这样就不会影响迁移过程,恢复完成后需要进行的只是修改域名对应的dns解析ip地址
4、gitlab升级
[root@gitlab ~]# gitlab-ctl stop #关闭gitlab服务
[root@gitlab ~]# gitlab-rake gitlab:backup:create #备份
下载新版gitlab的rpm包安装,安装时选择升级
安装的过程中可能会出现报错
Error executing action `run` on resource 'ruby_block[directory resource: /var/opt/gitlab/git-data/repositories]'
解决方法为
[root@gitlab ~]# chmod 2770 /var/opt/gitlab/git-data/repositories
安装成功后重新加载配置并启动
[root@gitlab ~]# gitlab-ctl reconfigure
[root@gitlab ~]# gitlab-ctl restart
5、gitlab更改默认的nginx
[root@gitlab ~]# vim /etc/gitlab/gitlab.rb
nginx['enable'] = false #不启用nginx
检查默认nginx配置文件,并迁移至新Nginx服务
/var/opt/gitlab/nginx/conf/nginx.conf #nginx配置文件,包含gitlab-http.conf文件
/var/opt/gitlab/nginx/conf/gitlab-http.conf #gitlab核心nginx配置文件
重启 nginx、gitlab服务
[root@gitlab ~]# gitlab-ctl restart
[root@gitlab ~]# systemctl restart nginx.service
访问可能出现报502。原因是nginx用户无法访问gitlab用户的socket文件。 重启gitlab需要重新授权
[root@gitlab ~]# chmod -R o+x /var/opt/gitlab/gitlab-rails
参考来源:http://www.xuliangwei.com/xubusi/803.html


