Spring学习沉淀
Spring学习沉淀
- 基本概念
- Reactive && Servlet
- Reactive
- Servlet
- Spring注解总结
- 装配bean
- 配置类Config
- Bean
- 测试类
- 源码学习
- 依赖注入和控制反转(spring容器)
- 应用上下文(ApplicationContext)
- BeanFactory
- Bean创建过程
- 一个简单的demo:
- IOC容器启动流程
- 面向切面
- AOP基本理论
- SpringAop 和 AspectJ 的关系
- Spring AOP 基本用法及名词解释
- AOP源码解析
- 参考链接:
- 基本流程:
- ProxyFactory详解:
基本概念
来自Spring官网的定义:End-to-end support for reactive & servlet based apps on the JVM.
理解:为在JVM上运行的基于reactive和servlet的应用提供一个端到端的支持(应该是封装了一些基于Reactive和Servlet的应用所应具备的基本逻辑,基于spring框架的开发不用感知这些事情)
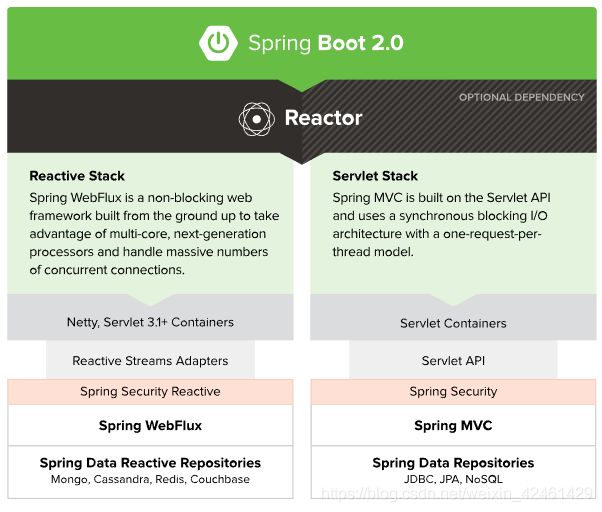
Reactive && Servlet
Reactive
- 定义:Reactive响应式(反应式)编程 是一种新的编程风格
1)react to events对事件立即反应,事件驱动的自然特性使的反应能够立即加载实施,通过避免对共享资源的争用实现可扩展性。
2)react to failure对失败立即反应,在任何级别都可以建立一个能够实现失败恢复的弹性系统。
3)react to users 对用户立即反应,无论任何负载,值得一样的响应时间。
特点:异步或并发、事件驱动、消息通知采用PUSH机制、非阻塞的IO
更多参考:https://www.jdon.com/reactive.html
http://www.reactive-streams.org/
Servlet
- 定义:Java Servlet 是运行在 Web 服务器或应用服务器上的程序,它是作为来自 Web 浏览器或其他 HTTP 客户端的请求和 HTTP 服务器上的数据库或应用程序之间的中间层。
特点:这种编程方式是阻塞的IO、一个请求一个线程
Spring注解总结
装配bean
配置类Config
@Configuration : 标记这个类为一个配置类,这种类用java语法创建对象
@ComponentScan(basePackages = {xxxBean.class , xxxxBean.class}) : 标记在Configuration类上 , 扫描xxxBean.class所在包中带@Component标记的类,不配置时默认会扫描与Config类在同一个包中的类
下被@Component标记的类,并为这些类创建bean
@Bean , 标注在Config类的方法中,告诉Spring这个方法会返回一个对象
@Profile(“环境”) : 表示在该环境中采用这种配置
@Conditional:用在@Bean注解的方法上,给定的条件为true时,会创建这个bean
@PropertySource(“文件路径名”) :声明属性源
Bean
@Component : 标记在普通类中,表明Spring要为这个类创建Bean;
@Component(“id”) = @Named(“id”),给bean定义一个id
@Autowired = @Inject , 注入bean
@Scope(ConfigurableBeanFactory.SCOPE_PROTOTYPE) : 注解在bean上,定义为原型bean,每次注入或者通过Spring应用上下文获取时都会创建一个新的bean实例
测试类
@RunWith(SpringJUnit4ClassRunner.class):标记测试类,在测试开始的时候自动创建Spring应用上下文
@ContextConfiguration(classes = xxx.class)
告诉测试类在哪个Config类中加载配置
@ActiveProfiles(“dev”) : 指定运行测试时要激活那个profile
源码学习
依赖注入和控制反转(spring容器)
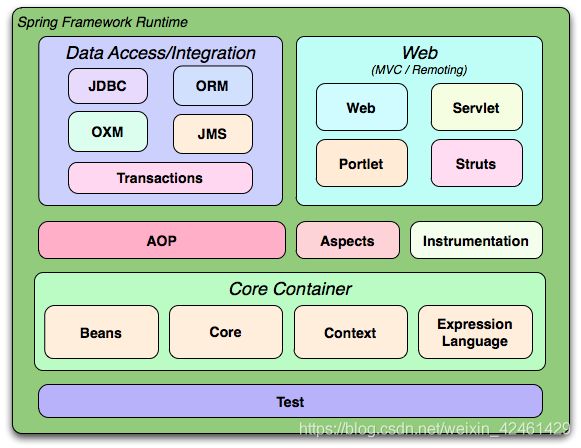
spring的整体架构如图,基础是core container(IOC容器),在此之上才有AOP、DATA和WEB后面的繁荣。spring容器最核心的三个jar包是bean,context,core。bean是spring基石,一切结尾bean,context维护了应用的上下文,如果bean是演员,那么context就是舞台,而core则是道具。
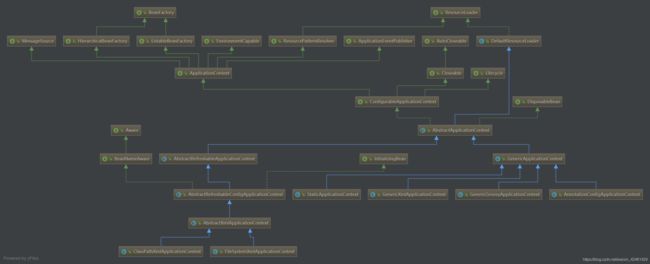
应用上下文(ApplicationContext)
ApplicationConext:从类图的继承关系我们看到基础类ApplicationConext继承了资源,消息,事件,环境,工厂五种能力,ApplicationConext只包含了简单的只读属性。
ConfigurableApplicationContext:继承了生命周期管控能力,同时继承ApplicationConext,拓展了context的环境,事件等写的属性。
AbstractApplicationContext:大部分的能力在该类定义实现,该类继承类加载能力接口DefaultResourceLoader和读写context的ConfigurableApplicationContext,ioc容器启动的流程详细解析该类。
BeanFactory
spring的世界一切皆为bean,几个重要的接口和类
AliasRegistry:别名注册表
BeanFactory:工厂
BeanDefinitionRegistry:
DefaultListableBeanFactory这个收敛了所以上层的能力,具体包含核心的BeanDefinitionRegistry和BeanFactory,也就是bean的定义和生产bean的工厂。
Bean创建过程
一个简单的demo:
- 测试启动类Application
package com.alipay;
import org.springframework.context.ApplicationContext;
import org.springframework.context.support.FileSystemXmlApplicationContext;

/**
 - Unit test for simple App.
 */
public class AppTest
{
	public static void main(String[] args){
		String XMLPath = "springdemo/src/spring-config.xml";
		ApplicationContext applicationContext = new FileSystemXmlApplicationContext(XMLPath);

		ILogin login = (ILogin) applicationContext.getBean("loginService");
		login.loginCheck("boy", "123");
	}
}
- spring配置文件
经过以上几个步骤之后,我们成功的将配置文件里面描述的对象,通过spring的IOC容器创建了出来,而且不需要再使用new的形式来创建对象
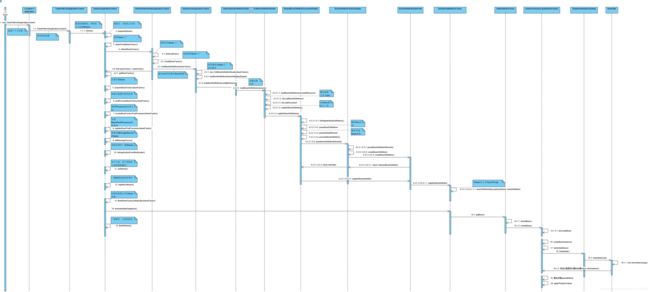
IOC容器启动流程
总体流程图:
类继承图:

- 创建上下文对象
这里调用了FileSystemXmlApplicationContext的构造方法,传入xml文件的路径(相对路径),xml的构造方法进行了下面的调用。
public FileSystemXmlApplicationContext(String configLocation) throws BeansException {
		this(new String[] {configLocation}, true, null);  //this(参数a,参数b,参数c)可以调用另外一个构造函数
	}

public FileSystemXmlApplicationContext(
			String[] configLocations, boolean refresh, @Nullable ApplicationContext parent)
			throws BeansException {

		super(parent);
		setConfigLocations(configLocations);
		if (refresh) {
			refresh();  // 核心方法
		}
	}
- 核心方法refresh解读
@Override
	public void refresh() throws BeansException, IllegalStateException {
		synchronized (this.startupShutdownMonitor) {
			// Prepare this context for refreshing.
			prepareRefresh();

			// Tell the subclass to refresh the internal bean factory.
			ConfigurableListableBeanFactory beanFactory = obtainFreshBeanFactory();

			// Prepare the bean factory for use in this context.
			prepareBeanFactory(beanFactory);

			try {
				// Allows post-processing of the bean factory in context subclasses.
				postProcessBeanFactory(beanFactory);

				// Invoke factory processors registered as beans in the context.
				invokeBeanFactoryPostProcessors(beanFactory);

				// Register bean processors that intercept bean creation.
				registerBeanPostProcessors(beanFactory);

				// Initialize message source for this context.
				initMessageSource();

				// Initialize event multicaster for this context.
				initApplicationEventMulticaster();

				// Initialize other special beans in specific context subclasses.
				onRefresh();

				// Check for listener beans and register them.
				registerListeners();

				// Instantiate all remaining (non-lazy-init) singletons.
				finishBeanFactoryInitialization(beanFactory);

				// Last step: publish corresponding event.
				finishRefresh();
			}

			catch (BeansException ex) {
				if (logger.isWarnEnabled()) {
					logger.warn("Exception encountered during context initialization - " +
							"cancelling refresh attempt: " + ex);
				}

				// Destroy already created singletons to avoid dangling resources.
				destroyBeans();

				// Reset 'active' flag.
				cancelRefresh(ex);

				// Propagate exception to caller.
				throw ex;
			}

			finally {
				// Reset common introspection caches in Spring's core, since we
				// might not ever need metadata for singleton beans anymore...
				resetCommonCaches();
			}
		}
	}
refresh方法用于启动IOC容器,整个操作包含在一个同步代码块中,同步锁是一个private final 访问权限的object。refresh方法主要包含以下几个步骤:
2.1 容器初始化之前的初始化工作(prepareRefresh())
用到的数据结构和类型:AtomicBoolean 和 LinkedHashSet , 为什么要用这两个东西 ?
AtomicBoolean可以保证操作原子性 ; LinkedHashSet集合也是根据元素hashCode值来决定元素存储位置,但它同时使用链表维护元素的次序,这样使得元素看起来是以插入的顺序保存的。
2.2 创建BeanFactory(obtainFreshBeanFactory()),这个是整个IOC容器启动流程的两大核心模块之一 ,主要包含两个步骤:
2.2.1 重置BeanFactory,存在则销毁,不存在则创(refreshBeanFactory())
destroyBeans() 解读:
1)销毁对象时AbstractApplicationContext中先通过getBeanFactory()获得一个ConfigurableListableBeanFactory 对象(这是一个接口,具体实现是DefaultListableBeanFactory extends AbstractAutowireCapableBeanFactory extends AbstractBeanFactory extends FactoryBeanRegistrySupport extends DefaultSingletonBeanRegistry)
2)调用ConfigurableListableBeanFactory.destroySingletons()方法
2.1)这个方法中会调用父类方法DefaultSingletonBeanRegistry.destroySingletons() -> 这个方法会调用DefaultSingletonBeanRegistry.destroySingleton(String beanName)
这个方法会做的操作就是根据beanName把几个map中这个beanName对应的记录都移除
public void destroySingleton(String beanName) {
		// Remove a registered singleton of the given name, if any.
		removeSingleton(beanName);

		// Destroy the corresponding DisposableBean instance.
		DisposableBean disposableBean;
		synchronized (this.disposableBeans) {
			disposableBean = (DisposableBean) this.disposableBeans.remove(beanName);
		}
		destroyBean(beanName, disposableBean);
	}
removeSingleton方法
protected void removeSingleton(String beanName) {
		synchronized (this.singletonObjects) {
			this.singletonObjects.remove(beanName);
			this.singletonFactories.remove(beanName);
			this.earlySingletonObjects.remove(beanName);
			this.registeredSingletons.remove(beanName);
		}
	}
singletonObjects是一个ConcurrentHashMap
singletonFactories是一个HashMap
earlySingletonObjects是一个HashMap
registeredSingletons是一个LinkedHashSet
disposableBeans是一个LinkedHashMap
destroyBean()方法
protected void destroyBean(String beanName, @Nullable DisposableBean bean) {
		// Trigger destruction of dependent beans first...
		Set dependencies;
		synchronized (this.dependentBeanMap) {
			// Within full synchronization in order to guarantee a disconnected Set
			dependencies = this.dependentBeanMap.remove(beanName);
		}
		if (dependencies != null) {
			if (logger.isTraceEnabled()) {
				logger.trace("Retrieved dependent beans for bean '" + beanName + "': " + dependencies);
			}
			for (String dependentBeanName : dependencies) {
				destroySingleton(dependentBeanName);
			}
		}

		// Actually destroy the bean now...
		if (bean != null) {
			try {
				bean.destroy();
			}
			catch (Throwable ex) {
				if (logger.isWarnEnabled()) {
					logger.warn("Destruction of bean with name '" + beanName + "' threw an exception", ex);
				}
			}
		}

		// Trigger destruction of contained beans...
		Set containedBeans;
		synchronized (this.containedBeanMap) {
			// Within full synchronization in order to guarantee a disconnected Set
			containedBeans = this.containedBeanMap.remove(beanName);
		}
		if (containedBeans != null) {
			for (String containedBeanName : containedBeans) {
				destroySingleton(containedBeanName);
			}
		}

		// Remove destroyed bean from other beans' dependencies.
		synchronized (this.dependentBeanMap) {
			for (Iterator>> it = this.dependentBeanMap.entrySet().iterator(); it.hasNext();) {
				Map.Entry> entry = it.next();
				Set dependenciesToClean = entry.getValue();
				dependenciesToClean.remove(beanName);
				if (dependenciesToClean.isEmpty()) {
					it.remove();
				}
			}
		}

		// Remove destroyed bean's prepared dependency information.
		this.dependenciesForBeanMap.remove(beanName);
	}
整体逻辑,删除这个bean前要先删除依赖它的bean。
(1)dependentBeanMap 中这个beanName作为key对应的value不为空时,需要先destroy依赖它的bean
(2)containedBeanMap 中这个beanName作为key对应的value不为空是,需要删除它包含的bean
(3)把这个bean从它依赖的bean的依赖关系中删除,删除过程用到了迭代器
先获取指向这个map.entrySet()的迭代器,先把beanName从每个entry对应的set中移除(dependenciesToClean.remove(beanName)),如果最后这个set为空,则把整个entry移除(it.remove())
2.2)updateManualSingletonNames()
清理完map之后会更新单例的名字,此处用到很多jdk8的东西
updateManualSingletonNames(Set::clear, set -> !set.isEmpty());
第一个函数表达式入参为一个consumer接口,代表了 接受一个输入参数并且无返回的操作
第二个函数表达式入参为一个Predicate断言型函数式接口,接受一个输入参数,返回一个布尔值结果。
代码:
private void updateManualSingletonNames(Consumer> action, Predicate> condition) {
		if (hasBeanCreationStarted()) {
			// Cannot modify startup-time collection elements anymore (for stable iteration)
			synchronized (this.beanDefinitionMap) {
				if (condition.test(this.manualSingletonNames)) {
					Set updatedSingletons = new LinkedHashSet<>(this.manualSingletonNames);
					action.accept(updatedSingletons);
					this.manualSingletonNames = updatedSingletons;
				}
			}
		}
		else {
			// Still in startup registration phase
			if (condition.test(this.manualSingletonNames)) {
				action.accept(this.manualSingletonNames);
			}
		}
	}
如果Bean已经创建了,不能直接清除manualSingletonNames(后面看为什么),先判断manualSingletonNames是否为空,不为空则根据manualSingletonNames新建一个set,然后把这个set清空,然后在把manualSingletonNames指向这个set(为什么?)
jdk8 :: 的用法:https://blog.csdn.net/csmans/article/details/82256690
createBeanFactory()解读
DefaultListableBeanFactory beanFactory = createBeanFactory();
createBeanFactory ->
return new DefaultListableBeanFactory(getInternalParentBeanFactory());
@Nullable
	protected BeanFactory getInternalParentBeanFactory() {
		return (getParent() instanceof ConfigurableApplicationContext ?
				((ConfigurableApplicationContext) getParent()).getBeanFactory() : getParent());
	}
ApplicationContext 继承了BeanFactory接口
loadBeanDefinitions()解读
(1)作用:加载配置在xml文件中的bean定义,通过XmlBeanDefinitionReader
官方解释:
The lifecycle of the bean factory is handled by the {@link #refreshBeanFactory}method; hence this method is just supposed to load and/or register bean definitions.
(2)实际从xml文件读取bean定义的方法:
XmlBeanDefinitionReader.doLoadBeanDefinitions(InputSource inputSource, Resource resource)
Document doc = doLoadDocument(inputSource, resource);
			int count = registerBeanDefinitions(doc, resource);
			if (logger.isDebugEnabled()) {
				logger.debug("Loaded " + count + " bean definitions from " + resource);
			}
			return count;
1)Document doc = doLoadDocument(inputSource, resource); 根据xml文件生成Document 对象
xml到dom对象的解析方法:https://www.cnblogs.com/shenliang123/archive/2012/05/11/2495252.html
protected Document doLoadDocument(InputSource inputSource, Resource resource) throws Exception {
		return this.documentLoader.loadDocument(inputSource, getEntityResolver(), this.errorHandler,
				getValidationModeForResource(resource), isNamespaceAware());
	}
2)int count = registerBeanDefinitions(doc, resource); 注册bean,返回文件中找到的bean的数量
protected void doRegisterBeanDefinitions(Element root) {
		// Any nested  elements will cause recursion in this method. In
		// order to propagate and preserve  default-* attributes correctly,
		// keep track of the current (parent) delegate, which may be null. Create
		// the new (child) delegate with a reference to the parent for fallback purposes,
		// then ultimately reset this.delegate back to its original (parent) reference.
		// this behavior emulates a stack of delegates without actually necessitating one.
		BeanDefinitionParserDelegate parent = this.delegate;
		this.delegate = createDelegate(getReaderContext(), root, parent);

		if (this.delegate.isDefaultNamespace(root)) {
			String profileSpec = root.getAttribute(PROFILE_ATTRIBUTE);
			if (StringUtils.hasText(profileSpec)) {
				String[] specifiedProfiles = StringUtils.tokenizeToStringArray(
						profileSpec, BeanDefinitionParserDelegate.MULTI_VALUE_ATTRIBUTE_DELIMITERS);
				// We cannot use Profiles.of(...) since profile expressions are not supported
				// in XML config. See SPR-12458 for details.
				if (!getReaderContext().getEnvironment().acceptsProfiles(specifiedProfiles)) {
					if (logger.isDebugEnabled()) {
						logger.debug("Skipped XML bean definition file due to specified profiles [" + profileSpec +
								"] not matching: " + getReaderContext().getResource());
					}
					return;
				}
			}
		}

		preProcessXml(root);
		parseBeanDefinitions(root, this.delegate);
		postProcessXml(root);

		this.delegate = parent;
	}
在DefaultBeanDefinitionDocumentReader处理Document元素时,将Document文档内元素具体解析工作委托给BeanDefinitionParserDelegate类来处理,默认BeanDefinitionParserDelegate会处理”http://www.springframework.org/schema/beans“命名空间下元素及其属性
遍历root下的所有子节点元素,注册bean的代码
/**
	 * Register the given bean definition with the given bean factory.
	 * @param definitionHolder the bean definition including name and aliases
	 * @param registry the bean factory to register with
	 * @throws BeanDefinitionStoreException if registration failed
	 */
	public static void registerBeanDefinition(
			BeanDefinitionHolder definitionHolder, BeanDefinitionRegistry registry)
			throws BeanDefinitionStoreException {

		// Register bean definition under primary name.
		String beanName = definitionHolder.getBeanName();
		registry.registerBeanDefinition(beanName, definitionHolder.getBeanDefinition());

		// Register aliases for bean name, if any.
		String[] aliases = definitionHolder.getAliases();
		if (aliases != null) {
			for (String alias : aliases) {
				registry.registerAlias(beanName, alias);
			}
		}
	}
注册bean时调用DefaultListableBeanFactory.registerBeanDefinition()方法,注册的时候会向beanDefinitionMap 和 beanDefinitionNames 中加入
2.2.2 返回创建的新工厂(getBeanFactory()),最后得到一个ConfigurableListableBeanFactory 对象
在重置refreshBeanFactory()时会获取bean的定义(loadBeanDefinitions()):包括
读取配置文件 -> 解析配置文件(将单个xml配置文件里面的标签属性映射到BeanDefinitionHolder对象里面)->注册对象(在beanDefinitionMap增加beanDefinition)
2.3 对象实例化
finishBeanFactoryInitialization(beanFactory) -> 调用beanFactory.preInstantiateSingletons() 实例化对象
2.3.1 实例化对象时,先实例化这个bean依赖的bean,再实例化这个bean
创建bean的方法
if (instanceWrapper == null) {
			instanceWrapper = createBeanInstance(beanName, mbd, args);
}
创建bean的核心方法:
return BeanUtils.instantiateClass(constructorToUse); -> ctor.newInstance(argsWithDefaultValues)
(ctor是一个Constructor 类,通过反射构造出对象)
2.4 对象属性初始化
初始化bean属性的方法
// Initialize the bean instance.
Object exposedObject = bean;
try {
	populateBean(beanName, mbd, instanceWrapper);
	exposedObject = initializeBean(beanName, exposedObject, mbd);
}
polulateBean()方法初始化bean的属性 -> 调用了
AbstractAutowireCapableBeanFactory.applyPropertyValues()
(1) new 一个深拷贝列表:List deepCopy = new ArrayList<>(original.size());
(2)然后把List original 里面的属性都添加到deepCopy中
(3)最后把值通过beanwrapper的方法设置进对象属性,bw.setPropertyValues(new MutablePropertyValues(deepCopy));
面向切面
参考:https://juejin.im/entry/5b572405e51d451964625f66
AOP基本理论
SpringAop 和 AspectJ 的关系
AspectJ 能干很多 Spring AOP 干不了的事情,它是 AOP 编程的完全解决方案。Spring AOP 致力于解决的是企业级开发中最普遍的 AOP 需求(方法织入),而不是力求成为一个像 AspectJ 一样的 AOP 编程完全解决方案。
因为 AspectJ 在实际代码运行前完成了织入,Spring AOP 是基于代理实现的,在容器启动的时候需要生成代理实例,在方法调用上也会增加栈的深度,使得 Spring AOP 的性能不如 AspectJ 那么好。
(代理模式需要一个接口、一个具体实现类,然后就是定义一个代理类,用来包装实现类,添加自定义逻辑,在使用的时候,需要用代理类来生成实例)
Spring AOP 只能作用于 Spring 容器中的 Bean,它是使用纯粹的 Java 代码实现的,只能作用于 bean 的方法。
Spring 延用了 AspectJ 中的概念,包括使用了 AspectJ 提供的 jar 包中的注解,但是不依赖于其实现功能。
Spring AOP 基本用法及名词解释
-
Spring AOP的几种基本使用方法
Spring 1.2 基于接口的配置:最早的 Spring AOP 是完全基于几个接口的,想看源码的同学可以从这里起步。
Spring 2.0 schema-based 配置:Spring 2.0 以后使用 XML 的方式来配置,使用 命名空间
Spring 2.0 @AspectJ 配置:使用注解的方式来配置,这种方式感觉是最方便的,还有,这里虽然叫做 @AspectJ,但是这个和 AspectJ 其实没啥关系 -
Spring AOP的名字解释
2.1 我们来理解 Advisor 的概念,它也比较简单,它内部需要指定一个 Advice,Advisor 决定该拦截哪些方法,拦截后需要完成的工作还是内部的 Advice 来做。
2.2 Spring AOP 只支持 bean 中的方法(不像 AspectJ 那么强大),所以我们可以认为 Pointcut 就是用来匹配 Spring 容器中的所有 bean 的方法的
对于开发者来说,其实最重要的就是这两个了,定义 Pointcut 和使用合适的 Advice 在各个 Pointcut 上
AOP源码解析
参考链接:
https://juejin.im/entry/5b572405e51d451964625f66
基本流程:
ioc容器在启动创建有方法需要注入aop切面的bean时,会调用beanPostProcessor.postProcessAfterInitialization(Object bean,String beanName)接口方法,具体实现为AbstractAutoProxyCreator.createProxy(ClassbeanClass,String beanName,Object[] specificInterceptors,TargetSource targetSource)
这个方法内会创建一个ProxyFactory,然后调用proxyFactory.getProxy(getProxyClassLoader())方法,最后返回这个bean的aop代理。
ProxyFactory详解:
proxyFactory.getProxy(getProxyClassLoader()) 会依次调用ProxyFactory的如下方法:
- getProxy()
public Object getProxy(@Nullable ClassLoader classLoader) {
		return createAopProxy().getProxy(classLoader);
	}
- createAopProxy() : 这个是ProxyFactory继承自ProxyCreatorSupport的方法
protected final synchronized AopProxy createAopProxy() {
		if (!this.active) {
			activate();
		}
		return getAopProxyFactory().createAopProxy(this);
	}
- AopProxyFactory.createAopProxy(AdvisedSupport config)
public AopProxy createAopProxy(AdvisedSupport config) throws AopConfigException {
		if (config.isOptimize() || config.isProxyTargetClass() || hasNoUserSuppliedProxyInterfaces(config)) {
			Class<?> targetClass = config.getTargetClass();
			if (targetClass == null) {
				throw new AopConfigException("TargetSource cannot determine target class: " +
						"Either an interface or a target is required for proxy creation.");
			}
			if (targetClass.isInterface() || Proxy.isProxyClass(targetClass)) {
				return new JdkDynamicAopProxy(config);
			}
			return new ObjenesisCglibAopProxy(config);
		}
		else {
			return new JdkDynamicAopProxy(config);
		}
	}
创建一个jdk动态代理类或者Cglib代理类,默认情况下config.isOptimize()和config.isProxyTargetClass()为fasle。
hasNoUserSuppliedProxyInterfaces(config)判断是否有实现自定义的接口,如果被代理的目标类实现了一个或多个自定义的接口,那么就会使用 JDK 动态代理,如果没有实现任何接口,会使用 CGLIB 实现代理,如果设置了 proxy-target-class=“true”,那么都会使用 CGLIB。
那么(targetClass.isInterface() || Proxy.isProxyClass(targetClass))这个判断逻辑有什么用呢?如果要代理的类本身就是接口 或者 java.lang.reflect.Proxy.isProxyClass(Class cl)方法当且仅当使用getProxyClass方法或newProxyInstance方法将指定的类动态生成为代理类时,方法才返回true
下面分析返回JdkDynamicAopProxy代理类的情况:
@Override
public Object getProxy(ClassLoader classLoader) {
   if (logger.isDebugEnabled()) {
      logger.debug("Creating JDK dynamic proxy: target source is " + this.advised.getTargetSource());
   }
   //根据aop配置(this.advised),获取需要代理的所有接口
   Class<?>[] proxiedInterfaces = AopProxyUtils.completeProxiedInterfaces(this.advised, true);
   //找到代理方法
   findDefinedEqualsAndHashCodeMethods(proxiedInterfaces);
   //新建代理实例,this为是 InvocationHandler 实例,我们看到这里传了 this,因为 JdkDynamicAopProxy 本身实现了 InvocationHandler 接口
   return Proxy.newProxyInstance(classLoader, proxiedInterfaces, this);
}
invocationHandler(to study)只有一个方法,当生成的代理类对外提供服务的时候,都会导到这个方法中,JdkDynamicAopProxy对其进行了实现。
难点:为什么配置了
>
就能实现自动代理?
DefaultAdvisorAutoProxyCreator这个bean的作用最主要在于在初始化完这个bean后AbstractBeanFactory 中的beanPostProcessors列表中会新增一个AbstractAutoProxyCreator实例。
然后在其它bean初始化时在调用Object current = processor.postProcessAfterInitialization(result, beanName); 方法时,
会调用到AbstractAutoProxyCreator.postProcessAfterInitialization(Object bean, String beanName)方法。