spring oauth2实现数据库存储token
之前我有写过一篇关于spring oauth2的学习笔记,当时的实现是使用了在内存中定死了用户,然后将token存到redis中,可以说是一种比较简单的实现方式。
这篇文章是在之前的基础上迈了一小步,可以实现从数据库读取用户,并将token存储到数据库中。这样就可以满足一般的基本生产需求了。
当然还有更加深入的将client信息保存到数据库,使用jwt等等,由于我没有深入的了解,并且也不需要如此复杂的系统,所以就不献丑了,想要了解的朋友可以去查一下相关资料。
GitHub项目地址
参考文章:
https://www.jianshu.com/p/ded9dc32f550
https://wiselyman.iteye.com/blog/2379419
oauth2服务器
一般来说,我们会将oauth2的服务器和用户管理整合到一起,也就是说,和用户相关的一些操作都在这里,并且使用oauth2做一些认证。
所以首先就是我使用常用的账户管理:用户及权限角色
package com.yubotao.springOAuth2.model;

import lombok.Getter;
import lombok.Setter;

import javax.persistence.*;
import java.util.List;

/**
 * @Auther: yubt
 * @Description:
 * @Date: Created in 14:45 2018/12/17
 * @Modified By:
 */
@Entity
@Table(name = "account")
public class Account {
    @Id
    @GeneratedValue(strategy = GenerationType.IDENTITY)
    @Getter
    @Setter
    @Column(name = "id")
    private Long id;
    @Getter
    @Setter
    @Column(name = "username")
    private String username;
    @Getter
    @Setter
    @Column(name = "password")
    private String password;
    @Getter
    @Setter
    @OneToMany(mappedBy = "account")
    private List<AccountRole> accountRoles;
}
package com.yubotao.springOAuth2.model;

import lombok.Getter;
import lombok.Setter;

import javax.persistence.*;

/**
 * @Auther: yubt
 * @Description:
 * @Date: Created in 14:44 2018/12/17
 * @Modified By:
 */
@Entity
@Table(name = "role")
public class Role {
    @Id
    @GeneratedValue(strategy = GenerationType.IDENTITY)
    @Getter
    @Setter
    @Column(name = "id")
    private Long id;
    @Getter
    @Setter
    @Column(name = "name")
    private String name;
}
由于用户和角色间是多对多关系,所以有一个中间类
package com.yubotao.springOAuth2.model;

import lombok.Getter;
import lombok.Setter;

import javax.persistence.*;

/**
 * @Auther: yubt
 * @Description:
 * @Date: Created in 14:45 2018/12/17
 * @Modified By:
 */
@Entity
@Table(name = "account_role")
public class AccountRole {
    @Id
    @GeneratedValue(strategy = GenerationType.IDENTITY)
    @Getter
    @Setter
    @Column(name = "id")
    private Long id;
    @Getter
    @Setter
    @JoinColumn(name = "role_id")
    @ManyToOne
    private Role role;
    @Getter
    @Setter
    @ManyToOne
    @JoinColumn(name = "account_id")
    private Account account;
}
接着使用jpa简单的实现了一下查询方法
package com.yubotao.springOAuth2.jpa;

import com.yubotao.springOAuth2.model.Account;
import org.springframework.data.jpa.repository.JpaRepository;
import org.springframework.data.jpa.repository.Query;
import org.springframework.data.repository.query.Param;

/**
 * @Auther: yubt
 * @Description:
 * @Date: Created in 16:59 2018/12/17
 * @Modified By:
 */
public interface AccountJpa extends JpaRepository<Account, String> {
    @Query("SELECT u FROM Account u WHERE LOWER(u.username) = LOWER(:username)")
    Account findAccountByUsername(@Param("username") String username);
}
package com.yubotao.springOAuth2.jpa;

import com.yubotao.springOAuth2.model.Account;
import com.yubotao.springOAuth2.model.AccountRole;
import org.springframework.data.jpa.repository.JpaRepository;
import org.springframework.data.jpa.repository.Query;
import org.springframework.data.repository.query.Param;

import java.util.List;

/**
 * @Auther: yubt
 * @Description:
 * @Date: Created in 17:14 2018/12/17
 * @Modified By:
 */
public interface ARJpa extends JpaRepository<AccountRole, String> {
    @Query("SELECT ar FROM AccountRole ar WHERE LOWER(ar.account) = LOWER(:account)")
    List<AccountRole> findAccountRolesByAccount(@Param("account") Account account);
}
然后我们需要开始进行相关的安全设置。
spring security
package com.yubotao.springOAuth2.config;

import org.springframework.beans.factory.annotation.Autowired;
import org.springframework.context.annotation.Bean;
import org.springframework.context.annotation.Configuration;
import org.springframework.security.authentication.AuthenticationManager;
import org.springframework.security.config.annotation.authentication.builders.AuthenticationManagerBuilder;
import org.springframework.security.config.annotation.web.builders.HttpSecurity;
import org.springframework.security.config.annotation.web.configuration.EnableWebSecurity;
import org.springframework.security.config.annotation.web.configuration.WebSecurityConfigurerAdapter;
import org.springframework.security.crypto.bcrypt.BCryptPasswordEncoder;
import org.springframework.security.crypto.password.PasswordEncoder;

/**
 * @Auther: yubt
 * @Description:
 * @Date: Created in 10:51 2018/7/26
 * @Modified By:
 */
@Configuration
@EnableWebSecurity
public class SecurityConfiguration extends WebSecurityConfigurerAdapter {
	// 自定义UserDetailsService实现
    @Autowired
    CustomUserDetailsService userDetailsService;

    // 内存用法
//    @Bean
//    @Override
//    protected UserDetailsService userDetailsService(){
//        BCryptPasswordEncoder bCryptPasswordEncoder = new BCryptPasswordEncoder();
//        String finalPassword = "{bcrypt}" + bCryptPasswordEncoder.encode("123456");
//        InMemoryUserDetailsManager manager = new InMemoryUserDetailsManager();
//        manager.createUser(User.withUsername("user_1").password(finalPassword).authorities("ADMIN").build());
//        manager.createUser(User.withUsername("user_2").password(finalPassword).authorities("USER").build());
//        return manager;
//    }

    @Bean
    PasswordEncoder passwordEncoder(){
        return new BCryptPasswordEncoder();
    }

//    public static void main(String[] args) {
//        System.out.println(new  BCryptPasswordEncoder().encode("admin"));
//    }

    @Autowired
    public void config(AuthenticationManagerBuilder auth) throws Exception{
        //设置UserDetailsService以及密码规则
        auth.userDetailsService(userDetailsService).passwordEncoder(passwordEncoder());
    }

    /**
     * 这一步的配置是必不可少的,否则SpringBoot会自动配置一个AuthenticationManager,覆盖掉内存中的用户
    * */
    @Bean
    @Override
    public AuthenticationManager authenticationManagerBean() throws Exception {
        AuthenticationManager manager = super.authenticationManagerBean();
        return manager;
    }

    @Override
    protected void configure(HttpSecurity http) throws Exception {
        http
                .requestMatchers().anyRequest()
                .and()
                .authorizeRequests()
                .antMatchers("/oauth/**").permitAll();
    }

}
spring oauth2
package com.yubotao.springOAuth2.config;

import org.springframework.beans.factory.annotation.Autowired;
import org.springframework.context.annotation.Bean;
import org.springframework.context.annotation.Configuration;
import org.springframework.context.annotation.Primary;
import org.springframework.http.HttpMethod;
import org.springframework.security.authentication.AuthenticationManager;
import org.springframework.security.config.annotation.web.builders.HttpSecurity;
import org.springframework.security.config.http.SessionCreationPolicy;
import org.springframework.security.crypto.bcrypt.BCryptPasswordEncoder;
import org.springframework.security.oauth2.config.annotation.configurers.ClientDetailsServiceConfigurer;
import org.springframework.security.oauth2.config.annotation.web.configuration.*;
import org.springframework.security.oauth2.config.annotation.web.configurers.AuthorizationServerEndpointsConfigurer;
import org.springframework.security.oauth2.config.annotation.web.configurers.AuthorizationServerSecurityConfigurer;
import org.springframework.security.oauth2.config.annotation.web.configurers.ResourceServerSecurityConfigurer;
import org.springframework.security.oauth2.provider.token.AuthorizationServerTokenServices;
import org.springframework.security.oauth2.provider.token.DefaultTokenServices;
import org.springframework.security.oauth2.provider.token.TokenStore;
import org.springframework.security.oauth2.provider.token.store.JdbcTokenStore;

import javax.sql.DataSource;

/**
 * @Auther: yubt
 * @Description:
 * @Date: Created in 10:07 2018/7/26
 * @Modified By:
 */
@Configuration
public class OAuth2ServerConfig {

    private static final String DEMO_RESOURCE_ID = "order";

    @Configuration
    // 资源服务器
    @EnableResourceServer
    protected static class ResourceServerConfiguration extends ResourceServerConfigurerAdapter {
        @Autowired
        private AuthExceptionEntryPoint authExceptionEntryPoint;

        @Override
        public void configure(ResourceServerSecurityConfigurer resources){
            resources.resourceId(DEMO_RESOURCE_ID).stateless(true);
            resources.authenticationEntryPoint(new AuthExceptionEntryPoint());
        }

        @Override
        public void configure(HttpSecurity http) throws Exception {
            // @formatter:off
            http.exceptionHandling().authenticationEntryPoint(authExceptionEntryPoint)
                    .and()
                    .sessionManagement().sessionCreationPolicy(SessionCreationPolicy.IF_REQUIRED)
                    .and()
                    .requestMatchers().anyRequest()
                    .and()
                    .anonymous()
                    .and()
                    .authorizeRequests()
                    // or可以通过access_token访问,但是and不行;经过测试,应该是hasRole()方法出了问题,这里无法通过
//                    .antMatchers("/product/**").access("#oauth2.hasScope('select') and  hasRole('ROLE_ADMIN')")
                    .antMatchers("/order/**").authenticated();  // 配置order访问控制,必须认证过后才可以访问
            // @formatter:on
        }

    }

    @Configuration
//    身份认证服务器
    @EnableAuthorizationServer
    protected static class AuthorizationServerConfiguration extends AuthorizationServerConfigurerAdapter {
        @Autowired
        AuthenticationManager authenticationManager;
//        @Autowired
//        RedisConnectionFactory redisConnectionFactory;
//        @Autowired
//        UserDetailsService userDetailsService;
        @Autowired
        private DataSource dataSource;
        @Autowired
        private CustomUserDetailsService userDetailsService;


        @Override
        public void configure(ClientDetailsServiceConfigurer clients) throws Exception {
            String finalSecret = new BCryptPasswordEncoder().encode("123456");
            // 配置两个客户端,一个用于password认证,一个用于client认证
            clients.inMemory().withClient("client_1")
                    .resourceIds(DEMO_RESOURCE_ID)
                    .authorizedGrantTypes("client_credentials")
                    .scopes("select")
                    .authorities("oauth2")
                    .secret(finalSecret)
                    .and()
                    .withClient("client_2")
                    .resourceIds(DEMO_RESOURCE_ID)
                    .authorizedGrantTypes("password", "refresh_token")
                    .scopes("select")
                    .authorities("oauth2")
                    .secret(finalSecret);
        }

        // 用来对token进行相关设置,比如设置token有效时长
        @Primary
        @Bean
        public AuthorizationServerTokenServices tokenServices() {
            DefaultTokenServices defaultTokenServices = new DefaultTokenServices();
            defaultTokenServices.setAccessTokenValiditySeconds(1000000);
            defaultTokenServices.setRefreshTokenValiditySeconds(200000);
            defaultTokenServices.setSupportRefreshToken(true);
            defaultTokenServices.setReuseRefreshToken(false);
            defaultTokenServices.setTokenStore(tokenStore());
            return defaultTokenServices;
        }

        @Bean
        @Primary
        public TokenStore tokenStore() {
//            TokenStore tokenStore = new InMemoryTokenStore();
            return new JdbcTokenStore(dataSource);
        }


        @Override
        public void configure(AuthorizationServerEndpointsConfigurer endpoints) throws Exception {
            endpoints
                    .tokenStore(tokenStore())
//                    .tokenStore(new RedisTokenStore(redisConnectionFactory))
//                    .tokenServices(tokenServices())
                    .authenticationManager(authenticationManager)
                    // 没有它,在使用refresh_token的时候会报错 IllegalStateException, UserDetailsService is required.
                    .userDetailsService(userDetailsService)
                    // 不加报错"method_not_allowed",
                    .allowedTokenEndpointRequestMethods(HttpMethod.GET,HttpMethod.GET);
        }

        @Override
        public void configure(AuthorizationServerSecurityConfigurer oauthServer) throws Exception {
            // 允许表单认证
            oauthServer.allowFormAuthenticationForClients();
        }
    }

}
资源服务器就不用多说了,主要是在身份认证服务器做一些小的修改。首先就是TokenStore的设置,使用了数据库模式;然后在配置AuthorizationServerEndpointsConfigurer时,设置好对应的tokenStore以及userDetailsService(也就是我们自定义的)。
自定义UserDetailsService
package com.yubotao.springOAuth2.config;

import com.yubotao.springOAuth2.exception.CustomException;
import com.yubotao.springOAuth2.jpa.ARJpa;
import com.yubotao.springOAuth2.jpa.AccountJpa;
import com.yubotao.springOAuth2.model.Account;
import com.yubotao.springOAuth2.model.AccountRole;
import com.yubotao.springOAuth2.model.Role;
import org.springframework.beans.factory.annotation.Autowired;
import org.springframework.security.core.GrantedAuthority;
import org.springframework.security.core.authority.SimpleGrantedAuthority;
import org.springframework.security.core.userdetails.User;
import org.springframework.security.core.userdetails.UserDetails;
import org.springframework.security.core.userdetails.UserDetailsService;
import org.springframework.stereotype.Component;
import org.springframework.transaction.annotation.Transactional;

import java.util.ArrayList;
import java.util.Collection;
import java.util.List;

/**
 * @Auther: yubt
 * @Description:
 * @Date: Created in 17:29 2018/12/17
 * @Modified By:
 */
@Component
public class CustomUserDetailsService implements UserDetailsService {
    @Autowired
    AccountJpa accountJpa;
    @Autowired
    ARJpa arJpa;

    @Override
    @Transactional
    public UserDetails loadUserByUsername(final String username) {
        String lowerUsername = username.toLowerCase();
        Account account = accountJpa.findAccountByUsername(lowerUsername);
        if (account == null) {
            throw new CustomException("User " + lowerUsername + " was not found in the database");
        }
        Collection<GrantedAuthority> grantedAuthorities = new ArrayList<>();
        List<AccountRole> ars = arJpa.findAccountRolesByAccount(account);
        for (AccountRole ar : ars){
            Role role = ar.getRole();
            GrantedAuthority grantedAuthority = new SimpleGrantedAuthority(role.getName());
            grantedAuthorities.add(grantedAuthority);
        }

        return new User(account.getUsername(), account.getPassword(), grantedAuthorities);
    }
}
这里主要的功能就是构造一个UserDetails以便供oauth2使用,这里如果不太了解可以去看我的学习笔记中关于这里的源码解读。
而我们构造User的方式就是取数据库中的数据以及对应权限来构造。
接着,在我们获取token之前,我们需要构建两张表来存token。sql如下:
-- ----------------------------
-- Table structure for oauth_access_token
-- ----------------------------
DROP TABLE IF EXISTS `oauth_access_token`;
CREATE TABLE `oauth_access_token` (
  `token_id` varchar(256) DEFAULT NULL,
  `token` blob,
  `authentication_id` varchar(256) DEFAULT NULL,
  `user_name` varchar(256) DEFAULT NULL,
  `client_id` varchar(256) DEFAULT NULL,
  `authentication` blob,
  `refresh_token` varchar(256) DEFAULT NULL
) ENGINE=MyISAM DEFAULT CHARSET=utf8;

-- ----------------------------
-- Records of oauth_access_token
-- ----------------------------

-- ----------------------------
-- Table structure for oauth_refresh_token
-- ----------------------------
DROP TABLE IF EXISTS `oauth_refresh_token`;
CREATE TABLE `oauth_refresh_token` (
  `token_id` varchar(256) DEFAULT NULL,
  `token` blob,
  `authentication` blob
) ENGINE=MyISAM DEFAULT CHARSET=utf8;

-- ----------------------------
-- Records of oauth_refresh_token
-- ----------------------------
这个表的构建格式是有相关文档的,在spring oauth2的官方资料中有。我现在只找到中文版的了。
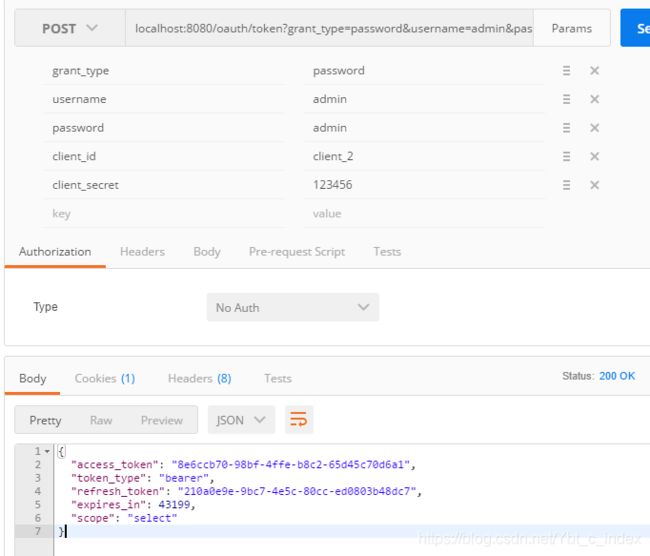
当这些准备完毕之后,我们就可以测试一下token端点获取access_token了。

这里需要提的一点就是,所有涉及密码的地方,spring要求都必须使用加密后的密码。包括用户的密码以及client的密码。如果这些密码没有加密过,用的明文的话就会报错,导致无法获取token。
oauth2 客户端
当我们建起oauth2服务端之后,我们就需要在整个服务架构中使用oauth2来保证资源的安全。这样我们就需要为那些需要受保护的服务配置oauth2.
所以可以看到还有一个oauth2-client服务。里面的配置非常简单。
首先我们需要配置资源服务器
package com.yubotao.oauth2client.config;

import org.springframework.context.annotation.Configuration;
import org.springframework.security.config.annotation.web.builders.HttpSecurity;
import org.springframework.security.oauth2.config.annotation.web.configuration.EnableResourceServer;
import org.springframework.security.oauth2.config.annotation.web.configuration.ResourceServerConfigurerAdapter;

import javax.servlet.http.HttpServletResponse;

/**
 * @Auther: yubt
 * @Description:
 * @Date: Created in 9:41 2018/12/18
 * @Modified By:
 */
@Configuration
public class OAuth2Config {
    @Configuration
    @EnableResourceServer
    public class ResourceServerConfig  extends ResourceServerConfigurerAdapter {

        @Override
        public void configure(HttpSecurity http) throws Exception {
            http
                    .csrf().disable()
                    .exceptionHandling()
                    .authenticationEntryPoint((request, response, authException) -> response.sendError(HttpServletResponse.SC_UNAUTHORIZED))
                    .and()
                    // 这里配置了任何该服务下的资源全部需要通过认证来获取
                    .authorizeRequests()
                    .anyRequest().authenticated()
                    .and()
                    .httpBasic();
        }
    }
}
接着我们需要在配置文件application.properties中配置oauth2的user信息端点:
security.oauth2.resource.user-info-uri=http://localhost:8080/user
所以,同时我们需要在oauth2服务器端配置相应的端点。
@RequestMapping(value = "/user", method = RequestMethod.GET)
    public Principal user(Principal user){
        return user;
    }
之后我们测试我们client端的资源请求。只有在携带token的情况下才能够正常得到资源信息。

2019-5-28
有的时候,我们在客户端想要快捷又方便的获取用户的相关信息,这个时候我们可以用到一个工具类
package com.yubotao.oauth2client.util;

import com.alibaba.fastjson.JSONObject;
import org.springframework.security.core.context.SecurityContextHolder;

/**
 * @Auther: yubotao
 * @Description:
 * @Date: Created in 11:19 2019/5/28
 * @Modified By:
 */
public class AuthenticationUtil {

    public static JSONObject getUserInfo(){
        JSONObject authentication =(JSONObject) JSONObject.toJSON(SecurityContextHolder.getContext().getAuthentication());
        // 返回的信息为user-info端点对应接口的返回值
        return (JSONObject) ((JSONObject) authentication.get("userAuthentication")).get("details");
    }

    public static String getUserId(){
        JSONObject userInfo = getUserInfo();
        return (String)userInfo.get("id");
    }
}
但是想要使用这个工具类是有一定的条件限制的。
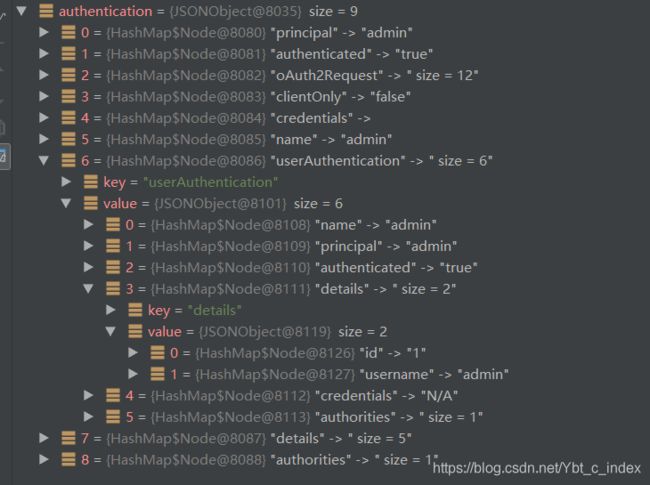
首先我们看一下这个authentication中都是什么信息:

而details中的信息实际上是配置的user-info端点的返回值.
所以我们的端点对应的接口返回的信息如下

可以看到这里返回的信息和details中的信息是一致的,所以如果我们后续需要通过SecurityContextHolder获得用户的其他详细信息,只需要修改这个接口即可。