用css绘制各种形状(放松一下)
自适应的椭圆
border-radius它可以单独指定水平和垂直半径。
用 / 分隔这两个值。并且该属性的值不仅可以接受长度值,还能接收百分比的值。百分比的值会基于元素的尺寸进行解析,宽是水平半径的解析,高是垂直半径的解析。
so 代码如下:
div {
        width: 100%;
        height: 300px;
        background: pink;
        border-radius: 50%;
    }
这个比较无聊,没意思,高度固定宽度百分比嘛,还可以自适应矩形,next….
半椭圆的实现
border-radius的值是可以分开设置的,用空格进行分开,甚至可以为四个角提供完全不同的水平和垂直的半径。
border-radius四个值的渲染顺序是从左上角开始,顺时针渲染;
当只给定3个值时,第四个值和第二个相等;
当给定两个值时,第三个值和第一个值相等,第四个值和第二个值相等。
半圆代码
{
    width: 200px;
    height: 100px;
    background: pink;
    border-radius: 50% / 100% 100% 0 0;
}
/*
  会解析成下面的样子
    border-top-left-radius: 50% 100%;
    border-top-right-radius: 50% 100%;
    border-bottom-right-radius: 50% 0px;
    border-bottom-left-radius: 50% 0px;
*/
切脚效果的实现
代码如下:
div {
        width: 300px;
        height: 300px;
        background: pink;
        margin:0 auto;
        text-align: center;
        line-height: 300px;
        font-size: 30px;
        background: linear-gradient(-45deg, transparent 15px, #58a 0);
    }
两个切脚:
div {
    width: 300px;
    height: 300px;
    background: pink;
    margin: 0 auto;
    text-align: center;
    line-height: 300px;
    font-size: 30px;
    background: linear-gradient(-45deg, transparent 15px, #58a 0)
    right, linear-gradient(45deg, transparent 15px, #65a
    0) left;
    background-size: 50% 100%;
    background-repeat: no-repeat;
}
这个主要是渐变的属性可以写多个,用逗号隔开。
so 四个角也完全没问题啦
div {
    width: 300px;
    height: 300px;
    background: pink;
    margin: 0 auto;
    text-align: center;
    line-height: 300px;
    font-size: 30px;
    background: linear-gradient(135deg, transparent 15px, #58a 0) top
left, linear-gradient(-135deg, transparent 15px, #58a 0) top right, linear-gradient(-45deg, transparent 15px, #58a 0) bottom right, linear-gradient(45deg, transparent 15px, #58a 0) bottom left;
    background-size: 50% 50%;
    background-repeat: no-repeat;
}
上面的代码可维护比较差,在改变切角和颜色时都要修改多处,所以我们可以使用scss的mixin来写:
@mixin beveled-corners($bg, $tl:0, $tr:$tl, $br:$tl, $bl:$tr) {
    background: $bg;
    background:
    linear-gradient(135deg, transparent $tl, $bg 0) top left,
    linear-gradient(225deg, transparent $tr, $bg 0) top right,
    linear-gradient(-45deg, transparent $br, $bg 0) bottom right,
    linear-gradient(45deg, transparent $bl, $bg 0) bottom left;
    background-size: 50% 50%;
    background-repeat: no-repeat;
}
调用时:
@include beveled-corners(#58a, 15px, 5px);最后生成的效果是左上角和右下角是15px的切角,右上角和左下角是5px的切角。上面的minxin设置了初值,当传入的值少于四个值时,就跟border-radius赋值一样。
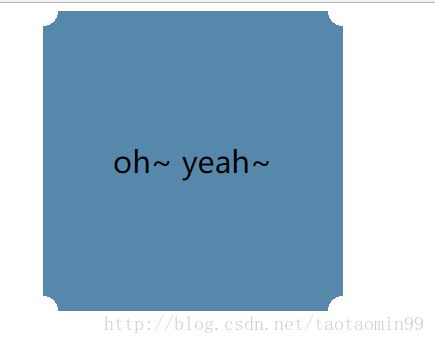
一样的道理我们也可以创建弧形切角,至少改成径向渐变
div {
    width: 300px;
    height: 300px;
    background: pink;
    margin: 0 auto;
    text-align: center;
    line-height: 300px;
    font-size: 30px;
    background: radial-gradient(circle at top left, transparent 15px, #58a 0) top left, radial-gradient(circle at top right, transparent 15px, #58a 0) top right, radial-gradient(circle at bottom right, transparent 15px, #58a 0) bottom right, radial-gradient(circle at bottom left, transparent 15px, #58a 0) bottom left;
    background-size: 50% 50%;
    background-repeat: no-repeat;
}梯形标签页的实现
<style type="text/css">
div {
    position: relative;
    display: inline-block;
    padding: .5em 1em .35em;
    color: white;
}

div::before {
    content: '';
    position: absolute;
    top: 0;
    right: 0;
    bottom: 0;
    left: 0;
    z-index: -1;
    background: #58a;
    transform: scaleY(1.3) perspective(.5em) rotateX(5deg);
    transform-origin: bottom;
}
style>

<div>
oh~ yeah~
div>
变形效果会让这个元素以它自身的中心线为轴进行空间上的旋转,这会让它的尺寸很难控制,解决办法可以设置transform-origin:bottom;,当它在3D空间中旋转时,把它的底边固定。固定底边的同时,高度的缩水会变得更加显眼。为了解决这个问题,可以通过变形属性(scaleY())来改变它的尺寸。
同样的方法可以实现下面这种tab布局:
nav > a {
    position: relative;
    display: inline-block;
    padding: .3em 1em 0;
}
nav > a::before {
    content: '';
    position: absolute;
    top: 0; right: 0; bottom: 0; left: 0;
    z-index: -1;
    background: #ccc;
    background-image: linear-gradient(hsla(0,0%,100%,.6), hsla(0,0%,100%,0));
    border: 1px solid rgba(0,0,0,.4);
    border-bottom: none;
    border-radius: .5em .5em 0 0;
    box-shadow: 0 .15em white inset;
    transform: perspective(.5em) rotateX(5deg);
    transform-origin: bottom;
}
通过把transform-origin改成bottom left或bottom right,就可以立即得到左侧倾斜或右侧倾斜的标签页。
这个方法的缺点是:斜边的角度依赖于元素的宽度。不过,对于宽度变化不大的多个元素(比如导航菜单)来说,这个方法还是非常管用的。

