Qt5官方demo解析集20——Chapter 6: Writing an Extension Plugin
本系列所有文章可以在这里查看http://blog.csdn.net/cloud_castle/article/category/2123873
接上文Qt5官方demo解析集19——Chapter 5: Using List Property Types
在前文中我们定义的PieChart和PieSlice这两个自定义QML类型只用来供app.qml文件使用,如果希望我们所定义的类型可以被多个qml使用,那么可以将其创建为可扩展的插件。由于是将C++定义的类创建为供QML使用的插件,所以这与我们原先创建C++的插件略有不同。
1、首先我们需要继承QQmlExtensionPlugin类,这是一个抽象基类,提供了可供QML装载的插件。
2、接着我们需要在其子类中使用Q_PLUGIN_METADATA宏将其这个插件注册到Qt的元对象系统中。
3、重写纯虚函数registerTypes(),并在其中使用qmlRegisterType()注册插件中的QML类型,这与我们之前在main函数中做的一样。
4、然后我们需要编写一个插件的工程文件,包括TEMPLATE、CONFIG、DESTDIR、TARGET等等。
5、最后,我们还需要创建一个qmldir文件来描述这个插件。
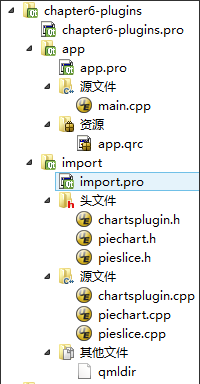
先看下工程目录,其中piechart与pieslice并没有任何变化:
这实际上是两个工程,我们完全可以单独编译import来生成dll插件,然后放在合适的地方供app工程使用。我们先来看import工程中的文件
chartsplugin.h:
#ifndef CHARTSPLUGIN_H
#define CHARTSPLUGIN_H

//![0]
#include

class ChartsPlugin : public QQmlExtensionPlugin     // 继承QQmlExtensionPlugin
{
    Q_OBJECT
    Q_PLUGIN_METADATA(IID "org.qt-project.Qt.QQmlExtensionInterface")  // 为这个插件定义了一个唯一的接口,并注册至元对象系统

public:
    void registerTypes(const char *uri);           // 注册类型函数重载
};
//![0]

#endif
chartsplugin.cpp:
#include "chartsplugin.h"
//![0]
#include "piechart.h"
#include "pieslice.h"
#include

void ChartsPlugin::registerTypes(const char *uri)      // 实现插件中类型的注册
{
    qmlRegisterType(uri, 1, 0, "PieChart");
    qmlRegisterType(uri, 1, 0, "PieSlice");
}

//![0]
可以看到QML插件注册的代码也很间断,但真正的实现还在于下面两个文件:
qmldir这个文件只有两句话:
module Charts            // 定义了组件名称空间为Charts,这个名称也是我们最后import时使用的
plugin chartsplugin // 定义插件,与上面的chartsplugin一致TEMPLATE = lib // 生成库文件
CONFIG += plugin // 该库是一个插件
QT += qml quick
DESTDIR = ../Charts // 从Debug目录跳出到Build目录,并建立Charts目录,以存放dll与qmldir文件
TARGET = $$qtLibraryTarget(chartsplugin)
HEADERS += piechart.h \
pieslice.h \
chartsplugin.h
SOURCES += piechart.cpp \
pieslice.cpp \
chartsplugin.cpp
DESTPATH=$$[QT_INSTALL_EXAMPLES]/qml/tutorials/extending/chapter6-plugins/Charts // 设置了一个变量指向这个Charts目录
target.path=$$DESTPATH
qmldir.files=$$PWD/qmldir
qmldir.path=$$DESTPATH
INSTALLS += target qmldir
OTHER_FILES += qmldir
# Copy the qmldir file to the same folder as the plugin binary
QMAKE_POST_LINK += $$QMAKE_COPY $$replace($$list($$quote($$PWD/qmldir) $$DESTDIR), /, $$QMAKE_DIR_SEP)这样,在这个工程编译后,我们将在build目录中的Charts文件夹中找到我们的chartsplugind.dll与qmldir文件。d表示由debug编译产生。
接下来的app项目调用了这个插件并绘制了这个饼状图:
app.qml:
import QtQuick 2.0
import Charts 1.0   // 这里会有一条红色波浪线,QtCreator会抱怨可能找不到这个模块
                    // 你可以不管它,也可以设置qmlplugindump让QtQuick获知到这个模块的信息
Item {
    width: 300; height: 200

    PieChart {                      // 我们可以像前面的例子一样使用我们自定义的类型
        anchors.centerIn: parent
        width: 100; height: 100

        slices: [
            PieSlice {
                anchors.fill: parent
                color: "red"
                fromAngle: 0; angleSpan: 110
            },
            PieSlice {
                anchors.fill: parent
                color: "black"
                fromAngle: 110; angleSpan: 50
            },
            PieSlice {
                anchors.fill: parent
                color: "blue"
                fromAngle: 160; angleSpan: 100
            }
        ]
    }
}
main.cpp中不需要做额外的工作:
#include
#include

int main(int argc, char *argv[])
{
    QGuiApplication app(argc, argv);
    QQuickView view;
    view.setResizeMode(QQuickView::SizeRootObjectToView);
    view.setSource(QUrl("qrc:///app.qml"));
    view.show();
    return app.exec();
}
app.pro:
TARGET = chapter6-plugins            // 设置项目名
QT += qml quick

# Avoid going to debug/release subdirectory
# so that our application will see the
# import path for the Charts module.
win32: DESTDIR = ./                 // 这一句将程序从debug移到上级build目录,也就是Charts的同级目录,这样使得程序可以到上面生成的插件

SOURCES += main.cpp
RESOURCES += app.qrc
最后还有一个根工程文件chapter6-plugins.pro:
TEMPLATE = subdirs        // 编译下面SUBDIRS定义的子目录
CONFIG += ordered         // 顺序编译,可能是基于效率不太被推荐,不过在这个小例子中就无所谓了
SUBDIRS = \
          import \        // 先编译import目录里的工程
          app.pro         // 然后编译app工程
最后还是看下效果呗~

