spring boot 提供HTTP、HTTPS都可访问的API
情景说明
考虑到数据的安全传输,现在用到HTTPS进行API调用的越来越多了。本节就介绍如何使自己编写的API能让别人
进行HTTP、HTTPS调用。
先看一下一般情况
正常编写一个
使用HTTP访问一下(不写的话,默认使用HTTP协议进行访问)
由此可见:HTTP是可以访问的,那么HTTPS呢?
由此可见,此时HTTPS是无法访问的!
软硬件环境:JDK1.8、Windows10、Eclipse、SpringBoot2.0.4RELEASE
准备工作:生成keystore证书库(秘钥库)
第一步:找到安装JDK的目录下的bin目录,并在此处打开cmd(或PowerShell)窗口
第二步:执行指令,生成对应的证书
此时,在相应位置即可看到生成的秘钥库(证书库)文件了:
给出上上图中的指令文字版(方便拷贝):
keytool -genkey -alias ds -keypass ds1994 -keyalg RSA -keysize 1024 -validity 730 -storetype PKCS12 -keystore C:/Users/JustryDeng/Desktop/dsstore.p12 -storepass ds1994
相关指令说明(提示:如果比较着急的话,可以不看这一块儿):
keytool工具:Java 数据证书的管理工具 ,keytool 将密钥(key)和证书(certificates)存在一个称为keystore的
秘钥库(证书库)文件中,在keystore里,包含两种数据:
密钥实体(Key entity):密钥(secret key)又或者是私钥和配对公钥(采用非对称加密)。
可信任的证书实体(trusted certificate entries):只包含公钥。
-genkey:生成一个秘钥库(证书库)文件(此文件的后缀名自定义也行,但一般按约定得来如:.keystory、.p12等等),存
放生成的密钥对(即:私钥和公钥、密钥实体和可信任的证书实体)。
-ailas:产生别名,每个keystore秘钥库(证书库)都关联这一个独一无二的alias,这个alias通常不区分大小写。
-keypass:指定别名条目ailas对应的密码(私钥的密码)。
-keyalg:指定密钥的算法(如:RSA、DSA、EC等,如果不指定则默认采用7DSA)
-keysize:秘钥位大小(指定秘钥长度)。
-validity:指定生成的证书的有效天数
-storetype:秘钥库(证书库)类型。证书库类型为:JKS、PKCS12等。jdk9以前,默认为JKS。自jdk9开始,默
认为PKCS12。
-keystore:指定存储密钥、证实实体的keystore名称,如果没有指定,那么将创建一个新的keystore库,并将其存
储为 .keystore 文件。
注:我们在指定时,可以指定其keystore的生成位置、名字等如:
C:/Users/JustryDeng/Desktop/dsstore.p12
-storepass:指定密钥库的密码,密钥库创建后,要对其做任何修改都必须提供该密码。
……
SpringBoot项目导入秘钥(证书)库
第一步:将生成的秘钥证书库放入项目资源文件夹下
第二步:在系统配置文件application.properties中,配置SSL
# 此端口为HTTPS端口
server.port = 9527
# 秘钥证书库文件所在位置
server.ssl.key-store = classpath:dsstore.p12
# 密码
server.ssl.key-store-password = ds1994
# 秘钥证书库类型
server.ssl.keyStoreType = PKCS12
# 别名条目
server.ssl.keyAlias= ds
#这里先放一个参数,一会儿再程序中直接@Value获取
myhttp.port = 8080
此时,启动项目,可以看见:
由此可见,此时:项目中的API就是只支持HTTPS协议的了。
第三步:配置一下项目启动类,使API既支持HTTPS又支持HTTP。
提示:到上面第二步结束,我们的项目就已经支持HTTPS了,这里我们只需要使项目再支持HTTPS的基础上,再支
持HTTP即可。
import org.apache.catalina.connector.Connector;
import org.springframework.beans.factory.annotation.Value;
import org.springframework.boot.SpringApplication;
import org.springframework.boot.autoconfigure.SpringBootApplication;
import org.springframework.boot.web.embedded.tomcat.TomcatServletWebServerFactory;
import org.springframework.boot.web.servlet.server.ServletWebServerFactory;
import org.springframework.context.annotation.Bean;
@SpringBootApplication
public class BaseWebApplication
{
/* SpringBoot程序入口 */
public static void main(String[] args) {
SpringApplication.run(AbcDemoApplication.class, args);
}
@Value("${myhttp.port}")
private Integer httpPort;
/* SpringBoot 2.x版本(以及更高版本) 使用下面的代码 */
@Bean
public ServletWebServerFactory servletContainer() {
TomcatServletWebServerFactory tomcat = new TomcatServletWebServerFactory();
tomcat.addAdditionalTomcatConnectors(createHTTPConnector());
return tomcat;
}
private Connector createHTTPConnector() {
Connector connector = new Connector("org.apache.coyote.http11.Http11NioProtocol");
connector.setScheme("http");
connector.setSecure(false);
connector.setPort(httpPort);
return connector;
}
/* SpringBoot 1.5.x版本(以及更低版本) 使用下面的代码 */
// @Bean
// public EmbeddedServletContainerFactory servletContainer() {
// TomcatEmbeddedServletContainerFactory tomcat = new TomcatEmbeddedServletContainerFactory();
// // 添加http
// tomcat.addAdditionalTomcatConnectors(createStandardConnector());
// return tomcat;
// }
// // 配置http
// private Connector createStandardConnector() {
// Connector connector = new Connector("org.apache.coyote.http11.Http11NioProtocol");
// connector.setPort(httpPort);
// return connector;
// }
}
此时,启动项目:
由此可见,此时,我们的API既支持HTTPS请求,又支持HTTP请求了。
测试一下
先简单编写一个controller
import javax.servlet.http.HttpServletRequest;
import org.springframework.web.bind.annotation.GetMapping;
import org.springframework.web.bind.annotation.PostMapping;
import org.springframework.web.bind.annotation.RequestBody;
import org.springframework.web.bind.annotation.RestController;
/**
* API支持HTTPS/HTTP测试
*
* @author JustryDeng
* @DATE 2018年9月13日 上午8:36:29
*/
@RestController
public class Test {
/**
* HTTP/HTTPS发送get请求
*
* @DATE 2018年9月13日 上午10:21:07
*/
@GetMapping("/get")
public String testMethodGet(HttpServletRequest request) {
// 获取URL协议
String requestURL = request.getRequestURL().toString();
String protocol = requestURL.split("://")[0];
// 获取当前URL连接中的端口
Integer port = request.getServerPort();
return "get ---> " + protocol + "\t" + port;
}
/**
* HTTP/HTTPS发送post请求
*
* @DATE 2018年9月13日 上午10:21:43
*/
@PostMapping("/post")
public String testMethodPost(HttpServletRequest request, @RequestBody String bodyString) {
// 获取URL协议
String requestURL = request.getRequestURL().toString();
String protocol = requestURL.split("://")[0];
// 获取当前URL连接中的端口
Integer port = request.getServerPort();
return "post ---> " + protocol + "\t" + port + "\n" + bodyString;
}
}
启动项目,使用postman进行HTTPS测试
提示:由于我们只配了秘钥(证书)库,但是还没有配置认证。我们这里主要测试是否可用https请求API,所以我们需要
先在postman的设置里面,先把证书认证关闭。
HTTPS发送get测试
HTTPS发送post测试
使用postman进行HTTP测试
HTTP发送get测试
HTTP发送post测试
自此:我们已实现了提供HTTP、HTTPS均可访问的API的功能了。
在 Nginx 上配置证书
-
Nginx 证书部署在腾讯云中有官方教程
-
教程中描述的很详细,下面说一下我在操作过程中踩过的一些坑
-
无法将 crt 和 key 文件利用 FileZilla 软件直接传输到 etc/nginx 文件中去
- 可以先复制到其他文件夹中,再在服务器内部复制到 etc/nginx 中去
-
在利用
bin/nginx –t来测试时,会报错nginx: [emerg] "user" directive is not allowed here in /etc/nginx/conf.d/nginx.conf:1- 可能是因为在 nginx 目录下有不止一份 nginx 的配置文件所以产生了冲突,删除多余的那一份就行。
结果
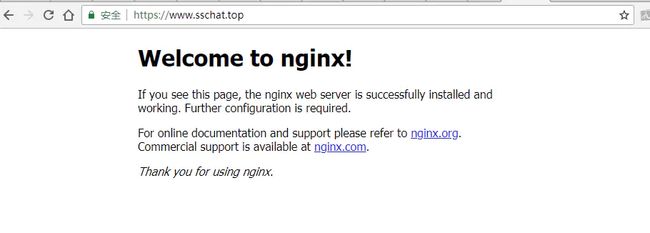
当配置完成后,输入对应的地址,当出现如下界面则配置成功。
配置成功界面
扩展:如何将springboot项目和nginx代理联合起来
前提
- 完成了上述的springboot项目的配置和nginx代理的配置
步骤
- 在刚刚配置的nginx.conf文件中添加一些配置信息,如下:
server {
        listen 443;
        server_name #填写绑定证书的域名;
        ssl on;
        ssl_certificate   #填写你的证书.crt;
        ssl_certificate_key #填写你的证书.key;
        ssl_session_timeout 5m;
        ssl_protocols TLSv1 TLSv1.1 TLSv1.2; #按照这个协议配置
        ssl_ciphers ECDHE-RSA-AES128-GCM-SHA256:HIGH:!aNULL:!MD5:!RC4:!DHE;#按照这个套件配置
        ssl_prefer_server_ciphers on;
        location / {
            proxy_set_header X-Real-IP $remote_addr;
            proxy_set_header X-Forwarded-For $proxy_add_x_forwarded_for;
            proxy_set_header Host $http_host;
            proxy_set_header X-NginX-Proxy true;
            proxy_pass http://服务器地址:端口号/;#这里填写你的端口号,要和在springboot项目中配置的端口号一致,若是在本机操作,则服务器地址可以填0.0.0.0或者127.0.0.1
            proxy_redirect off;
        }
    }
- 在springboot当中实现一个简单的helloworld程序
@RestController
public class helloController {
    @RequestMapping("hello")
    public String hello(){
        return "hello world!";
    }
}
- 启动项目
结果
当配置完成后,发现通过nginx的代理依然能够使用https协议,如下所示:
配置成功界面
参考链接、摘录内容出处
链接:https://www.jianshu.com/p/eb52e0f5ee85
https://baike.baidu.com/item/keytool/5885709?fr=aladdin
https://blog.csdn.net/zlfing/article/details/77648430
https://blog.csdn.net/wrs1226/article/details/49070681
https://www.cnblogs.com/liaojie970/p/4916602.html
https://www.jianshu.com/p/b6549f086b21
https://blog.csdn.net/zmken497300/article/details/53186730
https://blog.csdn.net/justry_deng/article/details/82684505

