NIO AIO
NIO-非阻塞IO,AIO-异步IO,NIO由JDK1.4引入,AIO由JDK1.7引入。
NIO主要解决普通IO中的性能瓶颈,比如当accept()的阻塞操作返回时,数据可能并没有传输过来,也就是readable()状态为false,此时我们负责处理的线程只能阻塞来等待这个数据。同理,写入状态也需要等待,这是不值得的。
AIO不需要等待任务完成就可以返回,之后可以通过回调函数或者future对象来获取结果,AIO可以控制线程数量,减少过多的线程带来的内存消耗和CPU调度的开销。
阻塞IO
我们可以使用NIO三个组件来构成一个简单的客户端,网络端的通信例子:
public class Server {
	public static void main(String[] args) throws IOException {
		ServerSocketChannel ssc = ServerSocketChannel.open();
		ssc.socket().bind(new InetSocketAddress(8080));
		while (true) {
			//阻塞,直到有一个连接进来
			SocketChannel sc = ssc.accept();
			//开启线程处理,在while循环中监听8080
			SocketHander handler = new SocketHander(socketChannel);//本质是一个线程,后面单独说这个类
			new Thread(handler).start();
		}
	}
}
关于SocketHandler:
public class SocketHandler implements Runnable {

	private SocketChannel sc;

	public SocketHandler(SocketChannel sc) {
		this.sc = sc;
	}

	@override
	public void run() {
		ByteBuffer buffer = ByteBuffer.allocate(1024);
		try {
			int num;
			while ((num = sc.read(buffer)) > 0) {
				//读取buffer
				buffer.filp();
				byte[] bytes = new byte[num];
				buffer.get(bytes);
				String res = new String(bytes, "UTF-8");
				System.out.println("received:" + res);
				//回复
				ByteBuffer writeBuffer = ByteBuffer.wrap("Received data. Your request data is :" + res);
				buffer.clear();
			}
		} catch(IOException e) {
			IOUtils.closeQuietly(sc);
		}
	}
}
客户端调用:
public class SocketChannelTest {
	public static void main(String[] args) throws IOException {
	SocketChannel sc = SocketChannel.open(new InetSocketAddress("localhost", 8080));
	//发送请求
	ByteBuffer buffer = ByteBuffer.wrap("12345".getBytes());
	sc.write(buffer);
	//读取响应
	ByteBuffer readBuffer = ByteBuffer.allocate(1024);
	int num;
	while (num = sc.read(readBuffer)) > 0) {
			readBuffer.flip();
			byte[] re = new byte[num];
			readBuffer.get(re);
			String result = new String(re, "UTF-8");
			System.out.println("Return data:" + result);
		}
	}
}
非阻塞IO
由于阻塞模式有诸多缺点,所以引入了NIO。NIO的核心在于使用一个Selector来管理多个通道,可以是SocketChannel,也可以是ServerSocketChannel。将各个通道注册到Selector上,指定监听的事件。
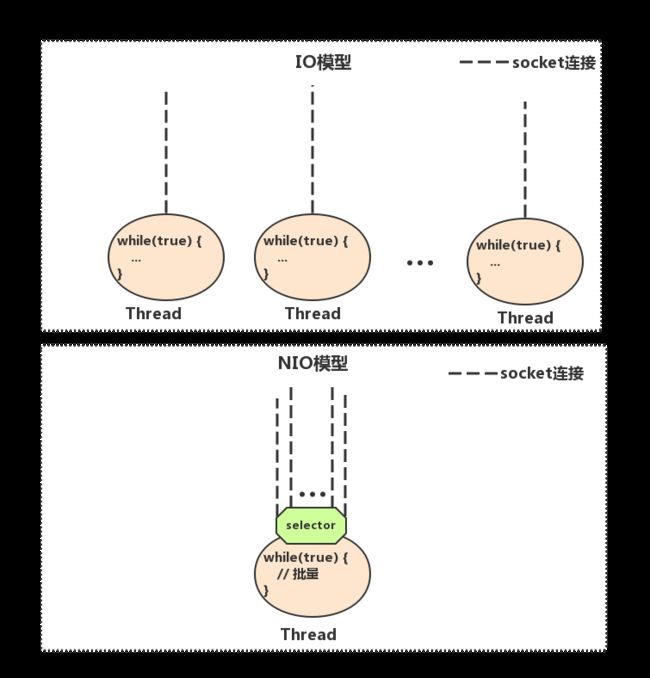
可以说对比传统IO,NIO对于一个新连接不再新开一个线程,而是通过轮询多路复用器来绑定多个连接,读写都由它来完成。
NIO中selector是对底层操作系统实现的一个抽象,管理通道状态每个底层系统的实现都不同。
NIO面向Selector编程实例代码:(客户端同上)
public class SelectorServer {
	public static void main(String[] args) {
		Selector selector = Selector.open();
		ServerSocketChannel ssc = ServerSocketChannel.open();
        ssc.socket().bind(new InetSocketAddress(8080));
		//注册到selector中监听OP_ACCEPT事件
		ssc.configureBlocking(false);
		ssc.register(selector, SelectionKey.OP_ACCEPT);

		while (true) {
			int readyChannelNum = selector.select();
			if (readyChannelNum == 0) {
				continue;
			}
			Set<SelectionKey> readyKeys = selector.selectedKeys();
			Iterator<SelectionKey> iterator = readyKeys.iterator();
			while (iterator.hasNext()) {
				SelectionKey key = iterator.next();
				iterator.remove();
				if (key.isAcceptable()) {
					SocketChannel sc = ssc.accept();
					//由于有连接不代表有数据,所以将channel注册到selector监听OP_READ事件
					sc.configureBlocking(false);
					sc.register(selector, SelectionKey.OP_READ);
				} else if (key.isReadable()) {
					//有数据可读,因为在上一个分支中注册了socketChannel,直接从key中拿出
					SocketChannel sc = (SocketChannel) key.channel();
					ByteBuffer readBuffer = ByteBuffer.allocate(1024);
					int num = sc.read(readBuffer);
					if (num > 0) {
						System.out.println("Received Data: " + new String(readBuffer.array()).trim());
						ByteBuffer buffer = ByteBuffer.wrap("Return data to client... ".getBytes());
						sc.write(buffer);
					} else if (num == -1) {
						socketChannel.close();
					}
				}
			}
		}
	}
}
在NIO模型中,一个连接来了后,直接注册到selector上,通过检查selector,就可以批量检测出可以读取(readable)的连接,进而读取数据。实际开发过程中,每一个线程对应着一批连接,相比传统IO一个线程对应一个连接的情况,消耗的线程资源大幅降低;同时因为大大削减了线程的数量,线程切换的消耗也大幅降低。
同时,IO模型读写单位是字节,每次从操作系统底层一个字节一个字节的读取,而NIO维护的是一个buffer,buffer有一个容量,相当于一个字节块,这样效率会更高。
对照代码,整理一下NIO的思路:
- NIO模型中通常两个线程,每个线程绑定一个Selector。例子中服务器selector 负责轮询是否有新连接。
- 服务端检测到连接后,不再新建一个新的线程,而是直接将连接绑定到selector上,这样不会出现多线程自旋的情况。
- selector通过while自旋,如果有多条连接建立,selector.select()方法可以轮询出来建立channel,等待数据可读取的时候处理。
- 数据的读取,以buffer为单位。
总结:NIO编程复杂,不友好,需要自己实现线程模型,功能复杂的NIO模型bug几率飙升,难以debug.
AIO
在jdk1.7中称为NIO.2,java中的AIO是由一个线程池负责执行任务,然后回调或者自己查询结果,控制线程数量,减少过多的线程带来的内存消耗和CPU在线程调度上的开销。
AIO适合IO操作时间重量级的情况。
AIO一共三个类需要关注,分别是AsynchronousSocketChannel、AsynchronousServerSocketChannel和AsynchronousFileChannel。显然是在之前三种channel上加了Asynchronous前缀。(还有DatagramChannel)
AIO也提供了回调和Future实例的使用方式。
返回Future实例
JDK线程池就是这么使用的,Future接口的语义也是通用的。
- future.isDone() - 判断操作是否完成,包括正常完成、异常抛出、取消
- future.cancel(true) - 取消操作,方式是中断。参数true说的是,即使任务在执行,也会进行中断。
- future.isCancelled() - 是否被取消,只有在任务正常结束之前被取消,才会返回true.
- future.get() - 获取执行结果,是阻塞的。
- future.get(10, TimeUnit.SECONDS) - 上一个方法默认执行0,设置阻塞的超时时间。
回调函数
提供java.nio.channels.CompletionHandler接口。它定义了两个方法,分别在异步操作成功和失败时回调:
public interface CompletionHandler<V,A> {
	void completed(V result, A attachment);
	void failed(Throwable exc, A attachment);
}
使用例子:
AsynchronousServerSocketChannel listener = AsynchronousServerSocketChannel.open().bind(null);

//可以传递Attachment
listener.accpet(attachment, new CompletionHandler<AsynchronousSocketChannel, Object>(){
	public void completed(AsynchronousSocketChannel client, Object attachment) {
	//操作成功
	}
	public void failed(Throwable exc, Object attachemnt) {
	//操作失败
	}
});
Asynchronous IO
异步文件IO AsynchronousFileChannel
文件IO不支持非阻塞,但是可以采用异步的方式提高性能。
实例化:
AsynchronousFileChannel channel = AsynchronousFileChannel.open(Paths.get("path"));
read()方法:
public abstract Future<Integer> read(ByteBuffer dst, long position);
public abstract <A> void read(ByteBuffer dst, long position, A attachemnt, CompletionHandler<Integer, ? super A> handler);
write()方法:
public abstract Future<Integer> write(ByteBuffer src, long position);
public abstract <A> write(ByteBuffer src, long position, A attachment, CompletionHandler<Integer, ? super A> handler);
AIO文件读写都需要一个文件的开始位置,开始位置为0;
AIO读写也是与Buffer打交道
锁定:
public abstract Future<FileLock> lock(long position, long size, boolean shared);
public abstract <A> void lock(long position, long size, boolean shared, A attachment, CompletionHandler<FileLock, ? super A> handler);
锁定文件部分数据以进行排他性操作,pos指定起始位置,size指定锁定区域大小,shared指定需要共享锁还是排它锁。
尝试获取锁:
public abstract FileLock tryLock(long position, long size, boolean shared) throws IOException;
如果被锁住,立刻返回null,否则返回FileLock对象。
force():立即将数据刷入磁盘,参数设置为true代表将属性信息也更新到磁盘。
public abstract void force(boolean metaData) throws IOException;
AsynchronousServerSocketChannel
服务端代码(回调函数):
public class SscExample {

    public static void main(String[] args) throws IOException {
        AsynchronousServerSocketChannel server = AsynchronousServerSocketChannel.open()
                .bind(new InetSocketAddress("localhost", 8080));
        Attachment att = new Attachment();
        att.setServer(server);

        server.accept(att, new CompletionHandler<AsynchronousSocketChannel, Attachment>() {
            @Override
            public void completed(AsynchronousSocketChannel client, Attachment attachment) {
                try {
                    SocketAddress clientAddr = client.getRemoteAddress();
                    System.out.println("Received new connection:" + clientAddr);

                    attachment.getServer().accept(attachment, this);
                    Attachment newAtt = new Attachment();
                    newAtt.setServer(server);
                    newAtt.setClient(client);
                    newAtt.setReadMode(true);
                    newAtt.setBuffer(ByteBuffer.allocate(2048));

                    client.read(newAtt.getBuffer(), newAtt, new CompletionHandler<Integer, Attachment>() {
                        @Override
                        public void completed(Integer result, Attachment attachment) {
                            if (attachment.isReadMode()) {
                                ByteBuffer buffer = attachment.getBuffer();
                                buffer.flip();
                                byte bytes[] = new byte[buffer.limit()];
                                buffer.get(bytes);
                                String msg = new String(buffer.array()).trim();
                                System.out.println("Received data from client: " + msg);

                                buffer.clear();
                                buffer.put("Response from server!".getBytes(Charset.forName("UTF-8")));
                                attachment.setReadMode(false);
                                buffer.flip();
                                attachment.getClient().write(buffer, attachment, this);
                            } else {
                                try {
                                    attachment.getClient().close();
                                } catch (IOException e) {
                                    e.printStackTrace();
                                }
                            }
                        }

                        @Override
                        public void failed(Throwable exc, Attachment attachment) {
                            System.out.println("Connection disconnected");
                        }
                    });
                } catch (IOException e) {
                    e.printStackTrace();
                }
            }

            @Override
            public void failed(Throwable exc, Attachment attachment) {
                System.out.println("accept failed");
            }
        });
        try {
            Thread.currentThread().join();
        } catch (InterruptedException e) {
            e.printStackTrace();
        }
    }
}
自定义Attachment类:
public class Attachment {
        private AsynchronousServerSocketChannel server;
        private AsynchronousSocketChannel client;
        private boolean readMode;
        private ByteBuffer buffer;

        public AsynchronousServerSocketChannel getServer() {
            return server;
        }

        public void setServer(AsynchronousServerSocketChannel server) {
            this.server = server;
        }

        public AsynchronousSocketChannel getClient() {
            return client;
        }

        public void setClient(AsynchronousSocketChannel client) {
            this.client = client;
        }

        public boolean isReadMode() {
            return readMode;
        }

        public void setReadMode(boolean readMode) {
            this.readMode = readMode;
        }

        public ByteBuffer getBuffer() {
            return buffer;
        }

        public void setBuffer(ByteBuffer buffer) {
            this.buffer = buffer;
        }
    }
AsynchronousSocketChannel
客户端代码 配合服务端使用:
public class ScExample {
    public static void main(String[] args) throws Exception {
        AsynchronousSocketChannel client = AsynchronousSocketChannel.open();
        Future future = client.connect(new InetSocketAddress("localhost", 8080));
        //此处阻塞等待连接成功
        future.get();

        Attachment att = new Attachment();
        att.setClient(client);
        att.setReadMode(false);
        att.setBuffer(ByteBuffer.allocate(1024));
        byte[] data = "I am a bot!".getBytes();

        att.getBuffer().put(data);
        att.getBuffer().flip();

        client.write(att.getBuffer(), att, new CompletionHandler<Integer, Attachment>() {
            @Override
            public void completed(Integer result, Attachment attachment) {
                ByteBuffer buffer = attachment.getBuffer();
                if (attachment.isReadMode()) {
                    buffer.flip();
                    byte[] bytes = new byte[buffer.limit()];
                    buffer.get(bytes);
                    String msg = new String(bytes, Charset.forName("UTF-8"));
                    System.out.println("Received data form server: " + msg);
                    try {
                        attachment.getClient().close();
                    } catch (Exception e) {
                        e.printStackTrace();
                    }
                } else {
                    attachment.setReadMode(true);
                    buffer.clear();
                    attachment.getClient().read(buffer, attachment, this);
                }
            }

            @Override
            public void failed(Throwable exc, Attachment attachment) {
                System.out.println("No reply from server");
            }
        });
        Thread.sleep(2000);

    }
}
Asynchronous Channel Groups
AIO 存在一个线程池,负责接受任务,处理IO事件,回调等。线程池在group内部,group一旦关闭,线程池就会关闭。
上面提到的服务端和客户端channel是属于group的,当我们调用他们的open()方法的时候,相应的channel就属于默认的group,由JVM自动构造并管理。可以通过启动参数来配置JVM的group。
如果要自定义group,可以使用以下的方法:
- AsynchronousChannelGroup.withCachedThreadPool(ExecutorService executor, int initialSize)
- AsynchronousChannelGroup.withFixedThreadPool(int nThreads, ThreadFactory threadFactory)
- AsynchronousChannelGroup.withThreadPool(ExecutorService executor)
长得和线程池Executors静态方法很像。使用例子:
AsynchronousChannelGroup group = AsynchronousChannelGroup.withFixedThreadPool(10, Executors.defaultThreadFactory());
AsynchronousServerSocketChannel server = AsynchronousServerSocketChannel.open(group);
AsynchronousSocketChannel client = AsynchronousSocketChannel.open(group);
总结
NIO AIO的确可以提升性能,但是工程上,这些底层的API比较难用,不利于实现和debug。因此需要一些框架来封装实现细节,提供给用户友好的接口,这就是Netty/Mina存在的原因。
