image source from unsplash.com by Sergio souza
众所周知,Tensorflow入门之所以困难,与其采用的Graph 和 Session 模式有关,这与原生的 Python 代码简单、直观的印象格格不入。同时,由于计算仅仅发生在Session里面,所以初始化参数和变量的时候没办法将结果打印出来,以至于调试起来也十分困难。
当然Google官方也意识到了这点,于是引入了Eager模式,在这个模式下tensorflow的常量和变量可以直接计算并打印出来,甚至还可以和numpy数组混合计算。本文代码参考官方教程(from github with Apache License 2.0)
同样的,为了方便与读者交流,所有的代码都放在了这里:
https://github.com/zht007/tensorflow-practice
1. 激活Eager模式
激活Eager模式也非常简单,仅几行代码。
import tensorflow as tf
tf.enable_eager_execution()
tfe = tf.contrib.eager
注意,eager模式在程序开始就要激活,且不能与普通模式混用。另外tfe在后面优化器(Optimizer)的时候需要用到,故先在这里定义了。
2. Eger模式上手
Eger模式下,定义的变量或者常量可以直接打印出来
a = tf.constant([[1, 2],
                 [3, 4]])
print('a=',a)

b = tf.Variable(np.zeros((2,2)))

print('\n b=',b)

c = tf.Variable([[6, 7],
                 [8, 9]])

print('\n c=',c)

-------output-------
a= tf.Tensor(
[[1 2]
 [3 4]], shape=(2, 2), dtype=int32)

 b=

 c=
可以直接转换成我们熟悉的numpy arrary
print(c.numpy())

---output---
[[6 7]
 [8 9]]
当然也可以直接计算并输出结果,甚至可以与numpy arrary 混合计算。
x = tf.Variable([[6, 7],
                 [8.0, 9.0]],dtype ="float32")
y = np.array([[1,2],
              [3,4]],dtype ="float32")

print(tf.matmul(x,y))
----output----
tf.Tensor(
[[27. 40.]
 [35. 52.]], shape=(2, 2), dtype=float32)
3. Eager 模式下训练线性回归模型
最后我们用Tensor Flow 在Eager模式下训练线性回归模型,该模型我们之前已经用Tensorflow和Keras训练过了,感兴趣的朋友可以参照之前的文章进行对比。
3.1 创建模拟数据
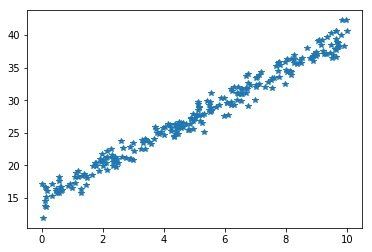
与之前的数据一样,此处数据是100万个带噪音的线性数据,100万个点用plt是画不出来的,图中随机采样了250个点
我们定义一个帮助函数方便以batch的形式这100万个数据点中随机抽取batch size大小的数据进行训练
def next_batch(x_data, batch_size):
    batch_index = np.random.randint(len(x_data),size=(BATCH_SIZE))
    x_train = x_data[batch_index]
    y_train = y_true[batch_index]
    return x_train, y_train
3.2 定义变量
此处与普通模式下的tensorflow变量没有任何区别
w_tfe = tf.Variable(np.random.uniform())
b_tfe = tf.Variable(np.random.uniform(1,10)
3.3 线性函数
在普通模式下的tensorflow中我们需要定义计算图谱,这里我们直接以 python 函数的形式,定义要训练的线性回归函数。
def linear_regression(inputs):
    return inputs * w_tfe + b_tfe
3.4 损失函数
同样的,MS(Mean Square)损失函数也要以python 函数的形式定义,而不是计算图谱。
def mean_square_fn(model_fn, inputs, labels):
    return tf.reduce_sum(tf.pow(model_fn(inputs) - labels, 2)) / (2 * BATCH_SIZE)
3.5 优化器
同样使用Gradient Descent 的优化器,不同在于,普通模式下我们创建一个计算图谱train = optimizer.minimize(error), 在Eager模式下,要用tfe.implicit_gradients()来返回一个函数。
optimizer = tf.train.GradientDescentOptimizer(learning_rate=0.001)

grad = tfe.implicit_gradients(mean_square_fn)
3.6 模型训练
由于没有计算图谱,所以也不需要初始化变量,也不需在Session下运行,而是类似于原生 Python 函数的形式将数据传入"Optimizer模型"函数。训练完成之后,w 和 b 的参数也自动保存下来,不必在Session中提取。
for step in range(BATCHS):

    x_train, y_train = next_batch(x_data, BATCH_SIZE)
    optimizer.apply_gradients(grad(linear_regression, x_train, y_train))
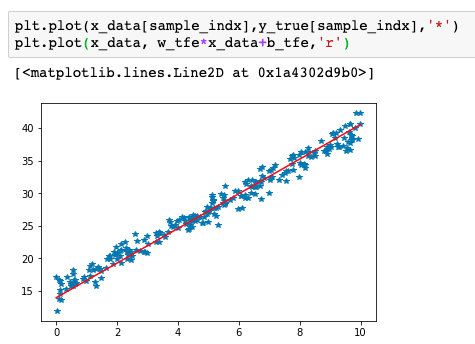
3.7 验证训练结果
直接将最终的 w 和 b 带入线性函数,训练结果也非常符合预期。
4. 总结
Eager 模式下的 Tensorflow 与原生的 Python 代码非常类似,可以直接计算并打印结果,创建和训练模型的过程也类似于python函数的创建和调用。Eager 和Keras API 都是Tensorflow 2.0 官方主推的 Tensorflow使用方式,相信在不久的将来,获取我们就再也看不到 init = tf.global_variables_initializer() 还有 with tf.Session() as sess:这样的类似八股文一样的关键词啦。
参考资料
[1] Google Tensorflow 官方文档和教程
[2] Github TensorFlow-Examples
相关文章
Tensorflow入门——线性回归
Tensorflow入门——Keras简介和上手
AI学习笔记——Tensorflow入门
首发steemit
欢迎扫描二维码关注我的微信公众号“tensorflow机器学习”,一起学习,共同进步


