自定义view之超级课程表页面的实现
之前机缘巧合做了一个类似超级课程表app的课程表界面,如图所示界面,特此分享它的实现方式和部分源码。
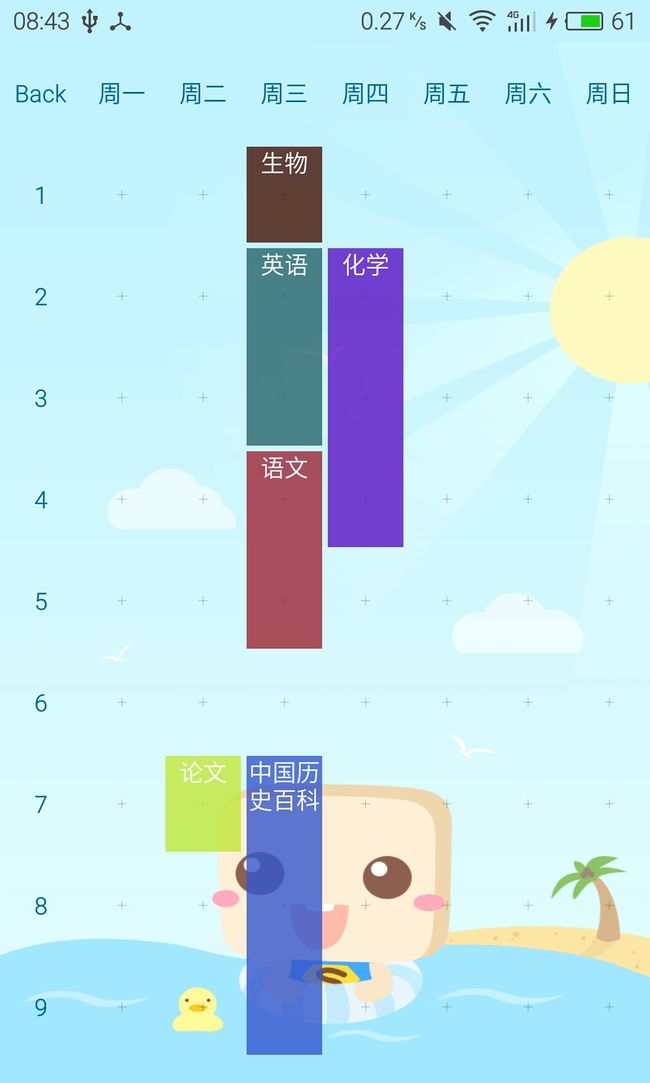
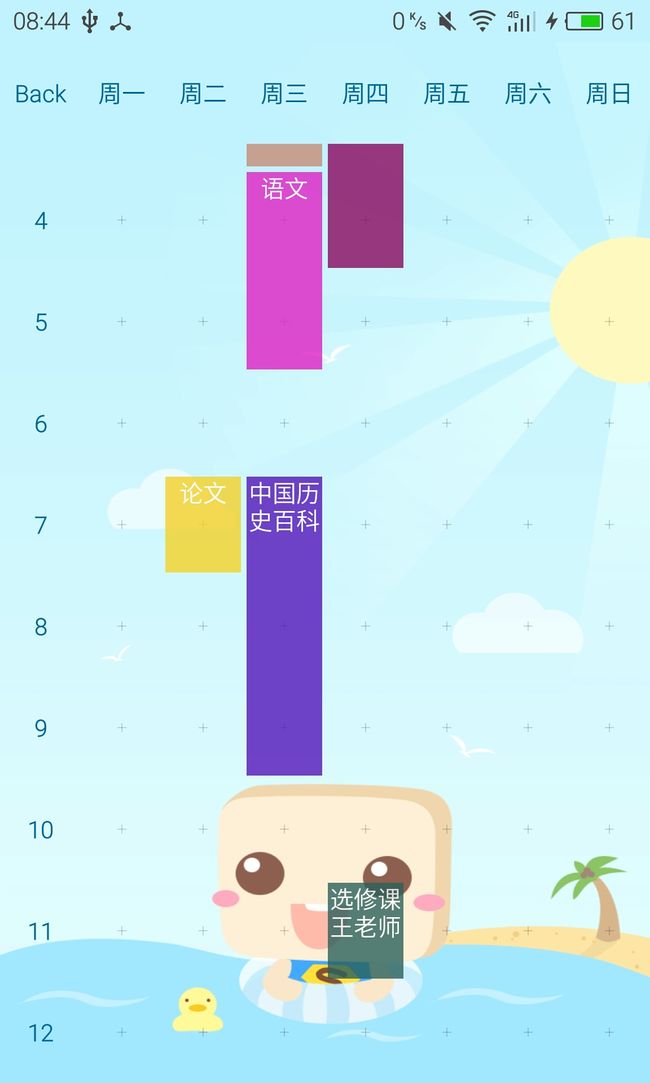
观察分析课程表,发现它可以按下图所示的方式实现:

一、视图部分的实现:
<1.顶部GridView表示周一到周五,设置numColumns为8,添加的数据为“”、周一到周日,这个很简单。
<2.左侧使用自定义的ListView,表示第几节课,这里自定义的原因是为解决ScrollView内嵌ListView的滑动冲突问题,下面会提供代码。
<3.中间Content部分是课程表的主要部分。我们的实现思路是这样的:
在FrameLayout中填充俩个组件,可以知道这俩个组件是重叠的。
第一个组件是自定义的GridView(原因同上),用于显示背景的课程格子,以及触发用户的点击事件,至于触发结果,就是获取用户当前选择的位置,以及课程内容和时长。
第二个组件是自定义的一个组件,我们起名为MySchedule,它是一个ViewGroup,作用是在背景GridView获取到数据后,将对应的数据以组件(这里是Textview)的形式添加到MySchedule的对应位置中,以达到课程格子的效果。本身他内部是没有任何组件的,也就是透明的。
二、存储部分的实现:
<1.存储方法:存储采用File文件将课程的数据(位置,课程内容,时长)存储在SD卡中。
<2.存储格式:这里使用Json的生成和解析。
三、代码部分。
<1.照旧,因为涉及到存储,记得添加权限。
<2.布局部分:
《2.1 主布局 activty_main.xml
xml version="1.0" encoding="utf-8"?>
<LinearLayout xmlns:android="http://schemas.android.com/apk/res/android"
    xmlns:tools="http://schemas.android.com/tools"
    android:layout_width="match_parent"
    android:layout_height="match_parent"
    android:background="@drawable/back"
    android:orientation="vertical"
    tools:context="monster.schedule.MainActivity">

    <GridView
        android:id="@+id/gvDate"
        android:layout_width="match_parent"
        android:layout_height="60dp"
        android:numColumns="8" />

    <ScrollView
        android:layout_width="match_parent"
        android:layout_height="match_parent"
        android:scrollbars="none">

        <LinearLayout
            android:layout_width="match_parent"
            android:layout_height="match_parent"
            android:orientation="horizontal"
            android:weightSum="8">

            <com.example.administrator.schedule.MyListView
                android:id="@+id/lvNum"
                android:layout_width="0dp"
                android:layout_height="match_parent"
                android:layout_weight="1"
                android:divider="@null">com.example.administrator.schedule.MyListView>

            <FrameLayout
                android:layout_width="0dp"
                android:layout_height="match_parent"
                android:layout_weight="7">

                <com.example.administrator.schedule.MyGridView
                    android:id="@+id/gvContent"
                    android:layout_width="match_parent"
                    android:layout_height="match_parent"
                    android:horizontalSpacing="0dp"
                    android:numColumns="7"
                    android:scrollbars="none"
                    android:verticalSpacing="0dp">com.example.administrator.schedule.MyGridView>

                <com.example.administrator.schedule.MySchedule
                    android:id="@+id/mySchedule"
                    android:layout_width="match_parent"
                    android:layout_height="match_parent">com.example.administrator.schedule.MySchedule>
            FrameLayout>
        LinearLayout>
    ScrollView>
LinearLayout>
《2.2 Content_GridView_item布局 item_gv_content.xml
xml version="1.0" encoding="utf-8"?>
<FrameLayout xmlns:android="http://schemas.android.com/apk/res/android"
    android:layout_width="match_parent"
    android:layout_height="match_parent"
    android:orientation="vertical">

    <com.example.administrator.schedule.MyCardView
        android:id="@+id/mcv"
        android:layout_width="match_parent"
        android:layout_height="60dp" />
FrameLayout>
《2.3 顶部GridView_item
布局 item_gv_date.xml
xml version="1.0" encoding="utf-8"?>
<TextView xmlns:android="http://schemas.android.com/apk/res/android"
    android:id="@+id/tvDate"
    android:textColor="#006699"
    android:layout_width="match_parent"
    android:layout_height="60dp"
    android:gravity="center"
    android:minHeight="60dp">
TextView>
《2.4 侧边ListView_item布局 item_lv_num.xml
xml version="1.0" encoding="utf-8"?>
<TextView xmlns:android="http://schemas.android.com/apk/res/android"
    android:id="@+id/tvNum"
    android:layout_width="match_parent"
    android:layout_height="60dp"
    android:gravity="center"
    android:minHeight="60dp"
    android:textColor="#006699">TextView>
《2.5 添加课程的提示Dialog布局 dialog.xml
xml version="1.0" encoding="utf-8"?>
<LinearLayout xmlns:android="http://schemas.android.com/apk/res/android"
    android:layout_width="match_parent"
    android:layout_height="match_parent"
    android:background="#ffffff"
    android:orientation="vertical">

    <EditText
        android:id="@+id/etName"
        android:layout_width="match_parent"
        android:layout_height="60dp"
        android:layout_marginLeft="20dp"
        android:background="#00000000"
        android:gravity="center_vertical"
        android:hint="输入课程名字" />

    <EditText
        android:id="@+id/etNum"
        android:layout_width="match_parent"
        android:layout_height="60dp"
        android:layout_marginLeft="20dp"
        android:background="#00000000"
        android:gravity="center_vertical"
        android:hint="输入课程时长"
        android:numeric="integer" />

    <LinearLayout
        android:layout_width="match_parent"
        android:layout_height="wrap_content"
        android:orientation="horizontal">

        <Button
            android:id="@+id/btnSure"
            android:layout_width="0dp"
            android:layout_height="wrap_content"
            android:layout_weight="1"
            android:text="确认" />

        <Button
            android:id="@+id/btnCancel"
            android:layout_width="0dp"
            android:layout_height="wrap_content"
            android:layout_weight="1"
            android:text="取消" />
    LinearLayout>
LinearLayout>
《2.6 编辑课程的提示Dialog布局 dialog_edit.xml
xml version="1.0" encoding="utf-8"?>
<LinearLayout xmlns:android="http://schemas.android.com/apk/res/android"
    android:layout_width="match_parent"
    android:layout_height="match_parent"
    android:background="#ffffff"
    android:orientation="vertical">

    <TextView
        android:layout_marginLeft="20dp"
        android:gravity="center_vertical"
        android:id="@+id/tvContent"
        android:layout_width="match_parent"
        android:layout_height="60dp" />

    <LinearLayout
        android:layout_width="match_parent"
        android:layout_height="wrap_content"
        android:orientation="horizontal">

        <Button
            android:id="@+id/btnDele"
            android:layout_width="0dp"
            android:layout_height="40dp"
            android:layout_weight="1"
            android:text="删除" />

        <Button
            android:id="@+id/btnClose"
            android:layout_width="0dp"
            android:layout_height="40dp"
            android:layout_weight="1"
            android:text="关闭" />
    LinearLayout>
LinearLayout>
<3.Java
《1.MainActivity 主要进行存储数据的读取和课程的添加操作
public class MainActivity extends Activity {
    private GridView gvDate, gvContent;
    private ListView lvNum;
    private MySchedule mySchedule;

    @Override
    protected void onCreate(Bundle savedInstanceState) {
        super.onCreate(savedInstanceState);
        setContentView(R.layout.activity_main);

        init();
        //因为重叠,所以可以通过GridView的ItemClick获取当前位置信息,这里传的是position,具体的计算工作交给MySchedule
        gvContent.setOnItemClickListener(new AdapterView.OnItemClickListener() {
            @Override
            public void onItemClick(AdapterView parent, View view, final int position, long id) {
                openAlter(position);
            }
        });
        //打开app,读取存储的课程信息
        mySchedule.read();
    }

    private void init() {
        gvDate = (GridView) findViewById(R.id.gvDate);
        gvDate.setAdapter(new GvDateAdapter(MainActivity.this));

        lvNum = (ListView) findViewById(R.id.lvNum);
        lvNum.setAdapter(new LvNumAdapter(MainActivity.this));

        gvContent = (GridView) findViewById(R.id.gvContent);
        gvContent.setAdapter(new GvContentAdapter(MainActivity.this));

        mySchedule = (MySchedule) findViewById(R.id.mySchedule);
    }

    //添加组件的dialog
    private void openAlter(final int position) {
        final AlertDialog alertDialog = new AlertDialog.Builder(MainActivity.this).create();
        alertDialog.show();
        alertDialog.getWindow().clearFlags(WindowManager.LayoutParams.FLAG_NOT_FOCUSABLE | WindowManager.LayoutParams.FLAG_ALT_FOCUSABLE_IM);
        alertDialog.getWindow().setSoftInputMode(WindowManager.LayoutParams.SOFT_INPUT_STATE_VISIBLE);
        Window window = alertDialog.getWindow();
        window.setContentView(R.layout.dialog);
        final EditText etName = (EditText) window.findViewById(R.id.etName);
        final EditText etNum = (EditText) window.findViewById(R.id.etNum);
        Button btnSuer = (Button) window.findViewById(R.id.btnSure);
        Button btnCancel = (Button) window.findViewById(R.id.btnCancel);

        btnSuer.setOnClickListener(new View.OnClickListener() {
            @Override
            public void onClick(View v) {
                if (!TextUtils.isEmpty(etName.getText().toString()) && !TextUtils.isEmpty(etNum.getText().toString())) {
                    int num = Integer.valueOf(etNum.getText().toString());
                    if (num <= 12 && num > 0) {
                        Coordinate coordinate = new Coordinate(position, num, etName.getText().toString());
                        //此时是新添加View,所以要先添加进列表,然后显示,最后还要进行数据的保存工作,这些全部在addToList中完成了
                        mySchedule.addToList(coordinate);
                        alertDialog.dismiss();
                    }
                }
            }
        });
        btnCancel.setOnClickListener(new View.OnClickListener() {
            @Override
            public void onClick(View v) {
                alertDialog.dismiss();
            }
        });
    }
}
《2.自定义的ListView和GridView,用于解决内嵌冲突。
public class MyGridView extends GridView {
    public MyGridView(Context context, AttributeSet attrs) {
        super(context, attrs);
    }

    public MyGridView(Context context) {
        super(context);
    }

    public MyGridView(Context context, AttributeSet attrs, int defStyle) {
        super(context, attrs, defStyle);
    }

    @Override
    public void onMeasure(int widthMeasureSpec, int heightMeasureSpec) {

        int expandSpec = MeasureSpec.makeMeasureSpec(Integer.MAX_VALUE >> 2,
                MeasureSpec.AT_MOST);
        super.onMeasure(widthMeasureSpec, expandSpec);
    }

}
-----------------------------------------------------------------------------
public class MyListView extends ListView {
    public MyListView(Context context, AttributeSet attrs) {
        super(context, attrs);
    }

    public MyListView(Context context) {
        super(context);
    }

    public MyListView(Context context, AttributeSet attrs, int defStyle) {
        super(context, attrs, defStyle);
    }

    @Override
    public void onMeasure(int widthMeasureSpec, int heightMeasureSpec) {

        int expandSpec = MeasureSpec.makeMeasureSpec(Integer.MAX_VALUE >> 2,
                MeasureSpec.AT_MOST);
        super.onMeasure(widthMeasureSpec, expandSpec);
    }

}
《3.三个适配器类,用于适配主布局中的Listview和俩个GridView
public class GvContentAdapter extends BaseAdapter { private Context context; private ArrayListlist; public GvContentAdapter(Context context) { this.context = context; list = new ArrayList<>(); for (int i = 0 ; i < 84;i++){ list.add(""); } } @Override public int getCount() { return list != null ? list.size() : 0; } @Override public Object getItem(int position) { return null; } @Override public long getItemId(int position) { return 0; } @Override public View getView(int position, View convertView, ViewGroup parent) { ViewHolder vh = null; if (convertView == null) { vh = new ViewHolder(); convertView = LayoutInflater.from(context).inflate(R.layout.item_gv_content, null); vh.mcv = (MyCardView) convertView.findViewById(R.id.mcv); convertView.setTag(vh); } else { vh = (ViewHolder) convertView.getTag(); } return convertView; } public static final class ViewHolder { MyCardView mcv; } }
------------------------------------------------------------------------------------------------------ public class GvDateAdapter extends BaseAdapter { private Context context; private ArrayListlist; public GvDateAdapter(Context context) { this.context = context; list = new ArrayList<>(); list.add("Back"); list.add("周一"); list.add("周二"); list.add("周三"); list.add("周四"); list.add("周五"); list.add("周六"); list.add("周日"); } @Override public int getCount() { return list != null ? list.size() : 0; } @Override public Object getItem(int position) { return null; } @Override public long getItemId(int position) { return 0; } @Override public View getView(int position, View convertView, ViewGroup parent) { ViewHolder vh = null; if (convertView == null) { vh = new ViewHolder(); convertView = LayoutInflater.from(context).inflate(R.layout.item_gv_date, null); vh.tvDate = (TextView) convertView.findViewById(R.id.tvDate); convertView.setTag(vh); } else { vh = (ViewHolder) convertView.getTag(); } vh.tvDate.setText(list.get(position)); return convertView; } public static final class ViewHolder { TextView tvDate; } }
------------------------------------------------------------------------------------------------------------------ public class LvNumAdapter extends BaseAdapter { private Context context; private ArrayListlist; public LvNumAdapter(Context context) { this.context = context; list = new ArrayList<>(); for (int i = 1; i <= 12; i++) { list.add(i + ""); } } @Override public int getCount() { return list != null ? list.size() : 0; } @Override public Object getItem(int position) { return null; } @Override public long getItemId(int position) { return 0; } @Override public View getView(int position, View convertView, ViewGroup parent) { ViewHolder vh = null; if (convertView == null) { vh = new ViewHolder(); convertView = LayoutInflater.from(context).inflate(R.layout.item_lv_num, null); vh.tvNum = (TextView) convertView.findViewById(R.id.tvNum); convertView.setTag(vh); } else { vh = (ViewHolder) convertView.getTag(); } vh.tvNum.setText(list.get(position)); return convertView; } public static final class ViewHolder { TextView tvNum; } }
《4.为了使背景的GridView的item有对应的“+”字符,我们稍微给它的item中的View自定义一下。
public class MyCardView extends TextView {
    private Paint mPaint;

    public MyCardView(Context context, AttributeSet attrs) {
        super(context, attrs);
        mPaint = new Paint();
        mPaint.setAntiAlias(true);
        mPaint.setStrokeWidth(2);
        mPaint.setAlpha(40);
    }

    @Override
    protected void onDraw(Canvas canvas) {
        super.onDraw(canvas);
        int x = getMeasuredWidth() / 2;
        int y = getMeasuredHeight() / 2;
        int key = getMeasuredWidth()/18;
        canvas.drawLine(x - key, y, x + key, y, mPaint);
        canvas.drawLine(x, y - key, x, y + key, mPaint);
    }
}
《5.用于存储课程信息的Bean类
//这是存储位置信息,课程名称,课程时长的Bean类
public class Coordinate implements Serializable {
    private int position;
    private int classNum;
    private String className;

    public Coordinate(int position, int classNum, String className) {
        this.position = position;
        this.classNum = classNum;
        this.className = className;
    }

    public String getClassName() {
        return className;
    }

    public void setClassName(String className) {
        this.className = className;
    }

    public int getClassNum() {
        return classNum;
    }

    public int getPosition() {
        return position;
    }

    public void setClassNum(int classNum) {
        this.classNum = classNum;
    }

    public void setPosition(int position) {
        this.position = position;
    }
}
《6.最关键的类,用于实现添加课程格子效果的自定义View---MySchedule
public class MySchedule extends ViewGroup {
    private Context context;
    private ArrayList list;
    //这个是存储路径,开发者可以自己定义
    private static final String file_path = "/schedule.txt";

    public MySchedule(Context context, AttributeSet attrs) {
        super(context, attrs);
        this.context = context;
        list = new ArrayList<>();
    }

    //根据List中存储的课程信息,依次添加TextView
    @Override
    protected void onLayout(boolean changed, int l, int t, int r, int b) {
        int childNum = getChildCount();
        for (int i = 0; i < childNum; i++) {
            View child = getChildAt(i);

            Coordinate child_coordinate = list.get(i);
            int position = child_coordinate.getPosition();
            //position是从0开始的
            //这个计算的是第几行和第几列,因为一周固定7天,所以这里直接使用了7
            int line = position / 7;
            int vertical = position % 7;

            //每个课程最小单元格的宽度和高度,注意,这里布局中的GridView和ListView是去除了Divider的
            int item_width = getMeasuredWidth() / 7;
            int item_height = getMeasuredHeight() / 12;
            //给子View计算位置坐标,分别是左上角和右下角的坐标
            int left = vertical * item_width;
            int top = line * item_height;
            int right = (vertical + 1) * item_width;
            int bottom = (line + child_coordinate.getClassNum()) * item_height;
            child.layout(left + 5, top + 5, right - 5, bottom - 5);
        }
    }

    //外部调用的、用于添加组件(课程)的方法
    public void addToList(Coordinate coordinate) {
        list.add(coordinate);
        addView(coordinate);
        save();
    }

    //添加视图
//    @TargetApi(Build.VERSION_CODES.LOLLIPOP)
    public void addView(final Coordinate coordinate) {
        TextView tv = new TextView(context);
        tv.setText(coordinate.getClassName());
        tv.setBackgroundColor(randomColor());
        tv.setGravity(Gravity.CENTER);
        tv.setTextColor(Color.parseColor("#ffffff"));
        tv.setAlpha(0.80f);
//        tv.setElevation(5);
        tv.setOnClickListener(new OnClickListener() {
            @Override
            public void onClick(View v) {
                openAlter(coordinate.getPosition(), coordinate.getClassName());
            }
        });
        addView(tv);
    }

    //移除视图
    private void removeView(int position) {
        for (int i = 0; i < list.size(); i++) {
            if (list.get(i).getPosition() == position) {
                list.remove(i);
                removeView(getChildAt(i));
            }
        }
        save();
    }

    //保存信息到sd卡下
    public void save() {
        JSONObject jsonObject = dataCreate(list);
        File sdDir = null;
        boolean sdCardExist = Environment.getExternalStorageState()
                .equals(android.os.Environment.MEDIA_MOUNTED); //判断sd卡是否存在
        if (sdCardExist) {
            sdDir = Environment.getExternalStorageDirectory();//获取跟目录
            FileOutputStream fout = null;//也可以传一个file作为参数
            try {
                fout = new FileOutputStream(sdDir + file_path);
                byte[] bytes = jsonObject.toString().getBytes();
                fout.write(bytes);
                fout.close();
            } catch (FileNotFoundException e) {
                e.printStackTrace();
            } catch (IOException e) {
                e.printStackTrace();
            }
        }
    }

    //把sd卡下的数据读取到list中,然后一一显示
    public void read() {
        File sdDir = null;
        boolean sdCardExist = Environment.getExternalStorageState()
                .equals(android.os.Environment.MEDIA_MOUNTED); //判断sd卡是否存在
        if (sdCardExist) {
            sdDir = Environment.getExternalStorageDirectory();//获取跟目录
            File file = new File(sdDir + file_path);
            if (!file.exists()) {
                return;
            }
            FileInputStream fin = null;
            try {
                fin = new FileInputStream(sdDir + file_path);
                int length = fin.available();
                byte[] buffer = new byte[length];
                fin.read(buffer);
                String res = new String(buffer, "utf-8");

                fin.close();

                dataParse(res);
                //此时已经将读取的数据全部存入到list中,只需要将list中的view显示出来就可,不需要保存
                for (int i = 0; i < list.size(); i++) {
                    addView(list.get(i));
                }
            } catch (FileNotFoundException e) {
                e.printStackTrace();
            } catch (UnsupportedEncodingException e) {
                e.printStackTrace();
            } catch (IOException e) {
                e.printStackTrace();
            }

        }
    }

    //随机生成颜色
    private int randomColor() {
        Random rnd = new Random();
        return Color.argb(255, rnd.nextInt(256), rnd.nextInt(256), rnd.nextInt(256));
    }

    //编辑dialog,开发者可以自行添加一些方法,比如修改
    private void openAlter(final int position, String text) {
        final AlertDialog alertDialog = new AlertDialog.Builder(context).create();
        alertDialog.show();
        alertDialog.getWindow().clearFlags(WindowManager.LayoutParams.FLAG_NOT_FOCUSABLE | WindowManager.LayoutParams.FLAG_ALT_FOCUSABLE_IM);
        alertDialog.getWindow().setSoftInputMode(WindowManager.LayoutParams.SOFT_INPUT_STATE_VISIBLE);
        Window window = alertDialog.getWindow();
        window.setContentView(R.layout.dialog_edit);
        TextView tvContent = (TextView) window.findViewById(R.id.tvContent);
        tvContent.setText(text);
        Button btnDele = (Button) window.findViewById(R.id.btnDele);
        Button btnClose = (Button) window.findViewById(R.id.btnClose);

        btnDele.setOnClickListener(new View.OnClickListener() {
            @Override
            public void onClick(View v) {
                removeView(position);
                alertDialog.dismiss();
            }
        });
        btnClose.setOnClickListener(new View.OnClickListener() {
            @Override
            public void onClick(View v) {
                alertDialog.dismiss();
            }
        });
    }

    //Json文件的生成
    private JSONObject dataCreate(ArrayList coordinates) {
        JSONObject jsonObject = new JSONObject();
        try {
            JSONArray jsonArray = new JSONArray();
            for (int i = 0; i < coordinates.size(); i++) {
                JSONObject object = new JSONObject();
                object.put("position", coordinates.get(i).getPosition());
                object.put("classNum", coordinates.get(i).getClassNum());
                object.put("className", coordinates.get(i).getClassName());
                jsonArray.put(i, object);
            }
            jsonObject.put("coordinate", jsonArray);
        } catch (JSONException e) {
            e.printStackTrace();
        }
        return jsonObject;
    }

    //Json文件的解析
    private void dataParse(String data) {
        try {
            JSONObject jsonObject = new JSONObject(data);
            JSONArray jsonArray = jsonObject.optJSONArray("coordinate");
            for (int i = 0; i < jsonArray.length(); i++) {
                JSONObject object = (JSONObject) jsonArray.optJSONObject(i);
                Coordinate coordinate = new Coordinate(
                        object.optInt("position"),
                        object.optInt("classNum"),
                        object.optString("className")
                );
                list.add(coordinate);
            }
        } catch (JSONException e) {
            e.printStackTrace();
        }
    }
}
最后附背景图一张,这样我们就做出了仿超级课程表页面的课程表。注意变更xml中的自定义组件名。
顶部采用GridView,侧边采用ListView是为了方便扩展。
为了更加美观,边框样式可以通过自定义item组件来实现多种多样的效果,dialog也如此,由于这里主讲的是实现方式,所以就不赘述了。
