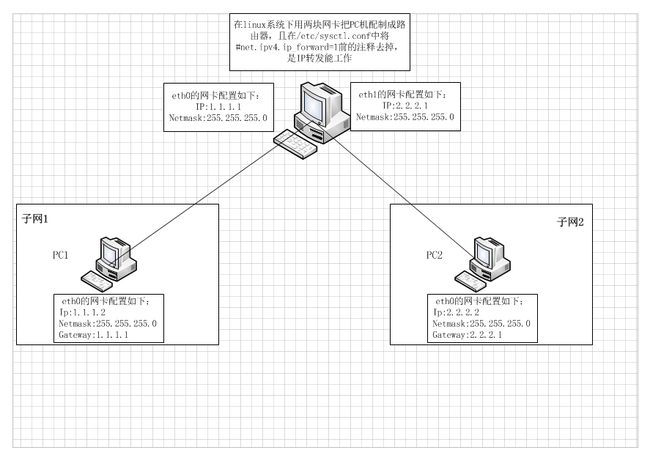
一、两个不同网段的子网相互访问或通信
废话不多说了,直接上图,一目了然吧。
按照如图配置,就可以实现两个不同网段的子网相互通信。
二、连接上网的配置:
如果想让这两个子网,不仅可以相互通信,而且还可以连接到Ineternet。那就需要三块网卡:
一台机器PC1配置三块网卡eth0、eth1和eth2.eth0连接外网,eth1和eth2分别连接两个不同网段的子网。假定192.168.0.3连接外网,网关为192.168.0.1.PC2为一个网卡接入内网,IP为192.168.1.2,网关为192.168.1.1
PC3为一个网卡接入另一个子网,IP:192.168.2.2,网关为192.168.2.1.
现在想PC2和PC3想通过PC1不仅可以相互通信还可以连接,上网。
1.首先要打开PC1的IP转发功能,默认是关闭的。可用下面命令检查:
more /proc/sys/net/ipv4/ip_forward
如果显示为0,则是关闭的,需要打开,
echo 1>/pro/sys/net/ipv4/ip_forward
由于该命令只是暂时打开转发,为了防止重启配置失效,需要进行如下配置:
vim /etc/sysctl.conf
将其中net.ipv4.ip_forward=1前面的注释去掉。然后运行
sysctl -p
立即生效,或者重启。
为PC1进行如下设置:
vim /etc/network/interface

auto eth0
iface eth0 inet static
address 192.168.0.3
netmask 255.255.255.0
gateway 192.168.0.1

auto eth1
iface eth1 inet static
address 192.168.1.1
netmask 255.255.255.0

auto eth2
iface eth2 inet static
address 192.168.2.1
netmask 255.255.255.0
重启网络:
$ sudo /etc/init.d/networking restart
你也可以使用route命令来添加,如下所示
route add -net 192.168.1.0/24 dev eth1
route add -net 192.168.2.0/24 dev eth2
2.PC2和PC3需要将缺省网关分别设置为PC1eth1的ip和PC1eth2的ip:
#PC2
vim /etc/sysconfig/network

auto eth0
iface eth0 inet static
address 192.168.1.2
netmask 255.255.255.0
gateway 192.168.1.1

#PC3
vim /etc/sysconfig/network

auto eth0
iface eth0 inet static
address 192.168.2.2
netmask 255.255.255.0
gateway 192.168.2.1
重启网络:
$ sudo /etc/init.d/networking restart
3.注意,当时就是忘了这个命令,弄了很久:
$ sudo iptables -t nat -A POSTROUTING -o eth0 -s 192.168.1.0/24 -j MASQUERADE

$ sudo iptables -t nat -A POSTROUTING -o eth0 -s 192.168.2.0/24 -j MASQUERADE
此刻,一个简单的不同网段相互通信,并且能够连接互联网,小型的路由器就这样完成了。
