计算机视觉ch4 照相机标定及增强现实
文章目录
- 准备
- 照相机标定
- 增强现实
准备
环境配置
库的安装
照相机标定
使用平面物体作为标记物,来计算用于新视图投影矩阵的例子。将图像的特征和对齐后的标记匹配,计算出单应性矩阵,然后用于计算照相机的姿态。
Python实现
from pylab import *
from PIL import Image
from PCV.geometry import homography, camera
from PCV.localdescriptors import sift

def cube_points(c, wid):
    p = []

    # 底部
    p.append([c[0] - wid, c[1] - wid, c[2] - wid])
    p.append([c[0] - wid, c[1] + wid, c[2] - wid])
    p.append([c[0] + wid, c[1] + wid, c[2] - wid])
    p.append([c[0] + wid, c[1] - wid, c[2] - wid])
    p.append([c[0] - wid, c[1] - wid, c[2] - wid])  # same as first to close plot

    # top
    p.append([c[0] - wid, c[1] - wid, c[2] + wid])
    p.append([c[0] - wid, c[1] + wid, c[2] + wid])
    p.append([c[0] + wid, c[1] + wid, c[2] + wid])
    p.append([c[0] + wid, c[1] - wid, c[2] + wid])
    p.append([c[0] - wid, c[1] - wid, c[2] + wid])  # same as first to close plot

    # 垂直的侧面
    p.append([c[0] - wid, c[1] - wid, c[2] + wid])
    p.append([c[0] - wid, c[1] + wid, c[2] + wid])
    p.append([c[0] - wid, c[1] + wid, c[2] - wid])
    p.append([c[0] + wid, c[1] + wid, c[2] - wid])
    p.append([c[0] + wid, c[1] + wid, c[2] + wid])
    p.append([c[0] + wid, c[1] - wid, c[2] + wid])
    p.append([c[0] + wid, c[1] - wid, c[2] - wid])
    return array(p).T

def my_calibration(sz):
    row, col = sz
    fx = 2555 * col / 2592
    fy = 2586 * row / 1936
    K = diag([fx, fy, 1])
    K[0, 2] = 0.5 * col
    K[1, 2] = 0.5 * row
    return K


# 计算
sift.process_image('D:\pythonxy\PCV-book-data\data/book_frontal.jpg', 'im0.sift')
l0, d0 = sift.read_features_from_file('im0.sift')
sift.process_image('D:\pythonxy\PCV-book-data\data/book_perspective.jpg', 'im1.sift')
l1, d1 = sift.read_features_from_file('im1.sift')

# 匹配特征并估计单应性
matches = sift.match_twosided(d0, d1)
ndx = matches.nonzero()[0]
fp = homography.make_homog(l0[ndx, :2].T)
ndx2 = [int(matches[i]) for i in ndx]
tp = homography.make_homog(l1[ndx2, :2].T)
model = homography.RansacModel()
H, inliers = homography.H_from_ransac(fp, tp, model)

# 摄像机标定
K = my_calibration((747, 1000))

# 3D points at plane z=0 with sides of length 0.2
box = cube_points([0, 0, 0.1], 0.1)

# 在第一个图像中投影底部正方形
cam1 = camera.Camera(hstack((K, dot(K, array([[0], [0], [-1]])))))

# 第一个点是底部的正方形
box_cam1 = cam1.project(homography.make_homog(box[:, :5]))

# use H 将点转移到第二幅图像
box_trans = homography.normalize(dot(H, box_cam1))

# 计算第二个摄像机矩阵 from cam1 and H
cam2 = camera.Camera(dot(H, cam1.P))
A = dot(linalg.inv(K), cam2.P[:, :3])
A = array([A[:, 0], A[:, 1], cross(A[:, 0], A[:, 1])]).T
cam2.P[:, :3] = dot(K, A)

# 第二个摄像机项目
box_cam2 = cam2.project(homography.make_homog(box))

# plotting
im0 = array(Image.open('D:\pythonxy\PCV-book-data\data/book_frontal.jpg'))
im1 = array(Image.open('D:\pythonxy\PCV-book-data\data/book_perspective.jpg'))
figure()
imshow(im0)
plot(box_cam1[0, :], box_cam1[1, :], linewidth=3)
title('2D projection of bottom square')
axis('off')
figure()
imshow(im1)
plot(box_trans[0, :], box_trans[1, :], linewidth=3)
title('2D projection transfered with H')
axis('off')
figure()
imshow(im1)
plot(box_cam2[0, :], box_cam2[1, :], linewidth=3)
title('3D points projected in second image')
axis('off')
show()

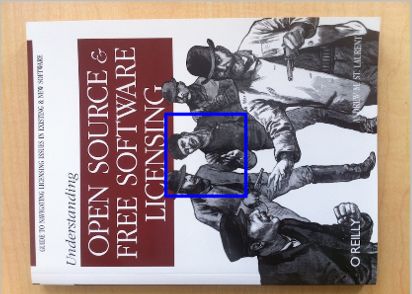
带有一个灰色正方形区域的模板图像

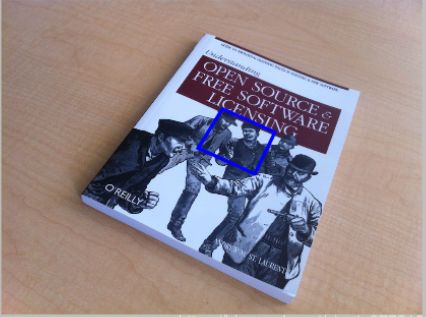
从未知视角拍摄的一幅图像,该图像包含同一个正方形,该正方形已经经过估计的单应性矩阵进行了变换

使用计算出的照相机矩阵变换立方体
增强现实
增强现实(Augmented Reality ,AR)是将物体和相应信息放置在图像数据上的一系列操作的总称。给定一幅带有标记平面的图像,我们能够计算出照相机的位置和姿态,使用这些信息来放置计算机图形学模型,能够正确的表示他们。
Python实现
import math
import pickle
from pylab import *
from OpenGL.GL import *
from OpenGL.GLU import *
from OpenGL.GLUT import *
import pygame, pygame.image
from pygame.locals import *
from PCV.geometry import homography, camera
from PCV.localdescriptors import sift


def cube_points(c, wid):
    """ Creates a list of points for plotting
        a cube with plot. (the first 5 points are
        the bottom square, some sides repeated). """
    p = []
    # bottom
    p.append([c[0] - wid, c[1] - wid, c[2] - wid])
    p.append([c[0] - wid, c[1] + wid, c[2] - wid])
    p.append([c[0] + wid, c[1] + wid, c[2] - wid])
    p.append([c[0] + wid, c[1] - wid, c[2] - wid])
    p.append([c[0] - wid, c[1] - wid, c[2] - wid])  # same as first to close plot

    # top
    p.append([c[0] - wid, c[1] - wid, c[2] + wid])
    p.append([c[0] - wid, c[1] + wid, c[2] + wid])
    p.append([c[0] + wid, c[1] + wid, c[2] + wid])
    p.append([c[0] + wid, c[1] - wid, c[2] + wid])
    p.append([c[0] - wid, c[1] - wid, c[2] + wid])  # same as first to close plot

    # vertical sides
    p.append([c[0] - wid, c[1] - wid, c[2] + wid])
    p.append([c[0] - wid, c[1] + wid, c[2] + wid])
    p.append([c[0] - wid, c[1] + wid, c[2] - wid])
    p.append([c[0] + wid, c[1] + wid, c[2] - wid])
    p.append([c[0] + wid, c[1] + wid, c[2] + wid])
    p.append([c[0] + wid, c[1] - wid, c[2] + wid])
    p.append([c[0] + wid, c[1] - wid, c[2] - wid])

    return array(p).T


def my_calibration(sz):
    row, col = sz
    fx = 2555 * col / 2592
    fy = 2586 * row / 1936
    K = diag([fx, fy, 1])
    K[0, 2] = 0.5 * col
    K[1, 2] = 0.5 * row
    return K


def set_projection_from_camera(K):
    glMatrixMode(GL_PROJECTION)
    glLoadIdentity()
    fx = K[0, 0]
    fy = K[1, 1]
    fovy = 2 * math.atan(0.5 * height / fy) * 180 / math.pi
    aspect = (width * fy) / (height * fx)
    near = 0.1
    far = 100.0
    gluPerspective(fovy, aspect, near, far)
    glViewport(0, 0, width, height)


def set_modelview_from_camera(Rt):
    glMatrixMode(GL_MODELVIEW)
    glLoadIdentity()
    Rx = np.array([[1, 0, 0], [0, 0, -1], [0, 1, 0]])
    R = Rt[:, :3]
    U, S, V = np.linalg.svd(R)
    R = np.dot(U, V)
    R[0, :] = -R[0, :]
    t = Rt[:, 3]
    M = np.eye(4)
    M[:3, :3] = np.dot(R, Rx)
    M[:3, 3] = t
    M = M.T
    m = M.flatten()
    glLoadMatrixf(m)


def draw_background(imname):
    bg_image = pygame.image.load(imname).convert()
    bg_data = pygame.image.tostring(bg_image, "RGBX", 1)
    glMatrixMode(GL_MODELVIEW)
    glLoadIdentity()

    glClear(GL_COLOR_BUFFER_BIT | GL_DEPTH_BUFFER_BIT)
    glEnable(GL_TEXTURE_2D)
    glBindTexture(GL_TEXTURE_2D, glGenTextures(1))
    glTexImage2D(GL_TEXTURE_2D, 0, GL_RGBA, width, height, 0, GL_RGBA, GL_UNSIGNED_BYTE, bg_data)
    glTexParameterf(GL_TEXTURE_2D, GL_TEXTURE_MAG_FILTER, GL_NEAREST)
    glTexParameterf(GL_TEXTURE_2D, GL_TEXTURE_MIN_FILTER, GL_NEAREST)
    glBegin(GL_QUADS)
    glTexCoord2f(0.0, 0.0);
    glVertex3f(-1.0, -1.0, -1.0)
    glTexCoord2f(1.0, 0.0);
    glVertex3f(1.0, -1.0, -1.0)
    glTexCoord2f(1.0, 1.0);
    glVertex3f(1.0, 1.0, -1.0)
    glTexCoord2f(0.0, 1.0);
    glVertex3f(-1.0, 1.0, -1.0)
    glEnd()
    glDeleteTextures(1)


def draw_teapot(size):
    glEnable(GL_LIGHTING)
    glEnable(GL_LIGHT0)
    glEnable(GL_DEPTH_TEST)
    glClear(GL_DEPTH_BUFFER_BIT)
    glMaterialfv(GL_FRONT, GL_AMBIENT, [0, 0, 0, 0])
    glMaterialfv(GL_FRONT, GL_DIFFUSE, [0.5, 0.0, 0.0, 0.0])
    glMaterialfv(GL_FRONT, GL_SPECULAR, [0.7, 0.6, 0.6, 0.0])
    glMaterialf(GL_FRONT, GL_SHININESS, 0.25 * 128.0)
    glutSolidTeapot(size)


width, height = 1000, 747


def setup():
    pygame.init()
    pygame.display.set_mode((width, height), OPENGL | DOUBLEBUF)
    pygame.display.set_caption("OpenGL AR demo")


# compute features
sift.process_image('book_frontal.JPG', 'im0.sift')
l0, d0 = sift.read_features_from_file('im0.sift')

sift.process_image('book_perspective.JPG', 'im1.sift')
l1, d1 = sift.read_features_from_file('im1.sift')

# match features and estimate homography
matches = sift.match_twosided(d0, d1)
ndx = matches.nonzero()[0]
fp = homography.make_homog(l0[ndx, :2].T)
ndx2 = [int(matches[i]) for i in ndx]
tp = homography.make_homog(l1[ndx2, :2].T)

model = homography.RansacModel()
H, inliers = homography.H_from_ransac(fp, tp, model)

K = my_calibration((747, 1000))
cam1 = camera.Camera(hstack((K, dot(K, array([[0], [0], [-1]])))))
box = cube_points([0, 0, 0.1], 0.1)
box_cam1 = cam1.project(homography.make_homog(box[:, :5]))
box_trans = homography.normalize(dot(H, box_cam1))
cam2 = camera.Camera(dot(H, cam1.P))
A = dot(linalg.inv(K), cam2.P[:, :3])
A = array([A[:, 0], A[:, 1], cross(A[:, 0], A[:, 1])]).T
cam2.P[:, :3] = dot(K, A)

Rt = dot(linalg.inv(K), cam2.P)

setup()
draw_background("book_perspective.bmp")
set_projection_from_camera(K)
set_modelview_from_camera(Rt)
draw_teapot(0.05)

pygame.display.flip()
while True:
    for event in pygame.event.get():
        if event.type == pygame.QUIT:
            sys.exit()
结果
闪退解决方法
在运行的时候可能会出现闪退问题,这是因为freeglut和glut共存的缘故,它们俩定义了相同的方法,这个是动态链接库的重叠问题
具体的解决方法如下:
把python文件夹下的Lib\site-packages\OpenGL\DLLS中的其他文件全部删除只留下glut32.vc9.dll文件即可解决。