centos安装elasticsearch6.0及head插件
1.准备工作
1).ES的.tar包,官网下载
2).系统安装好JDK,ES的运行需要依赖Java环境,最低要求JDK8。
2.开始安装elastic
- 找个地方建个文件夹,把下载好的ES压缩包丢进去,我自己是丢在/opt/dev-env/elasticsearch-6.0.0
里面,然后解压缩
[root@localhost dev-env]# ll
总用量 4
drwxr-xr-x. 8 root root 4096 2月  19 16:13 elasticsearch-6.0.0
解压完,目录如下
[root@localhost dev-env]# cd elasticsearch-6.0.0/
[root@localhost elasticsearch-6.0.0]# ll
总用量 228
drwxr-xr-x.  2 es-user es     4096 11月 10 2017 bin
drwxr-xr-x.  2 es-user es       72 2月  19 16:24 config
drwxr-xr-x.  2 es-user es     4096 11月 10 2017 lib
-rw-r--r--.  1 es-user es    11358 11月 10 2017 LICENSE.txt
drwxr-xr-x. 14 es-user es     4096 11月 10 2017 modules
-rw-rw-r--.  1 es-user es   193097 11月 10 2017 NOTICE.txt
drwxr-xr-x.  2 es-user es        6 11月 10 2017 plugins
-rw-r--r--.  1 es-user es     9326 11月 10 2017 README.textile
[root@localhost elasticsearch-6.0.0]#
- 创建 数据存放目录及log目录
[root@localhost elasticsearch-6.0.0]# mkdir -p esdata/data
[root@localhost elasticsearch-6.0.0]# mkdir -p esdata/log
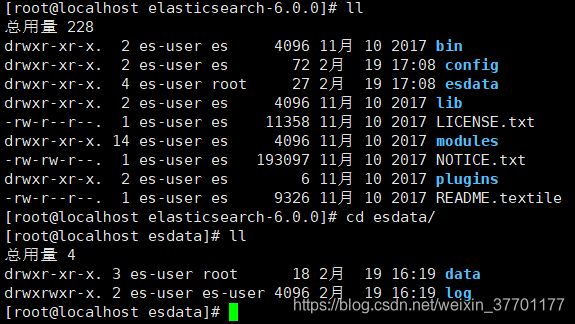
创建完毕后的目录结构如下

3) 创建es的用户以及用户组
elasticsearch不允许root用户启动运行。所以,需要为普通用户赋权限。
注意:以下创建用户和赋权限的操作都需要先切换为root用户才行。
1.创建一个普通用户es-user。(名称任意)
[root@localhost elasticsearch-6.0.0]# useradd es-user
2.为用户es-user创建密码,连续输入两次密码。
[root@localhost elasticsearch-6.0.0]# passwd es-user
3.创建一个用户组es。
[root@localhost elasticsearch-6.0.0]# groupadd es
4.分配用户es-admin到用户组es中。
[root@localhost elasticsearch-6.0.0]# usermod -G es es-user
5.给用户es-user赋予权限,-R表示逐级(N层目录) , *表示 任何文件。
[root@localhost elasticsearch-6.0.0]# chown -R es-admin.es *
注意:进入elastic的根目录执行
- 配置 config/elasticsearch.yml文件
[root@localhost elasticsearch-6.0.0]# cd config/
[root@localhost config]# ll
总用量 16
-rw-rw----. 1 es-user es 3270 2月  19 16:24 elasticsearch.yml
-rw-rw----. 1 es-user es 2672 11月 10 2017 jvm.options
-rw-rw----. 1 es-user es 5091 11月 10 2017 log4j2.properties
[root@localhost config]# vim elasticsearch.yml
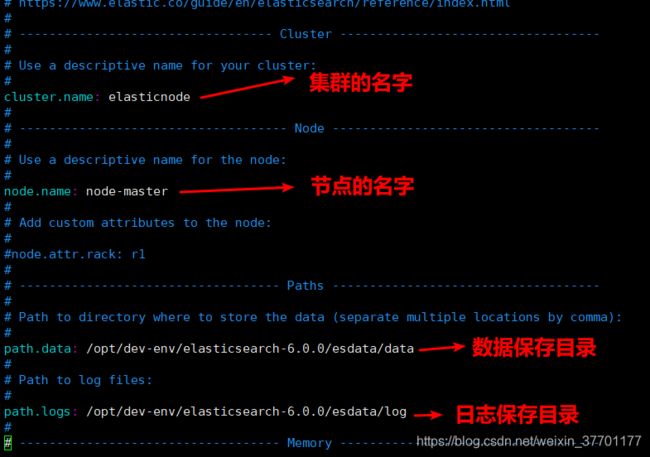
需要修改的地方如下:

注意:目录的路径与你自己的需要一致

5) 配置完毕,启动ES
- 切换到es-user用户
[root@localhost elasticsearch-6.0.0]# su es-user
- 启动elastic
[es-user@localhost elasticsearch-6.0.0]$ ./bin/elasticsearch
注意:现在启动会报错,因为本地的一些参数没有配置,所有的错误放在最后,根据出现的错误进行修改配置即可,这里只是为了说明elastic的启动过程
- 后台运行:
[es-user@localhost elasticsearch-6.0.0]$ ./bin/elasticsearch -d
- 关闭后台运行的elastic
[es-user@localhost elasticsearch-6.0.0]$ ps -ef|grep elasticsearch
[es-user@localhost elasticsearch-6.0.0]$ kill -9 进程号
3.检测
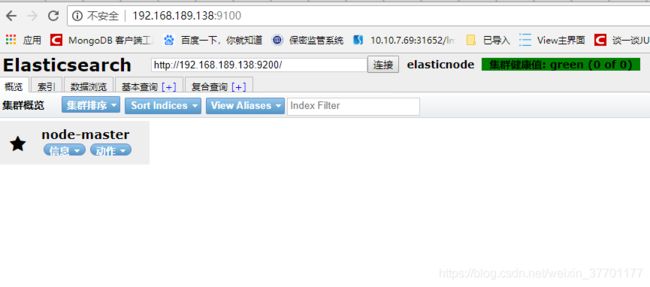
现在你便可以从浏览器输入 IP+:9200来访问ES.结果如下图

如果无法连接,注意防火墙问题。
- 直接关闭防火墙 systemctl stop firewalld #关闭
- 将端口加入防火墙规则
firewall-cmd --zone=public --add-port=80/tcp --permanent #添加端口(–permanent表示永久生效,没有此参数重启后失效)
80处修改为自己想加入的端口
安装过程中的错误合集:
1)max file descriptors [4096] for elasticsearch process likely too low, increase to at least [65536]
原因:无法创建本地文件问题,用户最大可创建文件数太小
可以用命令查看
ulimit -Hn
ulimit -Sn
解决方案:切换到root用户,编辑limits.conf配置文件, 添加类似如下内容:
vim /etc/security/limits.conf
添加如下内容:
*  soft  nofile  65536
*  hard  nofile  65536

备注:* 代表Linux所有用户名称(比如 hadoop)
需要保存、退出、重新登录才可生效。
2)max number of threads [1024] for user [es] likely too low, increase to at least [4096]
原因:无法创建本地线程问题,用户最大可创建线程数太小,修改配置文件/etc/security/limits.conf增加配置
解决方案:切换到root用户,进入limits.d目录下,修改90-nproc.conf 配置文件。
vim /etc/security/limits.conf
找到如下内容:
*   soft    nproc           4096
*   hard    nproc          4096
可以用命令查看
ulimit -Hn
ulimit -Sn
3)max virtual memory areas vm.max_map_count [65530] likely too low, increase to at least [262144]
原因:最大虚拟内存太小
解决方案:切换到root用户,修改/etc/sysctl.conf文件,增加如下配置。
vm.max_map_count=655360
执行sysctl -p ,修改生效。
差不多,足够将其运行起来了。
4. 安装head
ElasticSearch-head是一个H5编写的ElasticSearch集群操作和管理工具,可以对集群进行傻瓜式操作。
显示集群的拓扑,并且能够执行索引和节点级别操作
搜索接口能够查询集群中原始json或表格格式的检索数据
能够快速访问并显示集群的状态
- 安装nodejs
在这里,我将head插件以及nodejs都安装在elastic的同级目录下,新建一个目录nodejs
[root@localhost dev-env]# yum install -y nodejs
也可以通过下面的命令进行安装
[root@localhost dev-env]# wget https://npm.taobao.org/mirrors/node/latest-v4.x/node-v4.5.0-linux-x64.tar.gz
tar -xvf node-v4.5.0-linux-x64.tar.gz
然后是环境变量配置,如下
[root@localhost dev-env]# vim /etc/profile


export JAVA_HOME=/usr/local/java/jdk1.8
export NODE_HOME=/opt/dev-env/nodejs/node-v4.5.0-linux-x64
export PATH=$PATH:$NODE_HOME/bin/
export NODE_PATH=$NODE_HOME/lib/node_modules
export CLASSPATH=$:CLASSPATH:$JAVA_HOME/lib/
export PATH=$PATH:$JAVA_HOME/bin
[root@localhost dev-env]# source /etc/profile
2)安装npm
[root@localhost nodejs]# npm install -g cnpm --registry=https://registry.npm.taobao.org
等待执行完毕就好了
3)使用npm安装grunt
[root@localhost nodejs]# npm install -g grunt
[root@localhost nodejs]# npm install -g grunt-cli --registry=https://registry.npm.taobao.org --no-proxy
你可以使用命令来检验是否安装成功
node -v
npm -v
grunt -version
来查看他们的版本号
4)下载head插件源码
[root@localhost nodejs]# wget https://github.com/mobz/elasticsearch-head/archive/master.zip
也可以在别的地方下载,然后把他传上来,在解压缩
unzip +master.zip
进入 elasticsearch-head-master文件夹
[root@localhost nodejs]# cd elasticsearch-head-master/
[root@localhost elasticsearch-head-master]# ll
总用量 1224
-rw-r--r--. 1 es-admin es       248 1月  25 09:26 Dockerfile
-rw-r--r--. 1 es-admin es       221 1月  25 09:26 Dockerfile-alpine
-rw-r--r--. 1 es-admin es       104 1月  25 09:26 elasticsearch-head.sublime-project
-rw-r--r--. 1 es-admin es      2205 2月  19 18:06 Gruntfile.js
-rw-r--r--. 1 es-admin es      3482 1月  25 09:26 grunt_fileSets.js
-rw-r--r--. 1 es-admin es      1100 1月  25 09:26 index.html
-rw-r--r--. 1 es-admin es       559 1月  25 09:26 LICENCE
drwxr-xr-x. 9 es-admin root    4096 2月  19 18:04 node_modules
-rw-r--r--. 1 root     root 1199253 2月  19 18:04 npm-debug.log
-rw-r--r--. 1 es-admin es       886 1月  25 09:26 package.json
-rw-r--r--. 1 es-admin es       100 1月  25 09:26 plugin-descriptor.properties
drwxr-xr-x. 4 es-admin es        50 1月  25 09:26 proxy
-rw-r--r--. 1 es-admin es      7020 1月  25 09:26 README.textile
drwxr-xr-x. 5 es-admin es      4096 1月  25 09:26 _site
drwxr-xr-x. 4 es-admin es        29 1月  25 09:26 src
drwxr-xr-x. 4 es-admin es        66 1月  25 09:26 test
[root@localhost elasticsearch-head-master]#
5)下载依赖
进入elasticsearch-head-master目录,执行下面命令安装head的依赖
[root@localhost elasticsearch-head-master]# npm installnpm install
如果成功,万事大吉,如果失败,换一种方式安装
[root@localhost elasticsearch-head-master]# npm install -g cnpm --registry=https://registry.npm.taobao.org
6)修改Head插件配置文件
[root@localhost elasticsearch-head-master]# vim Gruntfile.js
找到connect:server,添加hostname一项,如下
connect: {
                        server: {
                                options: {
                                        hostname: '本机ip',
                                        port: 9100,
                                        base: '.',
                                        keepalive: true
                                }
                        }
                }
这样的话,你就可以在外界是由ip+9100来访问heade了
注意安装head的时候,将ES服务停掉。
现在启动ES,
再启动head
[root@localhost elasticsearch-head-master]# grunt server
注意去对应的目录下启动
如果提示下面的错误
[es-user@localhost elasticsearch-head-master]$ grunt server
>> Local Npm module "grunt-contrib-clean" not found. Is it installed?
>> Local Npm module "grunt-contrib-concat" not found. Is it installed?
>> Local Npm module "grunt-contrib-watch" not found. Is it installed?
>> Local Npm module "grunt-contrib-connect" not found. Is it installed?
>> Local Npm module "grunt-contrib-copy" not found. Is it installed?
>> Local Npm module "grunt-contrib-jasmine" not found. Is it installed?
Warning: Task "connect:server" not found. Use --force to continue.

Aborted due to warnings.
说明缺少依赖,依次下载上依赖就好了
npm install grunt-contrib-clean --registry=https://registry.npm.taobao.org
npm install grunt-contrib-concat --registry=https://registry.npm.taobao.org
npm install grunt-contrib-watch --registry=https://registry.npm.taobao.org
npm install grunt-contrib-connect --registry=https://registry.npm.taobao.org
npm install grunt-contrib-copy --registry=https://registry.npm.taobao.org
npm install grunt-contrib-jasmine --registry=https://registry.npm.taobao.org
