什么时候使用到storyBoard?
- 描述静态单元格
- 描述多个控制器的时候
监听TextField的编辑3种方式
- 代理:注意不要让自己成为自己的代理
- target
- 通知
设置TextField占位文字的颜色
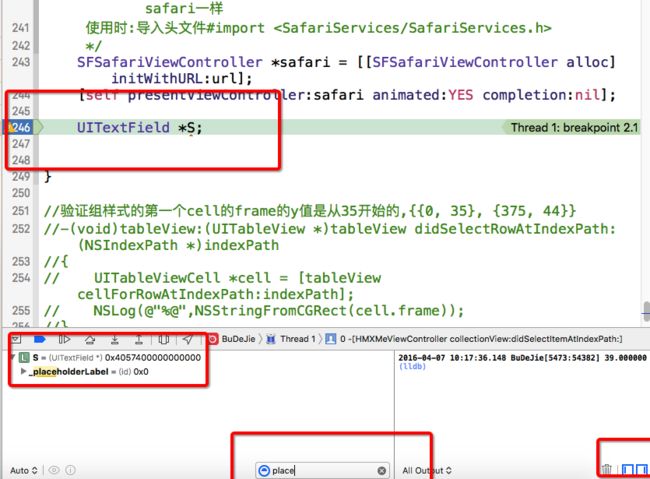
方案一- 拿到占位文字控件(UILabel),设置UILabel的文字颜色,但是发现系统的TextFiel并没有向外提供这个属性,也就是这个属性是私有的,我们可以通过断点调试的方法来获取这个TextFiel的私有属性名,然后,通过KVC来获取它的值,然后改变文字颜色
UILabel *placeLabel = [self valueForKey:@"placeholderLabel"];
    placeLabel.textColor = [UIColor whiteColor];
- 通过断点条调试的方法获取一个对象的私有属性的方法如下
方案二:使用runtime在TextField的分类中写一个分类属性
#import

@interface UITextField (Placeholder)

@property UIColor *placeholderColor;

@end
- 在分类的.m文件中实现以下方法
//交换方法
+(void)load
{

    Method M1 = class_getInstanceMethod(self, @selector(setHMX_placeholder:));
    Method M2 = class_getInstanceMethod(self, @selector(setPlaceholder:));
    method_exchangeImplementations(M1, M2);
}

//设置占位文字
-(void)setHMX_placeholder:(NSString *)placeholder
{
    //设置占位文字
    [self setHMX_placeholder:placeholder];

    //设置占位文字颜色
    [self setPlaceholderColor:self.placeholderColor];

}

//设置占位文字颜色
-(void)setPlaceholderColor:(UIColor *)placeholderColor
{
    //1.把文字颜色先保存起来
    objc_setAssociatedObject(self, @"placeholderColor",placeholderColor, OBJC_ASSOCIATION_RETAIN_NONATOMIC);

    //2.等真正设置文字的时候再去设置文字颜色
    //获取文字控件
    UILabel *place = [self valueForKey:@"placeholderLabel"];
    place.textColor = placeholderColor;

}

//获取文字颜色
-(UIColor *)placeholderColor
{
    return objc_getAssociatedObject(self, @"placeholderColor");
}
方案三
   //设置占位文字的颜色(第一个参数表示要给哪个文字设置富文本属性)
    NSMutableDictionary *attri = [NSMutableDictionary dictionary];
    attri[NSForegroundColorAttributeName] = [UIColor lightGrayColor];
    self.attributedPlaceholder = [[NSAttributedString alloc] initWithString:self.placeholder attributes:attri];
分组样式的TableView注意点
- 如果TableView是分组样式,默认每一组都会有头部和尾部间距,可以通过以下的属性来设置间距的大小
 self.tableView.sectionHeaderHeight = 0;
    self.tableView.sectionFooterHeight = 10;
- 分组样式的第一个cell的frame的y值自动设置为35,如果想将所有的cell往上移动,可以通过contentInset属性来设置
self.tableView.contentInset = UIEdgeInsetsMake(-25, 0, 0, 0);
不能去手动设置TableView的滚动范围
- tableView的滚动范围是系统自动根据内容去计算的,如果我们自己手动去设置,会出问题
- 例如:
//请求数据

//collectionView作为TableView的底部视图,开始的时候设置collectionView的尺寸为0,当collectionView的数据加载完毕后,重新计算collectionView的高度,让TableView重新计算滚动范围,实现滚动

-(void)loadData
{
    AFHTTPSessionManager *manager = [AFHTTPSessionManager manager];

    NSMutableDictionary *prame = [NSMutableDictionary dictionary];
    prame[@"a"] = @"square";
    prame[@"c"] = @"topic";
    [manager GET:@"http://url123" parameters:prame progress:nil success:^(NSURLSessionDataTask * _Nonnull task, id  _Nullable responseObject) {//成功后回调

        //解析数据
        self.squareArray = [HMXSqaureItem mj_objectArrayWithKeyValuesArray:responseObject[@"square_list"]];


        //重新计算collectionView的高度(计算出有多少行cell)
        NSInteger count = self.squareArray.count;
        //行数
        NSInteger rows = (count - 1)/cols + 1;

        //collectionView的高度
        CGFloat collectionH = rows * itemWH + (rows - 1) * margin;

        self.collectionView.height = collectionH;

        //刷新collectionView
        [self.collectionView reloadData];

        //重新设置tableView的滚动范围
        self.tableView.tableFooterView = self.collectionView;


        //注意:当collectionView的数据加载完毕后,不能使用下面的方法手动设置TableView的contentSize,如果设置了,在当前页面,滚动范围会是准确的,但是当跳转到下一个控制器后再回来,发现contentSize又会恢复原来的尺寸,这是因为,TableView在显示的时候会根据当前的内容自动计算滚动范围,在一开始collectionView的尺寸为0,因此TableView不能滚动,手动设置后,跳转到下一个控制器再回来,TableView在即将显示的时候又会根据当前的内容自动计算滚动范围,而当时设置的collectionView尺寸为0,因此不能滚动,恢复了原样

       // self.tableView.contentSize = CGSizeMake(0, CGRectGetMaxY(self.collectionView.frame));

    } failure:^(NSURLSessionDataTask * _Nullable task, NSError * _Nonnull error) {//失败后回调
        HMXLog(@"%@",error);
    }];
}
能打开网页的控制器或View
-
1.safari
- 缺点:跳转到safari应用,离开当前应用
- 优点:有很多自带的功能,前进,后退,刷新,网址
-
2.UIWebView
- 优点:在当前应用就可以打开
- 缺点:前进,后退,刷新等这些功能必须要手动去实现,而且进度条做不了,以前在WebView上面看到的进度条都是假象
-
3.WKWebView(UIWebView的升级版)
- 优点:在当前应用就可以打开,自带前进,后退,刷新等功能,并且可以监听真正的进度
-
4.SFSafariViewController
- iOS9新出来的控制器,在当前应用打开网页,功能同safari一样,这个控制器在storyboard中还没有集成,所以只能通过代码手动创建,使用时:导入头文件#import
- iOS9新出来的控制器,在当前应用打开网页,功能同safari一样,这个控制器在storyboard中还没有集成,所以只能通过代码手动创建,使用时:导入头文件#import
  SFSafariViewController *safari = [[SFSafariViewController alloc] initWithURL:url];
  //一定要使用modal的方式跳转到这个控制器,因为苹果在方法的声明前写的很清楚,当使用modal的方式的时候,在modal控制器点击Done的时候系统会自动dismiss掉modal控制器控制器回到上一个控制器
    [self presentViewController:safari animated:YES completion:nil];
抽取业务类的规范
在.h文件的头部说明该工具类主要用来干嘛
在方法的声明前最好写上有提示功能的注释,方便别人使用
.h文件
// 该类专门用于文件的处理

#import

@interface FileManager : NSObject

/**
 *  获取文件夹尺寸
 *
 *  @param directoryPath 文件夹全路径
 *
 *  @return 文件夹的尺寸
 */

+(NSInteger)getDirectorySize:(NSString *)directoryPath;
/**
 *  删除文件夹下所有文件
 *
 *  @param directoryPath 文件夹全路径
 */
+(void)removeDirectoryPath:(NSString *)directoryPath;

@end
- .m文件
#import "FileManager.h"

@implementation FileManager

//获取文件大小
+(NSInteger)getDirectorySize:(NSString *)directoryPath
{

    //获取文件管理者
    NSFileManager *fileManager = [NSFileManager defaultManager];

    //如果用户传入的不是文件夹或者该文件不存在就报错
    BOOL isDirectory;
    BOOL isExist = [fileManager fileExistsAtPath:directoryPath isDirectory:&isDirectory];
    if (!isExist || !isDirectory)
    {
        NSException *exception = [NSException exceptionWithName:@"filePathError" reason:@"请传入符合规范的文件夹路径" userInfo:nil];
        [exception raise];
    };


    //获取这个文件路径下所有的文件
    NSArray *subPaths = [fileManager subpathsAtPath:directoryPath];

    NSInteger totalSize = 0;

    //遍历数组
    for (NSString *subPath in subPaths) {

        //拼接全文件路径
        NSString *fileFullPath = [directoryPath stringByAppendingPathComponent:subPath];

        //排除文件夹和不存在的文件
        BOOL isDirectory;
        BOOL isExist = [fileManager fileExistsAtPath:fileFullPath isDirectory:&isDirectory];
        if (!isExist || isDirectory) continue;

        //排除隐藏文件
        if ([fileFullPath containsString:@".DS"] ) continue;

        //获取指定路径下的文件属性
        NSDictionary *artt = [fileManager attributesOfItemAtPath:fileFullPath error:nil];
        NSInteger size = [artt fileSize];
        totalSize += size;
    }

    return totalSize;
}

//删除文件
+(void)removeDirectoryPath:(NSString *)directoryPath
{
    //获取文件管理者
    NSFileManager *fileManager = [NSFileManager defaultManager];

    //如果用户传入的不是文件夹或者该文件不存在就报错
    BOOL isDirectory;
    BOOL isExist = [fileManager fileExistsAtPath:directoryPath isDirectory:&isDirectory];
    if (!isExist || !isDirectory)
    {
        NSException *exception = [NSException exceptionWithName:@"filePathError" reason:@"请传入符合规范的文件夹路径" userInfo:nil];
        [exception raise];
    };

    //获取cachePath文件路径下所有的一级文件夹
    NSArray *subPaths = [[NSFileManager defaultManager] contentsOfDirectoryAtPath:directoryPath error:nil];

    //拼接全路径
    for (NSString *subPath in subPaths) {

        NSString *filePath = [directoryPath stringByAppendingPathComponent:subPath];
        //移除该文件夹下所有的文件
        [[NSFileManager defaultManager] removeItemAtPath:filePath error:nil];
    }

}

@end