图像拼接 示例-python-opencv
图像拼接 示例-python-opencv
- 1. 任务描述
- 2. 参考资料
- 3. 算法流程以及对应的opencv函数
- 4. 可能遇到的错误
- 5. 拼接结果
- 6. 思考
- 7. 代码
1. 任务描述
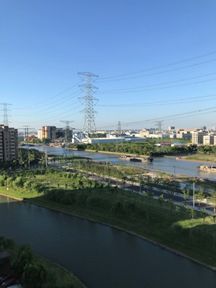
输入如下两幅图像,拼接得到第三幅图像。
输入图像的特点:
(1)两幅图像有重叠区域,也有非重叠区域。
(2)拍摄左图之后,相机向右旋转再拍摄右图。


2. 参考资料
1、上一次课程中使用orb进行图像匹配和求解旋转矩阵的代码。
%matplotlib inline
import numpy as np
import cv2
from matplotlib import pyplot as plt

MIN_MATCH_COUNT = 10

#####################################
# 修改图像文件位置
# img1 = cv2.imread('anchors/tattoo_seed.jpg',0)
# img2 = cv2.imread('anchors/hush.jpg',0)
# query and test images
img1 = cv2.imread('../images/bb.jpg',0)
img2 = cv2.imread('../images/color2_small.jpg',0)
#####################################


#####################################
# 使用ORB算法替换 Sift 相关代码
# Initiate SIFT detector
# sift = cv2.xfeatures2d.SIFT_create()

# find the keypoints and descriptors with SIFT
# kp1, des1 = sift.detectAndCompute(img1,None)
# kp2, des2 = sift.detectAndCompute(img2,None)

# create the ORB detector
orb = cv2.ORB_create()
kp1, des1 = orb.detectAndCompute(img1,None)
kp2, des2 = orb.detectAndCompute(img2,None)
#####################################


#####################################
# 使用 BFMatch 算法替换 knnMatch 相关代码

# FLANN_INDEX_KDTREE = 0
# index_params = dict(algorithm = FLANN_INDEX_KDTREE, trees = 5)
# search_params = dict(checks = 50)

#flann = cv2.FlannBasedMatcher(index_params, search_params)

# matches = flann.knnMatch(des1,des2,k=2)


# brute force matching
bf = cv2.BFMatcher(cv2.NORM_HAMMING, crossCheck=True)
matches = bf.match(des1,des2)
#####################################


#####################################
# 删除 对matches的后处理,
# 默认为所有的matches都是可信任的结果, 设置good = matches
# store all the good matches as per Lowe's ratio test.
# good = []
#for m,n in matches:
#    if m.distance < 0.7*n.distance:
#        good.append(m)
good = matches
#####################################


if len(good)>MIN_MATCH_COUNT:
    # 这部分是这一堂课的重点
    # 需要理解三个函数,理解函数参数的含义,熟练应用:
    # findHomography:计算单应矩阵 H。
    # perspectiveTransform:根据 H 对 坐标进行 投影(旋转和平移)操作。
    # polylines:绘制多边形。
    src_pts = np.float32([ kp1[m.queryIdx].pt for m in good ]).reshape(-1,1,2)
    dst_pts = np.float32([ kp2[m.trainIdx].pt for m in good ]).reshape(-1,1,2)

    M, mask = cv2.findHomography(src_pts, dst_pts, cv2.RANSAC,5.0)
    matchesMask = mask.ravel().tolist()

    h,w = img1.shape
    pts = np.float32([ [0,0],[0,h-1],[w-1,h-1],[w-1,0] ]).reshape(-1,1,2)
    dst = cv2.perspectiveTransform(pts,M)

    img2 = cv2.polylines(img2,[np.int32(dst)],True,255,3, cv2.LINE_AA)

else:
    print ("Not enough matches are found - %d/%d" % (len(good),MIN_MATCH_COUNT))
    matchesMask = None


# 接下来的三句话的功能:显示特征匹配结果
draw_params = dict(matchColor = (0,255,0), # draw matches in green color
                   singlePointColor = None,
                   matchesMask = matchesMask, # draw only inliers
                   flags = 2)

img3 = cv2.drawMatches(img1,kp1,img2,kp2,good,None,**draw_params)

plt.imshow(img3, 'gray'),plt.show()
2、博客“使用python-opencv进行图像拼接”中图像旋转和拼接的代码。
https://blog.csdn.net/qq_37734256/article/details/86745451
关键代码如下:

3. 算法流程以及对应的opencv函数
步骤1、图像读取(imread)
步骤2、将原始彩色图像转换为灰度图像(cvtColor)
步骤3、图像缩放(resize)
步骤4、使用ORB算法进行特征点检测(orb.detectAndCompute)
步骤5、将左右两幅图像中的特征点进行匹配(bf.match)
步骤6、使用匹配点计算从左图到右图的旋转矩阵M(findHomography)
步骤7、对M求逆,得到从右图到左图的旋转矩阵H(np.linalg.inv(M))
步骤8、将右图旋转到左图的成像平面(warpPerspective)
步骤9、找到左右两幅图像的重叠区域的左边界和右边界。
步骤10、对于只在左图中出现的区域,使用左图中的像素填充拼接后的图像区域。
步骤11、对于只在右图中出现的区域,使用右图中的像素填充拼接后的图像区域。
步骤12、对于左右图像的重叠区域,使用如下方法计算拼接后的像素值:
alpha = srcImgLen / (srcImgLen + testImgLen)
res[row, col] = np.clip(img1[row, col] * (1-alpha) + warpImg[row, col] * alpha, 0, 255)
4. 可能遇到的错误
问题1:报错信息

原因:
等号两边的矩阵大小不匹配,左边矩阵形状是218x216,右边矩阵形状是218x216x3
res中每个像素使用三个数值分别表示R分量、G分量、B分量。
warpImg中每个像素只用一个数值表示,这个数值表示的这个像素的灰度。
解决方法:从res中拿出一个分量(比如B分量)赋值给warpImg。
修改后的代码如下:

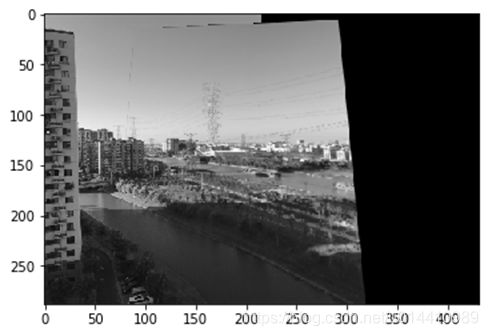
5. 拼接结果

6. 思考
(1)对比上面两种拼接结果图像有什么区别?
(2)上述区别是如何引起的?
(3)如何去除拼接图像中的虚假边缘?
7. 代码
代码
%matplotlib inline
import numpy as np
import cv2
from matplotlib import pyplot as plt

MIN_MATCH_COUNT = 10

#####################################
# 修改图像文件位置
# img1 = cv2.imread('anchors/tattoo_seed.jpg',0)
# img2 = cv2.imread('anchors/hush.jpg',0)
# query and test images
img1_color = cv2.imread('../images/image_mosaic_2_left.jpg')
img2_color = cv2.imread('../images/image_mosaic_2_right.jpg')

# 使用 cvtColor 进行颜色转换
img1 = cv2.cvtColor(img1_color, cv2.COLOR_BGR2GRAY)
img2 = cv2.cvtColor(img2_color, cv2.COLOR_BGR2GRAY)


# 为了加快拼接速度,把原始图像缩小为原来的五分之一
height, width = img1.shape[:2] # img1.shape 得到原来图像大小
# 使用 resize 函数进行图像缩放。
# 参数1:原始图像,参数2:缩放之后的图像宽和高,参数3:制定了插值的方法。
img1 = cv2.resize(img1, (int(width/5), int(height/5)), interpolation=cv2.INTER_CUBIC)
height, width = img2.shape[:2]
img2 = cv2.resize(img2, (int(width/5), int(height/5)), interpolation=cv2.INTER_CUBIC)
#####################################


#####################################
# 使用ORB算法替换 Sift 相关代码
# Initiate SIFT detector
# sift = cv2.xfeatures2d.SIFT_create()

# find the keypoints and descriptors with SIFT
# kp1, des1 = sift.detectAndCompute(img1,None)
# kp2, des2 = sift.detectAndCompute(img2,None)

# create the ORB detector
orb = cv2.ORB_create()
kp1, des1 = orb.detectAndCompute(img1,None)
kp2, des2 = orb.detectAndCompute(img2,None)
#####################################


#####################################
# 使用 BFMatch 算法替换 knnMatch 相关代码

# FLANN_INDEX_KDTREE = 0
# index_params = dict(algorithm = FLANN_INDEX_KDTREE, trees = 5)
# search_params = dict(checks = 50)

#flann = cv2.FlannBasedMatcher(index_params, search_params)

# matches = flann.knnMatch(des1,des2,k=2)


# brute force matching
bf = cv2.BFMatcher(cv2.NORM_HAMMING, crossCheck=True)
matches = bf.match(des1,des2)
#####################################


#####################################
# 删除 对matches的后处理,
# 默认为所有的matches都是可信任的结果, 设置good = matches
# store all the good matches as per Lowe's ratio test.
# good = []
#for m,n in matches:
#    if m.distance < 0.7*n.distance:
#        good.append(m)
good = matches
#####################################


if len(good)>MIN_MATCH_COUNT:
    # 这部分是这一堂课的重点
    # 需要理解三个函数,理解函数参数的含义,熟练应用:
    # findHomography:计算单应矩阵 H。
    # perspectiveTransform:根据 H 对 坐标进行 投影(旋转和平移)操作。
    # polylines:绘制多边形。
    src_pts = np.float32([ kp1[m.queryIdx].pt for m in good ]).reshape(-1,1,2)
    dst_pts = np.float32([ kp2[m.trainIdx].pt for m in good ]).reshape(-1,1,2)

    # 计算从 img1 到 img2 的旋转矩阵M
    M, mask = cv2.findHomography(src_pts, dst_pts, cv2.RANSAC,5.0)
    matchesMask = mask.ravel().tolist()

    h,w = img1.shape
    pts = np.float32([ [0,0],[0,h-1],[w-1,h-1],[w-1,0] ]).reshape(-1,1,2)
    dst = cv2.perspectiveTransform(pts,M)

    # 在 右图 中 把左图拍摄的区域 用四边形框起来 。
    # img2 = cv2.polylines(img2,[np.int32(dst)],True,255,3, cv2.LINE_AA)


    #######################################
    # 这一次课程新增加的内容
    #######################################
    # src_pts = np.float32([kp1[m.queryIdx].pt for m in good]).reshape(-1,1,2)
    # ano_pts = np.float32([kp2[m.trainIdx].pt for m in good]).reshape(-1,1,2)
    # M,mask=cv2.findHomography(src_pts,ano_pts,cv2.RANSAC,5.0)
    warpImg = cv2.warpPerspective(img2, np.linalg.inv(M), (img1.shape[1]+img2.shape[1], img2.shape[0]))
    direct=warpImg.copy()
    direct[0:img1.shape[0], 0:img1.shape[1]] =img1
    #simple=time.time()
    rows,cols=img1.shape[:2]

    for col in range(0,cols):
        if img1[:, col].any() and warpImg[:, col].any():#开始重叠的最左端
            left = col
            break
    for col in range(cols-1, 0, -1):
        if img1[:, col].any() and warpImg[:, col].any():#重叠的最右一列
            right = col
            break
    res = np.zeros([rows, cols, 3], np.uint8)
    for row in range(0, rows):
        print(row)
        for col in range(0, cols):
            if not img1[row, col].any():#如果没有原图,用旋转的填充
                res[row, col] = warpImg[row, col]
            elif not warpImg[row, col].any():
                res[row, col] = img1[row, col]
            else:
                srcImgLen = float(abs(col - left))
                testImgLen = float(abs(col - right))
                alpha = srcImgLen / (srcImgLen + testImgLen)
                res[row, col] = np.clip(img1[row, col] * (1-alpha) + warpImg[row, col] * alpha, 0, 255)
    # 从res中拿出一个分量(比如B分量)赋值给warpImg。
    # warpImg[0:img1.shape[0], 0:img1.shape[1]]=res
    warpImg[0:img1.shape[0], 0:img1.shape[1]]=res[:,:,0]

    #final=time.time()
    img3=cv2.cvtColor(direct,cv2.COLOR_BGR2RGB)
    plt.imshow(img3,),plt.show()
    img4=cv2.cvtColor(warpImg,cv2.COLOR_BGR2RGB)
    plt.imshow(img4,),plt.show()
    #print("simple stich cost %f"%(simple-starttime))
    #print("\ntotal cost %f"%(final-starttime))
    #cv2.imwrite("simplepanorma.png",direct)
    #cv2.imwrite("bestpanorma.png",warpImg)


else:
    print ("Not enough matches are found - %d/%d" % (len(good),MIN_MATCH_COUNT))
    matchesMask = None


# 接下来的三句话的功能:显示特征匹配结果
draw_params = dict(matchColor = (0,255,0), # draw matches in green color
                   singlePointColor = None,
                   matchesMask = matchesMask, # draw only inliers
                   flags = 2)

img3 = cv2.drawMatches(img1,kp1,img2,kp2,good,None,**draw_params)

plt.imshow(img3, 'gray'),plt.show()