对部分核心源代码进行分析,项目已开源,查看完整代码,文章底部有链接。
学生信息管理系统分为三个部分
- [ ] [项目展示]()
- [x] [源码分析]()
- [ ] [项目打包]()
现在展示的是对原有系统进行
二次开发的结果。为
2.0版本。
一、界面设计
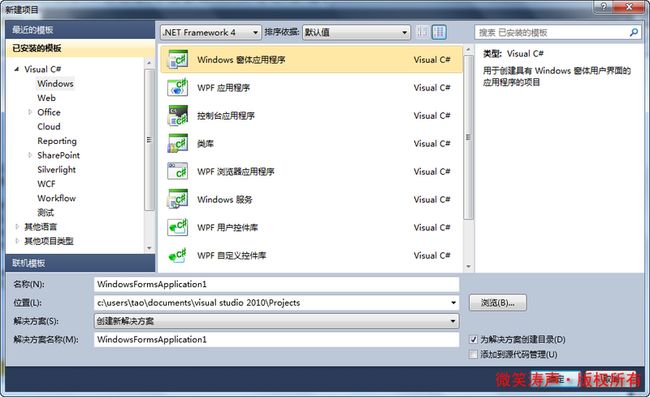
1、新建项目
新建项目的时候选择Windows窗体应用程序

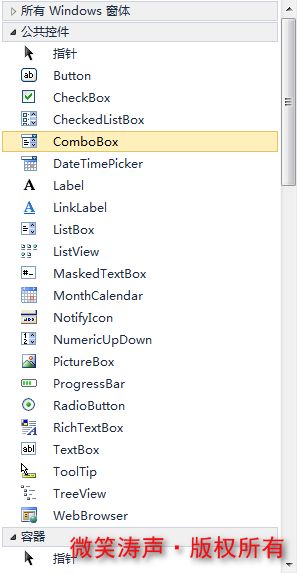
2、工具箱的使用
使用Windows窗体应用程序,界面的代码不用自己写。直接将工具箱里面的控件拖过来进行搭配即可。比较简单。

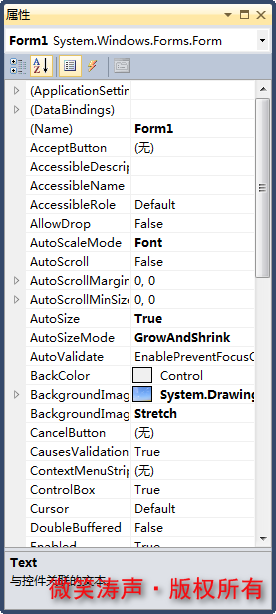
3、控件的属性设置
每个控件都有很多的属性,可以针对不同的场景进行不同的属性设置。

可以先将所有的界面都设计好再进行逻辑部分的编程
二、代码分析
1、数据库的链接代码
因为系统的所有数据都是存储在数据库,所以先进行数据库的链接。有两种链接方式:
(1)、直接在触发事件里面写数据库链接语句(数据库存放在Debug文件夹下)
string wa;
OleDbConnection a1 = new OleDbConnection();
OleDbCommand a2 = new OleDbCommand();
//数据库连接语句
a1.ConnectionString = "Provider=Microsoft.ace.OLEDB.12.0;Data Source= 学生信息管理数据库.accdb";
a1.Open();
(2)、进行数据库连接的集成,使用的时候直接调用文件即可
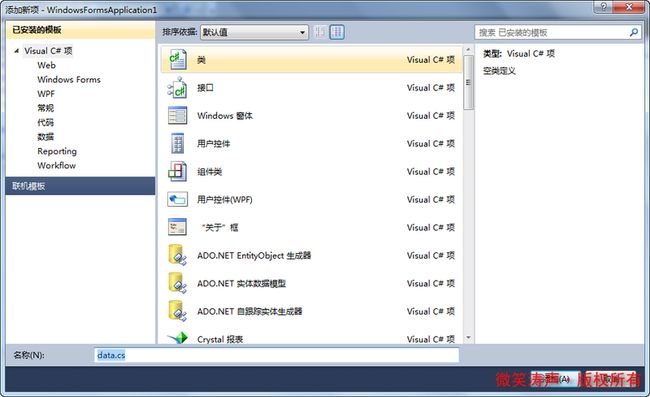
新建一个类,命名为data.cs,用来存放数据库连接语句

data.cs文件代码
using System;
using System.Collections.Generic;
using System.Linq;
using System.Text;

namespace WindowsFormsApplication1
{
    class data
    {
        //进行数据库连接集成,后续就不用每个From都写数据库连接语句
        public static string mystr = "provider =microsoft.ace.oledb.12.0;data source=学生信息管理数据库.accdb";
    }
}
需要调用的时候这样写:
string wa;
OleDbConnection a1 = new OleDbConnection();
OleDbCommand a2 = new OleDbCommand();
a1.ConnectionString = data.mystr; //调用data文件,获取数据库连接代码
a1.Open();
2、进行查询操作(以登录为例)
用户进行登录其实也是一个查询的过程。用户输入用户名、密码和角色,首先对数据进行查询是否真实。然后在按照角色来判断应该跳转到学生端、教师端还是后台管理。首页代码如下:
using System;
using System.Collections.Generic;
using System.ComponentModel;
using System.Data;
using System.Drawing;
using System.Linq;
using System.Text;
using System.Windows.Forms;
using System.Data.OleDb;

namespace WindowsFormsApplication1
{
    public partial class Form1 : Form
    {
        public Form1()
        {
            InitializeComponent();
        }
        /*
         *登录按钮触发事件
         */
        private void button1_Click(object sender, EventArgs e)
        {
            string wa;
            OleDbConnection a1 = new OleDbConnection();
            OleDbCommand a2 = new OleDbCommand();
            //数据库连接
            a1.ConnectionString = "Provider=Microsoft.ace.OLEDB.12.0;Data Source= 学生信息管理数据库.accdb";
            a1.Open();
            //在数据库中查找对应 的用户名和密码
            wa = "Select * from 用户表 where 用户名='" + textBox1.Text.Trim() + "'and 密码='" + textBox2.Text.Trim() + "'and 角色='" + comboBox1.Text.Trim() + "'";
            a2.CommandText = wa;
            a2.Connection = a1;
            a2.ExecuteScalar();
            //获取到数据证明输入账号正确
            if (null != a2.ExecuteScalar())
            {
                //判断账户类型是否为学生
                if (comboBox1.Text == "学生")
                {
                    MessageBox.Show("欢迎进入信息管理系统学生端!", "登录成功!", MessageBoxButtons.OK, MessageBoxIcon.Information);
                    this.Visible = false;
                    Form2 f2 = new Form2();   //Form2为学生端主界面
                    f2.ShowDialog();
                    this.Visible = true;
                }
                else
                {
                    //判断账户类型是否为老师
                    if (comboBox1.Text == "老师")
                    {
                        MessageBox.Show("欢迎进入信息管理系统教师端!", "登录成功!", MessageBoxButtons.OK, MessageBoxIcon.Information);
                        this.Visible = false;
                        Form4 f3 = new Form4();  //Form4为教师端主界面
                        f3.ShowDialog();
                        this.Visible = true;
                    }
                    else
                    {
                        //判断账户类型是否为管理员
                        MessageBox.Show("欢迎进入后台管理模式!", "登录成功!", MessageBoxButtons.OK, MessageBoxIcon.Information);
                        this.Visible = false;
                        Form16 f4 = new Form16();  //Form2为后台管理主界面
                        f4.ShowDialog();
                        this.Visible = true;

                    }
                }
            }
            else  //账户或者密码错误
            {
                MessageBox.Show("登录失败!请输入正确的用户名、密码和角色!", "警告!", MessageBoxButtons.OK, MessageBoxIcon.Warning);

            }
        }

        /*
       *注册按钮触发事件
       */
        private void button2_Click(object sender, EventArgs e)
        {
            Form32 f2 = new Form32();  //Form32为注册界面
            f2.ShowDialog();
        }

        /*
       *取消按钮触发事件
       */
        private void button3_Click(object sender, EventArgs e)
        {
            //清空数据
            textBox1.Text = "";
            textBox2.Text = "";
            comboBox1.Text = "";

        }

        /*
       *底部版权超链接
       */
        private void linkLabel1_LinkClicked(object sender, LinkLabelLinkClickedEventArgs e)
        {
           linkLabel1.LinkVisited = true;
            //使用IE浏览器打开
           System.Diagnostics.Process.Start("IExplore", "https://www.cztcms.cn");
        }

        private void Form1_Load(object sender, EventArgs e)
        {

        }

        private void textBox1_TextChanged(object sender, EventArgs e)
        {

        }
    }
}
3、添加操作(以注册为例)
用户注册涉及查询和添加。首先进行查询是否存在这个用户,如果不存在则可以注册。注册界面代码:
using System;
using System.Collections.Generic;
using System.ComponentModel;
using System.Data;
using System.Drawing;
using System.Linq;
using System.Text;
using System.Windows.Forms;
using System.Data.OleDb;
using System.IO;

namespace WindowsFormsApplication1
{
    public partial class Form32 : Form
    {
        public Form32()
        {
            InitializeComponent();
        }

        private void button1_Click(object sender, EventArgs e)
        {
            if (textBox1.Text == "")
            { MessageBox.Show("请输入用户名!", "警告!", MessageBoxButtons.OK, MessageBoxIcon.Warning); }
            else
                if (textBox2.Text == "")
                { MessageBox.Show("请输入用户密码!", "警告!", MessageBoxButtons.OK, MessageBoxIcon.Warning); }
                else
                    if (comboBox1.Text == "")
                    { MessageBox.Show("请选择用户角色!", "警告!", MessageBoxButtons.OK, MessageBoxIcon.Warning); }

                    else
                        if (textBox2.Text == textBox3.Text)
                        {


                            string wa;
                            OleDbConnection a1 = new OleDbConnection();
                            OleDbCommand a2 = new OleDbCommand();
                            a1.ConnectionString = "Provider=Microsoft.ace.OLEDB.12.0;Data Source= 学生信息管理数据库.accdb";
                            a1.Open();
                            wa = "Select * from 用户表 where 用户名='" + textBox1.Text.Trim() + "'";
                            a2.CommandText = wa;
                            a2.Connection = a1;
                            a2.ExecuteScalar();
                            if (null != a2.ExecuteScalar())
                            {
                                MessageBox.Show("注册失败,该用户名已经存在!", "警告!", MessageBoxButtons.OK, MessageBoxIcon.Warning);

                            }
                            else
                            {
                            //向数据库添加数据
                                wa = "INSERT into 用户表 values(" + "'" + textBox1.Text.Trim() + "','" + textBox2.Text.Trim() + "','" + comboBox1.Text.Trim() + "')";
                                a2.CommandText = wa;
                                a2.Connection = a1;
                                a2.ExecuteNonQuery();
                                MessageBox.Show("用户注册成功,请进行登录!", "", MessageBoxButtons.OK, MessageBoxIcon.Information);
                               Application.OpenForms["form32"].Close();


                            }
                        }
                        else
                        {
                            MessageBox.Show("两次输入的密码不一样!", "警告!", MessageBoxButtons.OK, MessageBoxIcon.Warning);

                        }


        }

        private void label5_Click(object sender, EventArgs e)
        {

        }

        private void button2_Click(object sender, EventArgs e)
        {

        }

        private void Form32_Load(object sender, EventArgs e)
        {

        }
    }
}
4、修改操作(以修改密码为例)
  private void button1_Click(object sender, EventArgs e)
        {
            if (textBox1.Text == "")
            { MessageBox.Show("请输入用户名!", "警告!", MessageBoxButtons.OK, MessageBoxIcon.Warning); }
            else
                if (textBox2.Text == "")
                { MessageBox.Show("请输入用户密码!", "警告!", MessageBoxButtons.OK, MessageBoxIcon.Warning); }
                else
                    if (textBox3.Text == "")
                    { MessageBox.Show("请再次输入密码!", "警告!", MessageBoxButtons.OK, MessageBoxIcon.Warning); }
                    else

                        if (textBox2.Text == textBox3.Text)
                        {
                            string wa;
                            OleDbConnection a1 = new OleDbConnection();
                            OleDbCommand a2 = new OleDbCommand();
                            a1.ConnectionString = "Provider=Microsoft.ace.OLEDB.12.0;Data Source= 学生信息管理数据库.accdb";
                            a1.Open();


                            string sql = "select * from 用户表 where 用户名='" + textBox1.Text.Trim() + "'";
                            a2.CommandText = sql;
                            a2.Connection = a1;
                            OleDbDataReader a3 = a2.ExecuteReader();
                            if (a3.Read() == false)
                            { MessageBox.Show("系统不存在此信息!", "警告!", MessageBoxButtons.OK, MessageBoxIcon.Warning); }
                            else
                            {
                                MessageBoxButtons messButton = MessageBoxButtons.OKCancel;
                                DialogResult dr = MessageBox.Show("确定要修改此信息吗!", "修改信息", messButton, MessageBoxIcon.Information);
                                if (dr == DialogResult.OK)
                                {
                                    a3.Close();
                                    wa = "update 用户表 set 密码='" + textBox2.Text.Trim() + "' where 用户名='"+textBox1 .Text .Trim ()+"'";
                                    a2.CommandText = wa;
                                    a2.Connection = a1;
                                    a2.ExecuteNonQuery();
                                    MessageBox.Show("信息修改成功!", "", MessageBoxButtons.OK, MessageBoxIcon.Information);
                                }

                            }
                        }
else
                            {
                                MessageBox.Show("两次密码不一样!", "警告!", MessageBoxButtons.OK, MessageBoxIcon.Warning);
                            }


                        }
5、删除操作
  private void button3_Click(object sender, EventArgs e)
        {
            if (textBox1.Text == "")
            { MessageBox.Show("请输入用户名!", "警告!", MessageBoxButtons.OK, MessageBoxIcon.Warning); }
            else
                if (textBox2.Text == "")
                { MessageBox.Show("请先查询用户信息!", "警告!", MessageBoxButtons.OK, MessageBoxIcon.Warning); }
                else

                    if (comboBox1.Text == "")
                    { MessageBox.Show("请先查询用户信息!", "警告!", MessageBoxButtons.OK, MessageBoxIcon.Warning); }

                    else
                    {
                        OleDbConnection a1 = new OleDbConnection();
                        OleDbCommand a2 = new OleDbCommand();
                        a1.ConnectionString = data.mystr;
                        a1.Open();
                        MessageBoxButtons messButton = MessageBoxButtons.OKCancel;
                        DialogResult dr = MessageBox.Show("确定要删除此用户吗!", "删除用户", messButton, MessageBoxIcon.Information);
                        if (dr == DialogResult.OK)
                        {
                            string wa;
                            wa = "delete * from 用户表 where 用户名='" + textBox1.Text.Trim() + "' and 密码='" + textBox2.Text.Trim() + "'and 角色='" + comboBox1.Text.Trim() + "' ";
                            a2.CommandText = wa;
                            a2.Connection = a1;
                            a2.ExecuteNonQuery();

                            { MessageBox.Show("用户删除成功!", "成功", MessageBoxButtons.OK, MessageBoxIcon.Information); }
                        }
                    }
        }
6、添加图片
在添加个人信息的时候需要进行个人照片的添加,有两个难点。一个是需要可以获取本机文件,另一个是上传图片的格式获取。首先在主类(Program)里面添加如下代码,注意:不是入口类Main
 //定义添加图片的成员变量
 public static string Imagefile;
 public static string FileName;
然后在添加图片的控件里面写如下代码:
OpenFileDialog dr = new OpenFileDialog();
dr.ShowDialog();
dr.Filter = "image file (*.bmp;*.jpg)|*.bmp;*.jpg";
string imagefile = dr.FileName;
pictureBox1.ImageLocation = imagefile;
Program.Imagefile = imagefile;
7、将数据库的数据显示在dataGridView控件上
dataGridView控件可以以表格的方式显示数据,对课程信息、成绩等等显示效果非常好。主要代码如下:
//查询整个表的内容
string sql1 = "select * from  学生信息表 ";
OleDbDataAdapter ad1 = new OleDbDataAdapter(sql1, a1);
DataSet ds1 = new DataSet();
ad1.Fill(ds1);
//将数据以列表的形式显示出来
dataGridView1.DataSource = ds1.Tables[0];
MessageBox.Show("检索成功!", "", MessageBoxButtons.OK, MessageBoxIcon.Information);
其实整个系统的功能都是围绕对数据的增删查改来开展。整个系统有非常多的漏洞。例如登录与注册时的数据限制,尤其是安全与角色权限这一部分。一大堆漏洞。不过在当时基本没有什么编程能力的前提下,写出了这样一个系统还是挺不错了。这次也只是记录一下自己的C#编程经历。至于系统就不会再去更新维护了。
下一篇进行项目的打包与安装,敬请期待!
项目开源地址(仅供学习参考)


