CentOS 安装及使用 terraform 最新教程
一. 官网下载安装包
二. 解压到 /usr/local/bin目录
三. 检查terraform是否安装成功
四. 测试百度云-对象存储
4.1 创建目录
4.2 进入 terraform-test 目录。
4.3 创建配置文件。
4.4 初始化工作目录
4.5 Terraform 管理 BOS
4.6 Terraform 创建 BOS
4.7 Terraform 删除 BOS
一. 官网下载安装包
安装文档 hashicorp给出的安装文档
文档中包含下载地址,选择CentOS 的安装包点击下载,格式为.zip
下载地址:https://www.terraform.io/downloads.html
安装包链接:https://releases.hashicorp.com/terraform/0.12.28/terraform_0.12.28_linux_amd64.zip
二. 解压到 /usr/local/bin目录
下载完成后将 .zip解压到 /usr/local/bin 目录下,方便下一步配置PATH变量。解压后的 terraform是一个 binary 可执行文件,如图所示
解压命令:
~$ unzip terraform_0.12.28_linux_amd64.zip -d /usr/local/bin/
~$ cd /usr/bin
~$ sudo ln -s /usr/local/bin/terraform
~$ source ~/.bash_profile
三. 检查terraform是否安装成功
直接在terminal中输入terraform,如果上一步的PATH配置成功,terminal会提示以下信息
四. 测试百度云-对象存储
因为每个 Terraform 项目都需要创建 1 个独立的工作目录,所以先创建一个测试目录 terraform-test。
4.1 创建目录
[root@test bin]#mkdir terraform-test4.2 进入 terraform-test 目录。
[root@test bin]#cd terraform-test
[root@test terraform-test]#
4.3 创建配置文件。
Terraform 在运行时,会读取该目录空间下所有 *.tf 和 *.tfvars 文件。因此,您可以按照实际用途将配置信息写入到不同的文件中。下面列出几个常用的配置文件:
provider.tf           -- provider 配置
terraform.tfvars      -- 配置 provider 要用到的变量
varable.tf            -- 通用变量
resource.tf           -- 资源定义
data.tf               -- 包文件定义
output.tf             -- 输出
例如:创建 provider.tf 文件时,您可按以下格式配置您的身份认证信息:
[root@test terraform-test]# vim main.tf
provider "baiducloud" {
    access_key  = "LTA*****************NO2"
    secret_key  = "MOk8x0*************wwff"
    region           = "bj"
}
4.4 初始化工作目录
[root@test terraform-test]#terraform init


Initializing provider plugins...
- Checking for available provider plugins on https://releases.hashicorp.com...
- Downloading plugin for provider "alicloud" (1.25.0)...
4.5 Terraform 管理 BOS
terraform plan:预览功能,允许在正式执行配置文件之前,查看将要执行哪些操作。
例如,您添加了创建 Bucket 的配置文件 test.tf :
[root@test terraform-test]#vim main.tf
provider "baiducloud" {
    access_key  = "LTA*****************NO2"
    secret_key  = "MOk8x0*************wwff"
    region           = "bj"
}

# 创建源 bucket
resource "baiducloud_bos_bucket" "source" {
  bucket = "charlietang"
  acl    = "public-read-write"
}
使用 terraform plan 可查看到将会执行的操作。
[root@test terraform-test]# terraform plan
Refreshing Terraform state in-memory prior to plan...
The refreshed state will be used to calculate this plan, but will not be
persisted to local or remote state storage.


------------------------------------------------------------------------

An execution plan has been generated and is shown below.
Resource actions are indicated with the following symbols:
  + create

Terraform will perform the following actions:

  # baiducloud_bos_bucket.tangdd will be created
  + resource "baiducloud_bos_bucket" "tangdd" {
      + acl                         = "public-read-write"
      + bucket                      = "charlietang1"
      + creation_date               = (known after apply)
      + force_destroy               = false
      + id                          = (known after apply)
      + location                    = (known after apply)
      + owner_id                    = (known after apply)
      + owner_name                  = (known after apply)
      + server_side_encryption_rule = (known after apply)
      + storage_class               = "STANDARD"
    }

Plan: 1 to add, 0 to change, 0 to destroy.

------------------------------------------------------------------------

Note: You didn't specify an "-out" parameter to save this plan, so Terraform
can't guarantee that exactly these actions will be performed if
"terraform apply" is subsequently run.
4.6 Terraform 创建 BOS
terraform apply:执行工作目录中的配置文件。
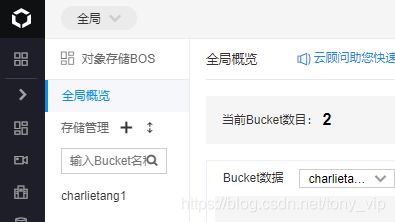
例如您想创建名为 charlietang 的 Bucket,您需要先添加创建 Bucket 的配置文件 main.tf。
[root@localhost baidu-cloud]# terraform apply

An execution plan has been generated and is shown below.
Resource actions are indicated with the following symbols:
  + create

Terraform will perform the following actions:

  # baiducloud_bos_bucket.tangdd will be created
  + resource "baiducloud_bos_bucket" "tangdd" {
      + acl                         = "public-read-write"
      + bucket                      = "charlietang1"
      + creation_date               = (known after apply)
      + force_destroy               = false
      + id                          = (known after apply)
      + location                    = (known after apply)
      + owner_id                    = (known after apply)
      + owner_name                  = (known after apply)
      + server_side_encryption_rule = (known after apply)
      + storage_class               = "STANDARD"
    }

Plan: 1 to add, 0 to change, 0 to destroy.

Do you want to perform these actions?
  Terraform will perform the actions described above.
  Only 'yes' will be accepted to approve.

  Enter a value: yes

baiducloud_bos_bucket.tangdd: Creating...
baiducloud_bos_bucket.tangdd: Creation complete after 2s [id=charlietang1]

Apply complete! Resources: 1 added, 0 changed, 0 destroyed.
4.7 Terraform 删除 BOS
terraform destroy:可删除通过 Terraform 创建的空 Bucket。
[root@localhost baidu-cloud]# terraform destroy
baiducloud_bos_bucket.tangdd: Refreshing state... [id=charlietang1]

An execution plan has been generated and is shown below.
Resource actions are indicated with the following symbols:
  - destroy

Terraform will perform the following actions:

  # baiducloud_bos_bucket.tangdd will be destroyed
  - resource "baiducloud_bos_bucket" "tangdd" {
      - acl                         = "public-read-write" -> null
      - bucket                      = "charlietang1" -> null
      - creation_date               = "2020-07-08T06:47:52Z" -> null
      - force_destroy               = false -> null
      - id                          = "charlietang1" -> null
      - location                    = "bj" -> null
      - owner_id                    = "3b4c0907265d49daa7fbf103bb2cba4a" -> null
      - owner_name                  = "UC:29883996" -> null
      - server_side_encryption_rule = "none" -> null
      - storage_class               = "STANDARD" -> null
    }

Plan: 0 to add, 0 to change, 1 to destroy.

Do you really want to destroy all resources?
  Terraform will destroy all your managed infrastructure, as shown above.
  There is no undo. Only 'yes' will be accepted to confirm.

  Enter a value: yes

baiducloud_bos_bucket.tangdd: Destroying... [id=charlietang1]
baiducloud_bos_bucket.tangdd: Destruction complete after 1s

Destroy complete! Resources: 1 destroyed.


