BIO与NIO比较及例子
说明:nio理论及例子,了解nio的可以跳过本文看hadoop的rpc实现,建议新手看看
一、阻塞式BIO的缺点:
前面自己实现了一个阻塞式BIO服务,采 用BIO通信模型的服务端,通常由一个独立的Acceptor线程负责监听客户端的连接,接收到客户端连接之后为客户端连接创建一个新的线程处理请求消 息,处理完成之后,返回应答消息给客户端,线程销毁,这就是典型的一请求一应答模型。该架构最大的问题就是不具备弹性伸缩能力,当并发访问量增加后,服务 端的线程个数和并发访问数成线性正比,由于线程是JAVA虚拟机非常宝贵的系统资源,当线程数膨胀之后,系统的性能急剧下降,随着并发量的继续增加,可能 会发生句柄溢出、线程堆栈溢出等问题,并导致服务器最终宕机。(http://www.open-open.com/lib/view/open1403057331075.html)
根据阻塞I/O通信模型,它的两缺点:
1. 当客户端多时,会创建大量的处理线程。且每个线程都要占用栈空间和一些CPU时间
2. 阻塞可能带来频繁的上下文切换,且大部分上下文切换可能是无意义的。
(本图来自: http://www.open-open.com/lib/view/open1403057331075.html)
二、异步非阻塞通信的引入
在 IO编程过程中,当需要同时处理多个客户端接入请求时,可以利用多线程或者IO多路复用技术进行处理。IO多路复用技术通过把多个IO的阻塞复用到同一个 select的阻塞上,从而使得系统在单线程的情况下可以同时处理多个客户端请求。与传统的多线程/多进程模型比,I/O多路复用的最大优势是系统开销 小,系统不需要创建新的额外进程或者线程,也不需要维护这些进程和线程的运行,降低了系统的维护工作量,节省了系统资源。JDK1.4提供了对非阻塞IO(NIO)的支持,JDK1.5_update10版本使用epoll替代了传统的select/poll,极大的提升了NIO通信的性能。
关于NIO知识详细见: 点击打开链接 http://blog.csdn.net/lzlchangqi/article/details/412097191. 由一个专门的线程来处理所有的 IO 事件,并负责分发。
2. 事件驱动机制:事件到的时候触发,而不是同步的去监视事件。
3. 线程通讯:线程之间通过 wait,notify 等方式通讯。保证每次上下文切换都是有意义的。减少无谓的线程切换。
如下图:一个线程Reactor用来处理所有io,并分发read、write等事件
![]()
(本图来自互联网)
三:结合互联网的例子进行分析NIO:
1、先看例子的源代码,不妨debug调试下
import java.io.IOException;
import java.net.InetSocketAddress;
import java.net.ServerSocket;
import java.nio.ByteBuffer;
import java.nio.channels.SelectionKey;
import java.nio.channels.Selector;
import java.nio.channels.ServerSocketChannel;
import java.nio.channels.SocketChannel;
import java.util.Iterator;
import java.util.Set;

public class NIOServer {

	/*标识数字*/
	private  int flag = 0;
	/*缓冲区大小*/
	private  int BLOCK = 4096;
	/*接受数据缓冲区*/
	private  ByteBuffer sendbuffer = ByteBuffer.allocate(BLOCK);
	/*发送数据缓冲区*/
	private  ByteBuffer receivebuffer = ByteBuffer.allocate(BLOCK);
	private  Selector selector;

	public NIOServer(int port) throws IOException {
		// 1、打开服务器套接字通道
		ServerSocketChannel serverSocketChannel = ServerSocketChannel.open();
		// 服务器配置为非阻塞
		serverSocketChannel.configureBlocking(false);
		// 检索与此通道关联的服务器套接字
		ServerSocket serverSocket = serverSocketChannel.socket();
		//2、 进行服务的绑定
		serverSocket.bind(new InetSocketAddress(port));
		//3、 通过open()方法找到Selector
		selector = Selector.open();
		//4、注册到selector,等待连接
		serverSocketChannel.register(selector, SelectionKey.OP_ACCEPT);
		System.out.println("Server Start----8888:");
	}


	// 监听
	private void listen() throws IOException {
		while (true) {
			// 选择一组键,并且相应的通道已经打开
			selector.select();
			// 返回此选择器的已选择键集。
			Set selectionKeys = selector.selectedKeys();
			Iterator iterator = selectionKeys.iterator();
			//5 轮询就绪的key
			while (iterator.hasNext()) {
				SelectionKey selectionKey = iterator.next();
				iterator.remove();
				handleKey(selectionKey);
			}
		}
	}

	// 处理请求
	private void handleKey(SelectionKey selectionKey) throws IOException {
		// 接受请求
		ServerSocketChannel server = null;
		SocketChannel client = null;
		String receiveText;
		String sendText;
		int count=0;
		// 测试此键的通道是否已准备好接受新的套接字连接。
		//步骤6 handle connect 处理新的客户接入
		if (selectionKey.isAcceptable()) {
			// 返回为之创建此键的通道。
			//步骤7 设置新建连接的socket
			server = (ServerSocketChannel) selectionKey.channel();
			// 接受到此通道套接字的连接。
			// 此方法返回的套接字通道(如果有)将处于阻塞模式。
			client = server.accept();
			// 配置为非阻塞
			client.configureBlocking(false);
			//步骤8   注册到selector,等待连接
			client.register(selector, SelectionKey.OP_READ);
		} else if (selectionKey.isReadable()) {//步骤9:异步处理请求消息到ByteBuffer(),代码中没有步骤10
			// 返回为之创建此键的通道。
			client = (SocketChannel) selectionKey.channel();
			//将缓冲区清空以备下次读取
			receivebuffer.clear();
			//读取服务器发送来的数据到缓冲区中
			count = client.read(receivebuffer);
			if (count > 0) {
				receivebuffer.flip();
				byte[] bytes = new byte[receivebuffer.remaining()];
				receivebuffer.get(bytes);
				receiveText = new String(bytes,"utf-8");
				System.out.println("服务器端接受客户端数据--:"+receiveText);
				client.register(selector, SelectionKey.OP_WRITE);
			}
		} else if (selectionKey.isWritable()) {//步骤11 异步写
			//将缓冲区清空以备下次写入
			sendbuffer.clear();
			// 返回为之创建此键的通道。
			client = (SocketChannel) selectionKey.channel();
			sendText="message from server--" + flag++;
			//向缓冲区中输入数据
			sendbuffer.put(sendText.getBytes());
			 //将缓冲区各标志复位,因为向里面put了数据标志被改变要想从中读取数据发向服务器,就要复位
			sendbuffer.flip();
			//输出到通道
			client.write(sendbuffer);
			System.out.println("服务器端向客户端发送数据--:"+sendText);
			client.register(selector, SelectionKey.OP_READ);
		}
	}

	/**
	 * @param args
	 * @throws IOException
	 */
	public static void main(String[] args) throws IOException {
		// TODO Auto-generated method stub
		int port = 8888;
		NIOServer server = new NIOServer(port);
		server.listen();
	}
}
import java.io.IOException;
import java.net.InetSocketAddress;
import java.nio.ByteBuffer;
import java.nio.channels.SelectionKey;
import java.nio.channels.Selector;
import java.nio.channels.SocketChannel;
import java.util.Iterator;
import java.util.Set;
public class NIOClient {
/*标识数字*/
private static int flag = 0;
/*缓冲区大小*/
private static int BLOCK = 4096;
/*接受数据缓冲区*/
private static ByteBuffer sendbuffer = ByteBuffer.allocate(BLOCK);
/*发送数据缓冲区*/
private static ByteBuffer receivebuffer = ByteBuffer.allocate(BLOCK);
/*服务器端地址*/
private final static InetSocketAddress SERVER_ADDRESS = new InetSocketAddress(
"localhost", 8888);
public static void main(String[] args) throws IOException {
// TODO Auto-generated method stub
//步骤1 打开socket的通道socketChannel
SocketChannel socketChannel = SocketChannel.open();
//步骤2 设置为非阻塞方式,同时设置tcp参数
socketChannel.configureBlocking(false);
Selector selector = null;
// 异步连接服务器
if (socketChannel.connect(SERVER_ADDRESS)) {
}
else {
//步骤5 注册连接服务端socket动作
selector = Selector.open();
socketChannel.register(selector, SelectionKey.OP_CONNECT);
}
// 分配缓冲区大小内存
Set selectionKeys;
Iterator iterator;
SelectionKey selectionKey;
SocketChannel client;
String receiveText;
String sendText;
int count=0;
//步骤6 启动线程
while (true) {
//选择一组键,其相应的通道已为 I/O 操作准备就绪。
//此方法执行处于阻塞模式的选择操作。
int ret = selector.select();
//System.out.println(ret);
//返回此选择器的已选择键集。
selectionKeys = selector.selectedKeys();
//System.out.println(selectionKeys.size());
iterator = selectionKeys.iterator();
while (iterator.hasNext()) {//7 轮询就绪的key
selectionKey = iterator.next();
//4 判断连接结果,如果连接成功,跳到步骤10,如果不成功,执行步骤5
if (selectionKey.isConnectable()) {
System.out.println("client connect");
client = (SocketChannel) selectionKey.channel();
// 判断此通道上是否正在进行连接操作。
// 完成套接字通道的连接过程。8 handle connect()
if (client.isConnectionPending()) {
client.finishConnect();//9 判断连接完成,完成连接
System.out.println("完成连接!");
sendbuffer.clear();
sendbuffer.put("Hello,Server".getBytes());
sendbuffer.flip();
client.write(sendbuffer);
}
//步骤10 向多路复用器注册 OP_READ
client.register(selector, SelectionKey.OP_READ);
} else if (selectionKey.isReadable()) {//步骤11 handle read() 异步读请求消息到ByteBuffer
client = (SocketChannel) selectionKey.channel();
//将缓冲区清空以备下次读取
receivebuffer.clear();
//读取服务器发送来的数据到缓冲区中
count=client.read(receivebuffer);
if(count>0){
receiveText = new String( receivebuffer.array(),0,count);
System.out.println("客户端接受服务器端数据--:"+receiveText);
client.register(selector, SelectionKey.OP_WRITE);
}
} else if (selectionKey.isWritable()) {//步骤13 异步写ByteBuffer到SocketChannel
sendbuffer.clear();
client = (SocketChannel) selectionKey.channel();
sendText = "message from client--" + (flag++);
sendbuffer.put(sendText.getBytes());
//将缓冲区各标志复位,因为向里面put了数据标志被改变要想从中读取数据发向服务器,就要复位
sendbuffer.flip();
client.write(sendbuffer);
System.out.println("客户端向服务器端发送数据--:"+sendText);
client.register(selector, SelectionKey.OP_READ);
}
}
selectionKeys.clear();
}
}
}
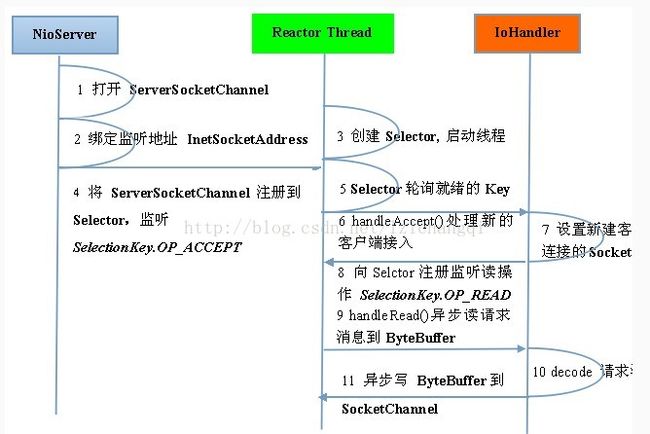
2、代码可用如下图说明(图片来自:http://www.open-open.com/lib/view/open1403057331075.html)
注意:通过debug可以发现Server端handle read后,就直接进行了步骤13,异步写操作,这是因为在步骤11进行了write的注册,因此它不需要client的触发,这就是selector轮询的作用。
按照Reactor模式设计和实现,它的服务端通信序列图如下:
客户端通信序列图如下:
客户端步骤4-6的标注有些牵强,其实在大的程序中是这样的,如hadoop的ipc代码中就是这样,稍后文章会讲解hadoop如何使用nio进行rpc通信。


