Netty框架入门学习--第一个Netty程序 hello world
作为netty学习的第一个博客内容,很简单,就是直接用netty开发一个简单的服务端,客户端发送一个请求,服务端返回一个hello world。
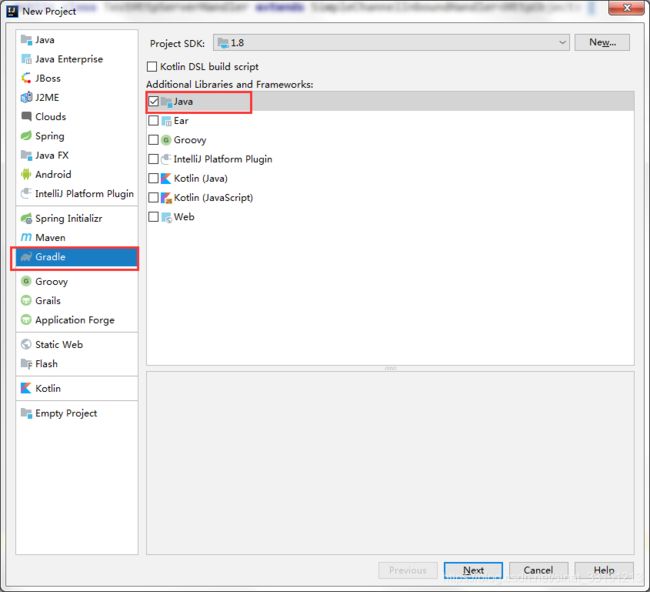
开始之前呢,需要安装好idea,gradle,然后通过idea创建一个project,如图,然后一步一步往下点就可以了,当然你用eclipse或者使用maven依赖的方式也是可以的。

配置build.gradle
创建好project之后呢,你就可以在project下面看到一个 build.gradle 文件,这里面就是添加依赖的地方,
本文netty的依赖如下:
dependencies {
    compile (
            "io.netty:netty-all:4.1.10.Final"
    )
}
好了,接下来就是用netty开发一个服务端了。
TestServer.java
/**
 * 客户端发送一个请求,不带任何参数,服务器端返回一个helloworld
 */
public class TestServer {
    public static void main(String[] args) throws Exception {
        /** 事件循环组
         *  首先定义两个EventLoopGroup
         *  bossGroup相当于老板,worker相当于工人,bossGroup不断的从客户端接收请求,但是不作任何处理,全都
         *  交给workerGroup处理
         *  也可以只用bossGroup完成整个流程,但是不推荐
         */
        EventLoopGroup bossGroup = new NioEventLoopGroup();
        EventLoopGroup workerGroup = new NioEventLoopGroup();
        try {
            //ServerBootstrap是一个简化服务端启动的一个类,然后关联一个处理器
            ServerBootstrap bootstrap = new ServerBootstrap();
            bootstrap.group(bossGroup, workerGroup).channel(NioServerSocketChannel.class)
                    .childHandler(new TestServerInitializer()); //定义一个我们自己的请求处理器 TestServerInitializer

            //bind端口
            ChannelFuture channelFuture = bootstrap.bind(8899).sync();
            channelFuture.channel().closeFuture().sync();
        } finally {
            //优雅的关闭
            bossGroup.shutdownGracefully();
            workerGroup.shutdownGracefully();
        }
    }
}
TestServerInitializer.java
这个类需要继承一个ChannelInitializer,需要的泛型是SocketChannel
public class TestServerInitializer extends ChannelInitializer<SocketChannel> {

    /**
     * 初始化管道,channel连接一旦被注册,这个方法就会被调用
     * 一个回调的方法
     */
    @Override
    protected void initChannel(SocketChannel ch) throws Exception {
    	//通过SocketChannel 获取到ChannelPipeline
    	/**
    	 * ChannelPipeline 类似于一个管道,里面可以有很多个channelHandler
    	 * 这个channelHandler就相当于拦截器一样,每一个拦截器都有自己相应的功能
    	 */
        ChannelPipeline pipeline = ch.pipeline();

        //handler的名字可以不用写,为了规范应该写上
        pipeline.addLast("httpServerCodec", new HttpServerCodec());
        //自己的定义的handler
        pipeline.addLast("testHttpServerHandler", new TestHttpServerHandler());

    }
}
TestHttpServerHandler.java
public class TestHttpServerHandler extends SimpleChannelInboundHandler<HttpObject> {

    /**
     *  读取客户端发送过来的请求,并且向客户端返回响应
     */
    @Override
    protected void channelRead0(ChannelHandlerContext ctx, HttpObject msg) throws Exception {
       	if (msg instanceof HttpRequest) {
            /**
             * ByteBuf 接收向客户端响应的内容
             * 这个方法中,“Hello World”就是向客户端响应的内容
             */
            ByteBuf buf = Unpooled.copiedBuffer("Hello World", CharsetUtil.UTF_8);
            FullHttpResponse response = new DefaultFullHttpResponse(HttpVersion.HTTP_1_1,
                    HttpResponseStatus.OK, buf);
            response.headers().set(HttpHeaderNames.CONTENT_TYPE, "text/plain");
            response.headers().set(HttpHeaderNames.CONTENT_LENGTH, buf.readableBytes());

            /**
             * ctx.write 这个方法只是内容放在缓冲区
             * ctx.writeAndFlush 才会将内容返回
             */
            ctx.writeAndFlush(response);
        }

    }
}
好了,现在启动TestServer,这里我是用浏览器当做一个客户端来访问这个服务端。
通过浏览器访问localhost:8899,可以看到一个Hello World。

到这里,用netty开发一个简单服务端就完成了。
这里在额外说一个问题。
我们在channelRead0这个方法里再打印"执行channelRead0".
if (msg instanceof HttpRequest) {
            System.out.println("执行channelRead0");
            /**
             * ByteBuf 接收向客户端响应的内容
             * 这个方法中,“Hello World”就是向客户端响应的内容
             */
            ByteBuf buf = Unpooled.copiedBuffer("Hello World", CharsetUtil.UTF_8);
            FullHttpResponse response = new DefaultFullHttpResponse(HttpVersion.HTTP_1_1,
                    HttpResponseStatus.OK, buf);
            response.headers().set(HttpHeaderNames.CONTENT_TYPE, "text/plain");
            response.headers().set(HttpHeaderNames.CONTENT_LENGTH, buf.readableBytes());

            /**
             * ctx.write 这个方法只是内容放在缓冲区
             * ctx.writeAndFlush 才会将内容返回
             */
            ctx.writeAndFlush(response);
        }
然后我们再去启动TestSever这个类,在浏览器输入:localhost:8899进行访问,浏览器会正常的显示hello world,但是再去看idea的控制台
 打印了两个“执行channelRead0”,也就是这个channelRead0回调了两次,这是为什么呢?
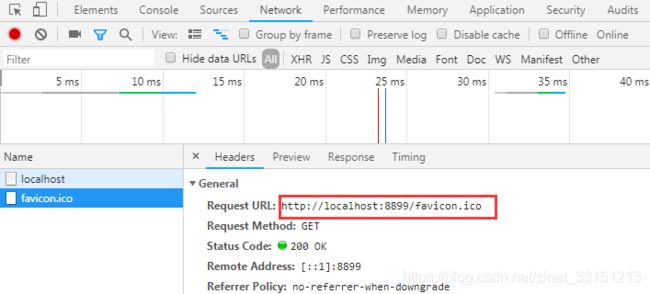
当你打开浏览器的控制台,点击Network,然后再去访问以下localhost:8899,会看到有两个请求,其中一个localhost,就是我们进行的请求,这个没问题,这里又多了一个http://localhost:8899/favicon.ico请求。有的浏览器发送请求的时候,比如chrome会额外发送一个网站图标的请求,这就是channelRead0回调了两次的原因。如果你测试的时候用的curl的方式,就不会出现这个问题了。

对于这个问题,把代码稍微处理下就可以了。
对请求路径localhost:8899/favicon.ico进行判断
if (msg instanceof HttpRequest) {

            HttpRequest request = (HttpRequest) msg;
            URI uri = new URI(request.uri());
            if ("/favicon.ico".equals(uri.getPath())) {
                System.out.println("请求了favicon.ico");
                return;
            }
            System.out.println("执行channelRead0");

            /**
             * ByteBuf 接收向客户端响应的内容
             * 这个方法中,“Hello World”就是向客户端响应的内容
             */
            ByteBuf buf = Unpooled.copiedBuffer("Hello World", CharsetUtil.UTF_8);
            FullHttpResponse response = new DefaultFullHttpResponse(HttpVersion.HTTP_1_1,
                    HttpResponseStatus.OK, buf);
            response.headers().set(HttpHeaderNames.CONTENT_TYPE, "text/plain");
            response.headers().set(HttpHeaderNames.CONTENT_LENGTH, buf.readableBytes());

            /**
             * ctx.write 这个方法只是内容放在缓冲区
             * ctx.writeAndFlush 才会将内容返回
             */
            ctx.writeAndFlush(response);
        }
OK,一个简单netty程序就开发好了。