java使用nio读写文件
IO原理
最近在研究 JAVA NIO 的相关知识,学习NIO,就不能提到IO的原理和事项,必经NIO是基于IO进化而来
IO涉及到的底层的概念大致如下:
- 缓冲区操作。2) 内核空间与用户空间。3) 虚拟内存。4) 分页技术
一,虚拟存储器
虚拟存储器是硬件异常(缺页异常)、硬件地址翻译、主存、磁盘文件和内核软件的完美交互,它为每个进程提供了一个大的、一致的和私有的地址空间。
虚拟存储器的三大能力:
①将主存看成是一个存储在磁盘上的地址空间的高速缓存。
②为每个进程提供了一个一致的地址空间。
③保护每个进程的地址空间不被其他进程破坏。
虚拟内存的两大好处:
① 一个以上的虚拟地址可指向同一个物理内存地址。
② 虚拟内存空间可大于实际可用的硬件内存。
二,用户空间与内核空间
设虚拟地址为32位,那么虚拟地址空间的范围为0~4G。操作系统将这4G分为二部分,将最高的1G字节(虚拟地址范围为:0xC0000000-0xFFFFFFFF)供内核使用,称为内核空间。而将较低的3G字节供各个进程使用,称为用户空间。
每个进程可以通过系统调用进入内核,因为内核是由所有的进程共享的。对于每一个具体的进程,它看到的都是4G大小的虚拟地址空间,即相当于每个进程都拥有一个4G大小的虚拟地址空间。
三,IO操作
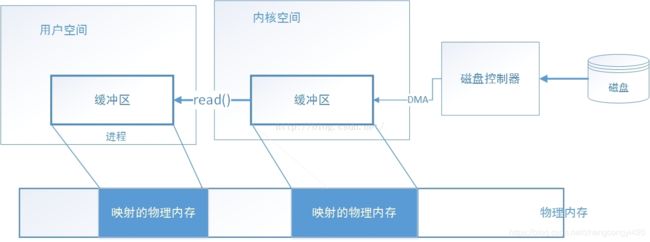
一般IO缓冲区操作:
- 用户进程使用read()系统调用,要求其用户空间的缓冲区被填满。
- 内核向磁盘控制器硬件发命令,要求从磁盘读入数据。
- 磁盘控制器以DMA方式(数据不经过CPU)把数据复制到内核缓冲区。
- 内核将数据从内核缓冲区复制到用户进程发起read()调用时指定的用户缓冲区。
从上图可以看出:磁盘中的数据是先读取到内核的缓冲区中。然后再从内核的缓冲区复制到用户的缓冲区。为什么会这样呢?
因为用户空间的进程是不能直接硬件的(操作磁盘控制器)。磁盘是基于块存储的硬件设备,它一次操作固定大小的块,而用户请求请求的可能是任意大小的数据块。因此,将数据从磁盘传递到用户空间,由内核负责数据的分解、再组合。
内存映射IO:就是复用一个以上的虚拟地址可以指向同一个物理内存地址。将内核空间的缓冲区地址(内核地址空间)映射到物理内存地址区域,将用户空间的缓冲区地址(用户地址空间)也映射到相同的物理内存地址区域。从而数据不需要从内核缓冲区映射的物理内存地址移动到用户缓冲区映射的物理内存地址了。从链路上看,这样的方式明显比上述的IO操作方式要短了,节省出来的路程,就是NIO操作的优势所在
要求:①用户缓冲区与内核缓冲区必须使用相同的页大小对齐。
②缓冲区的大小必须是磁盘控制器块大小(512字节磁盘扇区)的倍数—因为磁盘是基于块存储的硬件设备,一次只能操作固定大小的数据块。
用户缓冲区按页对齐,会提高IO的效率—这也是为什么在JAVA中new 一个字节数组时,指定的大小为2的倍数(4096)的原因吧。
四,JAVA中的IO,本质上是把数据移进或者移出缓冲区。
read()和write()系统调用完成的作用是:把内核缓冲区映射的物理内存空间中的数据 拷贝到 用户缓冲区映射的物理内存空间中。
因此,当使用内存映射IO时,可视为:用户进程直接把文件数据当作内存,也就不需要使用read()或write()系统调用了。
当发起一个read()系统调用时,根据待读取的数据的位置生成一个虚拟地址(用户进程使用的是虚拟地址),由MMU转换成物理地址,若内核中没有相应的数据,产生一个缺页请求,内核负责页面调入从而将数据从磁盘读取到内核缓冲区映射的物理内存中。对用户程序而言,这一切都是在不知不觉中进行。
总之,从根本上讲数据从磁盘装入内存是以页为单位通过分页技术装入内存的。
五,JAVA NIO中的直接缓存和非直接缓存
直接缓存:不是分配于堆上的存储,位于JVM之外,它不受JAVA的GC管理,相当于内核缓冲区。非直接缓存:建立在JAVA堆上的缓存,受JVM管理,相当于用户缓冲区。
根据上面第三点,将直接缓存中的数据写入通道的速度要快于非直接缓存。因为,连接到通道的另一端是文件(磁盘,FileChannel)或者网络(Socket通道),这些都是某种形式上的硬件。那么,对于非直接缓存而言,数据从缓冲区传递到硬件,要经过内核缓冲区中转。而对于直接缓存而言,就不需要了,因为直接缓存已经直接映射到内核缓冲区了。
了解了上述的基本概念后,下面我们分别使用传统的IO方式和NIO方式实现一个文件拷贝的功能,简单对比一下
IO方式实现文件拷贝:
	//IO方法实现文件k拷贝
    private static void traditionalCopy(String sourcePath, String destPath) throws Exception {
        File source = new File(sourcePath);
        File dest = new File(destPath);
        if (!dest.exists()) {
            dest.createNewFile();
        }
        FileInputStream fis = new FileInputStream(source);
        FileOutputStream fos = new FileOutputStream(dest);
        byte[] buf = new byte[1024];
        int len = 0;
        while ((len = fis.read(buf)) != -1) {
            fos.write(buf, 0, len);
        }
        fis.close();
        fos.close();
    }
然后我们来测试一下一个比较大的文件拷贝,看看性能如何
public static void main(String[] args) throws Exception{
        long start = System.currentTimeMillis();
        traditionalCopy("D:\\常用软件\\JDK1.8\\jdk-8u181-linux-x64.tar.gz", "D:\\常用软件\\JDK1.8\\IO.tar.gz");
        long end = System.currentTimeMillis();
        System.out.println("用时为:" + (end-start));
    }
180M的文件,这个速度也还不算太差,下面我们再尝试使用NIO的方式试一下,提供两种方式的拷贝,
public void nioCpoy(String source, String target, int allocate) throws IOException{
        ByteBuffer byteBuffer = ByteBuffer.allocate(allocate);
        FileInputStream inputStream = new FileInputStream(source);
        FileChannel inChannel = inputStream.getChannel();

        FileOutputStream outputStream = new FileOutputStream(target);
        FileChannel outChannel = outputStream.getChannel();

        int length = inChannel.read(byteBuffer);
        while(length != -1){
            byteBuffer.flip();//读取模式转换写入模式
            outChannel.write(byteBuffer);
            byteBuffer.clear(); //清空缓存,等待下次写入
            // 再次读取文本内容
            length = inChannel.read(byteBuffer);
        }
        outputStream.close();
        outChannel.close();
        inputStream.close();
        inChannel.close();
    }
public static void fileChannelCopy(String sfPath, String tfPath) {

        File sf = new File(sfPath);
        File tf = new File(tfPath);
        FileInputStream fi = null;
        FileOutputStream fo = null;
        FileChannel in = null;
        FileChannel out = null;
        try{
            fi = new FileInputStream(sf);
            fo = new FileOutputStream(tf);
            in = fi.getChannel();//得到对应的文件通道
            out = fo.getChannel();//得到对应的文件通道
            in.transferTo(0, in.size(), out);//连接两个通道,并且从in通道读取,然后写入out通道
        }catch (Exception e){
            e.printStackTrace();
        }finally {
            try{
                fi.close();
                in.close();
                fo.close();
                out.close();
            }catch (Exception e){
                e.printStackTrace();
            }
        }
    }
测试一下性能如何,运行一下下面的代码,
public static void main(String[] args) {
        long start = System.currentTimeMillis();
        String sPath = "D:\\常用软件\\JDK1.8\\jdk-8u181-linux-x64.tar.gz";
        String tPath = "D:\\常用软件\\JDK1.8\\NIO.tar.gz";
        fileChannelCopy(sPath,tPath);
        long end = System.currentTimeMillis();
        System.out.println("用时为:" + (end-start));
    }
这个效率通过简单的对比可以说明问题了,NIO在操作大文件读写时,性能优势就体现出来了,下面附上通过NIO操作文件读写的几个方法,后面做参考使用
/**
 * NIO读写文件工具类
 */
public class NIOFileUtil {

    private String file;

    public String getFile() {
        return file;
    }

    public void setFile(String file) {
        this.file = file;
    }

    public NIOFileUtil(String file) throws IOException {
        super();
        this.file = file;
    }

    /**
     * NIO读取文件
     * @param allocate
     * @throws IOException
     */
    public void read(int allocate) throws IOException {

        RandomAccessFile access = new RandomAccessFile(this.file, "r");

        //FileInputStream inputStream = new FileInputStream(this.file);
        FileChannel channel = access.getChannel();
        ByteBuffer byteBuffer = ByteBuffer.allocate(allocate);

        CharBuffer charBuffer = CharBuffer.allocate(allocate);
        Charset charset = Charset.forName("GBK");
        CharsetDecoder decoder = charset.newDecoder();
        int length = channel.read(byteBuffer);
        while (length != -1) {
            byteBuffer.flip();
            decoder.decode(byteBuffer, charBuffer, true);
            charBuffer.flip();
            System.out.println(charBuffer.toString());
            // 清空缓存
            byteBuffer.clear();
            charBuffer.clear();
            // 再次读取文本内容
            length = channel.read(byteBuffer);
        }
        channel.close();
        if (access != null) {
            access.close();
        }
    }

    /**
     * NIO写文件
     * @param context
     * @param allocate
     * @param chartName
     * @throws IOException
     */
    public void write(String context, int allocate, String chartName) throws IOException{
        // FileOutputStream outputStream = new FileOutputStream(this.file); //文件内容覆盖模式 --不推荐
        FileOutputStream outputStream = new FileOutputStream(this.file, true); //文件内容追加模式--推荐
        FileChannel channel = outputStream.getChannel();
        ByteBuffer byteBuffer = ByteBuffer.allocate(allocate);
        byteBuffer.put(context.getBytes(chartName));
        byteBuffer.flip();//读取模式转换为写入模式
        channel.write(byteBuffer);
        channel.close();
        if(outputStream != null){
            outputStream.close();
        }
    }

    /**
     * nio事实现文件拷贝
     * @param source
     * @param target
     * @param allocate
     * @throws IOException
     */
    public static void nioCpoy(String source, String target, int allocate) throws IOException{
        ByteBuffer byteBuffer = ByteBuffer.allocate(allocate);
        FileInputStream inputStream = new FileInputStream(source);
        FileChannel inChannel = inputStream.getChannel();

        FileOutputStream outputStream = new FileOutputStream(target);
        FileChannel outChannel = outputStream.getChannel();

        int length = inChannel.read(byteBuffer);
        while(length != -1){
            byteBuffer.flip();//读取模式转换写入模式
            outChannel.write(byteBuffer);
            byteBuffer.clear(); //清空缓存,等待下次写入
            // 再次读取文本内容
            length = inChannel.read(byteBuffer);
        }
        outputStream.close();
        outChannel.close();
        inputStream.close();
        inChannel.close();
    }

    //IO方法实现文件k拷贝
    private static void traditionalCopy(String sourcePath, String destPath) throws Exception {
        File source = new File(sourcePath);
        File dest = new File(destPath);
        if (!dest.exists()) {
            dest.createNewFile();
        }
        FileInputStream fis = new FileInputStream(source);
        FileOutputStream fos = new FileOutputStream(dest);
        byte[] buf = new byte[1024];
        int len = 0;
        while ((len = fis.read(buf)) != -1) {
            fos.write(buf, 0, len);
        }
        fis.close();
        fos.close();
    }

    public static void main(String[] args) throws Exception{
        /*long start = System.currentTimeMillis();
        traditionalCopy("D:\\常用软件\\JDK1.8\\jdk-8u181-linux-x64.tar.gz", "D:\\常用软件\\JDK1.8\\IO.tar.gz");
        long end = System.currentTimeMillis();
        System.out.println("用时为:" + (end-start));*/

        long start = System.currentTimeMillis();
        nioCpoy("D:\\常用软件\\JDK1.8\\jdk-8u181-linux-x64.tar.gz", "D:\\常用软件\\JDK1.8\\NIO.tar.gz",1024);
        long end = System.currentTimeMillis();
        System.out.println("用时为:" + (end-start));
    }

}
NIO在读写文件上体现出来的性能优势得益于其自身的结构设计,最重要的还是本文开头所讲的关于操作链路上的结构优化设计,掌握这一点原理基本就理解了NIO的实质,本篇到这里就结束了,最后感谢观看!


