OpenGL ES之GLSL实现“缩放”、“灵魂出窍”、“抖动”、“闪白”、“毛刺”、“幻觉”动态滤镜效果
无滤镜效果
- “动态滤镜”效果的实现准备工作的代码与“无分屏滤镜”中的实现逻辑和流程一致,只需要修改相应的底部item数组及对应的着色器名称等,这里不再说明这部分内容,顶点着色器也没有任何变化,本文主要是针对片元着色器中GLSL代码实现“动态滤镜”的算法做具体的说明和实现;
- 无滤镜效果具体实现流程请参考:OpenGL ES之GLSL实现“分屏滤镜”效果
缩放
一、效果展示
二、实现原理
原理
- 可以通过修改顶点坐标和纹理坐标的对应关系来实现;
- 需要在顶点着色器实现完成;
缩放滤镜算法
-
通过mod取模函数计算当前时间戳对应的时间周期,通过uniform传入顶点着色器:


-
计算顶点的放大倍数,即缩放的振幅,范围是[1.0, 1.3];
-
计算顶点坐标按照振幅缩放后的坐标;

三、GLSL实现
- 修改顶点着色器GLSL代码,不是片元着色器;
attribute vec4 Position;
attribute vec2 TextureCoords;
varying vec2 TextureCoordsVarying;
// 时间戳(随着定时器的方法调用及时更新):从0开始一直递增
uniform float Time;
const float PI = 3.1415926;
void main() {
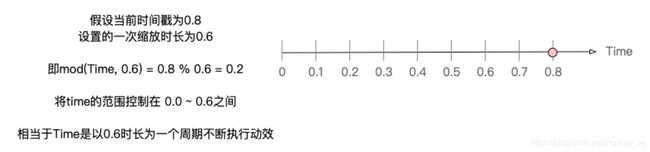
// 一次缩放效果的时长
float duration = 0.6;
//最大缩放幅度
float maxAmplitude = 0.3;
// 表示传入的事件周期,即time的范围被控制在0.0~0.6
//mod(a, b),求模运算 等价于 a%b,GLSL中不支持%求模
float time = mod(Time,duration);
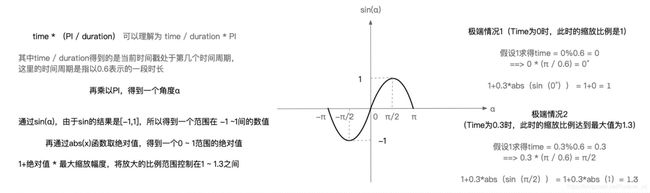
// amplitude表示振幅,引入PI的目的是为了使用sin函数,将amplitude的范围控制在1.0 ~ 1.3之间,并随着时间变化
// 这里可以不用取绝对值,因为角度的范围是[0,π],不会出现负数的情况
float amplitude = 1.0 + maxAmplitude * abs(sin(time * (PI / duration)));
// 放大关键代码:将顶点坐标的x和y分别乘以一个放大系数,即振幅,在纹理坐标不变的情况下,就达到了拉伸的效果
// xy放大,zw保持不变
gl_Position = vec4(Position.x * amplitude, Position.y * amplitude, Position.zw);
// 纹理坐标传递给TextureCoordsVarying
TextureCoordsVarying = TextureCoords;
}
- 注意:振幅的计算可以不用abs函数,主要是因为time * (PI / duration)的角度范围始终是在[0, π]范围内的,而这个范围内的sin函数的结果范围是[0,1],所以可以不用abs函数取绝对值;
- 片元着色器GLSL如下:
	precision highp float;

	uniform sampler2D Texture;
	varying vec2 TextureCoordsVarying;

	void main (void) {
    	vec4 mask = texture2D(Texture, TextureCoordsVarying);
    	gl_FragColor = vec4(mask.rgb, 1.0);
	}
灵魂出窍
一、效果展示
二、实现原理
原理
- 灵魂出窍滤镜: 通过在原图上叠加一个图层,将两个图层进行颜色混合实现,且上面的叠加的层随着时间推移逐渐放大且透明度降低至0,以此循环往复。
- 需要在片元着色器中进行滤镜算法;
灵魂出窍滤镜算法
-
根据当前时间戳计算当前周期在一个周期时长中的百分比,即进度;
-
计算当前进度对应的透明度和当前进度对应的缩放比例;
-
获取放大后的纹理坐标;
-
获取原纹理坐标 & 放大纹理坐标的纹素;
-
将原纹理和放大后的纹理进行颜色混合;

三、GLSL实现
precision highp float;
uniform sampler2D Texture;
varying vec2 TextureCoordsVarying;
// 时间戳
uniform float Time;
void main (void) {
// 一次灵魂出窍效果的时长
float duration = 0.7;
// 透明度上限值
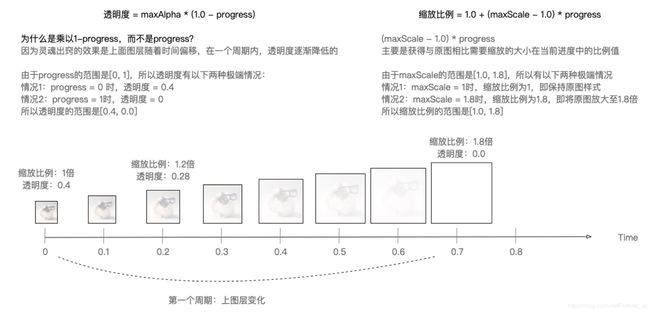
float maxAlpha = 0.4;
// 图片放大的上限
float maxScale = 1.8;
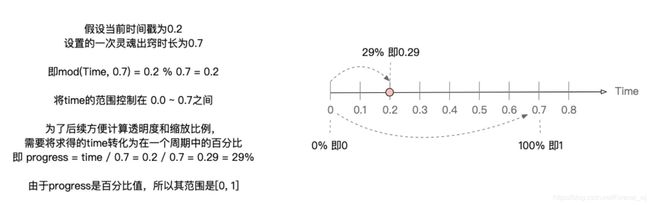
// 当前进度(时间戳与时长使用mod取模),再除以时长 得到[0,1],即百分比
float progress = mod(Time, duration) / duration; // 0~1
// 当前透明度[0.4,0]
float alpha = maxAlpha * (1.0 - progress);
// 当前缩放比例[1.0,1.8]
float scale = 1.0 + (maxScale - 1.0) * progress;
// 获取放大后的纹理坐标
// 将顶点坐标对应的纹理坐标的x/y值到中心点的距离,缩小一定的比例,仅仅只是改变了纹理坐标,而保持顶点坐标不变,从而达到拉伸效果
float weakX = 0.5 + (TextureCoordsVarying.x - 0.5) / scale;
float weakY = 0.5 + (TextureCoordsVarying.y - 0.5) / scale;
vec2 weakTextureCoords = vec2(weakX, weakY);
// 获取当前像素点纹理坐标,放大后的纹理坐标
vec4 weakMask = texture2D(Texture, weakTextureCoords);
vec4 mask = texture2D(Texture, TextureCoordsVarying);
// 颜色混合 内建函数mix / 混合方程式
gl_FragColor = mask * (1.0 - alpha) + weakMask * alpha;
}
抖动
一、效果展示
二、实现原理
原理
- 颜色偏移 + 微弱的放大效果,即先将纹理放大,然后将放大后的纹理坐标的纹素进行颜色偏移;
抖动滤镜的算法
- 根据当前时间戳计算当前进度的百分比;
- 计算当前进度对应的颜色偏移;
- 计算当前进度对应的缩放比例;
- 获取放大后的纹理坐标;
- 将放大后的纹理纹素进行颜色偏移,获得3组颜色;
- 从3组颜色中分别获取RGBA的值;
注意
- 其中获取时间戳、计算当前进度值与灵魂出窍中一致;
三、GLSL实现
void main() {
// 一次抖动效果的时长
float duration = 0.7;
// 放大图片的上限
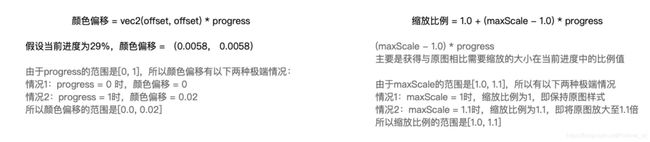
float maxScale = 1.1;
// 颜色偏移的步长
float offset = 0.02;
// 进度 0 ~ 1
float progress = mod(Time, duration) / duration;
// 颜色偏移值0 ~ 0.02
vec2 offsetCoords = vec2(offset, offset) * progress;
// 缩放比例 1.0 ~ 1.1
float scale = 1.0 + (maxScale - 1.0) * progress;
// 放大后的纹理坐标
// 下面这种向量相加减的方式 等价于 灵魂出窍滤镜中的单个计算x、y坐标再组合的为纹理坐标的方式
vec2 ScaleTextureCoords = vec2(0.5, 0.5) + (TextureCoordsVarying - vec2(0.5, 0.5)) / scale;
// 获取三组颜色:颜色偏移计算可以随意,只要偏移量很小即可
// 原始颜色 + offset
vec4 maskR = texture2D(Texture, ScaleTextureCoords + offsetCoords);
// 原始颜色 - offset
vec4 maskB = texture2D(Texture, ScaleTextureCoords - offsetCoords);
// 原始颜色
vec4 mask = texture2D(Texture, ScaleTextureCoords);
// 从3组颜色中分别取出 红色R,绿色G,蓝色B,透明度A填充到内置变量gl_FragColor内
gl_FragColor = vec4(maskR.r, maskB.g, mask.b, mask.a);
}
闪白
一、效果展示
二、实现原理
原理
- 在原图上添加一个白色遮罩,且白色图层的透明度随着时间推移而变化,并与原图进行颜色混合;
闪白滤镜算法
- 通过mod函数计算当前时间戳对应的时间周期;

- 设置一个白色遮罩;
- 计算白色遮罩的振幅,振幅范围是[0,0, 1.0];

- 获取原图纹理的纹素,并与白色遮罩颜色混合;
- 颜色混合的方式有多种,常用的一般是mix函数或者默认的混合方程式:mask*(1-alpha) + weakMask*alpha;
三、GLSL实现
precision highp float;
uniform sampler2D Texture;
varying vec2 TextureCoordsVarying;
// 时间戳
uniform float Time;
// PI常量
const float PI = 3.1415926;

void main(){
    // 一次闪白的时长
    float duration = 0.6;
    // 将时间戳转换到一个周期内,范围是0 ~ 0.6
    float time = mod(Time, duration);
    // 白色遮罩
    vec4 whiteMask = vec4(1.0, 1.0, 1.0, 1.0);
    // 振幅,范围是0 ~ 1
//    float amplitude = abs(sin(time * (PI / duration)));
    float amplitude = sin(time * (PI / duration));

   	// 获取纹理坐标对应的纹素颜色值
    vec4 mask = texture2D(Texture, TextureCoordsVarying);
    // 利用mix内置函数进行颜色混合,属于线性混合
    gl_FragColor = mix(mask, whiteMask, amplitude);
}
毛刺
一、效果展示
二、实现原理
原理
- 撕裂+微弱的颜色偏移,即设定一个阈值,当像素点的偏移值小于阈值时,才进行偏移,反之,则乘以一个缩小系数;
- 最终的呈现效果就是绝大部分都会进行微小的偏移,只有少量的行会进行较大偏移;
毛刺滤镜算法
-
mod函数计算时间周期;
-
计算振幅,范围是[0, 1];

-
获取像素点随机偏移值,范围是[-1,1];
-
判断是否需要偏移 & 计算纹理的x坐标;
-
需要偏移,撕裂较大,即x的颜色偏移较大;
-
不需要,撕裂较小,即x的颜色偏移值很微小;
-
获取撕裂后的纹理坐标;
-
计算撕裂后的三组纹素,并获取不同组中的RGBA值;
三、GLSL实现
precision highp float;
uniform sampler2D Texture;
varying vec2 TextureCoordsVarying;
// 时间戳
uniform float Time;
// PI常量
const float PI = 3.1415926;
// 随机数
float rand(float n){
// fract(x)返回x的小数部分
// 返回 sin(n) * 43758.5453123
// sin(n) * 极大值,带小数点,想要随机数算的比较低,乘的数就必须较大,噪声随机
// 如果想得到【0,1】范围的小数值,可以将sin * 1
// 如果只保留小数部分,乘以一个极大值
return fract(sin(n) * 43758.5453123);
}
void main() {
// 最大抖动上限
float maxJitter = 0.06;
// 一次毛刺效果的时长
float duration = 0.3;
// 红色颜色偏移
float colorROffset = 0.01;
// 绿色颜色偏移
float colorBOffset = -0.025;
// 表示将传入的事件转换到一个周期内,范围是 0 ~ 0.6,抖动时长变成0.6
float time = mod(Time, duration * 2.0);
// 振幅,随着时间变化,范围是[0, 1]
float amplitude = max(sin(time * (PI / duration)), 0.0);
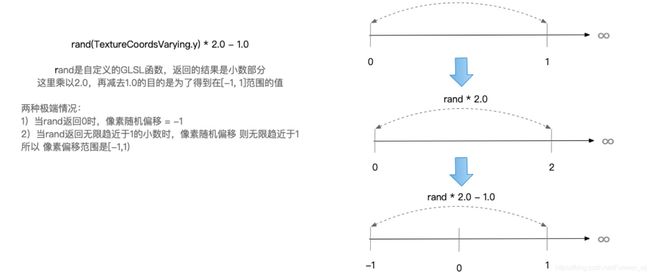
// 像素随机偏移范围 -1 ~ 1,* 2.0 - 1.0是为了得到【-1,1】范围内的随机值
float jitter = rand(TextureCoordsVarying.y) * 2.0 - 1.0;
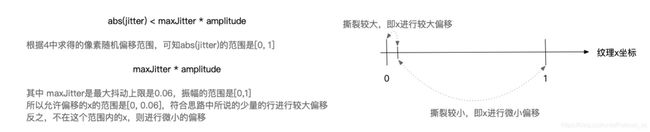
// 判断是否需要偏移,如果jitter范围 < 最大范围*振幅
// abs(jitter) 范围【0,1】
// maxJitter * amplitude 范围【0, 0.06】
bool needOffset = abs(jitter) < maxJitter * amplitude;
// 获取纹理x坐标,根据needOffset来计算它的x撕裂
//needOffset = YES,则撕裂大
//needOffset = NO,则撕裂小,需要降低撕裂 = *振幅*非常细微的数
float textureX = TextureCoordsVarying.x + (needOffset ? jitter : (jitter * amplitude * 0.006));
// 获取纹理撕裂后的x、y坐标
vec2 textureCoords = vec2(textureX, TextureCoordsVarying.y);
// 颜色偏移:获取3组颜色
// 撕裂后的原图颜色
vec4 mask = texture2D(Texture, textureCoords);
// 根据撕裂计算后的纹理坐标,获取纹素
vec4 maskR = texture2D(Texture, textureCoords + vec2(colorROffset * amplitude, 0.0));
// 根据撕裂计算后的纹理坐标,获取纹素
vec4 maskB = texture2D(Texture, textureCoords + vec2(colorBOffset * amplitude, 0.0));
// 颜色主要撕裂,红色和蓝色部分,所以只调整红色
gl_FragColor = vec4(maskR.r, mask.g, maskB.b, mask.a);
}
- 注意:GLSL中没有随机值的函数,需要通过自定义函数,利用fract函数获得随机数;
幻觉
一、效果展示

二、实现原理
原理
- 残影+颜色偏移的叠加;
- 残影:是每隔一段时间,就会新建一个图层,且该图层以红色为主,随着时间推移透明度逐渐降低,于是可以在一个周期时长内看到很多不同透明度的层叠加在一起,从而形成残影,让图片随着时间做圆周运动;
- 颜色偏移:图片在移动的过程中是蓝色在前,红色在后,即在移动的过程中,每间隔一段时间,遗失了一部分红色通道的值在原来的位置,并且这部分红色通道的值,随着时间偏移,会逐渐恢复。
幻觉滤镜算法
- 通过mod函数计算当前时间周期;
- 设置放大倍数;
- 计算放大后的纹理坐标;
- 获取转全过程中像素点的纹素;
- 通过for循环来新建图层,即幻影颜色;
- 获取由原始图层和新建层叠加的颜色;
三、GLSL实现
precision highp float;
uniform sampler2D Texture;
varying vec2 TextureCoordsVarying;

uniform float Time;

const float PI = 3.1415926;
// 一次幻觉效果的时长,即周期
const float duration = 2.0;

// 这个函数可以计算出,在某个时刻图片的具体位置,通过它可以每经过一段时间,去生成一个新的mask
// 转圈产生幻影的单个像素点的颜色值
vec4 getMask(float time, vec2 textureCoords, float padding) {
   // 圆心坐标
    vec2 translation = vec2(sin(time * (PI * 2.0 / duration)),cos(time * (PI * 2.0 / duration)));

    // 新的纹理坐标 = 原始纹理坐标 + 偏移量 * 圆周坐标(新的图层与图层之间是有间距的,所以需要偏移)
    vec2 translationTextureCoords = textureCoords + padding * translation;

    // 根据新的纹理坐标获取新图层的纹素
    vec4 mask = texture2D(Texture, translationTextureCoords);

    return mask;
}

// 这个函数可以计算出,某个时刻创建的层,在当前时刻的透明度
// 进度:
float maskAlphaProgress(float currentTime, float hideTime, float startTime) {
// mod(时长+持续时间 - 开始时间,时长)得到一个周期内的time
    float time = mod(duration + currentTime - startTime, duration);
    //如果小于0.9,返回time,反之,返回0.9
    return min(time, hideTime);
}

void main() {
    // 将传入的时间戳转换到一个周期内,time的范围是【0,2】
    // 获得时间周期
    float time = mod(Time, duration);
    // 放大后的倍数
    float scale = 1.2;
    // 偏移量 = 0.083
    float padding = 0.5 * (1.0 - 1.0 / scale);
    // 放大后的纹理坐标
    vec2 textureCoords = vec2(0.5, 0.5) + (TextureCoordsVarying - vec2(0.5, 0.5)) / scale;

    // 新建层的隐藏时间 即新建层什么时候隐藏
    float hideTime = 0.9;
    // 时间间隔:隔0.2s创建一个新层
    float timeGap = 0.2;

    // 注意:只保留了红色的透明的通道值,因为幻觉效果残留红色
    // 幻影残留数据
    // max RGB alpha
    // 新图层的 R透明度
    float maxAlphaR = 0.5;
    // 新图层的 G透明度
    float maxAlphaG = 0.05;
    // 新图层的 B透明度
    float maxAlphaB = 0.05;

    // 获取新的图层的坐标,需要传入时间、纹理坐标、偏移量
    vec4 mask = getMask(time, textureCoords, padding);
    // RGB :for循环中使用
    float alphaR = 1.0;
    float alphaG = 1.0;
    float alphaB = 1.0;

    // 最终图层颜色:初始化
    vec4 resultMask = vec4(0, 0, 0, 0);

    // 循环:每一层循环都会得到新的图层的颜色,即幻影颜色
    //一次循环只是计算一个像素点的纹素,需要在真机运行。模拟器会卡,主要是模拟器上是CPU模拟GPU的
    for (float f = 0.0; f < duration; f += timeGap) {
        float tmpTime = f;
        // 获取到【0,2】s内所获取的运动后的纹理坐标
        // 获得幻影当前时间的颜色值
        vec4 tmpMask = getMask(tmpTime, textureCoords, padding);

        // 某个时刻创建的层,在当前时刻的红绿蓝的透明度
        // 临时的透明度 = 根据时间推移RGB的透明度发生变化
        // 获得临时的红绿蓝透明度
        float tmpAlphaR = maxAlphaR - maxAlphaR * maskAlphaProgress(time, hideTime, tmpTime) / hideTime;
        float tmpAlphaG = maxAlphaG - maxAlphaG * maskAlphaProgress(time, hideTime, tmpTime) / hideTime;
        float tmpAlphaB = maxAlphaB - maxAlphaB * maskAlphaProgress(time, hideTime, tmpTime) / hideTime;

        // 累计每一层临时RGB * RGB的临时透明度
        // 结果 += 临时颜色 * 透明度,即刚产生的图层的颜色
        resultMask += vec4(tmpMask.r * tmpAlphaR,tmpMask.g * tmpAlphaG,tmpMask.b * tmpAlphaB,1.0);

        // 透明度递减
        alphaR -= tmpAlphaR;
        alphaG -= tmpAlphaG;
        alphaB -= tmpAlphaB;
    }

    // 最终颜色 += 原始纹理的RGB * 透明度
    resultMask += vec4(mask.r * alphaR, mask.g * alphaG, mask.b * alphaB, 1.0);

    // 将最终颜色填充到像素点里
    gl_FragColor = resultMask;
}