CV03-双线性差值pytorch实现
一、双线性差值
1.1 公式
在理解双线性差值(Bilinear Interpolation)的含义基础上,参考pytorch差值的官方实现注释,自己实现了一遍。
差值就是利用已知点来估计未知点的值。一维上,可以用两点求出斜率,再根据位置关系来求插入点的值。
同理,在二维平面上也可以用类似的办法来估计插入点的值。如图,已知四点![]() 、
、![]() 、
、![]() 、
、![]() 四点的值与坐标值
四点的值与坐标值![]() 、
、![]() 、
、![]() 、
、![]() ,求位于
,求位于![]() 的点
的点![]() 的值。思路是
的值。思路是
- 先用w方向一维的线性差值,根据
 、
、 求出点
求出点 ,根据
,根据 、
、 求出点
求出点 ;
; - 再用h方向一维线性差值,根据
 和
和 求出点
求出点 ;
;
那么就有如下公式
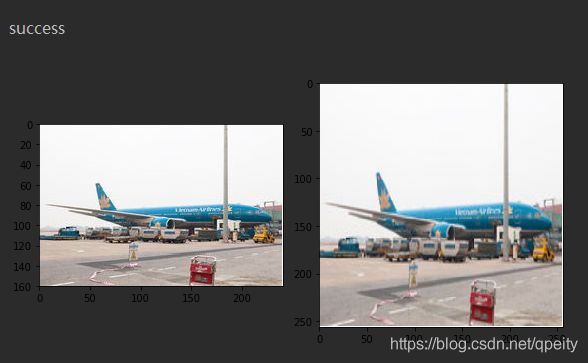
具体到图像的双线性差值问题,我们可以理解成将图片进行了放大,但不使图像变成大块的斑点状,而是增大了图像的分辨率,多出来的像素就是双线性差值的结果。图像上![]() 周边4点一定是临近的,也就是说
周边4点一定是临近的,也就是说
上面的公式简化为
这样我们就面临将目标图像的坐标![]() 映射到原图像上求出
映射到原图像上求出![]() 的问题。
的问题。
1.2 坐标变换
对于第一个问题,目标图像的坐标![]() 映射到原图像上求出
映射到原图像上求出![]() ,有两种思路。
,有两种思路。
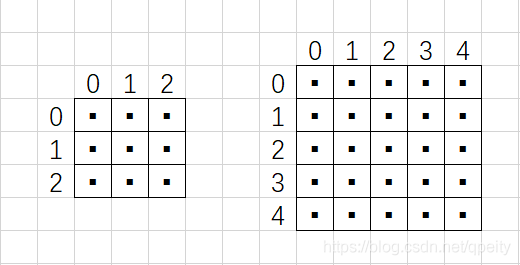
第一种是把像素点看成是1×1大小的方块,像素点位于方块的中心,坐标转换时,HW方向的坐标都要加0.5才能对应起来。pytorch里面叫做torch.nn.functional.interpolate(align_corners=False)。
举例,如图原图像是一个3×3的图像,放大到5×5,每个像素点都是位于方形内的黑色小点。设![]() 是原图像的大小,本例是3×3,
是原图像的大小,本例是3×3,![]() 是目标图像的大小,本例是5×5。换算公式为
是目标图像的大小,本例是5×5。换算公式为
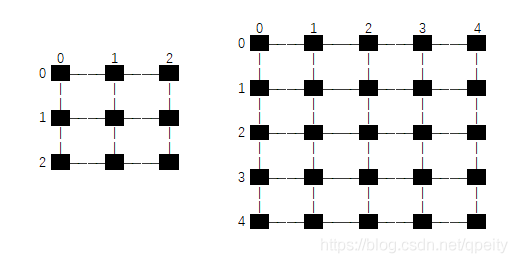
第二种是上下左右相邻的像素点之间连线,像素点都位于交点上,坐标转换时,HW方向的总长度都要减少1才能对应起来g。pytorch里面叫做torch.nn.functional.interpolate(align_corners=True)。
举例,一个3×3的图像放大到5×5,每个像素点都是位于交点的黑色小点。设![]() 是原图像的大小,本例是3×3,
是原图像的大小,本例是3×3,![]() 是目标图像的大小,本例是5×5。换算时,我们取边的长度,也就是HW方向各减1,也就是从2×2变成4×4。这样就有个结论就是变换以后目标图像四个顶点的像素值一定和原图像四个顶点像素值一样。换算公式为
是目标图像的大小,本例是5×5。换算时,我们取边的长度,也就是HW方向各减1,也就是从2×2变成4×4。这样就有个结论就是变换以后目标图像四个顶点的像素值一定和原图像四个顶点像素值一样。换算公式为
二、for循环实现双线性差值(naive实现)
是对一张图像的,维度HWC,采用for循环遍历H、W计算差值点的像素值。这个实现too young,too simple,简直naive,效率低但易于理解;这里只实现了第一种坐标变换。
import matplotlib.pyplot as plt
import matplotlib.image as mpimg
import numpy as np
import os

def bilinear_interpolation_naive(src, dst_size):
    """
    双线性差值的naive实现
    :param src: 源图像
    :param dst_size: 目标图像大小H*W
    :return: 双线性差值后的图像
    """
    (src_h, src_w, src_c) = src.shape  # 原图像大小 H*W*C
    (dst_h, dst_w), dst_c = dst_size, src_c  # 目标图像大小H*W*C

    if src_h == dst_h and src_w == dst_w:  # 如果大小不变,直接返回copy
        return src.copy()

    scale_h = float(src_h) / dst_h  # 计算H方向缩放比
    scale_w = float(src_w) / dst_w  # 计算W方向缩放比
    dst = np.zeros((dst_h, dst_w, dst_c), dtype=src.dtype)  # 目标图像初始化
    for h_d, row in enumerate(dst):  # 遍历目标图像H方向
        for w_d, col in enumerate(row):  # 遍历目标图像所有W方向
            h = scale_h * (h_d + 0.5) - 0.5  # 将目标图像H坐标映射到源图像上
            w = scale_w * (w_d + 0.5) - 0.5  # 将目标图像W坐标映射到源图像上
            h0 = int(np.floor(h))  # 最近4个点坐标h0
            w0 = int(np.floor(w))  # 最近4个点坐标w0
            h1 = min(h0 + 1, src_h - 1)  # h0 + 1就是h1,但是不能越界
            w1 = min(w0 + 1, src_w - 1)  # w0 + 1就是w1,但是不能越界
            r0 = (w1 - w) * src[h0, w0, ...] + (w - w0) * src[h0, w1, ...]  # 双线性差值R0
            r1 = (w1 - w) * src[h1, w0, ...] + (w - w0) * src[h1, w1, ...]  # 双线性插值R1
            p = (h1 - h) * r0 + (h - h0) * r1  # 双线性插值P
            dst[h_d, w_d, ...] = p.astype(np.uint8) # 插值结果放进目标像素点
    return dst


if __name__ == '__main__':
    def unit_test():
        image_file = os.path.join(os.getcwd(), 'test.jpg')
        image = mpimg.imread(image_file)
        image_scale = bilinear_interpolation_naive(image, (256, 256))

        fig, axes = plt.subplots(1, 2, figsize=(8, 10))
        axes = axes.flatten()
        axes[0].imshow(image)
        axes[1].imshow(image_scale)
        axes[0].axis([0, image.shape[1], image.shape[0], 0])
        axes[1].axis([0, image_scale.shape[1], image_scale.shape[0], 0])
        fig.tight_layout()
        plt.show()
        pass

    unit_test()
三、用numpy矩阵实现
是对一张图像的,维度HWC;采用numpy矩阵实现,速度快;
import matplotlib.pyplot as plt
import matplotlib.image as mpimg
import numpy as np
import os
import torch


def bilinear_interpolation(src, dst_size, align_corners=False):
    """
    双线性插值高效实现
    :param src: 源图像H*W*C
    :param dst_size: 目标图像大小H*W
    :return: 双线性插值后的图像
    """
    (src_h, src_w, src_c) = src.shape  # 原图像大小 H*W*C
    (dst_h, dst_w), dst_c = dst_size, src_c  # 目标图像大小H*W*C

    if src_h == dst_h and src_w == dst_w:  # 如果大小不变,直接返回copy
        return src.copy()
    # 矩阵方式实现
    h_d = np.arange(dst_h)  # 目标图像H方向坐标
    w_d = np.arange(dst_w)  # 目标图像W方向坐标
    if align_corners:
        h = float(src_h - 1) / (dst_h - 1) * h_d
        w = float(src_w - 1) / (dst_w - 1) * w_d
    else:
        h = float(src_h) / dst_h * (h_d + 0.5) - 0.5  # 将目标图像H坐标映射到源图像上
        w = float(src_w) / dst_w * (w_d + 0.5) - 0.5  # 将目标图像W坐标映射到源图像上

    h = np.clip(h, 0, src_h - 1)  # 防止越界,最上一行映射后是负数,置为0
    w = np.clip(w, 0, src_w - 1)  # 防止越界,最左一行映射后是负数,置为0

    h = np.repeat(h.reshape(dst_h, 1), dst_w, axis=1)  # 同一行映射的h值都相等
    w = np.repeat(w.reshape(dst_w, 1), dst_h, axis=1).T  # 同一列映射的w值都相等

    h0 = np.floor(h).astype(np.int)  # 同一行的h0值都相等
    w0 = np.floor(w).astype(np.int)  # 同一列的w0值都相等

    h0 = np.clip(h0, 0, src_h - 2)  # 最下一行上不大于src_h - 2,相当于padding
    w0 = np.clip(w0, 0, src_w - 2)  # 最右一列左不大于src_w - 2,相当于padding

    h1 = np.clip(h0 + 1, 0, src_h - 1)  # 同一行的h1值都相等,防止越界
    w1 = np.clip(w0 + 1, 0, src_w - 1)  # 同一列的w1值都相等,防止越界

    q00 = src[h0, w0]  # 取每一个像素对应的q00
    q01 = src[h0, w1]  # 取每一个像素对应的q01
    q10 = src[h1, w0]  # 取每一个像素对应的q10
    q11 = src[h1, w1]  # 取每一个像素对应的q11

    h = np.repeat(h[..., np.newaxis], dst_c, axis=2)  # 图像有通道C,所有的计算都增加通道C
    w = np.repeat(w[..., np.newaxis], dst_c, axis=2)
    h0 = np.repeat(h0[..., np.newaxis], dst_c, axis=2)
    w0 = np.repeat(w0[..., np.newaxis], dst_c, axis=2)
    h1 = np.repeat(h1[..., np.newaxis], dst_c, axis=2)
    w1 = np.repeat(w1[..., np.newaxis], dst_c, axis=2)

    r0 = (w1 - w) * q00 + (w - w0) * q01  # 双线性插值的r0
    r1 = (w1 - w) * q10 + (w - w0) * q11  # 双线性差值的r1
    q = (h1 - h) * r0 + (h - h0) * r1  # 双线性差值的q
    dst = q.astype(src.dtype)  # 图像的数据类型
    return dst


if __name__ == "__main__":
    def unit_test2():
        image_file = os.path.join(os.getcwd(), 'test.jpg')
        image = mpimg.imread(image_file)
        image_scale = bilinear_interpolation(image, (256, 256))

        fig, axes = plt.subplots(1, 2, figsize=(8, 10))
        axes = axes.flatten()
        axes[0].imshow(image)
        axes[1].imshow(image_scale)
        axes[0].axis([0, image.shape[1], image.shape[0], 0])
        axes[1].axis([0, image_scale.shape[1], image_scale.shape[0], 0])
        fig.tight_layout()
        plt.show()
        pass


    unit_test2()


    def unit_test3():
        src = np.array([[1, 2], [3, 4]])
        print(src)
        src = src.reshape((2, 2, 1))
        dst_size = (4, 4)
        dst = bilinear_interpolation(src, dst_size)
        dst = dst.reshape(dst_size)
        print(dst)

        tsrc = torch.arange(1, 5, dtype=torch.float32).view(1, 1, 2, 2)
        print(tsrc)
        tdst = F.interpolate(
            tsrc,
            size=(4, 4),
            mode='bilinear'
        )
        print(tdst)
    # unit_test3()
四、用torch张量实现
是对tensor的,维度NCHW;和第二段一样,但是采用了张量,可以批量处理。
import torch
import torch.nn.functional as F
import os
import matplotlib.pyplot as plt
import matplotlib.image as mpimg

def bilinear_interpolate(src, dst_size, align_corners=False):
    """
    双线性差值
    :param src: 原图像张量 NCHW
    :param dst_size: 目标图像spatial大小(H,W)
    :param align_corners: 换算坐标的不同方式
    :return: 目标图像张量NCHW
    """
    src_n, src_c, src_h, src_w = src.shape
    dst_n, dst_c, (dst_h, dst_w) = src_n, src_c, dst_size

    if src_h == dst_h and src_w == dst_w:
        return src.copy()
    """将dst的H和W坐标映射到src的H和W坐标"""
    hd = torch.arange(0, dst_h)
    wd = torch.arange(0, dst_w)
    if align_corners:
        h = float(src_h - 1) / (dst_h - 1) * hd
        w = float(src_w - 1) / (dst_w - 1) * wd
    else:
        h = float(src_h) / dst_h * (hd + 0.5) - 0.5
        w = float(src_w) / dst_w * (wd + 0.5) - 0.5

    h = torch.clamp(h, 0, src_h - 1)  # 防止越界,0相当于上边界padding
    w = torch.clamp(w, 0, src_w - 1)  # 防止越界,0相当于左边界padding

    h = h.view(dst_h, 1)  # 1维dst_h个,变2维dst_h*1个
    w = w.view(1, dst_w)  # 1维dst_w个,变2维1*dst_w个
    h = h.repeat(1, dst_w)  # H方向重复1次,W方向重复dst_w次
    w = w.repeat(dst_h, 1)  # H方向重复dsth次,W方向重复1次

    """求出四点坐标"""
    h0 = torch.clamp(torch.floor(h), 0, src_h - 2)  # -2相当于下边界padding
    w0 = torch.clamp(torch.floor(w), 0, src_w - 2)  # -2相当于右边界padding
    h0 = h0.long()  # torch坐标必须是long
    w0 = w0.long()  # torch坐标必须是long

    h1 = h0 + 1
    w1 = w0 + 1

    """求出四点值"""
    q00 = src[..., h0, w0]
    q01 = src[..., h0, w1]
    q10 = src[..., h1, w0]
    q11 = src[..., h1, w1]

    """公式计算"""
    r0 = (w1 - w) * q00 + (w - w0) * q01  # 双线性插值的r0
    r1 = (w1 - w) * q10 + (w - w0) * q11  # 双线性差值的r1
    dst = (h1 - h) * r0 + (h - h0) * r1  # 双线性差值的q

    return dst


if __name__ == '__main__':
    def unit_test4():
        # src = torch.randint(0, 100, (1, 3, 3, 3))
        src = torch.arange(1, 1 + 27).view((1, 3, 3, 3))\
            .type(torch.float32)
        print(src)
        dst = bilinear_interpolate(
            src,
            dst_size=(4, 4),
            align_corners=True
        )
        print(dst)
        pt_dst = F.interpolate(
            src.float(),
            size=(4, 4),
            mode='bilinear',
            align_corners=True
        )
        print(pt_dst)
        if torch.equal(dst, pt_dst):
            print('success')

        image_file = os.path.join(os.getcwd(), 'test.jpg')
        image = mpimg.imread(image_file)

        image_in = torch.from_numpy(image.transpose(2, 0, 1))
        image_in = torch.unsqueeze(image_in, 0)
        image_out = bilinear_interpolate(image_in, (256, 256))
        image_out = torch.squeeze(image_out, 0).numpy().astype(int)
        image_out = image_out.transpose(1, 2, 0)

        fig, axes = plt.subplots(1, 2, figsize=(8, 10))
        axes = axes.flatten()
        axes[0].imshow(image)
        axes[1].imshow(image_out)
        axes[0].axis([0, image.shape[1], image.shape[0], 0])
        axes[1].axis([0, image_out.shape[1], image_out.shape[0], 0])
        fig.tight_layout()
        plt.show()


    unit_test4()


