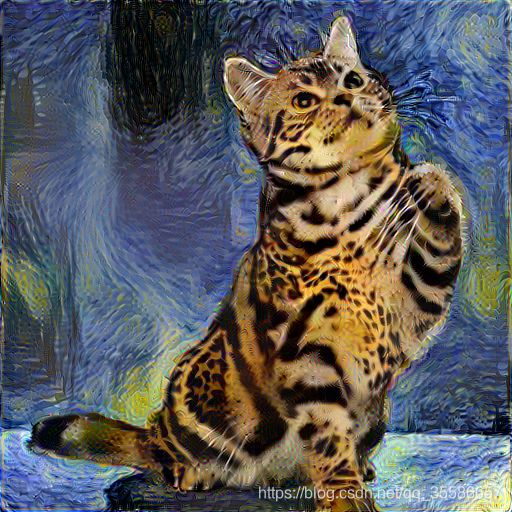
Neural Style 中 Spatial Control 的代码实现
在之前的博客Controlling Perceptual Factors in Neural Style Transfer阅读笔记中介绍了风格迁移中对spatial location、 colour information and spatial scale的控制原理,本文主要是对TensorFlow (Python API) implementation of Neural Style中实现Spatial Control部分代码的分析理解。
文章目录
- 代码理解
- 相关参数
- 相关函数
- 测试
- 制作mask
- HSV颜色模型
- 单张风格图片
- 多张风格图片
代码理解
相关参数
选取了部分关键参数
def parse_args():

  desc = "TensorFlow implementation of 'A Neural Algorithm for Artistic Style'"
  parser = argparse.ArgumentParser(description=desc)

  # options for single image
  parser.add_argument('--style_imgs', nargs='+', type=str,
    help='Filenames of the style images (example: starry-night.jpg)', required=True)
  #风格图片的路径,在 Spatial Control 中可以使用多张图片

  parser.add_argument('--style_imgs_weights', nargs='+', type=float,
    default=[1.0], help='Interpolation weights of each of the style images. (example: 0.5 0.5)')
  #风格图片的权重,对应上面风格图片的数量,对不同区域中风格图片计算损失的权重

  parser.add_argument('--content_img', type=str,
    help='Filename of the content image (example: lion.jpg)')
  #内容图片路径

  parser.add_argument('--init_img_type', type=str,
    default='content', choices=['random', 'content', 'style'],
    help='Image used to initialize the network. (default: %(default)s)')
  #输入变量的初始化,一般使用内容图片

  parser.add_argument('--max_size', type=int,
    default=512, help='Maximum width or height of the input images. (default: %(default)s)')
  #输入图片的最大尺寸

  parser.add_argument('--content_loss_function', type=int,
    default=1, choices=[1, 2, 3], help='Different constants for the content layer loss function. (default: %(default)s)')
  #内容损失的计算函数

  parser.add_argument('--content_layers', nargs='+', type=str,
    default=['conv4_2'], help='VGG19 layers used for the content image. (default: %(default)s)')
  #使用哪一层的feature map计算内容损失,一般只用一层

  parser.add_argument('--style_layers', nargs='+', type=str,
    default=['relu1_1', 'relu2_1', 'relu3_1', 'relu4_1', 'relu5_1'],
    help='VGG19 layers used for the style image. (default: %(default)s)')
  #使用哪几层的feature map计算风格损失

  parser.add_argument('--content_layer_weights', nargs='+', type=float,
    default=[1.0],
    help='Contributions (weights) of each content layer to loss. (default: %(default)s)')
  #使用上面指定的不同层数计算内容损失的权重

  parser.add_argument('--style_layer_weights', nargs='+', type=float,
    default=[0.2, 0.2, 0.2, 0.2, 0.2],
    help='Contributions (weights) of each style layer to loss. (default: %(default)s)')
  #使用上面指定的不同层数计算风格损失的权重

  parser.add_argument('--style_mask', action='store_true',
    help='Transfer the style to masked regions.')
  #是否使用mask,mask是实现Spatial Control的关键!

  parser.add_argument('--style_mask_imgs', nargs='+', type=str,
    default=None,
    help='Filenames of the style mask images (example: face_mask.png) (default: %(default)s)')
  #mask的路径,注意如果要实现不同区域不同风格的迁移,要和指定的风格图片一一对应

  parser.add_argument('--model_weights', type=str,
    default='imagenet-vgg-verydeep-19.mat',
    help='Weights and biases of the VGG-19 network.')
  #权重的初始化网络

  # optimizations
  parser.add_argument('--optimizer', type=str,
    default='lbfgs',
    choices=['lbfgs', 'adam'],
    help='Loss minimization optimizer.  L-BFGS gives better results.  Adam uses less memory. (default|recommended: %(default)s)')
  #优化方法,一般使用lbfgs(数据少,收敛快)

  parser.add_argument('--max_iterations', type=int,
    default=1000,
    help='Max number of iterations for the Adam or L-BFGS optimizer. (default: %(default)s)')
  #迭代的次数,次数越多,风格化效果更明显

  return args
相关函数
Spatial Control的实现原理其实就是在计算风格损失的时候给不同区域附加了不同的权重,主要体现在下面的函数中。
def sum_masked_style_losses(sess, net, style_imgs):
#计算加入mask的风格损失主函数
  total_style_loss = 0.
  weights = args.style_imgs_weights  #获取每个风格图片在计算风格损失时所占的权重(如果指定了多张)
  masks = args.style_mask_imgs #获取每个风格图片对应的mask
  for img, img_weight, img_mask in zip(style_imgs, weights, masks): #对每张风格图片和对应的mask计算一次风格损失
    sess.run(net['input'].assign(img))  #把网络输入设为该风格图片
    style_loss = 0.
    for layer, weight in zip(args.style_layers, args.style_layer_weights):
     #对该风格图片经过指定的几层得到的feature map分别计算风格损失
      a = sess.run(net[layer])    #得到风格图片在该层输出的feature map (是run后的结果)
      x = net[layer]    #定义当前初始化的输入在该层输出的feature map(是个tensor)
      a = tf.convert_to_tensor(a)    #把a转化为tensor
      a, x = mask_style_layer(a, x, img_mask)  #  feature map与权重相乘实现Spatial Control
      style_loss += style_layer_loss(a, x) * weight    # 计算累加带有mask权重的风格损失
    style_loss /= float(len(args.style_layers))
    total_style_loss += (style_loss * img_weight)  #  多张风格图片的损失累加
  total_style_loss /= float(len(style_imgs))
  return total_style_loss
def style_layer_loss(a, x):
#使用Gram矩阵计算风格图片与当前输入的风格损失
  _, h, w, d = a.get_shape()
  M = h.value * w.value
  N = d.value
  A = gram_matrix(a, M, N)
  G = gram_matrix(x, M, N)
  loss = (1./(4 * N**2 * M**2)) * tf.reduce_sum(tf.pow((G - A), 2))
  return loss

def gram_matrix(x, area, depth):
#计算Gram矩阵
  F = tf.reshape(x, (area, depth))
  G = tf.matmul(tf.transpose(F), F)
  return G
def mask_style_layer(a, x, mask_img):
#对某一层的feature map计算带有mask权重的结果
  _, h, w, d = a.get_shape()
  mask = get_mask_image(mask_img, w.value, h.value)
  mask = tf.convert_to_tensor(mask)
  tensors = []
  for _ in range(d.value):
    tensors.append(mask)
  mask = tf.stack(tensors, axis=2) #(h,w)->(h,w,d)
  mask = tf.stack(mask, axis=0)
  mask = tf.expand_dims(mask, 0) #(h,w,d)->(1,h,w,d)
  a = tf.multiply(a, mask)
  x = tf.multiply(x, mask)
  return a, x

def get_mask_image(mask_img, width, height):
#获取mask中的值
  path = os.path.join(args.content_img_dir, mask_img)
  img = cv2.imread(path, cv2.IMREAD_GRAYSCALE)
  check_image(img, path)
  img = cv2.resize(img, dsize=(width, height), interpolation=cv2.INTER_AREA)
  #根据feature map的大小对mask进行缩放
  #对INTER_AREA方法的解释 :https://zhuanlan.zhihu.com/p/38493205
  img = img.astype(np.float32)
  mx = np.amax(img)
  img /= mx    #对mask值归一化到(0,1)之间
  return img
其中mask_style_layer()函数中对mask的具体操作主要有两部分,首先根据不同feature map的大小,对mask进行缩放,并归一化。之后,对单通道的mask进行处理,由(h,w)->(1,h,w,c),之后把feature map与处理后的mask进行逐像素相乘,可得到权重化后的feature map。
shape变化的内部细节:
mask = tf.constant([[0.1,0.2,0.3] , [0.4,0.5,0.6]])
#假设此时mask的值,shape为(2,3)  注意:如果是黑白mask,值应该只有0和1组成
tensor = []
for i in range(3):  # 假设d为3
	tensor.append(mask)
#此时tensor的值为:[array([[0.1, 0.2, 0.3],
       [0.4, 0.5, 0.6]], dtype=float32), array([[0.1, 0.2, 0.3],
       [0.4, 0.5, 0.6]], dtype=float32), array([[0.1, 0.2, 0.3],
       [0.4, 0.5, 0.6]], dtype=float32)]

 mask = tf.stack(tensors, axis=2)
 #此时mask的值为:[[[0.1 0.1 0.1]  [0.2 0.2 0.2]  [0.3 0.3 0.3]]
                 [[0.4 0.4 0.4]  [0.5 0.5 0.5]  [0.6 0.6 0.6]]]   mask shape: (2, 3, 3)

  mask = tf.stack(mask, axis=0)
  mask = tf.expand_dims(mask, 0)
  #最终mask的值变为:[[[[0.1 0.1 0.1]  [0.2 0.2 0.2]  [0.3 0.3 0.3]]
                     [[0.4 0.4 0.4]  [0.5 0.5 0.5]  [0.6 0.6 0.6]]]]
    最终mask shape: (1, 2, 3, 3)
    同一个位置在不同通道上乘以同一个权重值
测试
结合代码可以更容易地理解Spatial Control的原理,其实就是当计算风格损失的时候在你给定的mask内有更高的权重,如果mask的权重值只取0和1,那么就只在指定区域内计算风格损失。
下面对单张和多张风格图的Spatial Control进行一些测试。
制作mask
Spatial Control的关键就是将目标区域通过mask单独提取出来,这里使用比较简单的方法,通过颜色划分制作mask,原图如下:

使用OpenCV中的inRange函数去除蓝色背景,先简单介绍一下OpenCV中HSV颜色模型及颜色分量范围。
HSV颜色模型
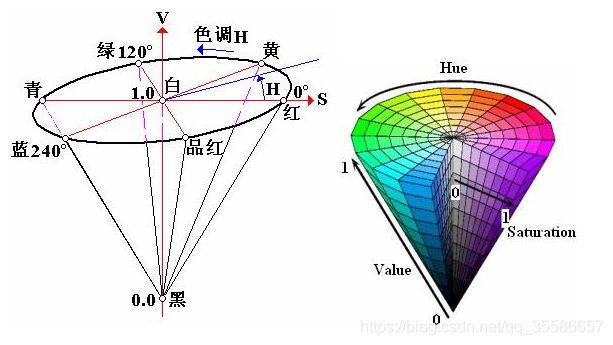
HSV(Hue, Saturation, Value)是根据颜色的直观特性由A. R. Smith在1978年创建的一种颜色空间, 也称六角锥体模型(Hexcone Model)。这个模型中颜色的参数分别是:色调(H),饱和度(S),亮度(V)。
色调H:用角度度量,取值范围为0°~360°,从红色开始按逆时针方向计算,红色为0°,绿色为120°,蓝色为240°。它们的补色是:黄色为60°,青色为180°,品红为300°;
饱和度S:取值范围为0.0~1.0;
亮度V:取值范围为0.0(黑色)~1.0(白色)。
HSV模型的三维表示从RGB立方体演化而来。设想从RGB沿立方体对角线的白色顶点向黑色顶点观察,就可以看到立方体的六边形外形。六边形边界表示色彩,水平轴表示纯度,明度沿垂直轴测量。
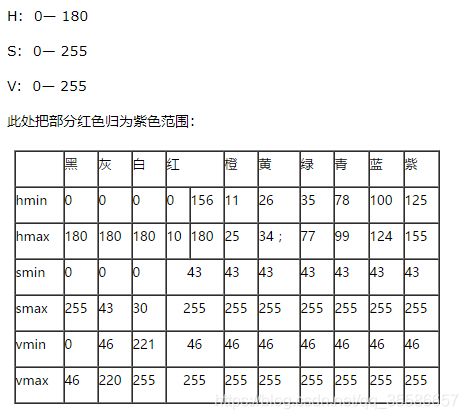
HSV颜色分量范围:一般对颜色空间的图像进行有效处理都是在HSV空间进行的,然后对于基本色中对应的HSV分量需要给定一个严格的范围,下面是通过实验计算的模糊范围(准确的范围在网上都没有给出)。
在了解HSV空间的表示之后,使用OpenCV中的inRange函数可以去除指定的颜色,代码如下:
import cv2
import numpy as np

#读入的图像是BGR空间图像
frame = cv2.imread("cat512.jpg")

# 部分1:将BGR空间的图片转换到HSV空间
hsv = cv2.cvtColor(frame, cv2.COLOR_BGR2HSV)

#获取mask
lower_blue=np.array([78,43,46])
upper_blue=np.array([124,255,255])    #根据上图中HSV颜色分量范围指定蓝色的取值范围

mask = cv2.inRange(hsv, lower_blue, upper_blue)
#cv2.inRange函数实现去除指定颜色
#第一个参数:hsv指的是原图
#第二个参数:lower_blue指的是图像中低于这个lower_blue的值,图像值变为0
#第三个参数:upper_blue指的是图像中高于这个upper_blue的值,图像值变为0
#在lower_blue~upper_blue之间的值变成255,也就是蓝色变白色,其它便黑色

cv2.imwrite('cat_mask.png', mask)

#灰度反转,制作两张mask,以便实现不同区域不同风格
src=cv2.imread('cat_mask.png',1)
gray=cv2.cvtColor(src,cv2.COLOR_BGR2GRAY)
img_info=src.shape
image_height=img_info[0]
image_weight=img_info[1]
dst=np.zeros((image_height,image_weight,1),np.uint8)
for i in range(image_height):
    for j in range(image_weight):
        grayPixel=gray[i][j]
        dst[i][j]=255 - grayPixel

cv2.imwrite('mask_cat.png',dst)
运行结果如下:
cat_mask.png: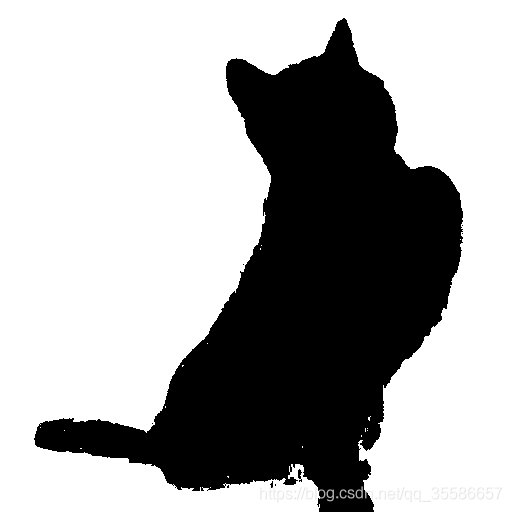
mask_cat.png:

单张风格图片
通过mask限制风格迁移的区域
原图:

风格图:
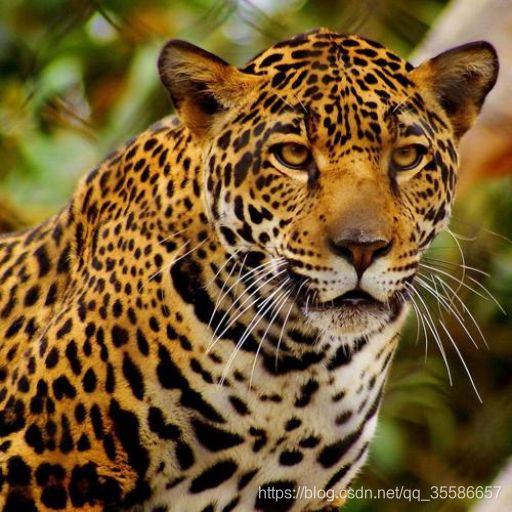
不添加mask:
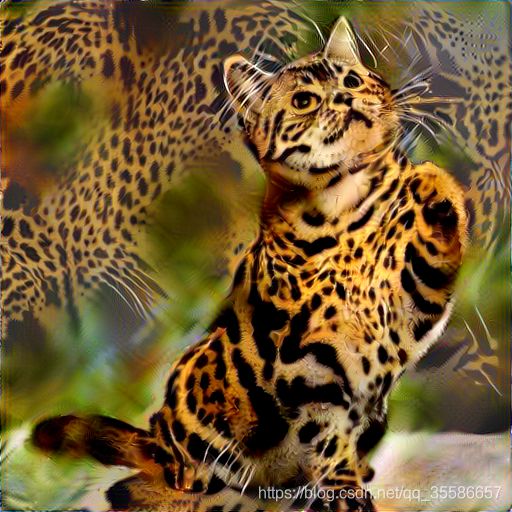
添加mask_cat.png:

多张风格图片
通过mask指定不同区域使用不同风格
通过参数设置cat_mask.png对应风格图1,mask_cat.png对应风格图2,权重各为0.5,效果如下:
风格图1:
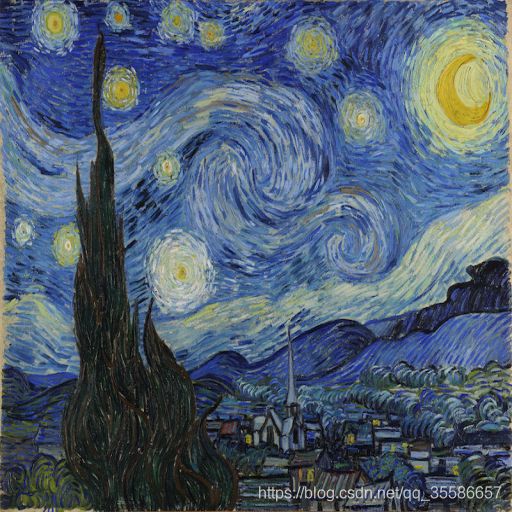
风格图2:
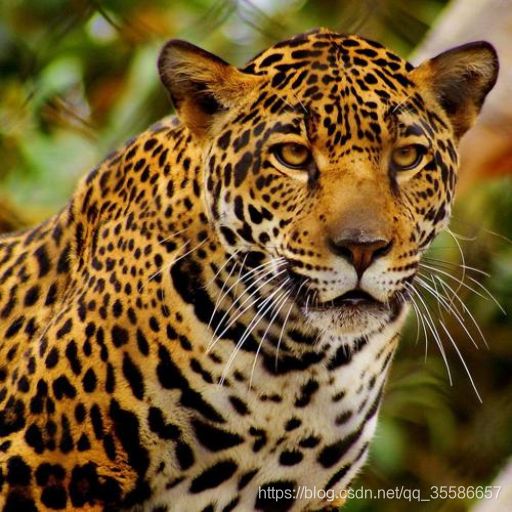
最终图片:
