Caffe框架下OPenMV的机器学习(四)制作数据集
1. 数据集的准备
所谓数据集,就是你要训练的图片、视频、语音、文字的数据内容,所选择数据集的好坏将会决定你网络模型的质量
深度学习的关键是训练。无论是从图像处理到语音识别,每个问题都有其独特的细微差别和方法。
但是,你可以从哪里获得这些数据?现在你看到的很多研究论文都使用专有数据集,而这些数据集通常不会向公众发布。如果你想学习并应用你新掌握的技能,数据就成为一个问题。
阿里云栖社区 给我们介绍了25个开放数据集,在这里我简单列举几个常用的:
- MNIST 手写数字数据集
- MS-COCO 一个大型的、丰富的物体检测,分割和字幕数据集
- ImageNet 根据WordNet层次结构组织的图像数据集
Open Images数据集 包含近900万个图像URL的数据集,这些图像跨越了数千个类的图像级标签边框并且进行了注释
VisualQA 一个包含相关图像的开放式问题的数据集,这些问题需要理解视野和语言
街景房屋号码(SVHN)
CIFAR-10 图像分类的另一个数据集,它由10个类的60,000个图像组成
Fashion--MNIST 包含60,000个训练图像和10,000个测试图像,它是一个时尚产品数据库
IMDB评论
WordNet 一个包含英文synsets的大型数据库
维基百科语料库
Twitter情绪分析
数据集往往有一个规范,MNIST输入为28x28 pix的图片,LeNet 卷积层输入为32x32 pix图片,卷积核 的大小为5,所以我们选择待训练图片时,应当注意图片的大小
参照OPenMV官网例程中介绍的 训练笑脸识别网络 的方法,我们在例程下载的数据集(点 这里 下载)中看到:
SMILEsmileD-master\SMILEs\negatives\negatives7\目录下的图片像素为64x64 pix,所以我们可以尝试制作一个64x64的数据集
2. 数据集的制作步骤
1、新建数据文件夹,在数据文件夹下新建10个存储数据的子文件夹
2、用画图软件 0~9 十个数字的图片(这里我是使用画图软件绘制了5个不同字体的数字,分别保存在对应数字的文件夹中)
3、将0~9 十个数字保存在20个文件夹中,十个保存数字,十个保存扩展图,命名必须不同(原数据文件夹的命名不能出现下划线):
扩展数据文件夹命名为:[序号]+下划线+类别名
4、使用augment函数扩展我们数据集的容量
augment_images.py 函数如下: (该函数OPenMV原码里有)
import os, sys
import argparse
import random
import cv2
import numpy as np
import imgaug as ia
from imgaug import augmenters as iaa
from tqdm import tqdm

def main():
    # CMD args parser
    parser = argparse.ArgumentParser(description='Augment image datasets')
    parser.add_argument("--input",   action = "store", help = "Input images dir")
    parser.add_argument("--output",  action = "store", help = "Output images dir")
    parser.add_argument("--count",   action = "store", help = "Number of augmented sets to make", type=int, default=1)

    # Parse CMD args
    args = parser.parse_args()
    if (args.input == None or args.output == None):
        parser.print_help()
        sys.exit(1)

    ia.seed(1)
    paths = os.listdir(args.input)

    for x in range(args.count):
        seq = iaa.Sequential([
            iaa.Fliplr(0.5), # horizontal flips

            # Small gaussian blur with random sigma between 0 and 0.5.
            # But we only blur about 50% of all images.
            iaa.Sometimes(0.5,
                iaa.GaussianBlur(sigma=(0, 0.2))
            ),

            # Add gaussian noise.
            # For 50% of all images, we sample the noise once per pixel.
            # For the other 50% of all images, we sample the noise per pixel AND
            # channel. This can change the color (not only brightness) of the pixels.
            iaa.Sometimes(0.5,
                iaa.AdditiveGaussianNoise(
                    loc=0, scale=(0.0, 0.005*255), per_channel=0.5
                )
            ),

            # Make some images brighter and some darker.
            # In 20% of all cases, we sample the multiplier once per channel,
            # which can end up changing the color of the images.
            iaa.Sometimes(0.5,
                iaa.Multiply((0.8, 1.2), per_channel=0.0),
            ),

            # Apply affine transformations to each image.
            # Scale/zoom images.
            iaa.Sometimes(0.5,
                iaa.Affine(
                     rotate=(-20, 20),
                ),
            ),

            # Translate/move images.
            iaa.Sometimes(0.5,
                iaa.Affine(
                     scale={"x": (0.8, 1.2), "y": (0.8, 1.2)},
                ),
            ),

            # Rotate images.
            iaa.Sometimes(0.5,
                iaa.Affine(
                    translate_percent={"x": (-0.1, 0.1), "y": (-0.1, 0.1)},
                ),
            ),
        ], random_order=True) # apply augmenters in random order

        print("Augmenting images set %d/%d"%(x+1, args.count))
        for i in tqdm(xrange(len(paths))):
            img = cv2.imread(args.input+'/'+paths[i], cv2.IMREAD_GRAYSCALE)
            img = seq.augment_image(img)
            f = os.path.splitext(paths[i])
            cv2.imwrite(args.output+'/'+f[0] + '_aug%d'%(x) + f[1], img)

    print('Finished processing all images\n')

if __name__ == '__main__':
    main()
将函数保存到我们训练网络的根目录中
编写批处理脚本扩展我们的数据集:
augment_pic.bat
python augment_images.py --input MY_numbers/ZERO/ --output MY_numbers/0_ZERO/ --count 20
echo.
python augment_images.py --input MY_numbers/ONE/ --output MY_numbers/1_ONE/ --count 20
echo.
python augment_images.py --input MY_numbers/TWO/ --output MY_numbers/2_TWO/ --count 20
echo.
python augment_images.py --input MY_numbers/THREE/ --output MY_numbers/3_THREE/ --count 20
echo.
python augment_images.py --input MY_numbers/FOUR/ --output MY_numbers/4_FOUR/ --count 20
echo.
python augment_images.py --input MY_numbers/FIVE/ --output MY_numbers/5_FIVE/ --count 20
echo.
python augment_images.py --input MY_numbers/SIX/ --output MY_numbers/6_SIX/ --count 20
echo.
python augment_images.py --input MY_numbers/SEVEN/ --output MY_numbers/7_SEVEN/ --count 20
echo.
python augment_images.py --input MY_numbers/EIGHT/ --output MY_numbers/8_EIGHT/ --count 20
echo.
python augment_images.py --input MY_numbers/NINE/ --output MY_numbers/9_NINE/ --count 20
pause
5、最后检查我们的数据集文件夹中是否都保存了拓展后的图片
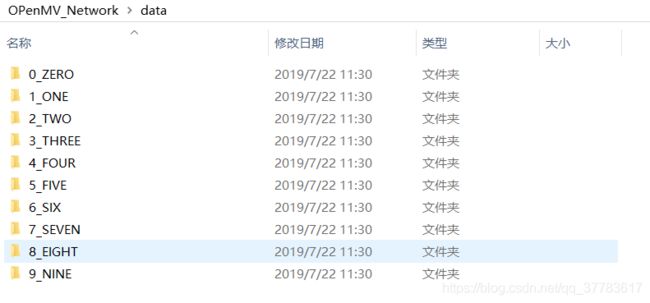
最后在根目录新建data文件夹,将带有序号的拓展文件夹拖入data中,大功告成:
在根目录按住shift+鼠标右键进入终端,用tree指令查看当前目录结构:
├─data
│ ├─0_ZERO
│ ├─1_ONE
│ ├─2_TWO
│ ├─3_THREE
│ ├─4_FOUR
│ ├─5_FIVE
│ ├─6_SIX
│ ├─7_SEVEN
│ ├─8_EIGHT
│ └─9_NINE
└─MY_numbers
├─0_ZERO
├─1_ONE
├─2_TWO
├─3_THREE
├─4_FOUR
├─5_FIVE
├─6_SIX
├─7_SEVEN
├─8_EIGHT
├─9_NINE
├─EIGHT
├─FIVE
├─FOUR
├─NINE
├─ONE
├─SEVEN
├─SIX
├─THREE
├─TWO
└─ZERO


