ios基础学习笔记
资源位置的问题
资源分文件(比如图片)和文件夹
图片资源
拖拽一张普通图片到xcode的工程的Assets.xcassets中。
拖拽3张相同内容的1x 、2x、 3x普通图片到xcode的工程的Assets.xcassets中。
拖拽一张普通图片到xcode的工程的代码所属的文件夹里面。
在代码里面分别读取Assets.xcassets里面和xcode的工程的代码所属的文件夹里面的图片。代码如下。
@interface ViewController ()
@end

@implementation ViewController

- (void)viewDidLoad {
    [super viewDidLoad];

    UIImageView *assetIv = [[UIImageView alloc] initWithFrame:CGRectMake(0, 100, 200, 100)];
    [assetIv setImage:[UIImage imageNamed:@"xcasset_imga"]]; //读取Assets.xcassets里面的图片,只需要写图片的名字,而不需要写图片的后缀
    [self.view addSubview:assetIv];

    UIImageView *inSourceIv = [[UIImageView alloc] initWithFrame:CGRectMake(0, 280, 300, 100)];
    [inSourceIv setImage:[UIImage imageNamed:@"in_source_imga.jpg"]]; //读取和代码放在一起的图片,需要写图片的路径及其名字,记得写图片的后缀!
    [self.view addSubview:inSourceIv];
}

@end
上面demo的运行结果
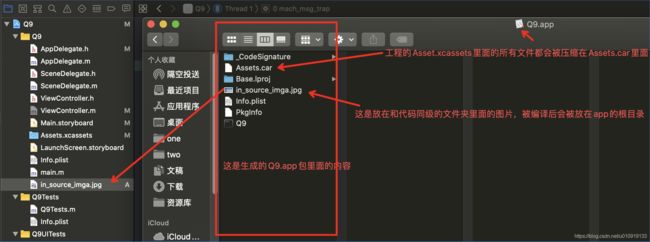
此时编译后生成的app里面的内容如下图。
包含图片的文件夹资源
- 下图是本地的两个文件夹,分别存有一张图片

- 把blueDir拖拽到工程,在弹框中选中的是”Create folder references“,具体步骤如下图。
- 把yellowDir拖拽到工程,在弹框中选中的是”Create groups“,具体步骤如下图。
在代码里面分别读取Assets.xcassets里面、xcode的工程的代码所属的文件夹里面、yellowDir文件夹里面、blueDir文件夹里面的图片。代码如下。
#import "ViewController.h"

@interface ViewController ()
@end

@implementation ViewController

- (void)viewDidLoad {
    [super viewDidLoad];

    UIImageView *assetIv = [[UIImageView alloc] initWithFrame:CGRectMake(0, 100, 200, 50)];
    [assetIv setImage:[UIImage imageNamed:@"xcasset_imga"]]; //读取Assets.xcassets里面的图片,只需要写图片的名字,而不需要写图片的后缀
    [self.view addSubview:assetIv];

    UIImageView *inSourceIv = [[UIImageView alloc] initWithFrame:CGRectMake(0, 200, 300, 50)];
    [inSourceIv setImage:[UIImage imageNamed:@"in_source_imga.jpg"]]; //读取和代码放在一起的图片,需要写图片的名字,记得写图片的后缀!
    [self.view addSubview:inSourceIv];

    UIImageView *blueDirIv = [[UIImageView alloc] initWithFrame:CGRectMake(0, 300, 200, 50)];
    [blueDirIv setImage:[UIImage imageNamed:@"blueDir/blue_imga.jpg"]]; //读取blueDir文件夹里面的图片,需要写图片的路径及其名字,记得写图片的后缀!
    [self.view addSubview:blueDirIv];

    UIImageView *yellowDirIv = [[UIImageView alloc] initWithFrame:CGRectMake(0, 400, 300, 50)];
    [yellowDirIv setImage:[UIImage imageNamed:@"yellow_imga.jpeg"]]; //读取和代码放在一起的图片,需要写图片的其名字,记得写图片的后缀!
    [self.view addSubview:yellowDirIv];

}

@end
- 运行结果如下图。
- 打开编译生成的app里面的内容,发现blueDir文件夹及其里面的文件都存在,但是yellowDir文件夹不存在,而yellowDir文件夹里面的文件存在!说白了,就是Xcode工程界面(如下图的左边部分)中的黄色文件夹是不会存在于app里面的!!!
非图片资源(比如MP3)
非图片资源(比如mp3)是不能放到Assets.xcassets目录中的,因为该目录存放的只能是图片。所以如果mp3文件想要放到和代码同级的目录下的话,就意味着该mp3文件就会被打包到app中,并且该文件是在app里面的根目录中。此时你代码上要通过NSBundle类来获取该文件的URL或者Path,因为NSBundle就是获取APP的安装包路径的类。而沙盒路劲里面的资源文件(图片、mp3等)是通过NSSearchPathForDirectoriesInDomains()或者NSHomeDirectory()函数来获取路径。
附加资料
UIImage 的imageNamed()方法内部自带缓存图片,即你通过该方法获取到的图片会被缓存到内存中并且一直存在于内存,该方法获取的是你放在Assets.xcassets目录中的图片.注意:Assets.xcassets目录及其里面的图片在编译后会被压缩并打包到app里面的根目录下的Assets.car文件中,所有放在Assets.xcassets目录里面的图片是不能通过UIImage 的imageWithContentsOfFile()等通过图片的路径来获取图片的方法来获取图片的。换句话说就是Assets.xcassets目录里面的图片只能通过UIImage 的imageNamed()方法来获取,并且Assets.xcassets目录里面只能存图片!!!!UIImage 的imageWithContentsOfFile()方法是不带缓存的,即访问完图片后再内存中就不存在了。
plist
往电脑桌面创建并写入和读取plist文件,demo如下。把一个字符串写入到str.plist文件中,把一个NSArray写入到array.plist文件中,然后分别读取。
#import "ViewController.h"

@interface ViewController ()
@end

@implementation ViewController
- (void)viewDidLoad {
    [super viewDidLoad];
    NSString *str = @"this is a string";
    NSString *strFilePath = @"/Users/chenshixing/Desktop/str.plist"; //运行该程序之前,该文件不存在
    BOOL strWriteSucessFlag = [str writeToFile:strFilePath atomically:YES encoding:NSUTF8StringEncoding error:nil];
    if (strWriteSucessFlag) {
        NSLog(@"str 写入到str.plist中");
    }
    NSString *newStr = [NSString stringWithContentsOfFile:strFilePath usedEncoding:nil error:nil];
    NSLog(@"从str.plist文件中读取的字符串:%@", newStr);
    NSArray *array = @[
        @{
            @"age" : @(1),
            @"name" : @"csx1"
        },
        @{
            @"age" : @(2),
            @"name" : @"csx2"
        },
        @{
            @"age" : @(3),
            @"name" : @"csx3"
        },
        @{
            @"age" : @(4),
            @"name" : @"csx4"
        },
    ];
    NSString *arrayFilePath = @"/Users/chenshixing/Desktop/array.plist"; //运行该程序之前,该文件不存在
    BOOL arrayWriteSucessFlag = [array writeToFile:arrayFilePath atomically:YES];
    if (arrayWriteSucessFlag) {
        NSLog(@"数组 写入到array.plist中");
    }
    newStr = [NSString stringWithContentsOfFile:arrayFilePath usedEncoding:nil error:nil];
    NSLog(@"从array.plist文件中的内容:%@", newStr);

    NSArray *newArray =[NSArray arrayWithContentsOfFile:arrayFilePath];
    NSLog(@"从array.plist文件中的内容:%@", newArray);

}

@end
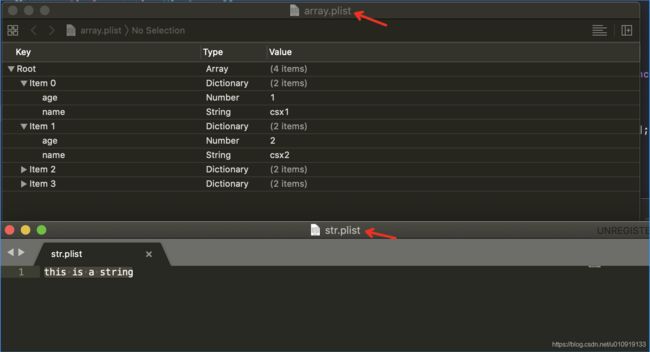
打开运行上面的代码后所生成的str.plist文件和array.plist文件,文件内容如下图。可以看出plist文件只是一个文件后缀名,仅此而已。
读取app里面的根目录里面的自己创建的plist文件,结果如下图。
info.plist文件能在哪里被修改?
UIView
UIView的layoutSubviews()方法是用来设置子控件的位置和尺寸的,当view的该方法被调用时,其位置和尺寸就已经有值了。每当你改变uiview实例的尺寸而不是位置时,该view实例的layoutSubviews()方法就会被调用!!!另外,uiview第一次显示时,其layoutSubviews()方法也会被调用。即UIView的layoutSubviews()方法的调用时机:①uiview的bounds中的x或y或宽或者高被修改;②uiview在第一次显示并且已经调用过addSubview()来添加子view时(如果一个view没有子view,那么该方法就不会被调用)。
当子view的bounds改变时,会触发系统先调用自己的父view的layoutSubviews(),然后再调用自己的layoutSubviews()。举例:假设存在A、B、C 3个UIView,A是B的父view,而B是C的父view。那么当C的bounds被修改时,系统会依次调用B和C的layoutSubviews(),但不会调用A的layoutSubviews()。当B的bounds被修改时,系统会依次调用A和B的layoutSubviews(),但不会调用C的layoutSubviews()。
UIView的frame的x和y 是由UIView.layer的position、anchorPoint和bounds.size这3者共同决定的!!!不信的话你改变一下bounds.width试试。。
NSNotificationCenter
NSNotificationCenter的通知监听的方法和发生通知的方法所在的线程相同,因为底层的实现是发生通知的方法直接调用监听通知的方法;
NSNotificationCenter监听通知的方式有两种(一种是监听回调的是方法,另一种则是监听回调的是block)。其中,方式2(监听回调的是block)会返回一个observer,以便让你能够移除该监听者。
//方式1:监听回调的是方法
- (void)addObserver:(id)observer selector:(SEL)aSelector name:(nullable NSNotificationName)aName object:(nullable id)anObject;
//方式2:监听回调的是block
- (id <NSObject>)addObserverForName:(nullable NSNotificationName)name object:(nullable id)obj queue:(nullable NSOperationQueue *)queue usingBlock:(void (^)(NSNotification *note))block API_AVAILABLE(macos(10.6), ios(4.0), watchos(2.0), tvos(9.0));
当UIViewController实例被销毁时,ios底层会自动调用[[NSNotificationCenter defaultCenter] removeObserver:UIViewController实例]; ,所以如果监听者是UIViewController及其子类的实例的情况下,我们就不需要手动移除,因为系统会自动帮我们移除,NSNotificationCenter里面保存的是UIViewController实例的弱引用。
而如果是 ”非VC的实例对象“ 通过(void)addObserver:(id)observer selector:(SEL)aSelector name:(nullable NSNotificationName)aName object:(nullable id)anObject;添加的监听。当该实例被销毁时,ios底层并不会调用[[NSNotificationCenter defaultCenter] removeObserver:非VC的实例对象]; 。这种场景下往非VC的实例对象所监听的那个通知名发送通知,app也不会crash。。。
通过(void)addObserver:(id)observer selector:(SEL)aSelector name:(nullable NSNotificationName)aName object:(nullable id)anObject方法所添加的observer实例,在底层都只会保存observer实例的弱引用,所以不用担心内存泄漏的问题。
[[NSNotificationCenter defaultCenter] removeObserver:observer]; 移除的是observer实例所监听的所有方法。举例如下,observer实例监听了app进入前台、后台和名为”fun“的三种通知,此时如果你调用了[[NSNotificationCenter defaultCenter] removeObserver:observer]; ,就意味着observer实例不再监听这三个通知。
[[NSNotificationCenter defaultCenter] addObserver:observer selector:@selector(fore:) name:UIApplicationWillEnterForegroundNotification object:nil];
    [[NSNotificationCenter defaultCenter] addObserver:observer selector:@selector(back:) name:UIApplicationDidEnterBackgroundNotification object:nil];
    [[NSNotificationCenter defaultCenter] addObserver:observer selector:@selector(fun:) name:@"fun" object:nil];
如何实现监听方法只会调用一次?实现代码如下。
 __block __weak id observer = nil;
    observer = [[NSNotificationCenter defaultCenter] addObserverForName:@"haha" object:nil queue:[NSOperationQueue mainQueue]  usingBlock:^(NSNotification * _Nonnull note) {
        NSLog(@"这里只会输出一次 = %@。因为下一行代码就已经移除了observer的监听", note);
        [[NSNotificationCenter defaultCenter] removeObserver:observer];
    }];
pch文件
demo
第1步,创建一个pch文件,如下图

pch文件的内容如下:
#ifndef myprefixheader_pch
#define myprefixheader_pch

#define screenW [[UIScreen mainScreen] bounds].size.width
#define screenH [[UIScreen mainScreen] bounds].size.height

#import "Person.h"

#ifdef DEBUG

#define MyLog(...) NSLog(@"%s(%p) %@", __PRETTY_FUNCTION__, self, [NSString stringWithFormat:__VA_ARGS__])

#else

#define MyLog(...) //NSLOG(__VA_ARGS__)

#endif

#endif /* myprefixheader_pch */
第2步,在xcode中配置该pch文件的路径
第3步,在ViewController.m里面就可以直接使用pch文件里的内容了
ViewController文件的内容如下:
#import "ViewController.h"


@interface ViewController ()

@end

@implementation ViewController

- (void)viewDidLoad {
    [super viewDidLoad];
    Person *p = [Person new];
    CGFloat screenWidth = screenW;
    CGFloat screenHeight = screenH;
    MyLog(@"Person = %@. screenWidth = %lf, screenHeight = %lf", p, screenWidth, screenHeight);

}


@end
假如该app要发布了,就按如下3张图进行操作。

选择Release而不是Debug。这意味着工程中就没有定义DEBUG这个宏。
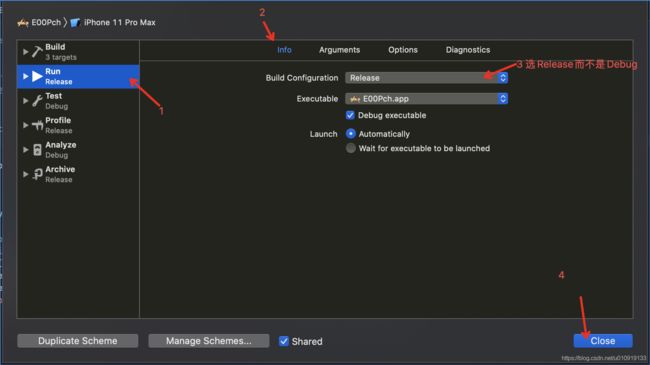
再一次运行项目,发现控制台并没有输出。这说明DEBUG这个宏在工程中没有定义,通过查看myprefixheader.pch文件可知,MyLog这个宏在没有定义DEBUG这个宏的情况下是为“空”,所以控制台没有输出。
pch文件的原理:把pch文件中的所有内容都拷贝到工程的每一个文件中。
所以工程中如果有c文件就会导致编译不过。而在OC中,每一个OC文件都有一个名为 __OBJC__ 的隐式宏。所以你只需要添加#ifdef __OBJC__ 即可使工程编译成功。
每一个OC文件中都隐式的有一个宏:__OBJC__
performSegueWithIdentifier的实现原理
- (void)performSegueWithIdentifier:(NSString *)identifier sender:(id)sender {
    //该方法的内部实现是:
    /**
            1 根据标识,去到StoryBoard当中,查找有没有指定的标识,如果有
            2 帮你创建segue对象(UIStoryboardSegue *)segue
            3 给segue对象的属性赋值。segue.sourceViewController = self;
            4 帮你创建segue箭头指向的VC实例,然后将该VC实例赋值给segue.destinationViewController
            5 调用prepareForSegue:(UIStoryboardSegue *)segue方法来告诉你segue已经准备好跳转了,在此方法里面你可以获取到要跳转的那个VC了,你可以在这里设置要传递的数据
            6 执行[segue perform]; 该方法里面会调用[segue.sourceViewController.navigationController pushViewContrller:segue.destinationViewContrller animated:YES];来实现跳转

     */
}
存储方式
plist
plis只是一个文件后缀名,仅此而已。可以通过[Nsstring实例 writeToFile:strFilePath atomically:YES encoding:NSUTF8StringEncoding error:nil];或者[NSArray实例 writeToFile:arrayFilePath atomically:YES];将元素写入plist文件。但是如果该数组里面有自定义对象(比如自定义的Person实例对象),调用writeToFile:arrayFilePath时就会报错。说明自定义对象不能直接存到plist文件中。
NSUserDefault
NSUserDefault也不能直接存储自定义对象!
NSKeyedArchiver
可以通过NSKeyedArchiver的archivedDataWithRootObject: requiringSecureCoding: error:方法来序列化自定义对象。
UIView
RunLoop就是个死循环,具体伪代码如下图:
while (true) {
        //1 程序员的业务代码
        //2 layout(),里面会调用有“重新布局子view布局的标记”的view的layoutSubviews()。所以你可以在view的layoutSubviews()里面布局你的子view
        //3 draw(),里面会让GPU调用view的drawRect()
        //4 wait()。你可以通过点击屏幕的按钮来唤醒线程
    }
view的setNeedsDisplay()方法:里面会把“调用view的drawRect()方法”的block添加到runLoop中。所以当你调用了[view setNeedsDisplay]时,在下一个runLoop中系统就会调用[view drawRect].
view的setNeedsLayout()方法:里面只是把该view打上一个“重新布局子view布局”的标记,但是不会把该view的子view也打上“重新布局子view布局”的标记。
view的setNeedsLayout()方法:里面会把“调用view的layoutSubviews()方法”的block添加到runLoop中。所以当你调用了[view setNeedsLayout]时,在下一个runLoop中系统就会调用[view layoutSubviews]。
view的layoutIfNeeded()方法:如果view有“重新布局子view布局”的标记,那么该view的layoutSubviews()就会被调用。当layoutIfNeeded()方法调用完layoutSubviews()后,会把view的“重新布局子view布局”的标记给去掉,即调用完layoutSubviews()后,该view就已经没有“重新布局子view布局”的标记了。如果没有该标记,那么该方法啥也不做。
layoutSubviews()的被调用时机:①调用有“重新布局子view布局的标记“的view的layoutIfNeeded()方法;②在RunLoop的死循环的第2步(看前面的RunLoop的伪代码)调用有“重新布局子view布局的标记“的view的layoutSubviews()方法。
导致view被打上”重新布局子view布局“的标记的情况有:①调用view的setNeedsLayout();②修改view的frame的size值;③修改view的bounds的origin或者size值;④创建该view实例的时候。
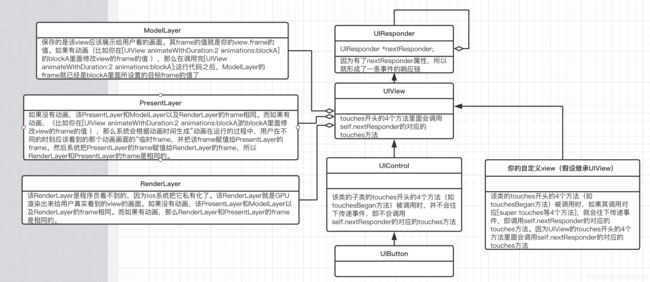
结论:如上图所示,RenderLayer的frame始终和PresentLayer的frame相同。没有动画时(比如你直接设置一个新的frame给view),你可以认为ModelLayer、PresentLayer、RenderLayer是相同的。但是有动画时,以下面的demo为例,在动画运行的过程中,ModelLayer的值始终是frame2,而PresentLayer和RenderLayer的frame一直在朝着frame2的方向变,且PresentLayer和RenderLayer的frame一直都相同。
Demo如下:
CGRect frame1 = CGRectMake(1, 1, 1, 1);
    UIView *view = [[UIView alloc] initWithFrame:frame1];
    [UIView animateWithDuration:3 animations:^{
        CGRect frame2 = CGRectMake(2, 2, 2, 2);
        view.frame = frame2;
    }];//当这行代码执行完后,view.ModelLayer的frame就已经是frame2了,而presentLayer和RenderLayer的frame是frame1.在动画运行结束后,RenderLayer和PresentLayer的frame是和ModelLayer相同的,即动画运行结束后,ModelLayer、PresentLayer、RenderLayer的frame都是frame2。系统可以把frame1的值通过有限个转换变成frame2的值,假设中间的转换的frame是frame1.1、frame1.2、frame1.3等。从动画的开始到动画的结束的过程中,ModelLayer的frame一直都是frame1;而PresentLayer的frame则一直在变,比如在动画开始后PresentLayer的frame的值是frame1.1,在下一时刻时PresentLayer的frame是frame1.2;而RenderLayer的frame也一直在变,其值始终和PresentLayer的frane相同。
##从VCA的UITableView点击某个cell,然后调用VCA所在的navigationVC的push()来展示VCB,此时VCA的view的宽高还是和屏幕相同,但是VCA的UITableView的宽高都变小、位置并没有改变,所以UITableView的cell的宽高也变小了,所以你如果把cell里面的某个UIView的位置偏移cell的右边界多少,就会有问题,即进入VCB时UIView的位置会往左挪一些!解决方法是UIView的位置偏移的位置是相对于屏幕宽度(通过[UIScreen mainScreen].bounds.size.width来获取)而不是cell的宽度
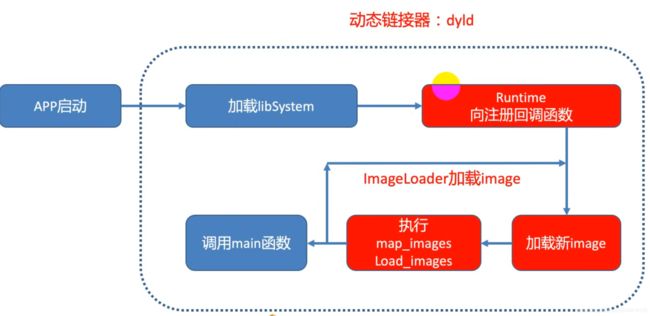
app的启动加载流程
WKWebView的使用
简单的demo1
#import 结果如下图

设置了WKNavigationDelegate的demo2
#import 结果如下图