springboot+redis+shiro实现前后端分离的权限管理(自定义session管理和redis缓存)
之前介绍了springboot+shrio的入门教程,项目结构比较简单,最近想自己做一个前后端分离项目,权限框架依然想用流行的shiro框架,参照网上的众多资料,踩了不少坑之后,终于是实现了后端的相关配置和操作,话不多说,马上进入正题。
温馨提示
本篇博文的代码并不是项目所用到的技术的全部代码,所以万万不可上来就只看博客就开始敲代码,一定要先下载下来我的项目,配合项目进行学习,博客里没有的类或接口在项目里都可以找到。
项目连接:https://gitee.com/qizhongxiao/candy-demo.git
SVN:svn://gitee.com/qizhongxiao/candy-demo
前期准备
项目使用的是springboot2.x+mysql5+redis+mybatis-plus+shiro
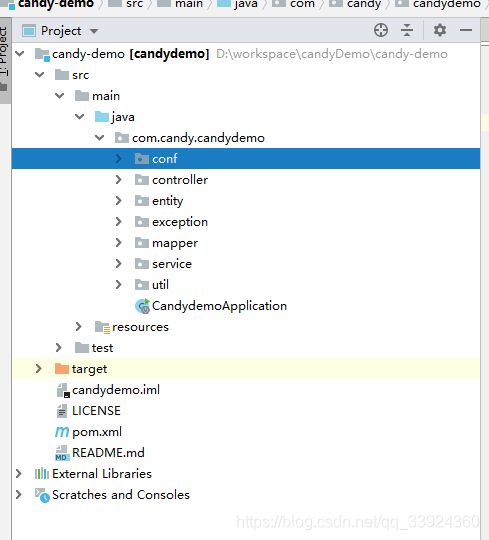
在开始我们的项目之前,我们需要先搭建一套springboot2.x的项目,所以你需要对springboot项目有一定的了解,同时我们需要在本地搭建redis服务器,没有搭建的话快去搭建吧,先来看看我们的项目结构:

然后是我们的数据库表结构:
/*
Navicat MySQL Data Transfer

Source Server         : 本地mysql5版本
Source Server Version : 50727
Source Host           : localhost:3307
Source Database       : activiti

Target Server Type    : MYSQL
Target Server Version : 50727
File Encoding         : 65001

Date: 2019-09-18 17:54:58
*/

SET FOREIGN_KEY_CHECKS=0;

-- ----------------------------
-- Table structure for sys_menu
-- ----------------------------
DROP TABLE IF EXISTS `sys_menu`;
CREATE TABLE `sys_menu` (
  `id` int(11) NOT NULL AUTO_INCREMENT,
  `menu_name` varchar(45) NOT NULL,
  `menu_path` varchar(45) NOT NULL,
  `permission_code` varchar(45) DEFAULT NULL COMMENT '权限名',
  `create_time` timestamp NULL DEFAULT CURRENT_TIMESTAMP,
  `update_time` timestamp NULL DEFAULT CURRENT_TIMESTAMP,
  PRIMARY KEY (`id`)
) ENGINE=InnoDB AUTO_INCREMENT=3 DEFAULT CHARSET=utf8;

-- ----------------------------
-- Records of sys_menu
-- ----------------------------
INSERT INTO `sys_menu` VALUES ('1', '例-table', '/example/table', 'sys:user:view', '2018-10-26 19:38:30', '2018-10-30 11:42:15');
INSERT INTO `sys_menu` VALUES ('2', '表单', '/form', 'sys:user:view', '2018-10-30 14:43:19', '2018-10-30 15:35:35');

-- ----------------------------
-- Table structure for sys_role
-- ----------------------------
DROP TABLE IF EXISTS `sys_role`;
CREATE TABLE `sys_role` (
  `id` int(11) NOT NULL AUTO_INCREMENT,
  `rolename` varchar(45) NOT NULL,
  `create_time` timestamp NOT NULL DEFAULT CURRENT_TIMESTAMP,
  PRIMARY KEY (`id`)
) ENGINE=InnoDB AUTO_INCREMENT=3 DEFAULT CHARSET=utf8;

-- ----------------------------
-- Records of sys_role
-- ----------------------------
INSERT INTO `sys_role` VALUES ('1', 'admin', '2018-10-25 16:33:34');
INSERT INTO `sys_role` VALUES ('2', '总经理', '2019-09-12 15:24:29');

-- ----------------------------
-- Table structure for sys_role_menu
-- ----------------------------
DROP TABLE IF EXISTS `sys_role_menu`;
CREATE TABLE `sys_role_menu` (
  `id` int(11) NOT NULL AUTO_INCREMENT,
  `role_id` int(11) NOT NULL,
  `menu_id` int(11) NOT NULL,
  `create_time` timestamp NULL DEFAULT CURRENT_TIMESTAMP,
  PRIMARY KEY (`id`)
) ENGINE=InnoDB AUTO_INCREMENT=3 DEFAULT CHARSET=utf8;

-- ----------------------------
-- Records of sys_role_menu
-- ----------------------------
INSERT INTO `sys_role_menu` VALUES ('1', '1', '1', '2018-10-27 20:16:50');
INSERT INTO `sys_role_menu` VALUES ('2', '1', '2', '2018-10-30 14:44:48');

-- ----------------------------
-- Table structure for sys_user
-- ----------------------------
DROP TABLE IF EXISTS `sys_user`;
CREATE TABLE `sys_user` (
  `id` int(11) NOT NULL AUTO_INCREMENT,
  `username` varchar(45) NOT NULL,
  `password` varchar(45) NOT NULL,
  `salt` varchar(10) DEFAULT NULL,
  `nickname` varchar(45) NOT NULL,
  `create_time` datetime NOT NULL DEFAULT CURRENT_TIMESTAMP,
  `update_time` datetime NOT NULL DEFAULT CURRENT_TIMESTAMP,
  `state` int(2) NOT NULL DEFAULT '1' COMMENT '1:有效\n2:冻结\n',
  `avatar` varchar(128) DEFAULT NULL,
  PRIMARY KEY (`id`)
) ENGINE=InnoDB AUTO_INCREMENT=9 DEFAULT CHARSET=utf8;

-- ----------------------------
-- Records of sys_user
-- ----------------------------
INSERT INTO `sys_user` VALUES ('1', 'admin', 'c34af346c89b8b03438e27a32863c9b5', 'admin', '王大锤', '2019-09-18 10:35:00', '2019-09-18 10:35:00', '1', 'https://wpimg.wallstcn.com/f778738c-e4f8-4870-b634-56703b4acafe.gif');
INSERT INTO `sys_user` VALUES ('2', 'wuyanzu', '6bb50ce0c9e42923e443af29a33b8fb8', 'wuyanzu', '吴彦祖', '2019-09-12 17:58:58', '2019-09-12 17:58:58', '1', 'https://wpimg.wallstcn.com/f778738c-e4f8-4870-b634-56703b4acafe.gif');

-- ----------------------------
-- Table structure for sys_user_role
-- ----------------------------
DROP TABLE IF EXISTS `sys_user_role`;
CREATE TABLE `sys_user_role` (
  `id` int(11) NOT NULL AUTO_INCREMENT,
  `user_id` int(11) NOT NULL,
  `role_id` int(11) NOT NULL,
  `create_time` timestamp NULL DEFAULT CURRENT_TIMESTAMP,
  PRIMARY KEY (`id`)
) ENGINE=InnoDB AUTO_INCREMENT=3 DEFAULT CHARSET=utf8;

-- ----------------------------
-- Records of sys_user_role
-- ----------------------------
INSERT INTO `sys_user_role` VALUES ('1', '1', '1', '2018-10-25 16:33:47');
INSERT INTO `sys_user_role` VALUES ('2', '7', '1', '2019-09-16 15:25:10');
代码奉上,直接运行就好
然后是我们的pom文件了,为了方便我这里也直接贴出来,因为我之后要集成其它技术,所以并不是所有的maven依赖我们都需要,我比懒,这里就直接全粘贴出来了(我只粘贴了properties和dependencies,注意哦)
        1.8
        5.1.47
        2.1.7.RELEASE
        3.1.0


            org.springframework.boot
            spring-boot-starter-activemq


            org.springframework.boot
            spring-boot-starter-data-redis


                    redis.clients
                    jedis


                    io.lettuce
                    lettuce-core


            redis.clients
            jedis


            org.apache.commons
            commons-pool2
            2.5.0


            com.alibaba
            fastjson
            1.2.47


            org.springframework.boot
            spring-boot-configuration-processor
            true


            org.springframework.boot
            spring-boot-starter-jdbc


            org.springframework.boot
            spring-boot-starter-thymeleaf


            org.springframework.boot
            spring-boot-starter-web


            org.springframework.boot
            spring-boot-starter-websocket


            org.springframework.session
            spring-session-data-redis


            org.springframework.session
            spring-session-jdbc


            org.springframework.boot
            spring-boot-devtools
            runtime
            true


            com.github.pagehelper
            pagehelper
            5.1.8


            org.springframework.boot
            spring-boot-starter-log4j2


            mysql
            mysql-connector-java
            ${mysql.version}


            com.fasterxml.jackson.core
            jackson-databind


            com.baomidou
            mybatis-plus-boot-starter
            3.1.0


            com.baomidou
            mybatis-plus-generator
            3.1.0


            org.freemarker
            freemarker


            org.projectlombok
            lombok
            true


            io.springfox
            springfox-swagger2
            2.9.2


            io.springfox
            springfox-swagger-ui
            2.9.2


            org.springframework.boot
            spring-boot-starter-thymeleaf


            org.apache.shiro
            shiro-spring
            1.4.0


            org.springframework.boot
            spring-boot-starter-aop


            com.alibaba
            druid-spring-boot-starter
            1.1.10


            org.apache.commons
            commons-lang3


            org.springframework.boot
            spring-boot-configuration-processor
            true


            org.apache.shiro
            shiro-spring
            1.4.0


            org.activiti
            activiti-spring-boot-starter-basic
            6.0.0


            org.apache.xmlgraphics
            batik-transcoder
            1.7


            org.apache.xmlgraphics
            batik-codec
            1.7


            org.activiti
            activiti-json-converter
            6.0.0


            org.apache.shiro
            shiro-cache
            1.4.0


            org.springframework.boot
            spring-boot-starter-cache


            net.sf.ehcache
            ehcache


            org.apache.shiro
            shiro-ehcache
            1.4.0


            org.crazycake
            shiro-redis
            ${shiro-redis.version}


            org.springframework.boot
            spring-boot-starter-aop


            org.springframework.boot
            spring-boot-starter-test
            test
添加完依赖后,我们需要编写配置文件application.yml,注意改jdbc的url哦
server:
  port: 8080

spring:
  datasource:
    url: jdbc:mysql://127.0.0.1:3307/activiti?useUnicode=true&characterEncoding=utf8&autoReconnect=true&useSSL=false
    driver-class-name: com.mysql.jdbc.Driver
    username: root
    password: root
    druid:
      #配置监控统计拦截的filters,去掉后监控界面SQL无法进行统计,'wall'用于防火墙
      filters: stat,wall,log4j
      #初始化大小
      initial-size: 10
      #最小连接数
      min-idle: 10
      #最大连接数
      max-active: 20
      #获取连接等待超时时间
      max-wait: 12000
      #间隔多久才进行一次检测,检测需要关闭的空闲连接,单位毫秒
      time-between-eviction-runs-millis: 60000
      #一个连接在池中最小生存的时间,单位是毫秒
      min-evictable-idle-time-millis: 30000
      #测试语句是否执行正确
      validation-query: SELECT 1
      validation-query-timeout: 2000
      #指明连接是否被空闲连接回收器(如果有)进行检验.如果检测失败,则连接将被从池中去除.
      test-while-idle: true
      #借出连接时不要测试,否则很影响性能
      test-on-borrow: false
      test-on-return: false
      #打开PSCache,并指定每个连接上PSCache的大小。oracle设为true,mysql设为false。分库分表较多推荐设置为false
      pool-prepared-statements: false
      #与Oracle数据库PSCache有关,再druid下可以设置的比较高
      max-pool-prepared-statement-per-connection-size: 20
  redis:
    host: 127.0.0.1
    port: 6379
    password : root
    timeout: 10000
    jedis:
      pool:
        max-active: 8
        max-idle: 8
        min-idle: 0
        max-wait: -1ms
  session:
    store-type: none

mybatis-plus:
  global-config:
    db-config:
      id-type: auto
      field-strategy: not_empty
      table-underline: true
      db-type: mysql
      logic-delete-value: 1
      logic-not-delete-value: 0
  mapper-locations: classpath:/mapper/*.xml
  configuration:
    log-impl: org.apache.ibatis.logging.stdout.StdOutImpl
至此前期的准备工作基本上就完成了,下面开始进入正题。
项目搭建
对于项目结构我这里是用mybatis-plus代码生成器直接生成的,下面贴出来
package com.candy.candydemo.util;

import com.baomidou.mybatisplus.core.toolkit.StringPool;
import com.baomidou.mybatisplus.generator.AutoGenerator;
import com.baomidou.mybatisplus.generator.InjectionConfig;
import com.baomidou.mybatisplus.generator.config.*;
import com.baomidou.mybatisplus.generator.config.po.TableFill;
import com.baomidou.mybatisplus.generator.config.po.TableInfo;
import com.baomidou.mybatisplus.generator.config.rules.NamingStrategy;
import com.baomidou.mybatisplus.generator.engine.FreemarkerTemplateEngine;

import java.util.ArrayList;
import java.util.List;

public class MysqlGenerator {

    /**
     * RUN THIS
     */
    public static void main(String[] args) {
        // 代码生成器
        AutoGenerator mpg = new AutoGenerator();

        // 全局配置
        GlobalConfig gc = new GlobalConfig();
        String projectPath = System.getProperty("user.dir");
        gc.setOutputDir(projectPath + "/src/main/java");
        // TODO 设置用户名
        gc.setAuthor("yuan");
        gc.setOpen(true);
        // service 命名方式
        gc.setServiceName("%sService");
        // service impl 命名方式
        gc.setServiceImplName("%sServiceImpl");
        // 自定义文件命名,注意 %s 会自动填充表实体属性!
        gc.setMapperName("%sMapper");
        gc.setXmlName("%sMapper");
        gc.setFileOverride(true);
        gc.setActiveRecord(true);
        // XML 二级缓存
        gc.setEnableCache(false);
        // XML ResultMap
        gc.setBaseResultMap(true);
        // XML columList
        gc.setBaseColumnList(false);
        mpg.setGlobalConfig(gc);

        // TODO 数据源配置
        DataSourceConfig dsc = new DataSourceConfig();
        dsc.setUrl("jdbc:mysql://127.0.0.1:3307/activiti?useUnicode=true&characterEncoding=utf8&autoReconnect=true&useSSL=false");
        dsc.setDriverName("com.mysql.jdbc.Driver");
        dsc.setUsername("root");
        dsc.setPassword("root");
        mpg.setDataSource(dsc);

        // TODO 包配置
        PackageConfig pc = new PackageConfig();
        //pc.setModuleName(scanner("模块名"));
        pc.setParent("com.candy.candydemo");
        pc.setEntity("entity");
        pc.setService("service");
        pc.setServiceImpl("service.impl");
        mpg.setPackageInfo(pc);

        // 自定义需要填充的字段
        List tableFillList = new ArrayList<>();
        //如 每张表都有一个创建时间、修改时间
        //而且这基本上就是通用的了,新增时,创建时间和修改时间同时修改
        //修改时,修改时间会修改,
        //虽然像Mysql数据库有自动更新几只,但像ORACLE的数据库就没有了,
        //使用公共字段填充功能,就可以实现,自动按场景更新了。
        //如下是配置
        //TableFill createField = new TableFill("gmt_create", FieldFill.INSERT);
        //TableFill modifiedField = new TableFill("gmt_modified", FieldFill.INSERT_UPDATE);
        //tableFillList.add(createField);
        //tableFillList.add(modifiedField);

        // 自定义配置
        InjectionConfig cfg = new InjectionConfig() {
            @Override
            public void initMap() {
                // to do nothing
            }
        };
        List focList = new ArrayList<>();
        focList.add(new FileOutConfig("/templates/mapper.xml.ftl") {
            @Override
            public String outputFile(TableInfo tableInfo) {
                // 自定义输入文件名称
                return projectPath + "/src/main/resources/mapper/"
                        + "/" + tableInfo.getEntityName() + "Mapper" + StringPool.DOT_XML;
            }
        });
        cfg.setFileOutConfigList(focList);
        mpg.setCfg(cfg);
        mpg.setTemplate(new TemplateConfig().setXml(null));

        // 策略配置
        StrategyConfig strategy = new StrategyConfig();
        strategy.setNaming(NamingStrategy.underline_to_camel);
        strategy.setColumnNaming(NamingStrategy.underline_to_camel);
        strategy.setEntityLombokModel(true);
        // 设置逻辑删除键
        strategy.setLogicDeleteFieldName("deleted");
        // TODO 指定生成的bean的数据库表名
        strategy.setInclude("sys_user","sys_user_role","sys_role","sys_role_menu","sys_role_permission","sys_menu","sys_permission");

        //strategy.setSuperEntityColumns("id");
        // 驼峰转连字符
        strategy.setControllerMappingHyphenStyle(true);
        mpg.setStrategy(strategy);
        // 选择 freemarker 引擎需要指定如下加,注意 pom 依赖必须有!
        mpg.setTemplateEngine(new FreemarkerTemplateEngine());
        mpg.execute();
    }

}
注意里面需要改动的地方,数据源以及模块名等,这个很简单,我就不详细赘述了。
然后是我们的redis配置文件:
package com.candy.candydemo.conf.redis;

import com.fasterxml.jackson.annotation.JsonAutoDetect;
import com.fasterxml.jackson.annotation.PropertyAccessor;
import com.fasterxml.jackson.databind.ObjectMapper;
import org.springframework.cache.annotation.CachingConfigurerSupport;
import org.springframework.context.annotation.Bean;
import org.springframework.context.annotation.Configuration;
import org.springframework.data.redis.connection.RedisConnectionFactory;
import org.springframework.data.redis.core.RedisTemplate;
import org.springframework.data.redis.serializer.Jackson2JsonRedisSerializer;
import org.springframework.data.redis.serializer.StringRedisSerializer;

/**
 * @author :qzx
 * @ClassName :RedisConfig
 * @date : 2019/9/6 10:04
 * @description : TODO redis配置类
 */
@Configuration
public class RedisConfig extends CachingConfigurerSupport {
        @Bean
        public RedisTemplate redisTemplate(RedisConnectionFactory redisConnectionFactory) {
            RedisTemplate redisTemplate = new RedisTemplate<>();
            redisTemplate.setConnectionFactory(redisConnectionFactory);
            // 使用Jackson2JsonRedisSerialize 替换默认的jdkSerializeable序列化
            Jackson2JsonRedisSerializer jackson2JsonRedisSerializer = new Jackson2JsonRedisSerializer(Object.class);
            ObjectMapper objectMapper = new ObjectMapper();
            objectMapper.setVisibility(PropertyAccessor.ALL, JsonAutoDetect.Visibility.ANY);
            objectMapper.enableDefaultTyping(ObjectMapper.DefaultTyping.NON_FINAL);
            jackson2JsonRedisSerializer.setObjectMapper(objectMapper);
            // 设置value的序列化规则和 key的序列化规则
            redisTemplate.setKeySerializer(new StringRedisSerializer());
            redisTemplate.setValueSerializer(jackson2JsonRedisSerializer);
            redisTemplate.afterPropertiesSet();
            return redisTemplate;
        }
}
如果你进行到这里了,说明你的项目结构已经搭建完成了,接下来就是最最重要的shiro配置环节了
shrio配置类的编写
从这里开始就非常重要了,稍不留神就会踩坑(我也是踩了很多坑才走到这一步的?)
ShiroRealm配置类的编写
这个配置类,主要是处理用户登录的操作和获取用户权限的操作,先贴上代码
package com.candy.candydemo.conf.shiro;

import com.candy.candydemo.entity.SysMenu;
import com.candy.candydemo.entity.SysRole;
import com.candy.candydemo.entity.SysUser;
import com.candy.candydemo.entity.vo.Result;
import com.candy.candydemo.service.SysUserService;
import com.candy.candydemo.util.StringUtil;
import org.apache.shiro.authc.*;
import org.apache.shiro.authz.AuthorizationInfo;
import org.apache.shiro.authz.SimpleAuthorizationInfo;
import org.apache.shiro.realm.AuthorizingRealm;
import org.apache.shiro.subject.PrincipalCollection;
import org.slf4j.Logger;
import org.slf4j.LoggerFactory;
import org.springframework.beans.factory.annotation.Autowired;
import org.springframework.util.CollectionUtils;
import java.util.List;

public class ShiroRealm extends AuthorizingRealm {
    private static final Logger LOGGER = LoggerFactory.getLogger(ShiroRealm.class);
    @Autowired//自己定义的接口,用于查询用户信息(用户名,角色,权限等)
    private SysUserService sysUserService;
    /**
     * @return : org.apache.shiro.authz.AuthorizationInfo
     * @Author : qzx
     * @Description : //TODO 授权
     * @Date : 10:34 2019/9/16
     * @Param : [principals]
     **/
    @Override
    protected AuthorizationInfo doGetAuthorizationInfo(PrincipalCollection principals) {
        LOGGER.info("---------------------执行shiro权限获取开始----------------------");
        Object principal = principals.getPrimaryPrincipal();
        SimpleAuthorizationInfo info = new SimpleAuthorizationInfo();
        if (principal instanceof SysUser) {
            SysUser sysUser = (SysUser) principal;
            if (sysUser != null) {
                List roles = sysUser.getRoles();
                if (!CollectionUtils.isEmpty(roles)) {
                    for (SysRole sysRole : roles) {
                        info.addRole(sysRole.getRolename());
                        List permissions = sysRole.getMenus();
                        if (!CollectionUtils.isEmpty(permissions)) {
                            for (SysMenu sysPermission : permissions) {
                                if (StringUtil.isNotEmpty(sysPermission.getPermissionCode())) {
                                    info.addStringPermission(sysPermission.getPermissionCode());
                                }
                            }
                        }
                    }
                }
            }
            LOGGER.info("---------------------执行shiro权限获取成功----------------------");
            return info;
        }
        return null;
    }
    /**
     * @return : org.apache.shiro.authc.AuthenticationInfo
     * @Author : qzx
     * @Description : //TODO 登录认证
     * @Date : 10:34 2019/9/16
     * @Param : [authcToken]
     **/
    @Override
    protected AuthenticationInfo doGetAuthenticationInfo(AuthenticationToken authcToken) throws AuthenticationException {
        LOGGER.info("--------------------执行shiro凭证认证开始----------------------");
        UsernamePasswordToken token = (UsernamePasswordToken) authcToken;
        String name = token.getUsername();
        SysUser sysuser = new SysUser();
        sysuser.setUsername(name);
        Result result = sysUserService.getUserByName(sysuser);
        SysUser user = (SysUser) result.getData();
        if (user != null) {
            if (!(user.getState() == 1)) {
                LOGGER.info("---------------------用户已被冻结----------------------");
                throw new DisabledAccountException();
            }
            LOGGER.info("---------------------执行shiro凭证认证成功----------------------");
            SimpleAuthenticationInfo authenticationInfo = new SimpleAuthenticationInfo(user, user.getPassword(), getName());
            return authenticationInfo;
        }
        throw new UnknownAccountException();
    }
}
这里主要是重写了AuthorizingRealm类的两个方法,doGetAuthenticationInfo方法主要是处理用户登录的相关操作,将用户登录信息存放到SimpleAuthenticationInfo中以供之后shiro调用,doGetAuthorizationInfo方法主要是获取用户信息,包括用户角色和权限。这里需要提一下,doGetAuthenticationInfo是在用户执行登录操作时就会调用,而doGetAuthorizationInfo是在某接口需要进行权限验证的时候才会调用。
自定义session管理类
shiro本身获取sessionid的方法是从cookie中获取的,如果cookie中没有就从url或参数中获取。在前后端分离中,我们推荐将sessionid放在请求头中,每次都从请求头中获取用户的sessionid。所以我们要重写shiro获取sessionid的放啊,建立SessionManager类,继成shiro的DefaultWebSessionManager,重写getSessionId方法,使我们从每次请求的请求头获取sessionId,代码如下
package com.candy.candydemo.conf.shiro;

import org.apache.commons.lang3.StringUtils;
import org.apache.shiro.session.Session;
import org.apache.shiro.session.UnknownSessionException;
import org.apache.shiro.session.mgt.SessionKey;
import org.apache.shiro.web.servlet.ShiroHttpServletRequest;
import org.apache.shiro.web.session.mgt.DefaultWebSessionManager;
import org.apache.shiro.web.session.mgt.WebSessionKey;
import org.apache.shiro.web.util.WebUtils;
import javax.servlet.ServletRequest;
import javax.servlet.ServletResponse;
import java.io.Serializable;

public class SessionManager extends DefaultWebSessionManager {
    private static final String AUTHORIZATION = "Token";
    private static final String REFERENCED_SESSION_ID_SOURCE = "Stateless request";
    public SessionManager() {
    }
    @Override
    protected Serializable getSessionId(ServletRequest request, ServletResponse response) {
        //获取请求头,或者请求参数中的Token
        String id = StringUtils.isEmpty(WebUtils.toHttp(request).getHeader(AUTHORIZATION))
                ? request.getParameter(AUTHORIZATION) : WebUtils.toHttp(request).getHeader(AUTHORIZATION);
        // 如果请求头中有 Token 则其值为sessionId
        if (StringUtils.isNotEmpty(id)) {
            request.setAttribute(ShiroHttpServletRequest.REFERENCED_SESSION_ID_SOURCE, REFERENCED_SESSION_ID_SOURCE);
            request.setAttribute(ShiroHttpServletRequest.REFERENCED_SESSION_ID, id);
            request.setAttribute(ShiroHttpServletRequest.REFERENCED_SESSION_ID_IS_VALID, Boolean.TRUE);

            return id;
        } else {
            // 否则按默认规则从cookie取sessionId
            return super.getSessionId(request, response);
        }
    }

    /**
     * 获取session 优化单次请求需要多次访问redis的问题
     *
     * @param sessionKey
     * @return
     * @throws UnknownSessionException
     */
    @Override
    protected Session retrieveSession(SessionKey sessionKey) throws UnknownSessionException {
        Serializable sessionId = getSessionId(sessionKey);
        ServletRequest request = null;
        if (sessionKey instanceof WebSessionKey) {
            request = ((WebSessionKey) sessionKey).getServletRequest();
        }
        if (request != null && null != sessionId) {
            Object sessionObj = request.getAttribute(sessionId.toString());
            if (sessionObj != null) {
                return (Session) sessionObj;
            }
        }
        Session session = super.retrieveSession(sessionKey);
        if (request != null && null != sessionId) {
            request.setAttribute(sessionId.toString(), session);
        }
        return session;
    }
}
这里的作用主要是在每次请求的时候,获取请求头中的sessionId,用来验证当前用户是否登录,如果当前的redis中存放有sessionid,那么就获取该用户信息。这个配置类先放在这里,等会我们再来看。
用户密码校验类(MD5加盐加密处理)
由于我们的密码进行了加盐加密处理,而shiro在获取用户信息后会进行密码比对,doCredentialsMatch就是其进行密码校对的方法,若想让其与我们的加密算法进行想匹配的话,我们不如重写这个方法,加入我们自己的逻辑。
package com.candy.candydemo.conf.shiro;

import com.candy.candydemo.util.Md5Util;
import org.apache.shiro.authc.AuthenticationInfo;
import org.apache.shiro.authc.AuthenticationToken;
import org.apache.shiro.authc.UsernamePasswordToken;
import org.apache.shiro.authc.credential.SimpleCredentialsMatcher;

public class CredentialsMatcher extends SimpleCredentialsMatcher {

	@Override
	public boolean doCredentialsMatch(AuthenticationToken token, AuthenticationInfo info) {
		UsernamePasswordToken utoken = (UsernamePasswordToken) token;
		// 获得用户输入的密码:(可以采用加盐(salt)的方式去检验)
		String inPassword = new String(utoken.getPassword());
		String inUsername = new String (utoken.getUsername());
		String password = Md5Util.md5(inPassword, inUsername);
		// 获得数据库中的密码
		String dbPassword = (String) info.getCredentials();
		// 进行密码的比对
		boolean flag = password.equals(dbPassword)? true:false;
		return flag;
	}
}
Md5Util的代码如下:
package com.candy.candydemo.util;


import org.apache.shiro.crypto.hash.SimpleHash;
import org.apache.shiro.util.ByteSource;

/** 用于生成MD5 密码的工具类
 * */
public class Md5Util {

    public static final String md5(String password, String salt){
        //加密方式
        String hashAlgorithmName = "MD5";
        //盐:为了即使相同的密码不同的盐加密后的结果也不同
        ByteSource byteSalt = ByteSource.Util.bytes(salt);
        //密码
        Object source = password;
        //加密次数
        int hashIterations = 1024;
        SimpleHash result = new SimpleHash(hashAlgorithmName, source, byteSalt, hashIterations);
        return result.toString();
    }
}
我这里为了演示方便只做了简单的加密处理,slat默认获取的是用户的用户名。
编写shiroConfig配置类
shiro里的核心配置类就是这个ShiroConfig配置类了,这个配置类主要是规定我们shiro需要拦截的接口,以及我们自定义session,redis相关配置注入等操作。下面我贴下完整的代码。
package com.candy.candydemo.conf.shiro;

import com.candy.candydemo.conf.filter.ShiroFormAuthenticationFilter;
import org.apache.shiro.mgt.SecurityManager;
import org.apache.shiro.spring.LifecycleBeanPostProcessor;
import org.apache.shiro.spring.security.interceptor.AuthorizationAttributeSourceAdvisor;
import org.apache.shiro.spring.web.ShiroFilterFactoryBean;
import org.apache.shiro.web.mgt.DefaultWebSecurityManager;
import org.apache.shiro.web.servlet.SimpleCookie;
import org.crazycake.shiro.RedisCacheManager;
import org.crazycake.shiro.RedisManager;
import org.crazycake.shiro.RedisSessionDAO;
import org.springframework.aop.framework.autoproxy.DefaultAdvisorAutoProxyCreator;
import org.springframework.beans.factory.annotation.Value;
import org.springframework.context.annotation.Bean;
import org.springframework.context.annotation.Configuration;

import javax.servlet.Filter;
import java.util.LinkedHashMap;
import java.util.Map;

@Configuration
public class ShiroConfig {

    @Value("${spring.redis.host}")
    private String redisHost;

    @Value("${spring.redis.port}")
    private int redisPort;

    @Value("${spring.redis.password}")
    private String redisPassword;

    @Bean
    public ShiroFilterFactoryBean shiroFilter(SecurityManager securityManager) {
        ShiroFilterFactoryBean shiroFilterFactoryBean = new ShiroFilterFactoryBean();
        shiroFilterFactoryBean.setSecurityManager(securityManager);
        // 没有登陆的用户只能访问登陆页面,前后端分离中登录界面跳转应由前端路由控制,后台仅返回json数据
        shiroFilterFactoryBean.setLoginUrl("/common/unauth");
        // 登录成功后要跳转的链接
        //shiroFilterFactoryBean.setSuccessUrl("/auth/index");
        // 未授权界面;
        shiroFilterFactoryBean.setUnauthorizedUrl("common/unauth");

        //自定义拦截器
        Map filtersMap = new LinkedHashMap();
        //限制同一帐号同时在线的个数。
        filtersMap.put("kickout", kickoutSessionControlFilter());
        filtersMap.put("authc", new ShiroFormAuthenticationFilter());//将自定义 的FormAuthenticationFilter注入shiroFilter中
        shiroFilterFactoryBean.setFilters(filtersMap);

        // 权限控制map.
        Map filterChainDefinitionMap = new LinkedHashMap();
        // 公共请求
        filterChainDefinitionMap.put("/common/**", "anon");
        // 静态资源
        filterChainDefinitionMap.put("/static/**", "anon");
        // 登录方法
        filterChainDefinitionMap.put("/admin/login*", "anon"); // 表示可以匿名访问

        //此处需要添加一个kickout,上面添加的自定义拦截器才能生效
        filterChainDefinitionMap.put("/admin/**", "authc,kickout");// 表示需要认证才可以访问
        //filterChainDefinitionMap.put("/**", "authc");
        shiroFilterFactoryBean.setFilterChainDefinitionMap(filterChainDefinitionMap);
        return shiroFilterFactoryBean;
    }

    @Bean
    public SecurityManager securityManager() {
        DefaultWebSecurityManager securityManager = new DefaultWebSecurityManager();

        // 自定义缓存实现 使用redis
        securityManager.setCacheManager(cacheManager());
        // 自定义session管理 使用redis
        securityManager.setSessionManager(sessionManager());
        // 设置realm.
        securityManager.setRealm(myShiroRealm());
        return securityManager;
    }

    /**
     * 身份认证realm
     *
     * @return
     */
    @Bean
    public ShiroRealm myShiroRealm() {
        ShiroRealm myShiroRealm = new ShiroRealm();
        myShiroRealm.setCredentialsMatcher(credentialsMatcher());
        return myShiroRealm;
    }

    @Bean
    public CredentialsMatcher credentialsMatcher() {
        return new CredentialsMatcher();
    }

    /**
     * cacheManager 缓存 redis实现
     * 使用的是shiro-redis开源插件
     *
     * @return
     */
    public RedisCacheManager cacheManager() {
        RedisCacheManager redisCacheManager = new RedisCacheManager();
        redisCacheManager.setRedisManager(redisManager());
        redisCacheManager.setKeyPrefix("SPRINGBOOT_CACHE:");
        return redisCacheManager;
    }

    /**
     * RedisSessionDAO shiro sessionDao层的实现 通过redis
     * 使用的是shiro-redis开源插件
     */
    @Bean
    public RedisSessionDAO redisSessionDAO() {
        RedisSessionDAO redisSessionDAO = new RedisSessionDAO();
        redisSessionDAO.setRedisManager(redisManager());
        redisSessionDAO.setKeyPrefix("SPRINGBOOT_SESSION:");
        return redisSessionDAO;
    }

    /**
     * Session Manager
     * 使用的是shiro-redis开源插件
     */
    @Bean
    public SessionManager sessionManager() {
        SimpleCookie simpleCookie = new SimpleCookie("Token");
        simpleCookie.setPath("/");
        simpleCookie.setHttpOnly(false);

        SessionManager sessionManager = new SessionManager();
        sessionManager.setSessionDAO(redisSessionDAO());
        sessionManager.setSessionIdCookieEnabled(false);
        sessionManager.setSessionIdUrlRewritingEnabled(false);
        sessionManager.setDeleteInvalidSessions(true);
        sessionManager.setSessionIdCookie(simpleCookie);
        return sessionManager;
    }


    /**AuthorizationAttributeSourceAdvisor
     * 配置shiro redisManager
     * 使用的是shiro-redis开源插件
     *
     * @return
     */
    public RedisManager redisManager() {
        RedisManager redisManager = new RedisManager();
        redisManager.setHost(redisHost);
        redisManager.setPort(redisPort);
        redisManager.setTimeout(1800); //设置过期时间
        redisManager.setPassword(redisPassword);
        return redisManager;
    }

    /**
     * 限制同一账号登录同时登录人数控制
     *这个方法不需要的话可以注释掉。注意注释掉这里需要同时注释掉shiroFilter中关于此方法的拦截器
     * @return
     */
    @Bean
    public SessionControlFilter kickoutSessionControlFilter() {
        SessionControlFilter kickoutSessionControlFilter = new SessionControlFilter();
        kickoutSessionControlFilter.setCache(cacheManager());
        kickoutSessionControlFilter.setSessionManager(sessionManager());
        kickoutSessionControlFilter.setKickoutAfter(false);
        kickoutSessionControlFilter.setMaxSession(1);
        kickoutSessionControlFilter.setKickoutUrl("/common/kickout");
        return kickoutSessionControlFilter;
    }


    /***
     * 授权所用配置
     *
     * @return
     */
    @Bean
    public DefaultAdvisorAutoProxyCreator getDefaultAdvisorAutoProxyCreator() {
        DefaultAdvisorAutoProxyCreator defaultAdvisorAutoProxyCreator = new DefaultAdvisorAutoProxyCreator();
        defaultAdvisorAutoProxyCreator.setUsePrefix(true);
        defaultAdvisorAutoProxyCreator.setProxyTargetClass(true);
        return defaultAdvisorAutoProxyCreator;
    }

    /***
     * 使授权注解起作用不如不想配置可以在pom文件中加入
     *
     *org.springframework.boot
     *spring-boot-starter-aop
     *
     * @param securityManager
     * @return
     */
    @Bean
    public AuthorizationAttributeSourceAdvisor authorizationAttributeSourceAdvisor(SecurityManager securityManager){
        AuthorizationAttributeSourceAdvisor authorizationAttributeSourceAdvisor = new AuthorizationAttributeSourceAdvisor();
        authorizationAttributeSourceAdvisor.setSecurityManager(securityManager);
        return authorizationAttributeSourceAdvisor;
    }

    /**
     * Shiro生命周期处理器
     * 此方法需要用static作为修饰词,否则无法通过@Value()注解的方式获取配置文件的值
     *
     */
    @Bean
    public static LifecycleBeanPostProcessor getLifecycleBeanPostProcessor() {
        return new LifecycleBeanPostProcessor();
    }
}
至此为止我们的配置就差不多完成了,中间有其它的一些类我们有贴出来,如果你编写到这里的话找不到那些类 ,可以去我的项目地址将项目下载下来看看吧。
编写相关类进行测试
进行到这里我们就可以进行相关的测试了,首先编写一个用户登录的Controller
package com.candy.candydemo.controller;

import com.alibaba.fastjson.JSON;
import com.alibaba.fastjson.JSONObject;
import com.candy.candydemo.entity.SysUser;
import com.candy.candydemo.entity.vo.Result;
import com.candy.candydemo.exception.ResultStatusCode;
import org.apache.shiro.SecurityUtils;
import org.apache.shiro.authc.IncorrectCredentialsException;
import org.apache.shiro.authc.LockedAccountException;
import org.apache.shiro.authc.UnknownAccountException;
import org.apache.shiro.authc.UsernamePasswordToken;
import org.apache.shiro.subject.Subject;
import org.springframework.web.bind.annotation.RequestMapping;
import org.springframework.web.bind.annotation.RestController;

@RestController
@RequestMapping("/admin")
public class LoginController {

    @RequestMapping("/login")
    public Result login(String loginName, String pwd){
        try {
            UsernamePasswordToken token = new UsernamePasswordToken(loginName, pwd);
            //登录不在该处处理,交由shiro处理
            Subject subject = SecurityUtils.getSubject();
            subject.login(token);
            if (subject.isAuthenticated()) {
                JSON json = new JSONObject();
                ((JSONObject) json).put("Token", subject.getSession().getId());

                return new Result(ResultStatusCode.OK, json);
            }else{
                return new Result(ResultStatusCode.SHIRO_ERROR);
            }
        }catch (IncorrectCredentialsException | UnknownAccountException e){
            return new Result(ResultStatusCode.NOT_EXIST_USER_OR_ERROR_PWD);
        }catch (LockedAccountException e){
            return new Result(ResultStatusCode.USER_FROZEN);
        }catch (Exception e){
            return new Result(ResultStatusCode.SYSTEM_ERR);
        }
    }

    /**
     * 退出登录
     * @return
     */
    @RequestMapping("/logout")
    public Result logout(){
        SecurityUtils.getSubject().logout();
        return new Result(ResultStatusCode.OK);
    }
}
接下来是我们没有权限或者没登陆时的跳转的Controller
package com.candy.candydemo.controller;

import com.candy.candydemo.entity.SysUser;
import com.candy.candydemo.entity.vo.Result;
import com.candy.candydemo.exception.ResultStatusCode;
import org.apache.shiro.SecurityUtils;
import org.apache.shiro.session.Session;
import org.apache.shiro.session.mgt.SessionKey;
import org.apache.shiro.subject.SimplePrincipalCollection;
import org.apache.shiro.subject.support.DefaultSubjectContext;
import org.apache.shiro.web.session.mgt.WebSessionKey;
import org.springframework.web.bind.annotation.RequestMapping;
import org.springframework.web.bind.annotation.RestController;

import javax.servlet.http.HttpServletRequest;
import javax.servlet.http.HttpServletResponse;

@RequestMapping("/common")
@RestController
public class CommonController {

    /**
     * 未授权跳转方法
     * @return
     */
    @RequestMapping("/unauth")
    public Result unauth(){
        //SysUser principal = (SysUser) SecurityUtils.getSubject().getPrincipal();
        SecurityUtils.getSubject().logout();
        return new Result(ResultStatusCode.UNAUTHO_ERROR);
    }
    /**
     * 被踢出后跳转方法
     * @return
     */
    @RequestMapping("/kickout")
    public Result kickout(){
        return new Result(ResultStatusCode.INVALID_TOKEN);
    }
}
最后是我们测试权限是否启用了的类
package com.candy.candydemo.controller;

import com.candy.candydemo.entity.SysUser;
import com.candy.candydemo.service.SysUserService;
import org.apache.shiro.authz.annotation.RequiresPermissions;
import org.apache.shiro.authz.annotation.RequiresRoles;
import org.springframework.beans.factory.annotation.Autowired;
import org.springframework.web.bind.annotation.RequestMapping;
import org.springframework.web.bind.annotation.RestController;

import java.util.List;

@RestController
@RequestMapping("test")
public class TestController {

    @RequiresRoles("admin") //表示只有admin这个角色才能访问这个方法
    @RequestMapping("test")
    public String test(){
        return "欢迎你,admin" ;
    }

}
测试结果展示
首先我们来访问一下我们的测试类,看看是什么结果,使用postman访问接口http://localhost:8080/test/test,结果应该是下图那样

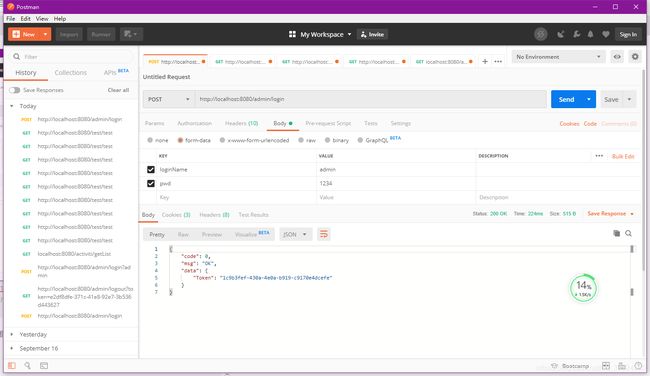
这是因为我们还未登录,所以获取不到我们的权限,接下来我们来执行登录操作,访问接口http://localhost:8080/admin/login

如果是上图显示,就说明我们登录成功了,注意,这里的token需要我们复制下来,等一会访问其它接口时作为请求头传到后台。还记得我们之前编写的sessionManager那个配置类吗?我们向后端的请求首先要经过sessionManager的验证,验证请求头中是否存在token,如果存在就获取,否则就在cookie中寻找我们的sessionid.
然后我们再来测试一下刚才的接口

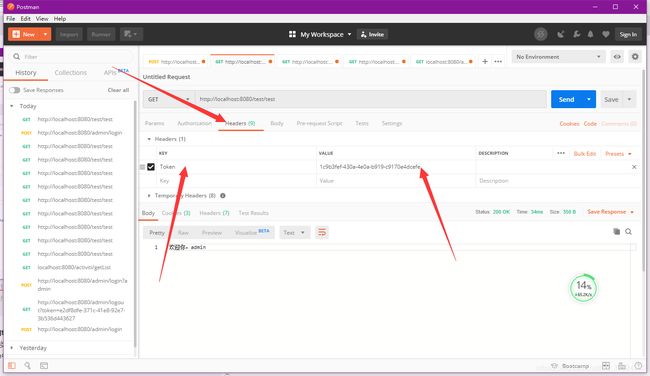
注意在访问的时候选择Headers并将刚才Token保存的sessionId传进去,再次访问发现接口访问成功了,至此,我们的shiro就全部完成了。
这篇博文我并没有花很多时间编写,所以内容上可能会有一些不全面,如果看到这里的话项目依然没有跑起来的话,赶紧去我的码云上把代码下载下来,配合项目和博文来进行学习吧。
项目地址:https://gitee.com/qizhongxiao/candy-demo.git
参考博文:https://blog.csdn.net/zhourenfei17/article/details/83543002
看完之后如果还有什么不懂得地方,欢迎评论哦!
如果有更好得建议,可以留言,我也会进行改进得!