Spring-Data-Jpa中的常用注解详解及其用法
** 1 @Query注解详解及其用法**
说明:本文的写作构建在我的公众号文章SpringBoot之路(二)使用用Spring-Data-JPA访问数据库进行基本的CRUD操作这篇文章的基础之上。
@Query注解在spring-data-jpa中可用来定制自定义sql语句的数据库增删改查操作,使用起来也是非常方便
1.1 源码分析
@Retention(RetentionPolicy.RUNTIME)
@Target({ElementType.METHOD, ElementType.ANNOTATION_TYPE})
@QueryAnnotation
@Documented
public @interface Query {
    /**
    *指定JPAL查询语句,nativeQuery=true时是原生的SQL语句
    */
    String value() default "";

	/**
	*指定count的 JPQL语句,如果不指定将根据query自动生成;
	*nativeQuery=true时是原生的SQL语句
	*/
    String countQuery() default "";
    /**
    *根据哪个字段来count,一般默认即可
    */
    String countProjection() default "";
	/**
	*默认为false,表示不是原生的SQL语句
	*/
    boolean nativeQuery() default false;

    /**
    *可以指定一个query的名字,必须是唯一的,
    *如果不指定,默认的生产规则是{$domainClass}.{$queryMethodName}
    */
    String name() default "";
	/**
	*指定一个count的query名字,必须是唯一的
	*如果不指定,默认的生产规则是{$domainClass}.{$queryMethodName}.count

	*/
    String countName() default "";
}
1.2 @Query的用法
使用命名查询为实体声明查询是一种有效的方法,对于少量查询 很有效;一般只需要关心@Query里面的value和nativeQuery的值;使 用声明式JPQL查询有一个好处,就是启动的时候就知道语法正确与否。
示例:声名一个@Query注解装饰的方法在UserRepository上
(1)@Query注解中自定义select语句
@Query(value="select user_id,user_name,password,user_sex,user_name_cn,user_role,tel_num," +      "email,reg_date,birth_day,created_by,created_time,last_updated_by,last_updated_time from user_info where user_role=?1",nativeQuery = true)
    List<UserInfo> findByUserRole(String userRole);
/**使用@Query装饰的方法自定义SQL查询时
*必须修改nativeQuery = true,表示这是一个原生SQL,
*否则项目启动时就会报错
*/
(2)@Query注解中自定义update语句
@Modifying
@Query(value="update user_info set email=?2 where user_name=?1",nativeQuery = true)
    Integer updateEmailByUserName(String username,String email);
注意:update操作必须在@Query注解上方加上@Modifying注解,否则执行sql语句时会报无法提取结果集异常
1.3 like查询,注意不会自动加上%关键字
 @Query(value="select user_id,user_name,user_sex,"+ "user_name_cn,user_role,tel_num,email,reg_date from user_info where user_name like ?1 %",nativeQuery=true)
    List<UserInfo> findByLikeUserName(String userName);
//注意以上1与%之间不能有空格
注意: nativeQuery不支持直接Sort的参数查询
nativeQuery的错误写法,下面这个写法会使项目启动时报错:
@Query(value="select * from user_info where user_name like ?1%",nativeQuery = true)
    List<UserInfo> findByUserName(String userName, Sort sort);
1.4 本节测试
以1.2中的在@Query注解中自定义update语句为例,完成Service层和Controller层代码
Service层代码
//UserService 接口中添加抽象方法
Integer updateEmailByUsername(String username,String email);

//UserServiceImpl类中实现方法,注意数据库增、删、改方法都要加上@Transactional事务注解
    @Override
    @Transactional
    public Integer  updateEmailByUsername(String username, String email) {

        return userRepository.updateEmailByUserName(username,email);

    }
controller层代码
@PutMapping("/email/{username}/{email}")
    public ServiceResponse<Integer> updateUserEmailByUsername(@PathVariable("username") String username,@PathVariable("email") String email){

        ServiceResponse<Integer> response = new ServiceResponse<>();
        log.info("username={},email={}",username,email);
        Integer count = userInfoService.updateEmailByUsername(username,email);
        response.setData(count);
        return response;
    }
这时就可以通过postman测试效果了
// 请求方法与URL
PUT http://localhost:8088/apiBoot/user/email/LiSi/lisi1989@163.com

//返回结果
{
    "status": 200,
    "message": "ok",
    "data": 1
}

//此时再来调用根据用户名查看用户信息接口
GET ttp://localhost:8088/apiBoot/user/userInfos/userName?userName=LiSi
//返回结果
{
    "status": 200,
    "message": "ok",
    "data": [
        {
            "userId": 2,
            "userName": "LiSi",
            "password": "89d462491dd4f9e5f2125485a835540c",
            "userNameCn": "李四",
            "userSex": "M",
            "userRole": "Admin",
            "telNum": 13100001002,
            "email": "[email protected]",
            "regDate": "2018-06-10",
            "birthDay": "1989-07-12",
            "createdBy": "system",
            "createdTime": "2020-03-13 23:48:30",
            "lastUpdatedBy": "admin",
            "lastUpdatedTime": "2020-04-26 11:28:29"
        }
    ]
}
从返回结果的email字段可发现用户的邮箱已经发生了改变
nativeQuery排序的正确写法
@Query(value="select * from user_info where user_name like ?1% order by ?2 desc",nativeQuery = true)
    List<UserInfo> findByUserNameAndOrderBy(String userName, String sort);
使用@Query注解查询时的不足就是不支持动态条件查询
2 javax.persistence概况介绍
虽然Spring Data JPA已经帮我们对数据的操作封装得很好了, 约定大于配置思想,帮我们默认了很多东西。JPA(Java持久性API) 是存储业务实体关联的实体来源。它显示了如何定义一个面向普通 Java对象(POJO)作为一个实体,以及如何与管理关系实体提供一套 标准。因此,javax.persistence下面的有些注解还是必须要去了解的,以便于更好地提高工作效率.
(1)javax.persistence位于org.hibernate:hibernate-core.jar包里面,可 以通过Intellij Idea的maven插件直接分析一下maven的依赖,也可以用 $ mvn dependency:tree分析,例如:
[INFO] |  +- org.hibernate:hibernate-core:jar:5.3.9.Final:compile
[INFO] |  |  +- javax.persistence:javax.persistence-api:jar:2.2:compile
[INFO] |  |  +- org.javassist:javassist:jar:3.23.1-GA:compile
[INFO] |  |  +- antlr:antlr:jar:2.7.7:compile
[INFO] |  |  +- org.jboss:jandex:jar:2.0.5.Final:compile
[INFO] |  |  +- org.dom4j:dom4j:jar:2.1.1:compile
[INFO] |  |  \- org.hibernate.common:hibernate-commons-annotations:jar:5.0.4.Final:compile
[INFO] |  +- org.springframework.data:spring-data-jpa:jar:2.1.6.RELEASE:compile
[INFO] |  |  +- org.springframework.data:spring-data-commons:jar:2.1.6.RELEASE:compile
[INFO] |  |  +- org.springframework:spring-orm:jar:5.1.6.RELEASE:compile
[INFO] |  |  \- org.springframework:spring-tx:jar:5.1.6.RELEASE:compile
[INFO] |  \- org.springframework:spring-aspects:jar:5.1.6.RELEASE:compile
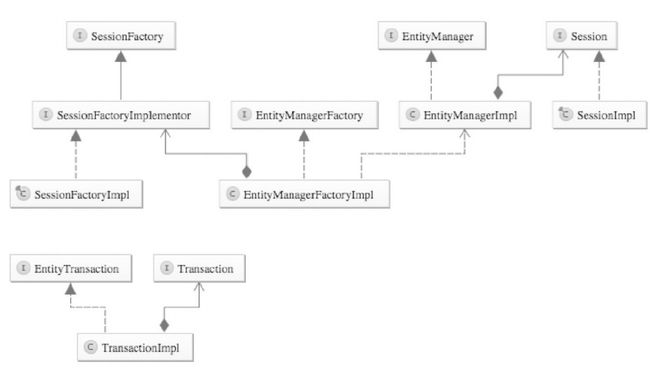
(2)通过Intellij Idea的Diagram来看一下此模块类的关键关 系,如图所示:

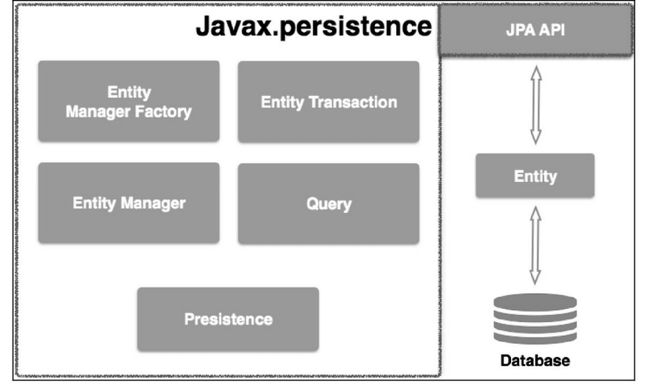
(3)下图显示了JPA的类的层次结构,包括核心类和JPA接口。

(4)JPA类层次结构的显示单元
| 单元 | 描述 |
|---|---|
| EntityManagerFactory | 一个EntityManager的工厂类,创建并管理多个EntityManager实例 |
| EntityManager | 一个接口,管理持久化操作对象,工作原理类似工厂的查询实例 |
| Entity | 实体是持久性对象,是存储在数据库中的记录 |
| EntityTransaction | 与EntityManager是一对一的关系,对于每个EntityManager,操作是由EntityTransaction来维护的 |
| Persistence | 这个类包含使用静态方法获取EntityManagerFactory的实例 |
| Query | 该接口由每个JPA供应商实现,能够获得符合标准的关系对象 |
上述的类和接口用于存储实体到数据库的一个记录,帮助程序员 通过减少自己编写的代码将数据存储到数据库中,使他们能够专注于 更重要的业务活动代码,如数据库表映射的类编写代码。
3 javax.persistence包下的基本注解
javax.persistence包下基本注解包括@Entity、@Table、@Id、@IdClass、 @GeneratedValue、@Basic、@Transient、@Column、@Temporal、 @Enumerated、@Lob。
3.1 @Entity
先看一个Blog的示例,其中实体的配置如下:
@Entity
@Table(name="user_blog",schema = "mysql")
@NoArgsConstructor
public class UserBlogEntity {

    @Id
    @Column(name="id",nullable = false)
    @GeneratedValue(strategy = GenerationType.IDENTITY)
    @Setter
    @Getter
    private Integer Id;

    @Column(name="title",nullable = true,length = 200)
    @Setter
    @Getter
    private String title;

    @Basic
    @Column(name="create_user_id",nullable = true)
    private Integer createUserId;

    //由于blog_content字段使用blob类型时从数据库查询出的结果一直显示乱码,
    //因此本实例使用text类型代替blob类型,
    //在mysql数据库中text类型的数据是一个大小写不敏感的blob类型数据
    @Basic
    @Column(name="blog_content",nullable = true,length = 4000)
    @Setter
    @Getter
    private String blogContent;

    @Column(name="image",nullable = true)
    @Lob
    @Setter
    @Getter
    private String image;

    //日期属性必须加上日期格式化注解com.fasterxml.jackson.annotation.JsonFormat,
    //防止序列化参数时报错
    @Column(name="create_time",nullable = true)
    @Temporal(TemporalType.DATE)
    @Setter
    @Getter
    @JsonFormat(pattern = "yyyy-MM-dd HH:mm:ss")
    private Date createTime;

    @Transient
    @Setter
    @Getter
    private String transitSimple;

}
在数据库中新建一张与UserBlogEntity实体类对应的表:
use mysql;
create table user_blog(
  `id` integer unique key,
   `create_user_id` integer,
   `title` varchar(200),
   `blog_content`  text,
   `image` varchar(500),
   `create_time` TIMESTAMP,
  primary key (`create_user_id`,`title`)
)engine=InnoDB default CHARSET=utf8;
@Entity定义对象将会成为被JPA管理的实体,将映射到指定的数据库表。
title` varchar(200),
   `blog_content`  text,
   `image` varchar(500),
   `create_time` TIMESTAMP,
  primary key (`create_user_id`,`title`)
)engine=InnoDB default CHARSET=utf8;
@Entity定义对象将会成为被JPA管理的实体,将映射到指定的数 据库表。
public @interface Entity {
    //默认是实体类的名字,全局唯一
    String name() default "";
}
3.2 @Table
@Table指定数据库的表名
public @interface Table {
    //表名,可选,不填写时默认为实体类名
    String name() default "";
    //表的catalog
    String catalog() default "";
    //表所在的schema
    String schema() default "";
    //唯一约束,只有在创建表时有用,默认不需要
    UniqueConstraint[] uniqueConstraints() default {};
    //索引,只在创建表时有用,默认不需要
    Index[] indexes() default {};
}
3.3 @Id
@Id定义属性为数据库的主键,一个实体里面必须有一个
3.4 @IdClass
@IdClass利用外部类的联合主键
public @interface IdClass {
    Class value();
}
-
作为符合主键类,要满足以下几点要求。
-
必须实现Serializable接口。
-
必须有默认的public无参数的构造方法。
-
必须覆盖equals和hashCode方法。equals方法用于判断两个对 象是否相同,EntityManger通过find方法来查找Entity时是根 据equals的返回值来判断的。在本例中,只有对象的name和 email值完全相同或同一个对象时才返回true,否则返回 false。hashCode方法返回当前对象的哈希码,生成的hashCode相同的概率越小越好,算法可以进行优化。
用法:假设UserBlog的联合主键是createUserId和title,新增一个UserBlogKey的类,UserBlogkey.class代码如下:
@NoArgsConstructor
@AllArgsConstructor
public class UserBlogKey implements Serializable {

    @Setter
    @Getter
    private Integer createUserId;

    @Setter
    @Getter
    private String title;

    //注意:作为联合主键的类需要重写equals和hashCode方法
    @Override
    public boolean equals(Object o) {
        if (this == o) return true;
        if (o == null || getClass() != o.getClass()) return false;
        UserBlogKey that = (UserBlogKey) o;
        return Objects.equals(createUserId, that.createUserId) &&
                Objects.equals(title, that.title);
    }

    @Override
    public int hashCode() {
        return Objects.hash(createUserId, title);
    }

}
UserBlogRepository中的改动如下:
public interface UserBlogRepository extends JpaRepository<UserBlogEntity,UserBlogKey> {

}
@IdClass的用法实战
(1)先写两个往User_Blog表中插入数据的接口和一个根据Id查询UserBlogEntity的接口
service层代码 UserBlogService.java
public interface UserBlogService {

    UserBlogEntity saveOne(UserBlogEntity userBlogEntity);

    List<UserBlogEntity> saveAll(List<UserBlogEntity> userBlogEntities);

    UserBlogEntity findById(UserBlogKey blogKey);
}
UserBlogServiceImpl.java
@Service
public class UserBlogServiceImpl implements UserBlogService {

    @Autowired
    private UserBlogRepository userBlogRepository;

    @Override
    @Transactional
    public UserBlogEntity saveOne(UserBlogEntity userBlogEntity) {

        return userBlogRepository.save(userBlogEntity);
    }

    @Override
    @Transactional
    public List<UserBlogEntity> saveAll(List<UserBlogEntity> userBlogEntities) {

        return userBlogRepository.saveAll(userBlogEntities);
    }

    @Override
    public UserBlogEntity findById(UserBlogKey blogKey) {

        return userBlogRepository.findById(blogKey).get();
    }
}
controller层代码 UserBlogController.java
@RestController
@RequestMapping("/userBlog")
@Slf4j
public class UserBlogController {

    @Autowired
    private UserBlogService userBlogService;

    @PostMapping("/oneUserBlog")
    public ServiceResponse<UserBlogEntity> saveOneUserBlog(@RequestBody UserBlogEntity blogEntity){
        log.info("blogEntity={}", JSON.toJSON(blogEntity));

        ServiceResponse<UserBlogEntity> response = new ServiceResponse<>();

        UserBlogEntity data = userBlogService.saveOne(blogEntity);

        response.setData(data);

        return response;
    }

    @PostMapping("/batchUserBlog")
    public ServiceResponse<List<UserBlogEntity>> batchSaveUserBlog(@RequestBody List<UserBlogEntity> blogEntities){

        log.info("blogEntities={}", JSONArray.toJSONString(blogEntities,true));

        ServiceResponse<List<UserBlogEntity>> response = new ServiceResponse<>();

        List<UserBlogEntity> data = userBlogService.saveAll(blogEntities);

        response.setData(data);

        return response;
    }

    @GetMapping("/findOne")
    public ServiceResponse<UserBlogEntity> findByBlogKey(@RequestParam("createUserId") Integer createUserId,
                                                         @RequestParam("title") String title){
        log.info("createUserId={},title={}",createUserId,title);

        ServiceResponse<UserBlogEntity> response = new ServiceResponse<>();

        UserBlogEntity blogEntity = userBlogService.findById(new UserBlogKey(createUserId,title));

        response.setData(blogEntity);

        return  response;

    }

}
postman测试
(1) 插入一条数据
//请求方法与URL
POST http://localhost:8088/apiBoot/userBlog/oneUserBlog
//入参数据
{
	"id":1,
	"createUserId":1,
	"title":"spring-data-jpa从入到精通(一)",
	"image":"https://pic.ibaotu.com/game/title/20200518/5ec24079a8164.png",
	"blogContent":"本博文讲述了使用spring-data-jpa进行基本的CRUD操作",
	"createTime":"2020-05-31 11:11:00",
	"transitSimple": "test1"
}
//请求响应数据
{
    "status": 200,
    "message": "ok",
    "data": {
        "title": "spring-data-jpa从入到精通(一)",
        "createUserId": 1,
        "blogContent": "本博文讲述了使用spring-data-jpa进行基本的CRUD操作",
        "image": "https://pic.ibaotu.com/game/title/20200518/5ec24079a8164.png",
        "createTime": "2020-05-31 11:11:00",
        "transitSimple": null,
        "id": 1
    }
}
(2)批量插入多条数据
//请求方法与URL
POST http://localhost:8088/apiBoot/userBlog/batchUserBlog
//入参数据
[{
	"id":2,
	"createUserId":1,
	"title":"spring-data-jpa从入到精通(二)",
	"image":"https://pic.ibaotu.com/game/title/20200518/5ec240798e78c.png",
	"blogContent":"本博文对spring-data-jpa框架中的常用注解及其用法进行了实战讲述",
	"createTime":"2020-05-31 11:41:00",
	"transitSimple": "test2"
},{
	"id":3,
	"createUserId":1,
	"title":"spring-data-jpa从入到精通(三)",
	"image":"https://pic.ibaotu.com/game/title/20200518/5ec240798e78c.png",
	"blogContent":"本博文主要讲述了在spring-boot项目中使用spring-data-jpa进行联表查询及复杂的动态查询的用法",
	"createTime":"2020-05-31 11:41:00",
	"transitSimple": "test3"
},{
   	"id":4,
	"createUserId":1,
	"title":"spring-data-jpa从入到精通(四)",
	"image":"https://pic.ibaotu.com/game/title/20200518/5ec24079a85cd.png",
	"blogContent":"本博文主要讲述了spring-data-jpa的扩展部分",
	"createTime":"2020-05-31 11:42:00",
	"transitSimple": "test4"
},{
	"id":5,
	"createUserId":2,
	"title":"Spring从入门到精通(一)",
	"image":"https://pic.ibaotu.com/game/title/20200518/5ec24079a85cd.png",
	"blogContent":"Spring官网阅读(一)容器及实例化",
	"createTime":"2020-05-31 11:42:00",
	"transitSimple": "test5"
},{
	"id":6,
	"createUserId":2,
	"title":"Spring从入门到精通(二)",
	"image":"https://pic.ibaotu.com/game/title/20200518/5ec24079a85cd.png",
	"blogContent":"Spring官网阅读(二)依赖注入及方法注入",
	"createTime":"2020-05-31 11:43:00",
	"transitSimple": "test6"
}]
//请求响应数据
{
    "status": 200,
    "message": "ok",
    "data": [
        {
            "title": "spring-data-jpa从入到精通(二)",
            "createUserId": 1,
            "blogContent": "本博文对spring-data-jpa框架中的常用注解及其用法进行了实战讲述",
            "image": "https://pic.ibaotu.com/game/title/20200518/5ec240798e78c.png",
            "createTime": "2020-05-31 11:41:00",
            "transitSimple": null,
            "id": 2
        },
        {
            "title": "spring-data-jpa从入到精通(三)",
            "createUserId": 1,
            "blogContent": "本博文主要讲述了在spring-boot项目中使用spring-data-jpa进行联表查询及复杂的动态查询的用法",
            "image": "https://pic.ibaotu.com/game/title/20200518/5ec240798e78c.png",
            "createTime": "2020-05-31 11:41:00",
            "transitSimple": null,
            "id": 3
        },
        {
            "title": "spring-data-jpa从入到精通(四)",
            "createUserId": 1,
            "blogContent": "本博文主要讲述了spring-data-jpa的扩展部分",
            "image": "https://pic.ibaotu.com/game/title/20200518/5ec24079a85cd.png",
            "createTime": "2020-05-31 11:42:00",
            "transitSimple": null,
            "id": 4
        },
        {
            "title": "Spring从入门到精通(一)",
            "createUserId": 2,
            "blogContent": "Spring官网阅读(一)容器及实例化",
            "image": "https://pic.ibaotu.com/game/title/20200518/5ec24079a85cd.png",
            "createTime": "2020-05-31 11:42:00",
            "transitSimple": null,
            "id": 5
        },
        {
            "title": "Spring从入门到精通(二)",
            "createUserId": 2,
            "blogContent": "Spring官网阅读(二)依赖注入及方法注入",
            "image": "https://pic.ibaotu.com/game/title/20200518/5ec24079a85cd.png",
            "createTime": "2020-05-31 11:43:00",
            "transitSimple": null,
            "id": 6
        }
    ]
(3) 使用联合主键查询单条记录
//请求方法与URL
GET http://localhost:8088/apiBoot/userBlog/findOne?createUserId=2&title=Spring从入门到精通
//请求响应数据
{
    "status": 200,
    "message": "ok",
    "data": {
        "title": "Spring从入门到精通(一)",
        "createUserId": 2,
        "blogContent": "Spring官网阅读(一)容器及实例化",
        "image": "https://pic.ibaotu.com/game/title/20200518/5ec24079a85cd.png",
        "createTime": "2020-05-31 11:42:00",
        "transitSimple": null,
        "id": 5
    }
}
3.5 @GeneratedValue
@GeneratedValue为主键生成策略,例如:
public @interface GeneratedValue {
   //ID生成策略
    GenerationType strategy() default GenerationType.AUTO;
   //通过Sequences生成ID,常见的是Oracle数据库ID的生成规则,需要配合@SequenceGenerator使用
    String generator() default "";
}
GenerationType一共有以下4个值:
public enum GenerationType {
    //通过表产生主键,框架有表模拟序列产生主键,使用该策略可以使应用更易于数据库移植
    TABLE,
    //通过序列产生主键,通过@SequenceGenerator指定序列名,Mysql不支持这种方式
    SEQUENCE,
    //采用数据库自增长,一般用于Mysql数据库
    IDENTITY,
    //JPA自动选择合适的策略,是默认
    AUTO;
}
3.6 @Basic
@Basic表示属性是到数据库表的字段的映射。如果实体的字段上 没有任何注解,默认即为@Basic。
public @interface Basic {
    //可选,EAGER(默认)为立即加载,LAZY为延迟加载(LAZY主要应用在大字段上面)
    FetchType fetch() default FetchType.EAGER;
    //可选,设置这个字段是否可以为空,默认为true
    boolean optional() default true;
}
3.7 @Transient
@Transient表示该属性并非一个到数据库表的字段的映射,表示 非持久化属性;
与@Basic作用相反。JPA映射数据库的时候忽略它。
3.8 @Column
@Column定义该属性对应数据库中的列名
public @interface Column {
    //数据库表的列名,可选;如果不填写,默认为字段名和实体类中的属性名相同
    String name() default "";
    //是否唯一,默认为false(可选)
    boolean unique() default false;
    //数据字段是否允许为null,可选,默认为true
    boolean nullable() default true;
    //执行insert操作时是否包含此字段,默认为true,可选
    boolean insertable() default true;
    //执行update操作时是否包含此字段,默认true,可选
    boolean updatable() default true;
    //表示该字段在数据库中的实际类型
    String columnDefinition() default "";
    //列对应的表名
    String table() default "";
    //字段允许的字符长度,默认为255
    int length() default 255;
    //精度
    int precision() default 0;
	//小数点位数
    int scale() default 0;
3.9 @Temporal
@Temporal用来设置Date类型的属性映射到对应精度的字段。
(1)@Temporal(TemporalType.DATE)映射为日期∥date(只有 日期)
(2)@Temporal(TemporalType.TIME)映射为日期∥time(只有 时间)
(3)@Temporal(TemporalType.TIMESTAMP)映射为日期∥date time(日期+时间)
3.10 @Enumerated
@Enumerated很好用,直接映射enum枚举类型的字段。
(1) 看源码:
public @interface Enumerated {
    //枚举映射的类型,默认是ORDINAL(枚举字段的下标)
    EnumType value() default EnumType.ORDINAL;
}

public enum EnumType {
    //映射枚举字段的下标
    ORDINAL,
    //映射枚举的Name
    STRING;
}
(2) 用法:
public enum Gender {
    MAIL("男性"),
    FEMALE("女性")
    ;
    private String value;

    Gender(String value) {
        this.value = value;
    }
}

@Entity
@Table(name="tb_user")
public class User implements Serializable{
    @Enumerated(EnumType.STRING)
    @Column(name="user_gender")
    private Gender gender;
    //....省略其他
}
这时插入两条数据,数据库里面的值是MAIL/FMAIL,而不是“男 性”/“女性”。如果我们用@Enumerated(EnumType.ORDINAL),那么 这时数据库里面的值是0,1。但是实际工作中,不建议用数字下标,
因为枚举里面的属性值是会不断新增的,如果新增一个,位置变化了 就惨了。
3.11 @Lob
@Lob 将属性映射成数据库支持的大对象类型,支持以下两种数 据库类型的字段。
(1)Clob(Character Large Ojects)类型是长字符串类型, java.sql.Clob、Character[]、char[]和String将被映射为Clob类 型
(2)Blob(Binary Large Objects)类型是字节类型, java.sql.Blob、Byte[]、byte[]和实现了Serializable接口的类型 将被映射为Blob类型。
(3)Clob、Blob占用内存空间较大,一般配合 @Basic(fetch=FetchType.LAZY)将其设置为延迟加载。
小结
本文主要结合源码和测试用例系统地讲解了spring-data-jpa中@Query注解及javax.persistence包下的基本注解及其用法和需要注意的坑,限于文章篇幅,关于联表查询的注解及其使用和JpoRepository扩展详解及高级查询用法将放在下一遍文章中完成。
推荐阅读
SpringBoot之路(二)使用用Spring-Data-JPA访问数据库进行基本的CRUD操作
参考文档
张振华著《Spring Data Jpa从入门到精通》第4章和第5章部分
需要源码的读者在公众号中发送消息“bootApi项目源码”即可获取该项目源码地址
