Spring Security OAuth2 - 自定义 OAuth2.0 令牌发放接口地址
登录实现
拿浏览器网页登录举例:
基于 OAuth2.0-密码模式 实现网页登录的本质就是浏览器通过 /oauth/token 接口将 用户名 和 密码 等信息传给后台, 然后后台验证通过后返回一个有效的 token 给浏览器.
通过 curl 命令发送请求
-
请求头
Authorization存放的是clientId和secret经过Base64编码后的结果 -
请求参数包括用户名(
username)、密码(password)、授权模式(grant_type).
curl --location --request
POST 'http://localhost:8101/oauth/token?username=zhangsan&password=123456&grant_type=password \
--header 'Authorization: Basic bmltbzE6MTIzNDU2'
响应内容
{
  "scope": "[all, read, write]",
  "code": 0,
  "access_token": "7e1d19dd-5cef-4993-a1c3-c35aa53d9b29",
  "token_type": "bearer",
  "refresh_token": "992518eb-4357-4283-8673-a9ca96ad2a9e",
  "expires_in": 7199
}
问题
如果我们想把登录接口命名为 /login, 该怎么办?
方法一
在 AuthorizationServerConfigurerAdapter 配置一个 pathMapping, 把原有的路径给 覆盖 掉.
@EnableAuthorizationServer
public class AuthorizationServerConfig extends AuthorizationServerConfigurerAdapter {
	@Override
	public void configure(AuthorizationServerEndpointsConfigurer endpoints) {
		endpoints
				.allowedTokenEndpointRequestMethods(HttpMethod.GET, HttpMethod.POST)
				.pathMapping("/oauth/token","/login");	}
}
方法二
根据上文 源码分析 - Spring Security OAuth2 生成 token 的执行流程 讲的 API , 实现 TokenEndpoint#postAccessToken()方法 的核心逻辑, 重新定义一个 /login 接口.
回顾上文中的一张图:
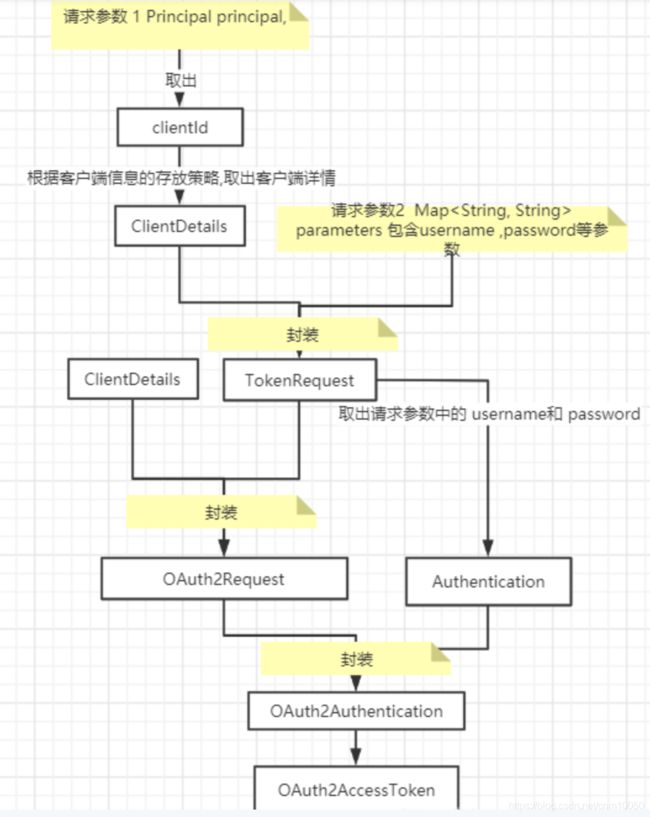
核心代码如下:
@PostMapping(value = "/login")
@ResponseBody
public String doLogin(
            HttpServletRequest request,
            String username,
            String password) {

    // 自定义响应对象
    LoginRes res = new LoginRes();

    try {
       // 对请求头进行 base64 解码, 获取 client id 和 client secret
       String[] tokens = CryptUtils.decodeBasicHeader(request.getHeader("Authorization"));
       String clientId = tokens[0];
       String clientSecret = tokens[1];

       // 通过 clientId 获取客户端详情
       ClientDetails clientDetails = clientDetailsService.loadClientByClientId(clientId);

       // 校验 ClientDetails
       if (clientDetails == null) {
          throw new UnapprovedClientAuthenticationException("Unknown client id : " + clientId);
       }

       if (!passwordEncoder.matches(clientSecret, clientDetails.getClientSecret())) {
          throw new UnapprovedClientAuthenticationException("Invalid client secret for client id : " + clientId);
       }

       // 通过 username 和 password 构建一个 Authentication 对象
       UsernamePasswordAuthenticationToken authRequest = new UsernamePasswordAuthenticationToken(req.getUsername(),
                    req.getPassword());

        // 验证用户信息
        Authentication auth = authenticationManager.authenticate(authRequest);
        // 放入 Secirty 的上下文
       SecurityContextHolder.getContext().setAuthentication(auth);

       // 通过 Client 信息和 请求参数, 获取一个 TokenRequest 对象
      TokenRequest tokenRequest = new TokenRequest(new HashMap(), clientId,
                    clientDetails.getScope(), "password");

      // 通过 TokenRequest 和 ClientDetails 构建 OAuthRequest
      OAuth2Request oAuth2Request = tokenRequest.createOAuth2Request(clientDetails);

      // 通过 OAuth2Request 和 Authentication 构建OAuth2Authentication
      OAuth2Authentication oAuth2Authentication = new OAuth2Authentication(oAuth2Request, auth);

      // 通过 OAuth2Authentication 构建 OAuth2AccessToken
      OAuth2AccessToken token = authorizationServerTokenServices.createAccessToken(oAuth2Authentication);

      // 把 token 信息封装到 自定义的响应对象中
       res.setAccessToken(token.getValue());
       res.setTokenType(token.getTokenType());
       res.setRefreshToken(token.getRefreshToken().getValue());
      res.setExpiresIn(token.getExpiresIn());
      res.setScope(token.getScope().toString());

  } catch (Exception e) {
      log.warn("Fail to login of user {} for {}", req.getUsername(), e.getMessage());
        }
   return JsonUtil.toJsonString(res);
 }