SpringBoot整合SwaggerUI实现在线API调试文档
目录
一、框架介绍
SwaggerUI
常用注解
为什么要使用SwaggerUI
二、项目整合
添加项目依赖
新增SwaggerConfig.java配置类
添加注解
启动项目,查看结果
小结
上一篇文章我们学习了SpringBoot整合MyBatis-Plus,快速搭建了开发骨架。在最后测试接口的时候我们使用到了postman工具,虽然这个工具在使用起来非常方便,但还是不够!尤其是在前后端分离盛行的今天,前后端开发人员在协作开发时,如果能有一个规范的标准的API文档,就能够大大减少沟通成本,进行高效的协作开发。
下面我们就开始学习今天的主角:SwaggerUI
一、框架介绍
SwaggerUI
- Swagger UI是一款RESTFUL接口的文档在线自动生成+功能测试功能软件。
常用注解
- @Api:用于修饰Controller类,生成Controller相关文档信息
- @ApiOperation:用于修饰Controller类中的方法,生成接口方法相关文档信息
- @ApiParam:用于修饰接口中的参数,生成接口参数相关文档信息
- @ApiModelProperty:用于修饰实体类的属性,当实体类是请求参数或返回结果时,直接生成相关文档信息
为什么要使用SwaggerUI
现在多数的项目开发中,网站和移动端都需要进行数据交互和对接,这少不了使用REST编写API接口这种场景。 特别是不同开发小组协作时,就更需要以规范和文档作为标准和协作基础。良好的文档可以减少沟通成本,达到事半功倍的效果。
有时对一些API说明的理解比较模糊,总想着能直接验证一下自己的理解就好了,而不是需要去项目写测试代码来验证自己的想法。 即API文档应具备直接执行能力,这种能力类似word,wiki等是无法提供。 SwaggerUI就是这样一种利器,基于html+javascript实现,倾向于在线文档和测试,使用和集成十分简单,能容易地生成不同模块下的API列表, 每个API接口描述和参数、请求方法都能定制并直接测试得到直观的响应数据。
体验SwaggerUI最好的方法就是看下官网提供的demo,看过之后相信你一定会兴奋不已。
官方体验地址:http://petstore.swagger.io/
二、项目整合
这里我们在上一篇文章SpringBoot整合MyBatis-Plus+Druid快速构建项目骨架的基础上进行整合
添加项目依赖
在pom.xml文件中添加SwaggerUI依赖
    io.springfox
    springfox-swagger2
    2.9.2


    io.springfox
    springfox-swagger-ui
    2.9.2
新增SwaggerConfig.java配置类
@Configuration
@EnableSwagger2
public class SwaggerConfig {

    @Bean
    public Docket createRestApi(){
        return new Docket(DocumentationType.SWAGGER_2)
                //页面展示信息设置
                .apiInfo(apiInfo())
                .select()
                //为当前包下controller生成API文档
                .apis(RequestHandlerSelectors.basePackage("com.ssymon.study.springbootstudy"))
                .paths(PathSelectors.any())
                .build();
    }

    private ApiInfo apiInfo() {
        return new ApiInfoBuilder()
                .title("Swagger在线文档")
                .description("SpringBootStudy API")
                //联系人:名字 网址 邮箱
                .contact(new Contact("SpringBootStudy","localhost:8080","[email protected]"))
                //版本号
                .version("1.0")
                .build();
    }
}
添加注解
在Student实体类中添加注解:@ApiModel , @ApiModelProperty
注意:这是里为了方便学习直接在实体类中添加对象注解,实际开发中尽量不了要使用entity作为传输对象
@Data
@EqualsAndHashCode(callSuper = false)
@Accessors(chain = true)
@TableName("STUDENT")
@ApiModel(value="Student对象", description="")
public class Student implements Serializable {

    private static final long serialVersionUID=1L;

    @ApiModelProperty(value = "主键ID")
    @TableId(value = "ID", type = IdType.AUTO)
    private Long id;

    @ApiModelProperty(value = "姓名")
    @TableField("NAME")
    private String name;

    @ApiModelProperty(value = "年龄")
    @TableField("AGE")
    private Integer age;

    @ApiModelProperty(value = "性别:1-男,0-女")
    @TableField("GENDER")
    private Integer gender;
}
在StudentController控制类中添加注解:@Api , @ApiOperation,另外在写几个简单的接口用来测试
@ApiOperation中几个参数的含义
value:该接口的显示名称
httpMethod:该接口的http请求类型
response:该接口的返回类型
@RestController
@RequestMapping("/student")
@Api(value = "Student", tags = {"Student"})
public class StudentController {

    @Autowired
    private StudentService studentService;

    @GetMapping("/listAll")
    @ApiOperation(value = "查询所有学生", httpMethod = "GET", response = List.class)
    public List list() {
        return studentService.list();
    }

    @PostMapping("/add")
    @ApiOperation(value = "新增学生", httpMethod = "POST", response = String.class)
    public String addStudent(@RequestBody Student student) {
        studentService.save(student);
        return "新增成功";
    }

    @DeleteMapping("/delete/{id}")
    @ApiOperation(value = "根据ID删除学生", httpMethod = "DETETE", response = String.class)
    public String deleteStudent(@PathVariable @ApiParam("学生ID") Long id) {
        studentService.removeById(id);
        return "删除成功";
    }

    @PutMapping("/edit")
    @ApiOperation(value = "编辑学生", httpMethod = "PUT", response = String.class)
    public String updateStudent(@RequestBody Student student) {
        studentService.updateById(student);
        return "编辑成功";
    }

    @GetMapping("/select/{id}")
    @ApiOperation(value = "根据ID查询学生", httpMethod = "GET", response = Student.class)
    public Student getStudent(@PathVariable @ApiParam("学生ID") Long id) {
        return studentService.getById(id);
    }
}
启动项目,查看结果
访问地址:http://localhost:8080/sb-study/swagger-ui.html,
sb-study是我设置的项目路径,没设置的话可以访问:http://localhost:8080/swagger-ui.html
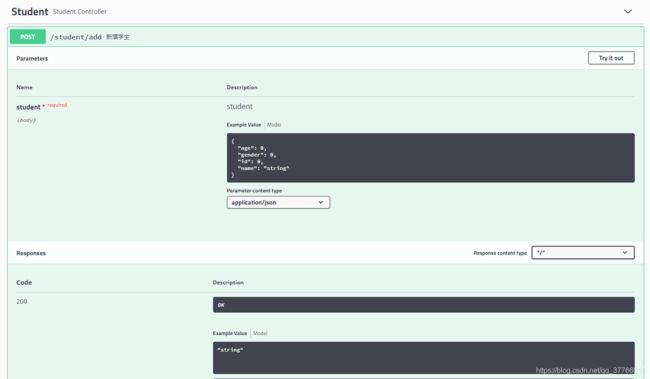
我们点击新增学生来接口测试一下,点击之后展开如下图
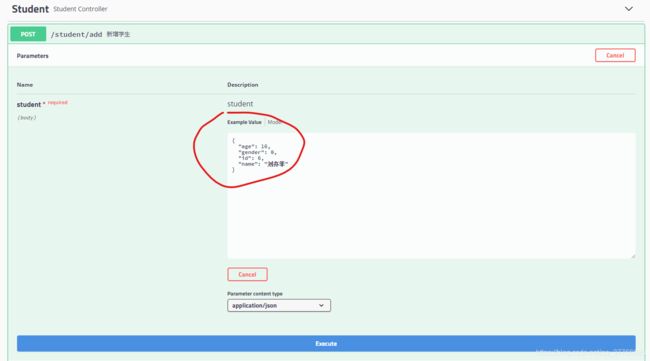
然后点击右上角 Try it out,输入参数,点击Execute
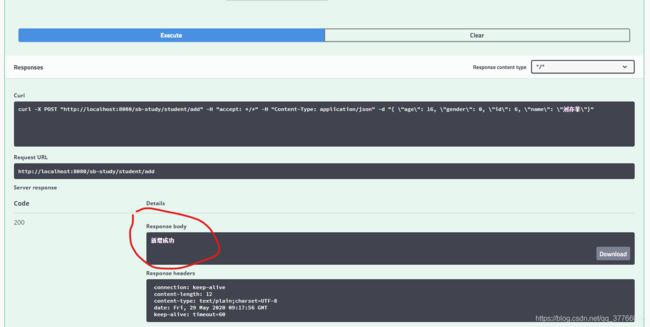
然后就可以在下面看到接口返回结果
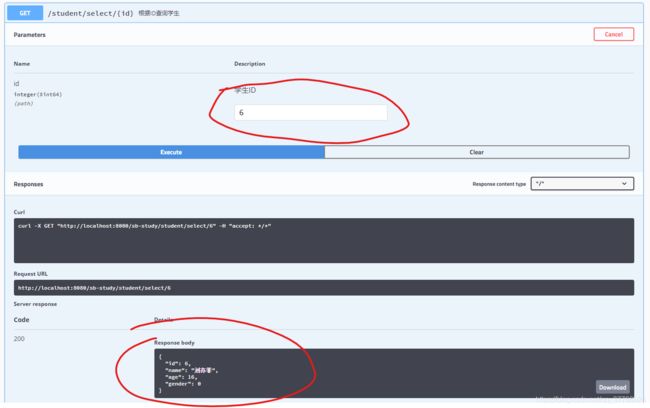
之后我们点击根据ID查询学生接口,输入新增的ID,执行之后就可以看到返回信息
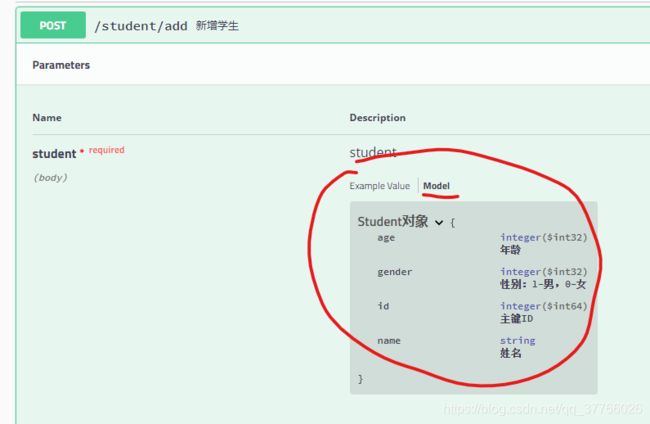
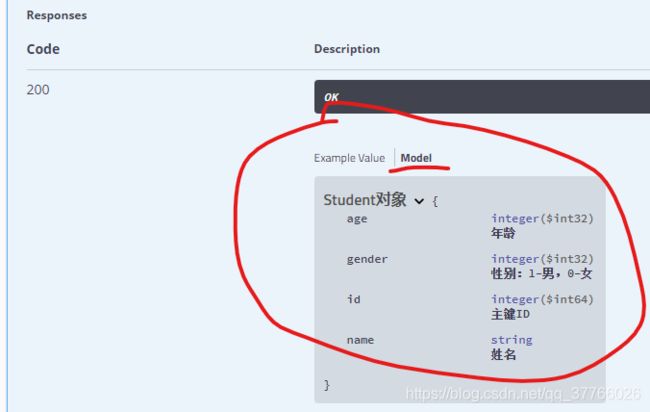
我们在测试接口是可以清晰的看到请求参数和返回参数中字段对应的解释
接口方法入参:@RequestBody Student student 对应请求参数如下图,前提是Student参数对象中添加了swagger注解
@ApiOperation注解的response参数:response = Student.class,对应返回参数如下图,前提是Student参数对象中添加了swagger注解
小结
通过以上简单的几步,就能成功整合SwaggerUI。自己测试再也不用使用postman来测试接口了,项目经理再也不会来逼我写接口文档了,前端小伙伴再也不会来问我那个字段是啥意思了。
API Developmentfor Everyone
SwaggerUI官网:https://swagger.io/

