ensp综合组网实验
一、实验背景
本实验以某大学校区信息平台2号楼实验楼网络工程项目的应用需求为背景,规划一个6层楼,约30个机房1600多台计算机的实验教学网络。
二、概述
利用网络设计规划、地址分配、VLAN划分、路由协议、网络管理、组播协议、地址转换、访问控制等技术,实现网络设计。
三、实验设计
- Vlan划分及配置
- DHCP协议配置
- STP协议配置
- 路由备份
- VRRP协议配置
- OSPF协议配置
- PPP认证
- 组播协议配置
- 远程登录控制
- SNMP协议配置
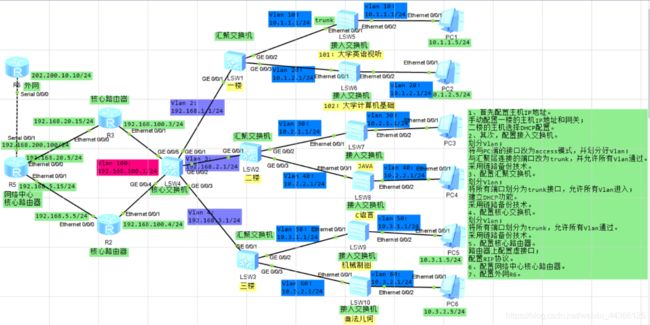
四、实验拓扑
五、具体配置
1、首先配置一楼(三楼与其配置类似,不再赘述);
LSW5的配置如下:
sys
Enter system view, return user view with Ctrl+Z.
[Huawei]undo info enable
Info: Information center is disabled.
[Huawei]sysname S5
[S5]vlan 30
[S5-vlan30]vlan 10
[S5-vlan10]int e0/0/2
[S5-Ethernet0/0/2]port link-type access
[S5-Ethernet0/0/2]port default vlan 10
[S5-Ethernet0/0/2]q
[S5]int e0/0/1
[S5-Ethernet0/0/1]port link-type trunk
[S5-Ethernet0/0/1]port trunk allow-pass vlan all
[S5-Ethernet0/0/1]q
[S5]q
LSW1的配置如下:
sys
Enter system view, return user view with Ctrl+Z.
[Huawei]undo info enable
Info: Information center is disabled.
[Huawei]sysname S1
[S1]vlan batch 2 10 20
[S1]int vlan 2
[S1-Vlanif2]ip add 192.168.1.1 24
[S1-Vlanif2]q
[S1]int g0/0/1
[S1-GigabitEthernet0/0/1]port link-type trunk
[S1-GigabitEthernet0/0/1]port trunk allow-pass vlan all
[S1-GigabitEthernet0/0/1]q
[S1]int vlan 10
[S1-Vlanif10]ip add 10.1.1.1 24
[S1-Vlanif10]q
[S1]int g0/0/2
[S1-GigabitEthernet0/0/2]port link-type trunk
[S1-GigabitEthernet0/0/2]port trunk allow-pass vlan all
[S1-GigabitEthernet0/0/2]q
[S1]int vlan 20
[S1-Vlanif20]ip add 10.1.2.1 24
[S1-Vlanif20]q
[S1]int g0/0/3
[S1-GigabitEthernet0/0/3]port link-type trunk
[S1-GigabitEthernet0/0/3]port trunk allow-pass vlan all
[S1-GigabitEthernet0/0/3]q
[S1]q
2、配置二楼;
LSW7的配置如下:
sys
Enter system view, return user view with Ctrl+Z.
[Huawei]undo info enable
Info: Information center is disabled.
[Huawei]sysname S7
[S7]vlan 30
[S7-vlan30]int vlan 30
[S7-Vlanif30]ip add 10.2.1.1 24
[S7-Vlanif30]q
[S7]int e0/0/2
[S7-Ethernet0/0/2]port link-type access
[S7-Ethernet0/0/2]q
[S7]int e0/0/1
[S7-Ethernet0/0/1]port link-type trunk
[S7-Ethernet0/0/1]port trunk allow-pass vlan all
[S7-Ethernet0/0/1]q
[S7]q
sys
Enter system view, return user view with Ctrl+Z.
[S7]int e0/0/2
[S7-Ethernet0/0/2]port default vlan 30
[S7-Ethernet0/0/2]q
[S7]q
save
LSW2的配置如下:
sys
Enter system view, return user view with Ctrl+Z.
[Huawei]undo info enable
Info: Information center is disabled.
[Huawei]sysname S2
[S2]vlan batch 3 30 40
Info: This operation may take a few seconds. Please wait for a moment...done.
[S2]int vlan 3
[S2-Vlanif3]ip add 192.168.2.1 24
[S2-Vlanif3]q
[S2]int g0/0/1
[S2-GigabitEthernet0/0/1]port link-type trunk
[S2-GigabitEthernet0/0/1]port trunk allow-pass vlan all
[S2-GigabitEthernet0/0/1]q
[S2]int vlan 30
[S2-Vlanif30]ip add 10.2.1.1 24
[S2-Vlanif30]q
[S2]int vlan 40
[S2-Vlanif40]ip add 10.2.2.1 24
[S2-Vlanif40]q
[S2]int g0/0/2
[S2-GigabitEthernet0/0/2]port link-type trunk
[S2-GigabitEthernet0/0/2]port trunk allow-pass vlan all
[S2-GigabitEthernet0/0/2]q
[S2]int g0/0/3
[S2-GigabitEthernet0/0/3]port link-type trunk
[S2-GigabitEthernet0/0/3]port trunk allow-pass vlan all
[S2-GigabitEthernet0/0/3]q
[S2]dhcp enable
Info: The operation may take a few seconds. Please wait for a moment.done.
[S2]int vlan 30
[S2-Vlanif30]dhcp select int
[S2-Vlanif30]dhcp server dns-list 10.2.1.1
[S2-Vlanif30]dhcp server lease day 4
[S2-Vlanif30]q
[S2]int vlan 40
[S2-Vlanif40]dhcp select int
[S2-Vlanif40]dhcp server dns-list 10.2.2.1
[S2-Vlanif40]dhcp server lease day 4
[S2-Vlanif40]q
[S2]q
save
其中包含了DHCP的配置。使用命令ipconfig查看PC3和PC4已被分配到IP地址。
3、先为路由器配置虚接口
以R2为例(其它类似,不再赘述):
sys
Enter system view, return user view with Ctrl+Z.
[Huawei]undo info enable
Info: Information center is disabled.
[Huawei]sysname R2
[R2]int loop1
[R2-LoopBack1]ip add 192.168.50.1 24
[R2-LoopBack1]q
[R2]int e0/0/1
[R2-Ethernet0/0/1]ip add 192.168.20.15 24
[R2-Ethernet0/0/1]q
[R2]int e0/0/0
[R2-Ethernet0/0/0]ip add 192.168.100.3 24
[R2-Ethernet0/0/0]q
[R2]q
save
4、配置静态路由
静态路由:
ip route-static 目的地址 子网掩码 下一跳地址
5、链路聚合的配置方法
因为本实验汇聚交换机与核心交换机之间只有一条链路,大家可增添两条链路,配置链路聚合.
以LSW1为例,配置链路聚合:
LACP模式下,需手工创建Eth-Trunk,手工加入Eth-Trunk成员接口。
sys
Enter system view, return user view with Ctrl+Z.
[S1]int eth-trunk 1
[S1-Eth-Trunk1]mode lacp-static
[S1-Eth-Trunk1]int g0/0/2
[S1-GigabitEthernet0/0/2]eth-trunk 1
Info: This operation may take a few seconds. Please wait for a moment...done.
[S1-GigabitEthernet0/0/2]int g0/0/3
[S1-GigabitEthernet0/0/3]eth-trunk 1
Info: This operation may take a few seconds. Please wait for a moment...done.
[S1-GigabitEthernet0/0/3]int g0/0/4
[S1-GigabitEthernet0/0/4]eth-trunk 1
Info: This operation may take a few seconds. Please wait for a moment...done.
[S1-GigabitEthernet0/0/4]q
[S1]int eth-trunk 1
[S1-Eth-Trunk1]max active-linknumber 2
[S1-Eth-Trunk1]int g0/0/2
[S1-GigabitEthernet0/0/2]lacp priority 100
[S1-GigabitEthernet0/0/2]int g0/0/3
[S1-GigabitEthernet0/0/3]lacp priority 100
[S1-GigabitEthernet0/0/3]q
6、配置OSPF协议
将R1、R2、R3和LSW4围成的区域设为骨干区域并配置OSPF协议。
以R3为例:
sys
Enter system view, return user view with Ctrl+Z.
[R3]ospf 1
[R3-ospf-1]ospf router 3.3.3.3
Info: The configuration succeeded. You need to restart the OSPF process to validate the new router ID.
[R3-ospf-1]area 0
[R3-ospf-1-area-0.0.0.0]network 192.168.5.0 0.0.0.255
[R3-ospf-1-area-0.0.0.0]network 192.168.100.0 0.0.0.255
[R3-ospf-1-area-0.0.0.0]network 192.168.30.0 0.0.0.255
[R3-ospf-1-area-0.0.0.0]q
[R3-ospf-1]q
[R3]q
save
7、 配置NAT转换;
NAT配置分为三个关键步骤:1.配置地址池:指出可使用的公网地址范围;2.配置访问控制列表:标识允许访问外网的的内部网络地址;3.在路由器的出接口上绑定访问控制列表和地址池。
配置地址池的命令是:nat address-group n 公网起始地址 公网结束地址。
配置访问控制列表ACL的命令是:1.acl number ACL编号(进入ACL视图),基本编号是从2000到2999。2.rule 规则编号 deny/permit(禁止/允许) source(指出禁止或允许的数据包源地址) 子网掩码(掩码按位取反)。注意,在规则列表中排在前面的先起作用,所以最后一条规则一般都是deny any。
配置路由器出接口上的nat绑定的命令是:nat outbound ACL编号 address-group 地址池编号。
最后,要在出口路由器上配置一条到外网的默认路由。
在R5上配置:
sys
Enter system view, return user view with Ctrl+Z.
[R5]nat address-group 1 200.202.10.1 200.202.10.100
[R5]acl 2000
[R5-acl-basic-2000]rule 5 permit source 10.0.0.0 0.255.255.255
[R5-acl-basic-2000]q
[R5]
[R5]int e0/0/0
[R5-Ethernet0/0/0]nat outbound 2000 address-group 1 no-pat
[R5-Ethernet0/0/0]q
[R5]q
save
8、ACL访问控制
此实验中,我们设定禁止102机房访问外网,其只能内部通信。
在LSW1上配置:
sys
Enter system view, return user view with Ctrl+Z.
[S1]acl 2000
[S1-acl-basic-2000]rule deny source 10.1.2.0 0.0.0.255
[S1-acl-basic-2000]q
[S1]int eth-trunk 1
[S1-Eth-Trunk1]traffic-filter outbound acl 2000
[S1-Eth-Trunk1]q
[S1]q
save
9、配置STP协议(链路备份);
以LSW1配置为例(将核心交换机配置为根桥,汇聚交换机配置为备份根桥):
sys
Enter system view, return user view with Ctrl+Z.
[S1]stp mode rstp
Info: This operation may take a few seconds. Please wait for a moment...done.
[S1]stp root secondary
[S1]stp enable
[S1]int eth-trunk 1
[S1-Eth-Trunk1]stp loop-protection   //开启环路保护功能
[S1-Eth-Trunk1]q
配置LSW4(核心交换机为根桥):
sys
Enter system view, return user view with Ctrl+Z.
[S4]stp mode rstp  //运行rstp
Info: This operation may take a few seconds. Please wait for a moment...done.
[S4]stp root primary  //指定LSW4为根桥
[S4]stp enable   //使能stp
[S4]int eth-trunk 1
[S4-Eth-Trunk1]stp root-protection  //开启根保护功能
[S4-Eth-Trunk1]q
[S4]q
10、VRRP配置(设备备份)
R3的配置如下:
sys
Enter system view, return user view with Ctrl+Z.
[R3]int e0/0/1
[R3-Ethernet0/0/1]vrrp vrid 1 virtual-ip 192.168.100.254
[R3-Ethernet0/0/1]vrrp vrid 1 priority 150
[R3-Ethernet0/0/1]q
[R3]q
save
R2的配置如下:
sys
Enter system view, return user view with Ctrl+Z.
[R2]int e0/0/0
[R2-Ethernet0/0/0]vrrp vrid 2 virtual-ip 192.168.100.254
[R2-Ethernet0/0/0]vrrp vrid 2 priority 200
[R2-Ethernet0/0/0]q
[R2]q
save
路由器主备关系,R2为主路由器,R3为备份路由器。
11、配置PPP认证
配置R5和R6之间PPP的CHAP认证,R5为认证方,R6为被认证方,认证用户名为chaiying,密码为hhhxyy@222。
R5配置如下:
sys
Enter system view, return user view with Ctrl+Z.
[R5]aaa
[R5-aaa]local-use chaiying password cipher hhhxyy@222
Info: Add a new user.
[R5-aaa]local-user chaiying service-type ppp
[R5-aaa]int s0/0/1
[R5-Serial0/0/1]link-protocol ppp
[R5-Serial0/0/1]ppp authentication-mode chap
[R5-Serial0/0/1]q
[R5]q
save
R6配置如下:
sys
Enter system view, return user view with Ctrl+Z.
[R6]int s0/0/0
[R6-Serial0/0/0]link-protocol ppp
[R6-Serial0/0/0]ppp chap user chaiying
[R6-Serial0/0/0]ppp chap password cipher hhhxyy@222
[R6-Serial0/0/0]q
[R6]q
save
12、远程设备登录控制
R5的配置如下:
sys
Enter system view, return user view with Ctrl+Z.
[R5]user-interface console 0
[R5-ui-console0]authentication-mode aaa
[R5-ui-console0]user privileg level 15
[R5-ui-console0]q
[R5]aaa
[R5-aaa]local-user admin1234 password cipher hhhxyy@222
Info: Add a new user.
[R5-aaa]local-user admin1234 privilege level 3
[R5-aaa]local-user admin1234 service-type terminal
[R5-aaa]q
[R5]q
save
13、配置路由备份
在LSW4上配置默认路由并为其设置优先级:
sys
Enter system view, return user view with Ctrl+Z.
[S4]ip route-static 0.0.0.0 0.0.0.0 192.168.100.3 preference 30
Info: Succeeded in modifying route.
[S4]ip route-static 0.0.0.0 0.0.0.0 192.168.100.4 preference 40
Info: Succeeded in modifying route.
[S4]q
save
14、组播协议配置
以LSW4为例:
sys
Enter system view, return user view with Ctrl+Z.
[S4]multicast routing-enable
[S4]int vlan 2
[S4-Vlanif2]pim dm
[S4-Vlanif2]q
[S4]int vlan 3
[S4-Vlanif3]pim dm
[S4-Vlanif3]q
[S4]int vlan 4
[S4-Vlanif4]pim dm
[S4-Vlanif4]q
15、SNMP协议配置
以R3为例配置SNMP协议:
sys
[R3]snmp-agent
[R3]snmp-agent community read public
[R3]snmp-agent community write private
[R3]snmp-agent sys-info version v1 v3
[R3]snmp-agent target-host trap address udp-domain 192.168.50.1 udp-port 161 params securityname public
[R3]q
六、实验总结
本次实验中,我学会了如何去做一个工程项目,同时还将之前做过的所有实验进行总结学习,这次实验有效地培养了我的综合素养,提升了我的综合能力,在今后的实验学习中,我会更加努力,不断探索,不断学习!
