ssh无密码登陆
经过过少次的困惑哦,终于明白了:
public key 要放到ssh server所在的机器的用户下的~/.ssh/authorized_keys中,且此文件的权限必须为700 。
private key 是ssh client访问的时候需要的ppk文件。
转自:
http://hostingrails.com/HowTo-SSH-SCP-without-a-password
http://technitip.net/putty-ssh-login-without-password-prompt
Linux/Unix 上 SSH
In the examples that follow please substitute 'servername' , 'ipaddress' and 'username' with the proper information for your setup. I have included a list of weblinks for the words in italic at the end of this document.
Step 1. Verify that you can connect normally (using a password) to the server you intend to setup keys for:
#### Examples ####
user@homebox ~ $ ssh username@'servername'
# Or:
user@homebox ~ $ ssh username@'ipaddress'
# If your username is the same on both the client ('homebox') and the server ('servername'):
user@homebox ~ $ ssh 'servername'
# Or:
user@homebox ~ $ ssh 'ipaddress'
# If this is your first time connecting to 'servername' (or 'ipaddress'), upon establishing a connection with the
# server you'll be asked if you want to add the servers fingerprint to the known_hosts file on your computer.
# Press 'enter' to add the fingerprint.
Step 2. Now that you're connected to the server and verified that you have everything you need for access (hopefully), disconnect by typing 'exit' .
#### Examples ####
user@servername ~ $ exit
# You should be back at:
user@homebox ~ $
Step 3. The next step is to copy a unique key generated on your 'homebox' to the server you are connecting too. First, before you generate a new key, check to see if you already have a key:
#### Example ####
user@homebox ~ $ ls -l ~/.ssh
total 20
-rwx--xr-x 1 user user 601 Feb 2 01:58 authorized_keys
-rwx--xr-x 1 user user 668 Jan 1 19:26 id_dsa
-rwx--xr-x 1 user user 599 Jan 1 19:26 id_dsa.pub
-rwx--xr-x 1 user user 6257 Feb 2 21:04 known_hosts
# The file we need to copy to the server is named id_dsa.pub. As you can see above, the file needed exists. You may or may not have other files in ~/.ssh as I do. If the key doesn't exist, however, you can make one as follows:
#### Example ####
user@homebox ~ $ ssh-keygen -t dsa
Generating public/private dsa key pair.
Enter file in which to save the key (/home/user/.ssh/id_dsa): # Press 'enter' here
Enter passphrase (empty for no passphrase): # Press 'enter' here
Enter same passphrase again: # Press 'enter' here
Your identification has been saved in /home/user/.ssh/id_dsa.
Your public key has been saved in /home/user/.ssh/id_dsa.pub.
The key fingerprint is:
6f:c3:cb:50:e6:e9:90:f0:0f:68:d2:10:56:eb:1d:91 user@host
# Entering a password when asked during the key generation processes when prompted would require you to enter a password each time you SSH/SCP to the server which defeats the purpose of this document.
Step 4. Regardless whether you had a key ready to go or if you had to generate a new key, the next step is the same in either case. Now you're ready to copy the key to the server. Do so like this:
#### Example ####
user@homebox ~ $ ssh-copy-id -i ~/.ssh/id_dsa.pub user@'servername' (or 'ipaddress')
# If you are asked weather or not you wish to continue, say yes.
Step 5. Now it's time to test the setup. To do that, try to ssh to the server:
#### Example ####
user@homebox ~ $ ssh 'servername' (or 'ipaddress')
# You should log in to the remote host without being asked for a password.
Step 6. You can now SSH or SCP to the remote host without having to enter a password at each connection. To make sure your public key stays secure from prying eyes, do the following to change permissions and restrict access on 'homebox' and also on 'servername' to ~/.ssh:
#### Example ####
user@homebox ~ $ chmod 600 ~/.ssh/id_dsa ~/.ssh/id_dsa.pub
# Verify the permissions on the files:
#### Example ####
user@homebox ~ $ ls -l ~/.ssh
-rw------- 1 user user 668 Feb 4 19:26 id_dsa
-rw------- 1 user user 599 Feb 4 19:26 id_dsa.pub
Mac 上 SSH
I've noticed that I don't have the command ssh-copy-id on my OS X machine (I didn't even know one existed!). To achieve the same effect I usually do the following:user@homebox ~ $ scp ~/.ssh/id_dsa.pub user@'servername':.ssh/authorized_keysThis is assuming you've already created a .ssh directory on your server 'servername' (just ssh in as normal and `mkdir .ssh`). This also assumes that you don't already have an `authorized_keys` file in the .ssh directory on your server. If you do just copy (scp) the id_dsa.pub file to a temporary file in your server's home directory and then
user@homebox~ $ scp .ssh/id_dsa.pub user@servername:homebox_dsa.pub
user@homebox ~ $ ssh user@servername
user@servername ~ $ cat homebox_dsa.pub >> .ssh/authorized_keys
user@servername ~ $ rm homebox_dsa.pub
Windows 上 SSH
Your desktop is running with Windows and you often need to connect remote servers using SSH then you will already know PuTTY. You will also know that it’s getting frustrating to enter the passoword every time. There is a simple way to login to remote machines using RSA/DAS keys.
What is needed?
First of all you will need to download the PuTTY.exe. And to generate the keys on your Windows desktop you’ll need to download PuTTYgen.exe as well.
Key Generation
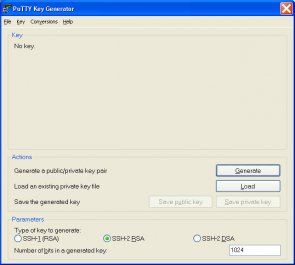
Start PuTTYgen.exe after download and press the Generate button. Now follow the instruction and move the mouse cursor over the desired area. I’ve used the default parameter [x] SSH-2 RSA with a key length of 1024 bits.
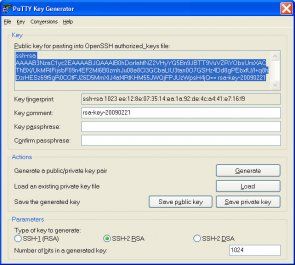
I leave the Key passphrase empty because I don’t want to enter any passwords during login.
To have the key later available for other servers use the “Save public key” and “Save private key” button. My private key is saved as haifisch.ppk and my public key as haifisch. By the way, haifisch is German and means shark.
Now mark the generated public key, copy it to the clip board and paste it into ~/.ssh/authorized_keys file on the remote server of the user you want to login as.
PuTTY Configuration
Keys have been generated and stored on the remote server, therefore PuTTYgen can be closed now and the PuTTY.exe is needed now.
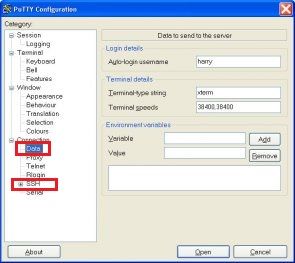
In PuTTY under the item “Session” enter the host name of the remote server and connection type SSH. Next choose “Connection/Data” and enter the remote user name. Also the previously defined private key is needed, it is given in “Connection/SSH/Auth” using the “Browse” button. In my case it’s haifisch.ppk.
When all settings are done go back to “Session”, enter a name for this session and press “Save”.
That’s it. Try it by double clicking on the saved session.
Login via Desktop Icon
If you want to have a desktop icon which opens putty and logs into a remote server generate a file e.g. www.myserver.com.bat with the content:
start C:\temp\putty\putty.exe -load "Session Name in PuTTY"
Now generate a link to this batch file on your desktop and login in by double clicking.
完!


