基于nginx的中间件架构--负载均衡
基于nginx的中间件架构
1、静态资源web服务
(1)静态资源类型:非服务器动态运行生成的文件。
浏览器端渲染—-html、css、js
图片
视频
文件。。。。。
(2)动态资源类型:通过服务端的解释器进行一些复杂的运算对数据进行一定的封装然后返回给用户。
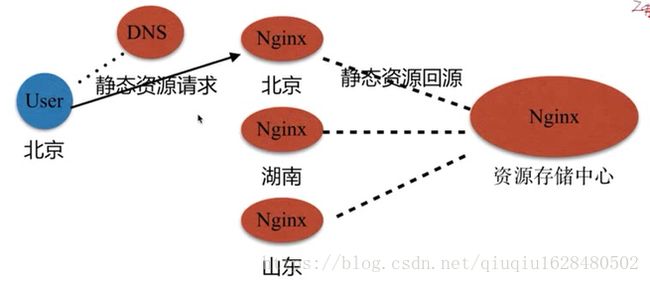
(3)静态资源服务场景—-CDN
CDN的全称是Content Delivery Network,即内容分发网络。其基本思路是尽可能避开互联网上有可能影响数据传输速度和稳定性的瓶颈和环节,使内容传输的更快、更稳定。通过在网络各处放置节点服务器所构成的在现有的互联网基础之上的一层智能虚拟网络,CDN系统能够实时地根据网络流量和各节点的连接、负载状况以及到用户的距离和响应时间等综合信息将用户的请求重新导向离用户最近的服务节点上。其目的是使用户可就近取得所需内容,解决 Internet网络拥挤的状况,提高用户访问网站的响应速度。
如图:

静态访问资源的配置
首先,添加静态访问资源sfz.png,添加在/opt/app/img(root下配置的路径)目录下面
配置配置文件:
    location ~ .*\.(gif|jpg|jpeg|png)$ {
      root    /opt/app/img;
    }
重启服务:
systemctl restart nginx.service然后在地址栏输入:
http://183.170.26.65/sfz.png可以看到,成功访问
 location ~ .*\.(gif|jpg|jpeg|png)$ {
      root    /opt/app/img;
     gzip on;
     gzip_min_length 1k;
     gzip_buffers 4 16k;
     #gzip_http_version 1.0;
     gzip_comp_level 2;
     gzip_types text/plain application/x-javascript text/css application/xml text/javascript application/x-httpd-php image/jpeg image/gif image/png;
     gzip_vary off;
     gzip_disable "MSIE [1-6]\.";
    }
重启服务:
systemctl restart nginx.service重新在地址栏中访问:
http://183.170.26.65/sfz.png开发者模式中我们可以看到比起之前访问的图片,这个图片的文件大小变小了,已经起到了压缩的作用。
小知识:
文件压缩:
gzip a.png可以发现文件a.png已经变成了a.png.gz
reload nginx:
nginx -s reload -c /etc/nginx/nginx.conf代理服务
分为正向代理与反向代理:
区别在于代理的对象不一样
正向代理代理的对象是客户端
反向代理代理的对象是服务端
负载均衡
配置负载均衡:
首先在/opt/app/下新建code1,code2,code3文件夹,里边分别写一个文件index.html(注意区分)
然后在我们的配置文件夹下(/etc/nginx/conf.d)新建三个配置文件,命名为:server1.conf,server2.conf,server3.conf
[root@yanjie conf.d]# ll
总用量 16
-rw-r--r--. 1 root root 1089 6月  11 16:52 server1.conf
-rw-r--r--. 1 root root 1088 6月  11 16:49 server2.conf
-rw-r--r--. 1 root root 1088 6月  11 16:53 server3.conf
-rw-r--r--. 1 root root 2082 6月  11 17:46 upstream_test.conf
分别配置我们的配置文件:
server1.conf:
server {
    listen       8001; #与server2.conf 以及 server3.conf不同的地方
    server_name  localhost;

    #charset koi8-r;
    #access_log  /var/log/nginx/host.access.log  main;

    location / {
        root    /opt/app/code1;#与server2.conf 以及 server3.conf不同的地方
        index  index.html index.htm;
    }

    #error_page  404              /404.html;

    # redirect server error pages to the static page /50x.html
    #
    error_page   500 502 503 504  /50x.html;
    location = /50x.html {
        root   /usr/share/nginx/html;
    }

    # proxy the PHP scripts to Apache listening on 127.0.0.1:80
    #
    #location ~ \.php$ {
    #    proxy_pass   http://127.0.0.1;
    #}

    # pass the PHP scripts to FastCGI server listening on 127.0.0.1:9000
    #
    #location ~ \.php$ {
    #    root           html;
    #    fastcgi_pass   127.0.0.1:9000;
    #    fastcgi_index  index.php;
    #    fastcgi_param  SCRIPT_FILENAME  /scripts$fastcgi_script_name;
    #    include        fastcgi_params;
    #}

    # deny access to .htaccess files, if Apache's document root
    # concurs with nginx's one
    #
    #location ~ /\.ht {
    #    deny  all;
    #}
}
server2.conf:
大致跟server1差不多,只列出不同的地方,没有列出的地方默认与server1.conf一致:
listen       8002;
server_name  localhost;
location / {
root /opt/app/code2;
index index.html index.htm;
}server3.conf:
大致跟server1差不多,只列出不同的地方,没有列出的地方默认与server1.conf一致:
listen       8003;
server_name  localhost;
location / {
root /opt/app/code3;
index index.html index.htm;
}至此,基本的配置文件已经完成,接下来要做的就是配置负载均衡服务器:
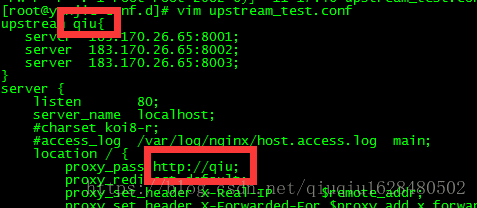
vim upstream_test.conf upstream qiu{
server 183.170.26.65:8001;
server 183.170.26.65:8002;
server 183.170.26.65:8003;
}
server {
listen 80;
server_name localhost;
#charset koi8-r;
#access_log /var/log/nginx/host.access.log main;
location / {
proxy_pass http://qiu;
proxy_redirect default;
proxy_set_header X-Real-IP $remote_addr;
proxy_set_header X-Forwarded-For $proxy_add_x_forwarded_for;
proxy_set_header Host $http_host;
proxy_set_header X-Real-IP $remote_addr;
proxy_connect_timeout 30;#nginx跟后端服务器连接超时时间(代理连接超时)
proxy_send_timeout 60;#后端服务器数据回传时间(代理发送超时)
proxy_read_timeout 60;#连接成功后,后端服务器响应时间(代理接收超时)
proxy_buffer_size 32k; #设置代理服务器(nginx)保存用户头信>息的缓冲区大小
proxy_buffers 4 128k;
proxy_busy_buffers_size 256k; #高负荷下缓冲大小(proxy_buffers*2)
proxy_temp_file_write_size 256k;
}
#error_page 404 /404.html;
# redirect server error pages to the static page /50x.html
#
error_page 500 502 503 504 /50x.html;
location = /50x.html {
root /usr/share/nginx/html;
}
# proxy the PHP scripts to Apache listening on 127.0.0.1:80
#
#location ~ \.php$ {
# proxy_pass http://127.0.0.1;
#}
# pass the PHP scripts to FastCGI server listening on 127.0.0.1:9000
#
#location ~ \.php$ {
# root html;
# fastcgi_pass 127.0.0.1:9000;nginx -t -c /etc/nginx/nginx.conf重新加载
nginx -s reload -c /etc/nginx/nginx.conf然后我们在浏览器地址栏中输入
183.170.26.65持续刷新,会看到,code1文件夹下的index.html与code2文件夹下的index.html以及code3文件夹下的index.html交替出现,至此出现了负载均衡。
接下来,我们想要暂停8002的服务,那么:
iptables -I INPUT -p tcp --dport 8002 -j DROP重新load
nginx -s reload -c /etc/nginx/nginx.conf在地址栏输入:
183.170.26.65持续刷新页面会发现这个时候8002端口对应的code2下的index.html中的内容不再显示,
#
访问的时候我们还可以对页面设置状态,罗列出状态:

大家可以自行设置。
举例:对backup进行举例说明:
配置我们的upstream_test.conf:
upstream qiu{
   server  183.170.26.65:8001 down;#不参与负载均衡
   server  183.170.26.65:8002 backup;#预留的备份服务器
   server  183.170.26.65:8003 max_fails=1 fail_timeout=10s;#正常
}
此时,我们访问:
183.170.26.65可以发现页面正常显示(code3文件夹下的index.html)
这时,关闭8003服务端口:
iptables -I INPUT -p tcp --dport 8002 -j DROP页面重载:
nginx -s reload -c /etc/nginx/nginx.conf在浏览器中输入:
183.170.26.65可以发现,页面刷新很慢,但是最后将code2中的index页面展示出来,证明备份服务器有效
那么如果8003端口恢复使用,还可以正常访问么?
回复端口:
iptables -Fcode3中的页面正常访问,持续刷新,也只有code3中的一个页面显示,这说明code2又处于备份状态了,实例完成。
下边这段代码,,当我们访问带有url(http://183.170.26.65/url1.html)这样的地址时,可想而知,第一次我们访问的是8001对应的页面,而当我们刷新时,可能会返回给我们8002对应的页面,所以要有一定的策略对其进行控制,以保证我们每次访问的时候页面保持一致性,所以,修改配置文件为:
upstream qiu{
   #ip_hash;
   hash request_uri;#保证访问同一个页面
   server  183.170.26.65:8001 ;
   server  183.170.26.65:8002 ;
   server  183.170.26.65:8003 ;
}
