Go语言没有类怎么面向对象
回顾
先回顾下面向对象的三个基本特性:
- 封装
- 继承
- 多态
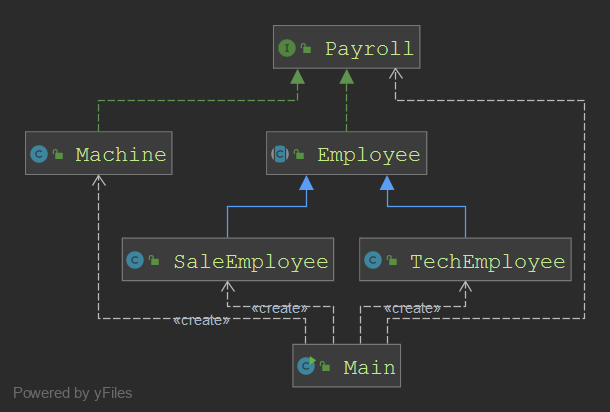
Java作为面向对象的王者,以下示例完美的展现了面向对象的三个基本特征。
public class Main {
    public static void main(String[] args) {
        List<Payroll> all = new ArrayList<>();

        //员工类封装了数据(姓名、年龄、性别)和行为(计算薪酬)
        //销售员工和技术员工继承自员工类,都实现了计算薪酬的接口
        //机器不是员工,但实现了计算薪酬的接口,也可以计算薪酬
        all.add(new SaleEmployee());
        all.add(new TechEmployee());
        all.add(new Machine());

        //多态:不管是人还是机器,只要实现了Payroll接口,就都可以正确的计算出各自的薪酬
        for (Payroll payroll : all) {
            System.out.println(payroll.calcSalary());
        }
    }
}
那么Go语言呢?我们一起来探索下Go语言的面向对象,先从类的封装开始。
封装
员工薪酬示例中,Java里的Employee类是这样的:
public abstract class Employee implements Payroll {
    private String name;
    private String sex;
    private int age;

    public String getName() {
        return name;
    }

    public void setName(String name) {
        this.name = name;
    }

    public String getSex() {
        return sex;
    }

    public void setSex(String sex) {
        this.sex = sex;
    }

    public int getAge() {
        return age;
    }

    public void setAge(int age) {
        this.age = age;
    }
}
这里暂时先关注员工类的三个属性,Go里面它确实没有类,要表示上面的员工对象,它是用struct的(和C很像):
type Employee struct {
	Name string
	Sex string
	Age int
}
看起来简洁多了,注意到Go里面没有private public的修饰符,它是用属性的首个字母大小写来区分private public,小写字母开头的是私有属性,大写字母开头表示公开属性。对象的实例化和使用对比:
//由于Employee是抽象类,不能实例化,直接用子类TechEmployee实例化
Employee tech = new TechEmployee();
tech.setName("lee");
System.out.println(tech.getName());
//这里的object.是包名,Employee放在object目录下
tech := object.Employee{
    Name: "lee",
    Sex:  "male",
    Age:  20,
}
tech.Name = "bruce lee"
fmt.Println(tech.Name)
另外,struct中是没有方法(行为)的,少了这个不是等于封装特征缺了只脚吗?当然不是了,Go语言里对应面向对象里的成员方法不是定义在struct里面,而是直接定义在struct外面,和struct平级,这里定义一个类似Java中的toString方法:
type Employee struct {
	Name string
	Sex  string
	Age  int
}

func (e *Employee) ToString() string {
	return "name=" + e.Name + ";sex=" + e.Sex + ";age=" + strconv.Itoa(e.Age)
}
这里(e *Employee)叫做方法的接收者,有点怪异,我们可以这样理解:
- Go里没有this,要自己加个类似this的东西,用于指代方法对应的实例,括号里前面的e相当于this,当然名字可以随便取。
- 方法定义和struct平级,如果不加个接收者定义,哪里知道这个方法属于谁的呢,括号里后面的类型表示这个方法属性于谁的,这里可以用(e Employee)或(e *Employee),区别是传值还是传指针,一般统一用后者。
继承
接下来继承,先看看Java的:
public class TechEmployee extends Employee {
    private double salaryPerMonth;

    public double getSalaryPerMonth() {
        return salaryPerMonth;
    }

    public void setSalaryPerMonth(double salaryPerMonth) {
        this.salaryPerMonth = salaryPerMonth;
    }

    @Override
    public double calcSalary() {
        return salaryPerMonth;
    }
}

public class SaleEmployee extends Employee {
    private Double baseSalary;
    private Double extraRate;

    public Double getBaseSalary() {
        return baseSalary;
    }

    public void setBaseSalary(Double baseSalary) {
        this.baseSalary = baseSalary;
    }

    public Double getExtraRate() {
        return extraRate;
    }

    public void setExtraRate(Double extraRate) {
        this.extraRate = extraRate;
    }

    @Override
    public double calcSalary() {
        return baseSalary * (1 + extraRate);
    }
}
同样,Go里面也没有像Java中类似extend继承的语法,Go是用了类似Java里组合的东西来让语法看起来像继承:
type TechEmployee struct {
	Employee
	SalaryPerMonth float32
}

type SaleEmployee struct {
	Employee
	BaseSalary float32
	ExtraRate  float32
}
对应的实例化和使用:
//实例化时,是传了个employee
tech := object.TechEmployee{
    Employee:       object.Employee{Name: "lee"},
    SalaryPerMonth: 10000,
}
//这里看起来像拥有了Employee的name属性,可以设置和访问
tech.Name = "bruce lee"
fmt.Println(tech.Name)
多态
关于多态,必须要提接口,终于Go里也是有接口的了:
public interface Payroll {
    double calcSalary();
}
type Payroll interface {
	CalcSalary() float32
}
接口的实现:
public class Machine implements Payroll {
    @Override
    public double calcSalary() {
        return 0;
    }
}
type TechEmployee struct {
	Employee
	SalaryPerMonth float32
}

func (e *TechEmployee) CalcSalary() float32 {
	return e.SalaryPerMonth
}

type Machine struct {

}

func (e *Machine) CalcSalary() float32 {
	return 0
}
可以看出,Java里比较直观,语法里直接写着实现xxx接口,Go相比的话,没那么直观,但更灵活,它没有指定实现哪个接口,而是如果定义了一个相同名字和返回值的方法,就认为是实现了对应拥有这个方法的接口,这里假如接口有两个方法,对应也必须要两个方法都有定义了,才认为是实现了接口。
最后,看一下集成使用的对比:
List<Payroll> all = new ArrayList<>();

//员工类封装了数据(姓名、年龄、性别)和行为(计算薪酬)
//销售员工和技术员工继承自员工类,都实现了计算薪酬的接口
//机器不是员工,但实现了计算薪酬的接口,也可以计算薪酬
all.add(new SaleEmployee());
all.add(new TechEmployee());
all.add(new Machine());

//多态:不管是人还是机器,只要实现了Payroll接口,就都可以正确的计算出各自的薪酬
for (Payroll payroll : all) {
    System.out.println(payroll.calcSalary());
}
var all [3] object.Payroll

all[0] = &object.TechEmployee{
    Employee:       object.Employee{Name: "lee"},
    SalaryPerMonth: 10000,
}
all[1] = &object.SaleEmployee{
    Employee:   object.Employee{Name: "lee"},
    BaseSalary: 10000,
    ExtraRate:  0.1,
}
all[2] = &object.Machine{}

for _, item := range all {
    fmt.Println(item.CalcSalary())
}
