使用Android Studio导入安卓源码
1 背景
这篇文章主要说明的是用它来看源码的相关配置(该实例依据官方源码进行配置说明)。在android源码中发现有一个development/tools/idegen目录,查了一下发现是生成IDE的project文件(主要是intellij的project文件,其实也就是Android Studio的),所以说福利工具就这么来了,欲知详情,请看下文。
2 配置使用过程
2-1 基础准备工作
首先你得安装配置了Android Studio,接着你得下载好了源码Code,至于如何下载这里不再说明,比较简单,上官网查看就行了。
其次你需要保证源码已经被编译生成了out相关目录文件。
好了,如上就是一些基本准备工作,针对定制源码或者原生源码来说,这些准备步骤都是必须的,没必要再强调了。
2-2 配置导入及使用
2-2-1 编译源码idegen模块及生成AS配置文件(*.ipr)
在开始编译idegen模块前,你一定知道需要先全局编译出out目录及相关文件吧,这个不再过多说了,我们通过如下命令编译idegen模块:
mmm development/tools/idegen/
这行命令的意思是编译idegen这个模块项目,然后生成idegen.jar文件(不信你自己去查看这个模块的Android.mk的目标吧,不多解释)。运行完以后如果看到如下信息则说明编译OK:
......
#### make completed successfully (7 seconds) ####
接着执行如下脚本:
development/tools/idegen/idegen.sh
这行命令的意思是在根目录生成对应的android.ipr、android.iml IEDA工程配置文件。等待片刻得到类似如下信息说明OK:
Read excludes: 21ms
Traversed tree: 194799ms
通过如上操作我们就完成了基本的源码配置工作。
2-2-2 导入Android Studio前的一些客户化操作
大家都知道使用Eclipse倒入源码很慢,Android Studio导入源码时也慢,所以建议修改android.iml文件(将自己不用的代码去掉),然后再导入Studio。
就像下面摘取的android.iml文件2237行开始的这些一样:
我们可以仿照上面这段代码的
也可以通过Android Studio的Project Stucture 打开左侧Modules,然后将右侧Sources中一些目录Excluded掉。
2-2-3 使用Android Studio导入源码工程
有了如上的这些操作以后,我们打开Android Studio,然后选择打开一个现有的Android Studio项目,然后选择打开源码 (File --> Open...) 根目录下的android.ipr文件,然后出现如图一样的索引即可等待导入就行:
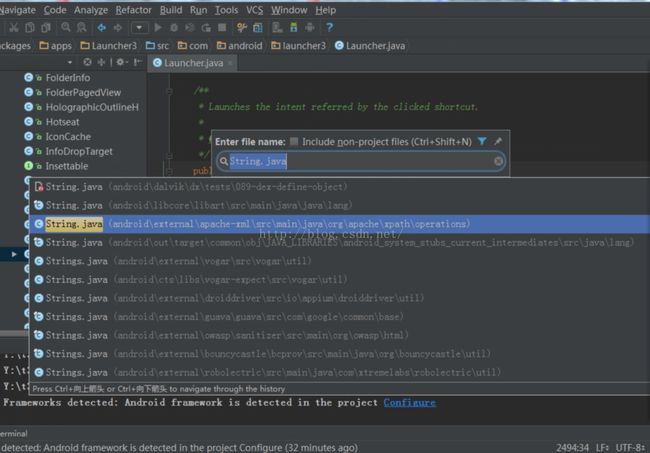
到目前为止我们就可以方便的使用Android Studio查看源码啦(Ctrl+Shift+N 或者 Navigate --> File)。如下图所示:
牛逼吧!!!
2-3 使用技巧
上图我们看见了,可以通过Android Studio搜索整套源码的代码了。但是这时候如果你打开一个Launcher.java类,然后把鼠标放在其中任意方法的String参数上按住CTRL+鼠标左键跳转到String类你会发现跳转过去的是一个String.class文件,为啥呢?因为他跳转的是你的默认SDK中的jar内部的class文件。既然要修改查看整套源码,这么跳转得多蛋疼啊,所以我们需要配置让其能跳转到String.java文件,具体做法如下:
首先删掉依赖中的所有依赖,只保留下图中没被选中的那两个(当然你可以选择保留一些你用到的其他jar),
接着点击加号的JARs or directories... 将你源码的frameworks及external和你用到的其他跳转目录添加到依赖中,然后apply即可,如下:
(这里需要特别注意:要将Android API 23这一项移到最后,不然跳转的时候仍然会优先跳转到SDK中的String.class)
这时候我们在像上面一样打开Launcher.java跳转String,你会发现像下图一样直接跳转到你源码路径下的String.java文件了,如下:
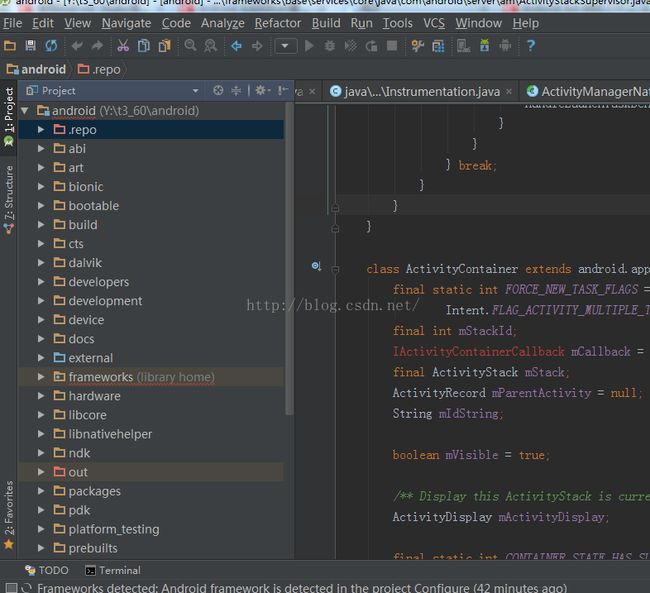
在android根目录上按快捷键F4(如果已经设为Eclipse快捷键方式则为F12)或者File --> Project Structure打开Module Setting,
选中不需要扫描的目录后点右上角的Excluded(其中.repo, out和prebuilts目录较大,建议选择),完成以后效果如左侧,文件夹颜色区分,红色的即为排除在外的文件夹,AS将不扫描其中内容。 重新启动AS,会发现扫描源码目录的时间大大缩减了。
Tips: 因为Android Studio 的配置和缓存文件存在home/.AndroidStudio (Windows系统在 C:\Users\Administrator\.AndroidStudio2.1 )文件夹中,时间长了可能会导致系统磁盘吃紧,若要修改默认存储位置(比如改到其他挂在盘),需修改android-studio/bin/idea.properties文件中相关的配置信息,修改内容参考:
四、配置AS的JDK、SDK
到此对于平时只是查看源码的人来说已经够用了。
3 总结
俗话说工欲善其事必先利其器,你会发现使用Android Studio比Eclipse和Source Insight都好很多(当然了,SubText还是很强大的),无论是代码提示还是跳转、还是Python Shell等插件支持等都很强大,慢慢体验吧。
顺带说一句,Google的野心真的很大,看来Android Studio即将要被他们打造为全能IDE了。
4 附加README
附上原版的英文README文档,英语高手直接看这里就行:
IDEGen automatically generates Android IDE configurations for IntelliJ IDEA
and Eclipse. Your IDE should be able to compile everything in a reasonable
amount of time with no errors.
If you’re using IntelliJ…
If this is your first time using IDEGen...

    IDEA needs a lot of memory. Add "-Xms748m -Xmx748m" to your VM options
    in "IDEA_HOME/bin/idea.vmoptions" on Linux or
    "IntelliJ IDEA.app/Contents/Info.plist" on OS X.

    Create a JDK configuration named "1.6 (No Libraries)" by adding a new
    JDK like you normally would and then removing all of the jar entries
    under the "Classpath" tab. This will ensure that you only get access to
    Android's core libraries and not those from your desktop VM.

From the project's root directory...

    Repeat these steps after each sync...

    1) make (to produce generated .java source)
    2) development/tools/idegen/idegen.sh
    3) Open android.ipr in IntelliJ. If you already have the project open,
       hit the sync button in IntelliJ, and it will automatically detect the
       updated configuration.

    If you get unexpected compilation errors from IntelliJ, try running
    "Build -> Rebuild Project". Sometimes IntelliJ gets confused after the
    project changes significantly.
If you’re using Eclipse…
If this is your first time using IDEGen...

    Edit eclipse.ini ("Eclipse.app/Contents/MacOS/eclipse.ini" on OS X) and
    add "-Xms748m -Xmx748m" to your VM options.

    Configure a JRE named "1.5 (No Libraries)" under "Preferences -> Java ->
    Installed JREs". Remove all of the jar entries underneath "JRE system
    libraries". Eclipse will not let you save your configuration unless at
    least one jar is present, so include a random jar that won't get in the
    way.

From the project's root directory...

    Repeat these steps after each sync...

    1) make (to produce generated .java source)
    2) development/tools/idegen/idegen.sh
    3) Import the project root directory into your Eclipse workspace. If you
       already have the project open, simply refresh it (F5).
Excluding source roots and jars
IDEGen keeps an exclusion list in the "excluded-paths" file. This file
has one regular expression per line that matches paths (relative to the
project root) that should be excluded from the IDE configuration. We
use Java's regular expression parser (see java.util.regex.Parser).

You can create your own additional exclusion list by creating an
"excluded-paths" file in the project's root directory. For example, you
might exclude all apps except the Browser in your IDE configuration with
this regular expression: "^packages/apps/(?!Browser)".
Controlling source root ordering (Eclipse)
You may want some source roots to come before others in Eclipse. Simply
create a file named "path-precedence" in your project's root directory.
Each line in the file is a regular expression that matches a source root
path (relative to the project's root directory). If a given source root's
path matches a regular expression that comes earlier in the file, that
source root will come earlier in the generated configuration. If a source
root doesn't match any of the expressions in the file, it will come last,
so you effectively have an implicit ".*" rule at the end of the file.

For example, if you want your applications's source root to come first,
you might add an expression like "^packages/apps/MyApp/src$" to the top
of the "path-precedence" file.  To make source roots under ./out come last,
add "^(?!out/)" (which matches all paths that don't start with "out/").


