net core 中Ocelot webapi getway入门实践(一)
1.Ocelot介绍
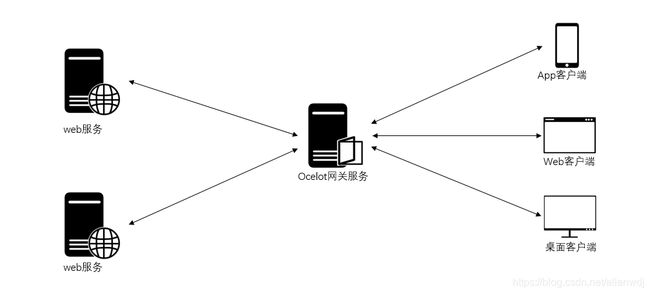
Ocelot是一个.net core框架下的网关的开源项目,下图是官方给出的基础实现图,即把后台的多个服务统一到网关处,前端应用:桌面端,web端,app端都只用访问网关即可,如下图:
关于Ocelot的详细使用说明,可以到官网查看:https://ocelot.readthedocs.io/en/latest/。
2.项目搭建
项目使用的visual studio 2017,net core版本是2.2
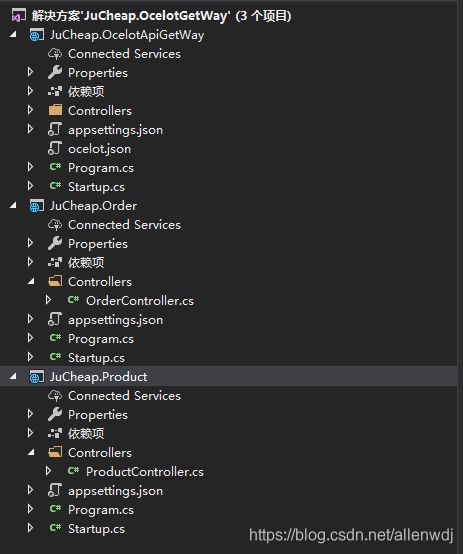
新建三个net core webapi项目,如下:
JuCheap.OcelotApiGetWay (网关webapi项目),地址:http://localhost:44773
JuCheap.Order (订单系统webapi项目),地址:http://localhost:46237
JuCheap.Product (产品系统webapi项目),地址:http://localhost:46254
api项目的端口可以自己配置,但是需要注意,配置后,需要在ocelot.json文件中,做对应的修改。效果如下图:
3.网关项目配置
在JuCheap.OcelotApiGetWay中引入Ocelot的包,包含Ocelot、Ocelot.Provider.Consul和Ocelot.Provider.Polly,如下图:
新建ocelot.json配置文件,配置文件里面,我们只需要关心如下配置节点:
DownstreamPathTemplate 上游转发到下游的url地址(也就是我们的目标api的地址,比如产品系统的api或者订单系统的api)
UpstreamPathTemplate 上游api路由模板地址
UpstreamHttpMethod 上游支持的请求方式
DownstreamScheme 下游的http头
DownstreamHostAndPorts.Host 下游的api Host
DownstreamHostAndPorts.Port 下游的api端口
ocelot.json的完整代码如下:
{
  "GlobalConfiguration": {
    "RequestIdKey": "OcRequestId",
    "AdministrationPath": "/admin"
  },
  "ReRoutes": [
    {
      "DownstreamPathTemplate": "/{url}",
      "UpstreamPathTemplate": "/order/{url}",
      "UpstreamHttpMethod": [
        "Get"
      ],
      "AddHeadersToRequest": {},
      "AddClaimsToRequest": {},
      "RouteClaimsRequirement": {},
      "AddQueriesToRequest": {},
      "RequestIdKey": "",
      "FileCacheOptions": {
        "TtlSeconds": 0,
        "Region": ""
      },
      "ReRouteIsCaseSensitive": false,
      "ServiceName": "",
      "DownstreamScheme": "http",
      "DownstreamHostAndPorts": [
        {
          "Host": "localhost",
          "Port": 46237
        }
      ],
      "QoSOptions": {
        "ExceptionsAllowedBeforeBreaking": 0,
        "DurationOfBreak": 0,
        "TimeoutValue": 0
      },
      "LoadBalancer": "",
      "RateLimitOptions": {
        "ClientWhitelist": [],
        "EnableRateLimiting": false,
        "Period": "",
        "PeriodTimespan": 0,
        "Limit": 0
      },
      "AuthenticationOptions": {
        "AuthenticationProviderKey": "",
        "AllowedScopes": []
      },
      "HttpHandlerOptions": {
        "AllowAutoRedirect": true,
        "UseCookieContainer": true,
        "UseTracing": true
      },
      "DangerousAcceptAnyServerCertificateValidator": false
    },
    {
      "DownstreamPathTemplate": "/{url}",
      "UpstreamPathTemplate": "/product/{url}",
      "UpstreamHttpMethod": [
        "Get"
      ],
      "AddHeadersToRequest": {},
      "AddClaimsToRequest": {},
      "RouteClaimsRequirement": {},
      "AddQueriesToRequest": {},
      "RequestIdKey": "",
      "FileCacheOptions": {
        "TtlSeconds": 0,
        "Region": ""
      },
      "ReRouteIsCaseSensitive": false,
      "ServiceName": "",
      "DownstreamScheme": "http",
      "DownstreamHostAndPorts": [
        {
          "Host": "localhost",
          "Port": 46254
        }
      ],
      "QoSOptions": {
        "ExceptionsAllowedBeforeBreaking": 0,
        "DurationOfBreak": 0,
        "TimeoutValue": 0
      },
      "LoadBalancer": "",
      "RateLimitOptions": {
        "ClientWhitelist": [],
        "EnableRateLimiting": false,
        "Period": "",
        "PeriodTimespan": 0,
        "Limit": 0
      },
      "AuthenticationOptions": {
        "AuthenticationProviderKey": "",
        "AllowedScopes": []
      },
      "HttpHandlerOptions": {
        "AllowAutoRedirect": true,
        "UseCookieContainer": true,
        "UseTracing": true
      },
      "DangerousAcceptAnyServerCertificateValidator": false
    }
  ]
}
然后将配置文件加入到WebHostBuilder中,找到Program.cs文件的Main方法,如下:
using System;
using System.Collections.Generic;
using System.IO;
using System.Linq;
using System.Threading.Tasks;
using Microsoft.AspNetCore;
using Microsoft.AspNetCore.Hosting;
using Microsoft.Extensions.Configuration;
using Microsoft.Extensions.Logging;
using Ocelot.Middleware;
using Ocelot.DependencyInjection;

namespace JuCheap.OcelotApiGetWay
{
    public class Program
    {
        public static void Main(string[] args)
        {
            CreateWebHostBuilder(args)
                .ConfigureAppConfiguration((hostingContext, config) =>
                {
                    config
                        .SetBasePath(hostingContext.HostingEnvironment.ContentRootPath)
                        .AddJsonFile("appsettings.json", true, true)
                        .AddJsonFile($"appsettings.{hostingContext.HostingEnvironment.EnvironmentName}.json", true, true)
                        .AddJsonFile("ocelot.json")
                        .AddEnvironmentVariables();
                })
                .Build().Run();
        }

        public static IWebHostBuilder CreateWebHostBuilder(string[] args) =>
            WebHost.CreateDefaultBuilder(args)
                .UseStartup();
    }
}
在Startup.cs文件中,配置Ocelot的服务,在ConfigureServices方法里面新增如下代码:
services.AddOcelot(Configuration).AddConsul().AddPolly();并在Configure方法里面启用Ocelot网关服务,代码如下:
app.UseOcelot().Wait();Startup.cs完整代码如下:
using Microsoft.AspNetCore.Builder;
using Microsoft.AspNetCore.Hosting;
using Microsoft.AspNetCore.Mvc;
using Microsoft.Extensions.Configuration;
using Microsoft.Extensions.DependencyInjection;
using Ocelot.DependencyInjection;
using Ocelot.Middleware;
using Ocelot.Provider.Consul;
using Ocelot.Provider.Polly;

namespace JuCheap.OcelotApiGetWay
{
    public class Startup
    {
        public Startup(IConfiguration configuration)
        {
            Configuration = configuration;
        }

        public IConfiguration Configuration { get; }

        // This method gets called by the runtime. Use this method to add services to the container.
        public void ConfigureServices(IServiceCollection services)
        {
            services.AddOcelot(Configuration).AddConsul().AddPolly();

            services.AddMvc().SetCompatibilityVersion(CompatibilityVersion.Version_2_2);
        }

        // This method gets called by the runtime. Use this method to configure the HTTP request pipeline.
        public void Configure(IApplicationBuilder app, IHostingEnvironment env)
        {
            if (env.IsDevelopment())
            {
                app.UseDeveloperExceptionPage();
            }
            else
            {
                // The default HSTS value is 30 days. You may want to change this for production scenarios, see https://aka.ms/aspnetcore-hsts.
                app.UseHsts();
            }

            app.UseOcelot().Wait();

            //app.UseHttpsRedirection();
            app.UseMvc();
        }
    }
}
最后将我们的3个api都配置成启动项目,右键点击解决方案,然后找到"属性"->"启动项目",选择多个启动项目栏,把要启动的项目的操作一栏,改成“启动”,如下图:
到此,我们就可以启动项目了,点击菜单栏上的“启动”,我们访问网关项目的如下地址:
http://localhost:44773/order/api/order
http://localhost:44773/product/api/product
效果如下图:
项目源代码:
https://github.com/jucheap/JuCheap.Ocelot


