代码地址:https://pan.baidu.com/s/18dyR6GDcsbsF5CDd3tJ85g 密码:q7je
SSM:spring + spring mvc + mybatis
可以先看看我之前写的spring mvc怎么搭以及怎么使用Mybatis-Generator自动生成Dao、Model层相关代码,再看这篇,传送门:
IntelliJ IDEA搭建最简单的Spring MVC项目
IntelliJ IDEA下Spring MVC数据库配置与增删改查开发
使用Mybatis-Generator自动生成Dao、Model层相关代码
与之相关的就不再写了。
1 新建工程,并完善目录结构与前面两篇文章一样
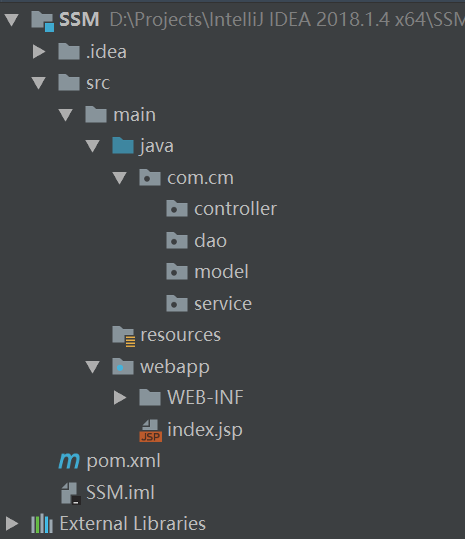
目录结构多了个service,用以放业务逻辑。
2 添加依赖包
pom.xml中依赖包加入:
  UTF-8
  1.7
  1.7

  5.0.5.RELEASE


    junit
    junit
    4.11
    test


    mysql
    mysql-connector-java
    5.1.37
    runtime


    c3p0
    c3p0
    0.9.1.2


    org.mybatis
    mybatis
    3.3.0


    org.mybatis
    mybatis-spring
    1.2.3


    taglibs
    standard
    1.1.2


    jstl
    jstl
    1.2


    com.google.code.gson
    gson
    2.8.2


    javax.servlet
    javax.servlet-api
    3.1.0


    org.springframework
    spring-core
    4.1.7.RELEASE


    org.springframework
    spring-beans
    4.1.7.RELEASE


    org.springframework
    spring-context
    4.1.7.RELEASE


    org.springframework
    spring-jdbc
    4.1.7.RELEASE


    org.springframework
    spring-tx
    4.1.7.RELEASE


    org.springframework
    spring-web
    4.1.7.RELEASE


    org.springframework
    spring-webmvc
    4.1.7.RELEASE


    org.springframework
    spring-test
    4.1.7.RELEASE
3 添加各种配置文件
数据源
在resources下面新建jdbc.properties文件。
这个文件用以配置jdbc数据源以及数据连接池的各种参数,单独放到文件便于修改。
jdbc.driver=com.mysql.jdbc.Driver
jdbc.url=jdbc:mysql://localhost:3306/cmtable?useUnicode=true&characterEncoding=utf8
jdbc.username=root
jdbc.password=root
#最大连接数
maxPoolSize=20
#最小连接数
minPoolSize=10
#连接超时时间
checkoutTimeout=60000
#失败重连次数
acquireRetryAttempts=3
mybatis-config.xml
在resources下面新建mybatis-config.xml,作为MyBatis的全局配置文件。
这个作为MyBatis的全局配置文件,还有很多参数可以设置,这里不细讲。
扫描 sql 配置⽂件:mapper 需要的 xml ⽂件
在resources文件夹下面新建mapper目录,用以放置那些对应的xml文件。
applicationContext.xml Spring全局配置文件
在resources下面新建applicationContext.xml
mvc-dispatcher.xml
在resources下面新建mvc-dispatcher.xml,与前面文章类似。
web.xml
与前面文章一模一样。
  Archetype Created Web Application


    contextConfigLocation
    classpath:applicationContext.xml


    encodingFilter
    org.springframework.web.filter.CharacterEncodingFilter

      encoding
      UTF-8


    encodingFilter
    /*


    org.springframework.web.context.ContextLoaderListener


    SpringMVC
    org.springframework.web.servlet.DispatcherServlet

      contextConfigLocation
      classpath:mvc-dispatcher.xml


    1


    SpringMVC

    /
好了,所有的配置文件都弄完了!
4 开发
建表。

使用之前文章里面说的方法自动生成Model和Dao以及对应的xml代码。
看看生成的代码,UserModel.java与前面类似,跳过。
其他的只是能参考,在这个基础上改,毕竟生成的有的接口不符合我们的想法。
    package com.cm.dao;

    import com.cm.model.UserModel;
    import java.util.List;
    public interface UserDao {
        List getAllUsers();
        UserModel getUser(String id);
        boolean addUser(UserModel userModel);
        boolean updateUser(String id, String name);
        boolean deleteUser(String id);
    }
MyBatis有个好处就是我们不用自己写实现,只需要配置对应的xml为其提供sql语句就行,在resources下的mapper文件夹下面新建UserDao.xml。模仿我们生成的xml进行修改。
insert ignore into user (name, age) values (#{id}, #{name})
update user set name=#{name} where id=#{id}
delete from user where id=#{id}
其实就是一堆sql语句,namespace表示对应的类。id对应方法名,#{name}表示传入的参数。parameterType为入参类型,可以省略。
service层
在service中新建UserService,放置业务逻辑代码。可以这么理解,Dao颗粒度比较小,基本操作,但是service颗粒度比较大,放业务逻辑操作。
    package com.cm.service;

    import com.cm.dao.UserDao;
    import com.cm.model.UserModel;
    import org.springframework.beans.factory.annotation.Autowired;
    import org.springframework.stereotype.Service;
    import org.springframework.transaction.annotation.Transactional;
    import java.util.List;

    @Service
    @Transactional
    public class UserService {
        @Autowired
        private UserDao userDao;

        public List getAllUsers(){
            return userDao.getAllUsers();
        }

        public UserModel getUser(String id) {
            return userDao.getUser(id);
        }

        boolean addUser(UserModel userModel) {
            return userDao.addUser(userModel);
        }

        boolean updateUser(String id, String name) {
            return userDao.updateUser(id, name);
        }

        boolean deleteUser(String id) {
            return userDao.deleteUser(id);
        }
    }
学习阶段就不写太大的业务逻辑了。
说几个:
(1) @Service 标记为service,这样就能被Spring扫描到。
(2)@Transactional,我们前面配置文件开启了事务处理。业务逻辑需要进行事务处理。
标注在类前:标示类中所有方法都进行事务处理
标注在接口、实现类的方法前:标示方法进行事务处理
(3)@Autowired这个前面文章讲过了,自动注入。
Controller 层
在controller下面新建UserController.java。内容就不全写了,以两个为例。其他类似。
    package com.cm.controller;

    import com.cm.model.UserModel;
    import com.cm.service.UserService;
    import org.springframework.beans.factory.annotation.Autowired;
    import org.springframework.stereotype.Controller;
    import org.springframework.web.bind.annotation.RequestMapping;
    import org.springframework.web.bind.annotation.RequestMethod;
    import org.springframework.web.bind.annotation.ResponseBody;

    import java.util.List;

    @Controller
    @RequestMapping("/user")
    public class UserController {
        private UserService userService;
        @Autowired
        public UserController(UserService userService) {
            this.userService = userService;
        }

        @RequestMapping(value="getAllUsers",method = RequestMethod.GET)
        @ResponseBody
        public List getAllUsers() {
            List userModels = userService.getAllUsers();
            return userModels;
        }

        @RequestMapping(value="getUser",method = RequestMethod.GET)
        @ResponseBody
        public UserModel getUser(String id) {
            UserModel userModel = userService.getUser(id);
            return userModel;
        }
    }
5 测试
配置Tomcat,方法前面说过了。表中插入一些数据。用浏览器或者postman访问。
http://localhost:8080/user/getAllUsers 结果如下:

http://localhost:8080/user/getUser?id=2 结果如下:

6 打包
点击左下角,在弹出的地方点击右边的Maven Projects,然后展开Lifecycle,双击package。然后就能在webapp下面看见war包,把war包放到tomcat下面的webapp里面,启动tomcat就能访问。注意这样访问要加上artifactid,示例:http://localhost:8080/SSM/user/getAllUsers

【SSM框架从零开始】系列文章链接:
IntelliJ IDEA搭建最简单的Spring MVC项目
IntelliJ IDEA下Spring MVC数据库配置与增删改查开发
使用Mybatis-Generator自动生成Dao、Model层相关代码
IntelliJ IDEA搭建SSM框架