CollectionView 相关内容:
1. iOS 自定义图片选择器 3 - 相册列表的实现
2. UICollectionView自定义布局基础
3. UICollectionView自定义拖动重排
4. iOS13 中的 CompositionalLayout 与 DiffableDataSource
5. iOS14 中的UICollectionViewListCell、UIContentConfiguration 以及 UIConfigurationState
UICollectionView在iOS开发中是一大利器,之前在文章【iOS 自定义图片选择器 3 - 相册列表的实现(UICollectionView)】中有对系统提供的 UICollectionViewFlowLayout 有简单介绍和使用,不了解的朋友也可先看看。这一篇为基础介绍,若读者急于寻找解决问题的答案或工具类文档,建议直接查看官方文档。
前言
UICollectionView 可以实现很多酷炫的布局,网上很多文章中有很多各种布局的展示,这里就不去找演示图了(因为我懒)。
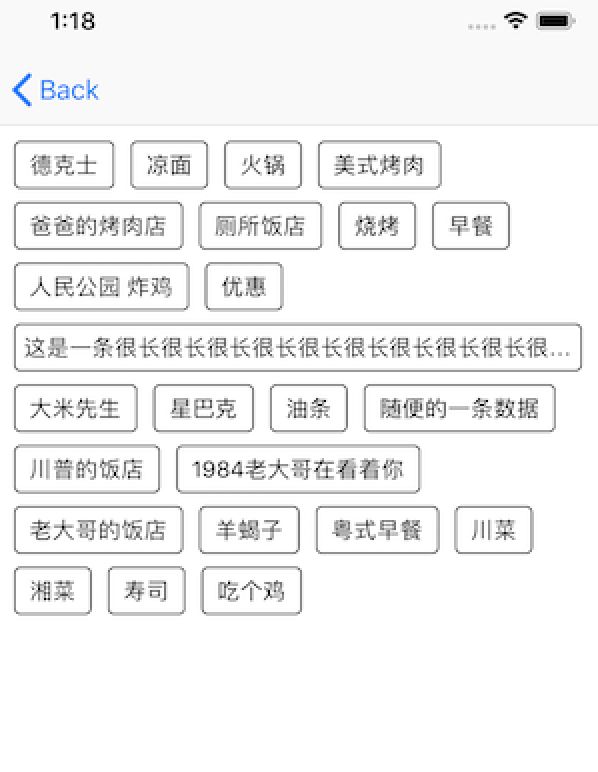
本篇文章我们以一个简单的效果来对UICollectionView的布局有一个基础的认识,打牢基础后就可以自由发挥啦,效果如下图:
自定义布局需要实现UICollectionViewLayout的子类,我们看看在UICollectionViewLayout中有些什么是我们现在要用到的:
//CollectionView会在初次布局时首先调用该方法
//CollectionView会在布局失效后、重新查询布局之前调用此方法
//子类中必须重写该方法并调用超类的方法
-(void)prepareLayout;

//子类必须重写此方法。
//并使用它来返回CollectionView视图内容的宽高,
//这个值代表的是所有的内容的宽高,并不是当前可见的部分。
//CollectionView将会使用该值配置内容的大小来促进滚动。
- (CGRect)collectionViewContentSize;

// UICollectionView 调用以下四个方法来确定布局信息
- (NSArray<__kindof UICollectionViewLayoutAttributes *> *)layoutAttributesForElementsInRect:(CGRect)rect; // return an array layout attributes instances for all the views in the given rect
- (UICollectionViewLayoutAttributes *)layoutAttributesForItemAtIndexPath:(NSIndexPath *)indexPath;
- (UICollectionViewLayoutAttributes *)layoutAttributesForSupplementaryViewOfKind:(NSString *)elementKind atIndexPath:(NSIndexPath *)indexPath;
- (UICollectionViewLayoutAttributes *)layoutAttributesForDecorationViewOfKind:(NSString*)elementKind atIndexPath:(NSIndexPath *)indexPath;

//当Bounds改变时,返回YES使CollectionView重新查询几何信息的布局
- (BOOL)shouldInvalidateLayoutForBoundsChange:(CGRect)newBounds;
以上提到的方法就是本文所用到的主要方法,也是CollectionView自定义布局的几个核心方法。实际上CollectionViewLayout所提供的方法远不止这些,例如还有:
//用于控制滚动的方法
- (CGPoint)targetContentOffsetForProposedContentOffset:(CGPoint)proposedContentOffset withScrollingVelocity:(CGPoint)velocity;
- (CGPoint)targetContentOffsetForProposedContentOffset:(CGPoint)proposedContentOffset NS_AVAILABLE_IOS(7_0);

//iOS9之后,拖动的相关控制
- (NSIndexPath *)targetIndexPathForInteractivelyMovingItem:(NSIndexPath *)previousIndexPath withPosition:(CGPoint)position NS_AVAILABLE_IOS(9_0);
- (UICollectionViewLayoutAttributes *)layoutAttributesForInteractivelyMovingItemAtIndexPath:(NSIndexPath *)indexPath withTargetPosition:(CGPoint)position NS_AVAILABLE_IOS(9_0);

//插入或删除的相关控制
- (nullable UICollectionViewLayoutAttributes *)initialLayoutAttributesForAppearingItemAtIndexPath:(NSIndexPath *)itemIndexPath;
- (nullable UICollectionViewLayoutAttributes *)finalLayoutAttributesForDisappearingItemAtIndexPath:(NSIndexPath *)itemIndexPath;
更多的方法大家可以自行查阅文档,本来是想把文档翻译下的,结果发现早就有人做了,链接在这里。
先想一想
开始之前需要准备一个带有 CollectionView 的页面,实现一个 UICollectionViewLayout 的子类用于实现我们的自定义布局,并将其赋值给 CollectionView:
现在要实现的布局为“等高不等宽的垂直流式布局”,在【iOS 自定义图片选择器 3 - 相册列表的实现(UICollectionView)】中我们用到了系统实现的流式布局UICollectionViewFlowLayout, 而我们现在实现的这个布局与其有一定相似:
- 流式布局
- UICollectionViewFlowLayout类中的itemSize, SectionInset等参数配置我们也需要用到,用于布局信息的计算。
有相似点,就可以仿照其结构进行一定程度的模仿,模仿之前我们先观摩下FlowLayout的头文件:
@property (nonatomic) CGFloat minimumLineSpacing;  //最小行间距
@property (nonatomic) CGFloat minimumInteritemSpacing; //最小item间距
@property (nonatomic) CGSize itemSize; //item大小
@property (nonatomic) CGSize estimatedItemSize //预设item大小 NS_AVAILABLE_IOS(8_0); // defaults to CGSizeZero - setting a non-zero size enables cells that self-size via -preferredLayoutAttributesFittingAttributes:
@property (nonatomic) UICollectionViewScrollDirection scrollDirection; // 默认为 UICollectionViewScrollDirectionVertical
@property (nonatomic) CGSize headerReferenceSize; //header size
@property (nonatomic) CGSize footerReferenceSize; //footer size
@property (nonatomic) UIEdgeInsets sectionInset; //section的内边距

//iOS11 后新增的方法,可用于约束CollectionViewsection来适配SafeAre(刘海屏, 例如你横平时刘海屏有部分遮挡的情况。)
/// The reference boundary that the section insets will be defined as relative to. Defaults to `.fromContentInset`.
/// NOTE: Content inset will always be respected at a minimum. For example, if the sectionInsetReference equals `.fromSafeArea`, but the adjusted content inset is greater that the combination of the safe area and section insets, then section content will be aligned with the content inset instead.
@property (nonatomic) UICollectionViewFlowLayoutSectionInsetReference sectionInsetReference API_AVAILABLE(ios(11.0), tvos(11.0)) API_UNAVAILABLE(watchos);

// 当返回YES时,将会悬浮对应的所有Header/Footer。
@property (nonatomic) BOOL sectionHeadersPinToVisibleBounds NS_AVAILABLE_IOS(9_0);
@property (nonatomic) BOOL sectionFootersPinToVisibleBounds NS_AVAILABLE_IOS(9_0);
都是一些最基础的配置参数,我们实现的效果还没有header,footer,也降低了我们配置布局的复杂度,这样看下来上面近一半的参数我们的布局都用不到,当然啦有时间还是写的健壮一点,万一哪天产品想加100个header呢?
现在我们知道了相似的地方,那么不同点在哪里呢?
等高不等宽
“不等宽 ” 意味着我们的宽度极有可能来自于数据的宽度,这种不固定的因素我们需要把其抛给调用者动态配置,这里使用代理,Block都是可以的,根据项目规范来吧。
现在开始实现我们那“等高不等宽”的布局吧
了解了相同点 和 不同点,我们可以把空白的布局头文件充实下了:
@interface RJHorizontalEqulHeightFlowLayout : UICollectionViewLayout
@property (assign, nonatomic) CGFloat itemHeight;
@property (assign, nonatomic) CGFloat itemSpace;
@property (assign, nonatomic) CGFloat lineSpace;
@property (assign, nonatomic) UIEdgeInsets sectionInsets;

/**
 配置item的宽度
 */
- (void)configItemWidth:(CGFloat (^)(NSIndexPath * indexPath, CGFloat height))widthBlock;

@end
现在先不要慌,在实现文件中,我们先实现那俩要求必须实现的方法 prepareLayout 与 layoutAttributesForElementsInRect
prepareLayout 在初始化以及每次失效后、重新查询布局之前都会调用。那么我们的布局初始化,改变在这里配置最为理想,而 layoutAttributesForElementsInRect 是返回了一个布局信息的集合。
是的,我们需要一个集合来保存我们的布局信息,且需要记录上一个item的布局信息的相关参数。
@property (assign, nonatomic) CGFloat currentY;   //当前Y值
@property (assign, nonatomic) CGFloat currentX;   //当前X值
@property (copy, nonatomic) WidthBlock widthComputeBlock;   //外包的宽度Block

@property (strong, nonatomic) NSMutableArray * attrubutesArray;   //所有元素的布局信息
那么单个的item布局信息在哪里配置呢?
- (UICollectionViewLayoutAttributes *)layoutAttributesForItemAtIndexPath:(NSIndexPath *)indexPath;
这其实也是一个必须实现的方法,没有哪个CollectionView会一直为空吧?相应的,若我们的collectionView有header、footer的话,也必须要重载与之对应的方法。
我们的布局只需要循环所有元素,并根据collectionView的大小,高度,以及动态的宽度确定每一个元素的位置,大小等信息,每个元素的信息都包含在一个UICollectionViewLayoutAttributes中,它所包含的参数并不多,都是基础的配置参数,可自行查看。我们现在已经做好了实现一个自定义布局所有最基础的准备,详细的实现如下:
- (void)prepareLayout {
    [super prepareLayout];
    NSInteger count = [self.collectionView numberOfItemsInSection:0];
    //初始化首个item位置
    _currentY = _sectionInsets.top;
    _currentX = _sectionInsets.left;
    _attrubutesArray = [NSMutableArray array];
    //得到每个item属性并存储
    for (NSInteger i = 0; i < count; i ++) {
        NSIndexPath * indexPath = [NSIndexPath indexPathForItem:i inSection:0];
        UICollectionViewLayoutAttributes * attributes = [self layoutAttributesForItemAtIndexPath:indexPath];
        [_attrubutesArray addObject:attributes];
    }
}

- (UICollectionViewLayoutAttributes *)layoutAttributesForItemAtIndexPath:(NSIndexPath *)indexPath {
    //获取宽度
    CGFloat contentWidth = self.collectionView.frame.size.width - _sectionInsets.left - _sectionInsets.right;

    //通过indexpath创建一个item属性
    UICollectionViewLayoutAttributes * temp = [UICollectionViewLayoutAttributes layoutAttributesForCellWithIndexPath:indexPath];
    //计算item宽
    CGFloat itemW = 0;
    if (_widthComputeBlock) {
        itemW = self.widthComputeBlock(indexPath, _itemHeight);
        //约束宽度最大值
        if (itemW > contentWidth) {
            itemW = contentWidth;
        }
    } else {
        NSAssert(YES, @"请实现计算宽度的block方法");
    }

    //计算item的frame
    CGRect frame;
    frame.size = CGSizeMake(itemW, _itemHeight);

    //检查坐标
    if (_currentX + frame.size.width > contentWidth) {
        _currentX = _sectionInsets.left;
        _currentY += (_itemHeight + _lineSpace);
    }
    //设置坐标
    frame.origin = CGPointMake(_currentX, _currentY);
    temp.frame = frame;

    //偏移当前坐标
    _currentX += frame.size.width + _itemSpace;
    return temp;
}


- (CGSize)collectionViewContentSize {
    return CGSizeMake(1,
                      _currentY + _itemHeight + _sectionInsets.bottom);
}

- (NSArray *)layoutAttributesForElementsInRect:(CGRect)rect{
    return _attrubutesArray;
}
这样就达成效果了。
结语:
自定义布局难点不在于其本身,难点在于各种自定义布局的实现方法,很多很酷炫的动画还要用到各种数学函数,若再在上面加点手势事件呢,再加个手势动画呢。
本篇文章仅实现了一个最简单的自定义布局。若读着想要加深下理解,可以做如下练习:
- 等宽不等高的垂直流式布局(宽高都不等呢)
- 居中放大的banner滚动效果布局(加入自动滚动以及相关手势)
- 圆环布局(加入手势滚动,外滑删除)
- 球体布局
下一篇文章会在此文章的项目基础上进行 拖动重排 的探索。
