Flume高可用,Flume负载均衡 03
1. 高可用Flume-NG配置案例failover
1.1 需求
在完成单点的Flume NG搭建后,下面我们搭建一个高可用的Flume NG集。
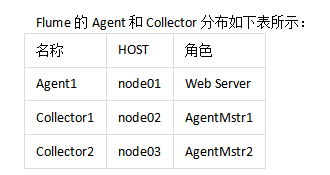
1.2 分析
1.3 实现
1.3.1 node01安装配置flume与拷贝文件脚本
-
将node03机器上面的flume安装包以及文件生产的两个目录拷贝到node01机器上面去
node03机器执行以下命令
cd /export/servers
scp -r apache-flume-1.6.0-cdh5.14.0-bin/ node01:$PWD
scp -r shells/ taillogs/ node01:$PWD
- node01机器配置agent的配置文件
cd /export/servers/apache-flume-1.6.0-cdh5.14.0-bin/conf
vim agent.conf
#agent1 name
agent1.channels = c1
agent1.sources = r1
agent1.sinks = k1 k2
#
##set gruop
agent1.sinkgroups = g1
#
##set channel
agent1.channels.c1.type = memory
agent1.channels.c1.capacity = 1000
agent1.channels.c1.transactionCapacity = 100
#
agent1.sources.r1.channels = c1
agent1.sources.r1.type = exec
agent1.sources.r1.command = tail -F /export/servers/taillogs/access_log
#
agent1.sources.r1.interceptors = i1 i2
agent1.sources.r1.interceptors.i1.type = static
agent1.sources.r1.interceptors.i1.key = Type
agent1.sources.r1.interceptors.i1.value = LOGIN
agent1.sources.r1.interceptors.i2.type = timestamp
#
## set sink1
agent1.sinks.k1.channel = c1
agent1.sinks.k1.type = avro
agent1.sinks.k1.hostname = node02
agent1.sinks.k1.port = 52020
#
## set sink2
agent1.sinks.k2.channel = c1
agent1.sinks.k2.type = avro
agent1.sinks.k2.hostname = node03
agent1.sinks.k2.port = 52020
#
##set sink group
agent1.sinkgroups.g1.sinks = k1 k2
#
##set failover
agent1.sinkgroups.g1.processor.type = failover
agent1.sinkgroups.g1.processor.priority.k1 = 10
agent1.sinkgroups.g1.processor.priority.k2 = 1
agent1.sinkgroups.g1.processor.maxpenalty = 10000
#
1.3.2 node02与node03配置flumecollection
- node02机器修改配置文件
cd /export/servers/apache-flume-1.6.0-cdh5.14.0-bin/conf
vim collector.conf
#set Agent name
a1.sources = r1
a1.channels = c1
a1.sinks = k1
#
##set channel
a1.channels.c1.type = memory
a1.channels.c1.capacity = 1000
a1.channels.c1.transactionCapacity = 100
#
## other node,nna to nns
a1.sources.r1.type = avro
a1.sources.r1.bind = node02
a1.sources.r1.port = 52020
a1.sources.r1.interceptors = i1
a1.sources.r1.interceptors.i1.type = static
a1.sources.r1.interceptors.i1.key = Collector
a1.sources.r1.interceptors.i1.value = node02
a1.sources.r1.channels = c1
#
##set sink to hdfs
a1.sinks.k1.type=hdfs
a1.sinks.k1.hdfs.path= hdfs://node01:8020/flume/failover/
a1.sinks.k1.hdfs.fileType=DataStream
a1.sinks.k1.hdfs.writeFormat=TEXT
a1.sinks.k1.hdfs.rollInterval=10
a1.sinks.k1.channel=c1
a1.sinks.k1.hdfs.filePrefix=%Y-%m-%d
#
- node03 机器修改配置文件
cd  /export/servers/apache-flume-1.6.0-cdh5.14.0-bin/conf
vim collector.conf
#set Agent name
a1.sources = r1
a1.channels = c1
a1.sinks = k1
#
##set channel
a1.channels.c1.type = memory
a1.channels.c1.capacity = 1000
a1.channels.c1.transactionCapacity = 100
#
## other node,nna to nns
a1.sources.r1.type = avro
a1.sources.r1.bind = node03
a1.sources.r1.port = 52020
a1.sources.r1.interceptors = i1
a1.sources.r1.interceptors.i1.type = static
a1.sources.r1.interceptors.i1.key = Collector
a1.sources.r1.interceptors.i1.value = node03
a1.sources.r1.channels = c1
#
##set sink to hdfs
a1.sinks.k1.type=hdfs
a1.sinks.k1.hdfs.path= hdfs://node01:8020/flume/failover/
a1.sinks.k1.hdfs.fileType=DataStream
a1.sinks.k1.hdfs.writeFormat=TEXT
a1.sinks.k1.hdfs.rollInterval=10
a1.sinks.k1.channel=c1
a1.sinks.k1.hdfs.filePrefix=%Y-%m-%d
1.3.3 顺序启动命令
- node03 机器上面启动flume
cd /export/servers/apache-flume-1.6.0-cdh5.14.0-bin
bin/flume-ng agent -n a1 -c conf -f conf/collector.conf -Dflume.root.logger=DEBUG,console
- node02机器上面启动flume
cd /export/servers/apache-flume-1.6.0-cdh5.14.0-bin
bin/flume-ng agent -n a1 -c conf -f conf/collector.conf -Dflume.root.logger=DEBUG,console
- node01机器上面启动flume
cd /export/servers/apache-flume-1.6.0-cdh5.14.0-bin
bin/flume-ng agent -n agent1 -c conf -f conf/agent.conf -Dflume.root.logger=DEBUG,console
- node01机器启动文件产生脚本
cd  /export/servers/shells
sh tail-file.sh
1.3.4 FAILOVER测试
下面我们来测试下Flume NG集群的高可用(故障转移)。场景如下:我们在Agent1节点上传文件,由于我们配置Collector1的权重比Collector2大,所以 Collector1优先采集并上传到存储系统。然后我们kill掉Collector1,此时有Collector2负责日志的采集上传工作,之后,我 们手动恢复Collector1节点的Flume服务,再次在Agent1上次文件,发现Collector1恢复优先级别的采集工作。具体截图如下所 示:
Collector1优先上传

HDFS集群中上传的log内容预览

Collector1宕机,Collector2获取优先上传权限

重启Collector1服务,Collector1重新获得优先上传的权限
2. Flume的负载均衡 load balancer
2.1 需求
负载均衡是用于解决一台机器(一个进程)无法解决所有请求而产生的一种算法。Load balancing Sink Processor 能够实现 load balance 功能,如下图Agent1 是一个路由节点,负责将 Channel 暂存的 Event 均衡到对应的多个 Sink组件上,而每个 Sink 组件分别连接到一个独立的 Agent 上,示例配置,如下所示:

在此处我们通过三台机器来进行模拟flume的负载均衡
三台机器规划如下:
node01:采集数据,发送到node02和node03机器上去
node02:接收node01的部分数据
node03:接收node01的部分数据
1.2 实现
- 开发node01服务器的flume配置
node01服务器配置:
cd /export/servers/apache-flume-1.6.0-cdh5.14.0-bin/conf
vim load_banlancer_client.conf
#agent name
a1.channels = c1
a1.sources = r1
a1.sinks = k1 k2

#set gruop
a1.sinkgroups = g1

#set channel
a1.channels.c1.type = memory
a1.channels.c1.capacity = 1000
a1.channels.c1.transactionCapacity = 100

a1.sources.r1.channels = c1
a1.sources.r1.type = exec
a1.sources.r1.command = tail -F /export/servers/taillogs/access_log

# set sink1
a1.sinks.k1.channel = c1
a1.sinks.k1.type = avro
a1.sinks.k1.hostname = node02
a1.sinks.k1.port = 52020

# set sink2
a1.sinks.k2.channel = c1
a1.sinks.k2.type = avro
a1.sinks.k2.hostname = node03
a1.sinks.k2.port = 52020

#set sink group
a1.sinkgroups.g1.sinks = k1 k2

#set failover
a1.sinkgroups.g1.processor.type = load_balance
a1.sinkgroups.g1.processor.backoff = true
a1.sinkgroups.g1.processor.selector = round_robin
a1.sinkgroups.g1.processor.selector.maxTimeOut=10000
- 开发node02服务器的flume配置
cd /export/servers/apache-flume-1.6.0-cdh5.14.0-bin/conf
vim load_banlancer_server.conf
# Name the components on this agent
a1.sources = r1
a1.sinks = k1
a1.channels = c1

# Describe/configure the source
a1.sources.r1.type = avro
a1.sources.r1.channels = c1
a1.sources.r1.bind = node02
a1.sources.r1.port = 52020

# Describe the sink
a1.sinks.k1.type = logger

# Use a channel which buffers events in memory
a1.channels.c1.type = memory
a1.channels.c1.capacity = 1000
a1.channels.c1.transactionCapacity = 100

# Bind the source and sink to the channel
a1.sources.r1.channels = c1
a1.sinks.k1.channel = c1
- 开发node03服务器flume配置
node03服务器配置
cd /export/servers/apache-flume-1.6.0-cdh5.14.0-bin/conf
vim load_banlancer_server.conf
# Name the components on this agent
a1.sources = r1
a1.sinks = k1
a1.channels = c1

# Describe/configure the source
a1.sources.r1.type = avro
a1.sources.r1.channels = c1
a1.sources.r1.bind = node03
a1.sources.r1.port = 52020

# Describe the sink
a1.sinks.k1.type = logger

# Use a channel which buffers events in memory
a1.channels.c1.type = memory
a1.channels.c1.capacity = 1000
a1.channels.c1.transactionCapacity = 100

# Bind the source and sink to the channel
a1.sources.r1.channels = c1
a1.sinks.k1.channel = c1
- 准备启动flume服务
启动node03的flume服务
cd /export/servers/apache-flume-1.6.0-cdh5.14.0-bin
bin/flume-ng agent -n a1 -c conf -f conf/load_banlancer_server.conf -Dflume.root.logger=DEBUG,console
启动node02的flume服务
cd /export/servers/apache-flume-1.6.0-cdh5.14.0-bin
bin/flume-ng agent -n a1 -c conf -f conf/load_banlancer_server.conf -Dflume.root.logger=DEBUG,console
启动node01的flume服务
cd /export/servers/apache-flume-1.6.0-cdh5.14.0-bin
bin/flume-ng agent -n a1 -c conf -f conf/load_banlancer_client.conf -Dflume.root.logger=DEBUG,console
- node01服务器运行脚本产生数据
cd /export/servers/shells
sh tail-file.sh
3. Flume案例一
3.1 案例场景
A、B两台日志服务机器实时生产日志主要类型为access.log、nginx.log、web.log
现在要求:
把A、B 机器中的access.log、nginx.log、web.log 采集汇总到C机器上然后统一收集到hdfs中。
但是在hdfs中要求的目录为:
/source/logs/access/20180101/**
/source/logs/nginx/20180101/**
/source/logs/web/20180101/**
3.2 分析
3.3 实现
服务器A对应的IP为 192.168.52.100
服务器B对应的IP为 192.168.52.110
服务器C对应的IP为 192.168.52.120
- 采集端配置文件开发
node01与node02服务器开发flume的配置文件
cd /export/servers/apache-flume-1.6.0-cdh5.14.0-bin/conf
vim exec_source_avro_sink.conf
# Name the components on this agent
a1.sources = r1 r2 r3
a1.sinks = k1
a1.channels = c1

# Describe/configure the source
a1.sources.r1.type = exec
a1.sources.r1.command = tail -F /export/servers/taillogs/access.log
a1.sources.r1.interceptors = i1
a1.sources.r1.interceptors.i1.type = static
##  static拦截器的功能就是往采集到的数据的header中插入自己定## 义的key-value对
a1.sources.r1.interceptors.i1.key = type
a1.sources.r1.interceptors.i1.value = access

a1.sources.r2.type = exec
a1.sources.r2.command = tail -F /export/servers/taillogs/nginx.log
a1.sources.r2.interceptors = i2
a1.sources.r2.interceptors.i2.type = static
a1.sources.r2.interceptors.i2.key = type
a1.sources.r2.interceptors.i2.value = nginx

a1.sources.r3.type = exec
a1.sources.r3.command = tail -F /export/servers/taillogs/web.log
a1.sources.r3.interceptors = i3
a1.sources.r3.interceptors.i3.type = static
a1.sources.r3.interceptors.i3.key = type
a1.sources.r3.interceptors.i3.value = web

# Describe the sink
a1.sinks.k1.type = avro
a1.sinks.k1.hostname = node03
a1.sinks.k1.port = 41414

# Use a channel which buffers events in memory
a1.channels.c1.type = memory
a1.channels.c1.capacity = 20000
a1.channels.c1.transactionCapacity = 10000

# Bind the source and sink to the channel
a1.sources.r1.channels = c1
a1.sources.r2.channels = c1
a1.sources.r3.channels = c1
a1.sinks.k1.channel = c1
- 服务端配置文件开发
在node03上面开发flume配置文件
cd /export/servers/apache-flume-1.6.0-cdh5.14.0-bin/conf
vim avro_source_hdfs_sink.conf
a1.sources = r1
a1.sinks = k1
a1.channels = c1
#定义source
a1.sources.r1.type = avro
a1.sources.r1.bind = 192.168.52.120
a1.sources.r1.port =41414

#添加时间拦截器
a1.sources.r1.interceptors = i1
a1.sources.r1.interceptors.i1.type = org.apache.flume.interceptor.TimestampInterceptor$Builder


#定义channels
a1.channels.c1.type = memory
a1.channels.c1.capacity = 20000
a1.channels.c1.transactionCapacity = 10000

#定义sink
a1.sinks.k1.type = hdfs
a1.sinks.k1.hdfs.path=hdfs://192.168.52.100:8020/source/logs/%{type}/%Y%m%d
a1.sinks.k1.hdfs.filePrefix =events
a1.sinks.k1.hdfs.fileType = DataStream
a1.sinks.k1.hdfs.writeFormat = Text
#时间类型
a1.sinks.k1.hdfs.useLocalTimeStamp = true
#生成的文件不按条数生成
a1.sinks.k1.hdfs.rollCount = 0
#生成的文件按时间生成
a1.sinks.k1.hdfs.rollInterval = 30
#生成的文件按大小生成
a1.sinks.k1.hdfs.rollSize  = 10485760
#批量写入hdfs的个数
a1.sinks.k1.hdfs.batchSize = 10000
#flume操作hdfs的线程数(包括新建,写入等)
a1.sinks.k1.hdfs.threadsPoolSize=10
#操作hdfs超时时间
a1.sinks.k1.hdfs.callTimeout=30000

#组装source、channel、sink
a1.sources.r1.channels = c1
a1.sinks.k1.channel = c1
- 采集端文件生成脚本
在node01与node02上面开发shell脚本,模拟数据生成
cd /export/servers/shells
vim server.sh
#!/bin/bash
while true
do
 date >> /export/servers/taillogs/access.log;
 date >> /export/servers/taillogs/web.log;
 date >> /export/servers/taillogs/nginx.log;
  sleep 0.5;
done
- 顺序启动服务
node03启动flume实现数据收集
cd /export/servers/apache-flume-1.6.0-cdh5.14.0-bin
bin/flume-ng agent -c conf -f conf/avro_source_hdfs_sink.conf -name a1 -Dflume.root.logger=DEBUG,console
node01与node02启动flume实现数据监控
cd /export/servers/apache-flume-1.6.0-cdh5.14.0-bin
bin/flume-ng agent -c conf -f conf/exec_source_avro_sink.conf -name a1 -Dflume.root.logger=DEBUG,console
node01与node02启动生成文件脚本
cd /export/servers/shells
sh server.sh
4. Flume案例二(自定义拦截器)
4.1 需求
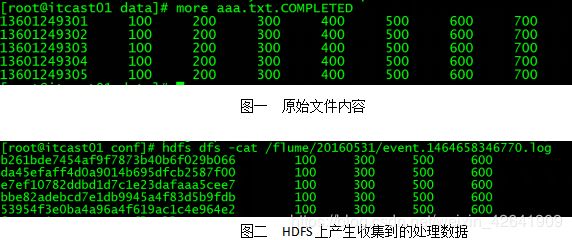
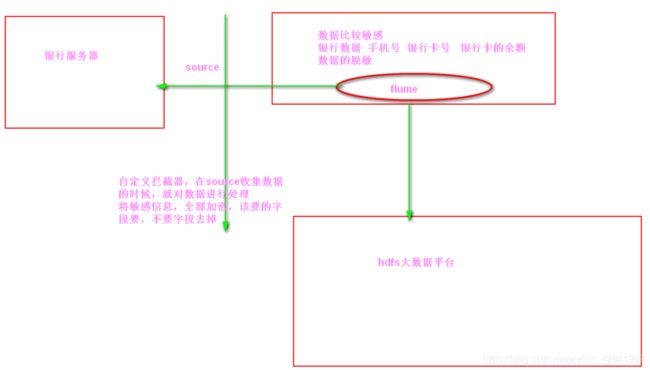
在数据采集之后,通过flume的拦截器,实现不需要的数据过滤掉,并将指定的第一个字段进行加密,加密之后再往hdfs上面保存。
原始数据与处理之后的数据对比
4.2 分析
4.3 实现步骤
- 创建maven java工程,导入jar包
<repositories>
    <repository>
        <id>clouderaid>
 <url>https://repository.cloudera.com/artifactory/cloudera-repos/url>
    repository>
repositories>
<dependencies>
    <dependency>
        <groupId>org.apache.flumegroupId>
        <artifactId>flume-ng-coreartifactId>
        <version>1.6.0-cdh5.14.0version>
        <scope>providedscope>
    dependency>
dependencies>
- 自定义flume的拦截器
package cn.itcast.iterceptor;
import com.google.common.base.Charsets;
import org.apache.flume.Context;
import org.apache.flume.Event;
import org.apache.flume.interceptor.Interceptor;
import java.security.MessageDigest;
import java.security.NoSuchAlgorithmException;
import java.util.ArrayList;
import java.util.List;
import java.util.regex.Matcher;
import java.util.regex.Pattern;

import static cn.itcast.iterceptor.CustomParameterInterceptor.Constants.*;

public class CustomParameterInterceptor implements Interceptor {
    /** The field_separator.指明每一行字段的分隔符 */
    private final String fields_separator;

    /** The indexs.通过分隔符分割后,指明需要那列的字段 下标*/
    private final String indexs;

    /** The indexs_separator. 多个下标的分隔符*/
    private final String indexs_separator;

    /**
     *
     * @param indexs
     * @param indexs_separator
     */
    public CustomParameterInterceptor( String fields_separator,
                                       String indexs, String indexs_separator,String encrypted_field_index) {
        String f = fields_separator.trim();
        String i = indexs_separator.trim();
        this.indexs = indexs;
        this.encrypted_field_index=encrypted_field_index.trim();
        if (!f.equals("")) {
            f = UnicodeToString(f);
        }
        this.fields_separator =f;
        if (!i.equals("")) {
            i = UnicodeToString(i);
        }
        this.indexs_separator = i;
    }

    /*
     *
     * \t 制表符 ('\u0009') \n 新行(换行)符 (' ') \r 回车符 (' ') \f 换页符 ('\u000C') \a 报警
     * (bell) 符 ('\u0007') \e 转义符 ('\u001B') \cx  空格(\u0020)对应于 x 的控制符
     *
     * @param str
     * @return
     * @data:2015-6-30
     */

    /** The encrypted_field_index. 需要加密的字段下标*/
    private final String encrypted_field_index;
    public static String UnicodeToString(String str) {
        Pattern pattern = Pattern.compile("(\\\\u(\\p{XDigit}{4}))");
        Matcher matcher = pattern.matcher(str);
        char ch;
        while (matcher.find()) {
            ch = (char) Integer.parseInt(matcher.group(2), 16);
            str = str.replace(matcher.group(1), ch + "");
        }
        return str;
    }

    /*
     * @see org.apache.flume.interceptor.Interceptor#intercept(org.apache.flume.Event)
     * 单个event拦截逻辑
     */
    public Event intercept(Event event) {
        if (event == null) {
            return null;
        }
        try {
            String line = new String(event.getBody(), Charsets.UTF_8);
            String[] fields_spilts = line.split(fields_separator);
            String[] indexs_split = indexs.split(indexs_separator);
            String newLine="";
            for (int i = 0; i < indexs_split.length; i++) {
                int parseInt = Integer.parseInt(indexs_split[i]);
                //对加密字段进行加密
                if(!"".equals(encrypted_field_index)&&encrypted_field_index.equals(indexs_split[i])){
                    newLine+=StringUtils.GetMD5Code(fields_spilts[parseInt]);
                }else{
                    newLine+=fields_spilts[parseInt];
                }

                if(i!=indexs_split.length-1){
                    newLine+=fields_separator;
                }
            }
            event.setBody(newLine.getBytes(Charsets.UTF_8));
            return event;
        } catch (Exception e) {
            return event;
        }
    }

    /*
     * @see org.apache.flume.interceptor.Interceptor#intercept(java.util.List)
     * 批量event拦截逻辑
     */
    public List<Event> intercept(List<Event> events) {
        List<Event> out = new ArrayList<Event>();
        for (Event event : events) {
            Event outEvent = intercept(event);
            if (outEvent != null) {
                out.add(outEvent);
            }
        }
        return out;
    }

    /*
     * @see org.apache.flume.interceptor.Interceptor#initialize()
     */
    public void initialize() {
        // TODO Auto-generated method stub

    }

    /*
     * @see org.apache.flume.interceptor.Interceptor#close()
     */
    public void close() {
        // TODO Auto-generated method stub

    }


    /**
     * 相当于自定义Interceptor的工厂类
     * 在flume采集配置文件中通过制定该Builder来创建Interceptor对象
     * 可以在Builder中获取、解析flume采集配置文件中的拦截器Interceptor的自定义参数:
     * 字段分隔符,字段下标,下标分隔符、加密字段下标 ...等
     * @author
     *
     */
    public static class Builder implements Interceptor.Builder {

        /** The fields_separator.指明每一行字段的分隔符 */
        private  String fields_separator;

        /** The indexs.通过分隔符分割后,指明需要那列的字段 下标*/
        private  String indexs;

        /** The indexs_separator. 多个下标下标的分隔符*/
        private  String indexs_separator;

        /** The encrypted_field. 需要加密的字段下标*/
        private  String encrypted_field_index;
        /*
         * @see org.apache.flume.conf.Configurable#configure(org.apache.flume.Context)
         */
        public void configure(Context context) {
            fields_separator = context.getString(FIELD_SEPARATOR, DEFAULT_FIELD_SEPARATOR);
            indexs = context.getString(INDEXS, DEFAULT_INDEXS);
            indexs_separator = context.getString(INDEXS_SEPARATOR, DEFAULT_INDEXS_SEPARATOR);
            encrypted_field_index= context.getString(ENCRYPTED_FIELD_INDEX, DEFAULT_ENCRYPTED_FIELD_INDEX);
        }
        /*
         * @see org.apache.flume.interceptor.Interceptor.Builder#build()
         */
        public Interceptor build() {
            return new CustomParameterInterceptor(fields_separator, indexs, indexs_separator,encrypted_field_index);
        }
    }
    /**
     * 常量
     *
     */
    public static class Constants {
        /** The Constant FIELD_SEPARATOR. */
        public static final String FIELD_SEPARATOR = "fields_separator";

        /** The Constant DEFAULT_FIELD_SEPARATOR. */
        public static final String DEFAULT_FIELD_SEPARATOR =" ";

        /** The Constant INDEXS. */
        public static final String INDEXS = "indexs";

        /** The Constant DEFAULT_INDEXS. */
        public static final String DEFAULT_INDEXS = "0";

        /** The Constant INDEXS_SEPARATOR. */
        public static final String INDEXS_SEPARATOR = "indexs_separator";

        /** The Constant DEFAULT_INDEXS_SEPARATOR. */
        public static final String DEFAULT_INDEXS_SEPARATOR = ",";

        /** The Constant ENCRYPTED_FIELD_INDEX. */
        public static final String ENCRYPTED_FIELD_INDEX = "encrypted_field_index";

        /** The Constant DEFAUL_TENCRYPTED_FIELD_INDEX. */
        public static final String DEFAULT_ENCRYPTED_FIELD_INDEX = "";

        /** The Constant PROCESSTIME. */
        public static final String PROCESSTIME = "processTime";
        /** The Constant PROCESSTIME. */
        public static final String DEFAULT_PROCESSTIME = "a";

    }
    /**
     * 工具类:字符串md5加密
     */
    public static class StringUtils {
        // 全局数组
        private final static String[] strDigits = { "0", "1", "2", "3", "4", "5",
                "6", "7", "8", "9", "a", "b", "c", "d", "e", "f" };
        // 返回形式为数字跟字符串
        private static String byteToArrayString(byte bByte) {
            int iRet = bByte;
            // System.out.println("iRet="+iRet);
            if (iRet < 0) {
                iRet += 256;
            }
            int iD1 = iRet / 16;
            int iD2 = iRet % 16;
            return strDigits[iD1] + strDigits[iD2];
        }

        // 返回形式只为数字
        private static String byteToNum(byte bByte) {
            int iRet = bByte;
            System.out.println("iRet1=" + iRet);
            if (iRet < 0) {
                iRet += 256;
            }
            return String.valueOf(iRet);
        }

        // 转换字节数组为16进制字串
        private static String byteToString(byte[] bByte) {
            StringBuffer sBuffer = new StringBuffer();
            for (int i = 0; i < bByte.length; i++) {
                sBuffer.append(byteToArrayString(bByte[i]));
            }
            return sBuffer.toString();
        }

        public static String GetMD5Code(String strObj) {
            String resultString = null;
            try {
                resultString = new String(strObj);
                MessageDigest md = MessageDigest.getInstance("MD5");
                // md.digest() 该函数返回值为存放哈希值结果的byte数组
                resultString = byteToString(md.digest(strObj.getBytes()));
            } catch (NoSuchAlgorithmException ex) {
                ex.printStackTrace();
            }
            return resultString;
        }
    }


}
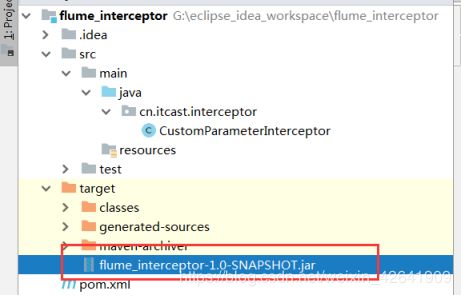
- 打包上传服务器
- 开发flume的配置文件
第三台机器开发flume的配置文件
cd  /export/servers/apache-flume-1.6.0-cdh5.14.0-bin/conf
vim spool-interceptor-hdfs.conf
a1.channels = c1
a1.sources = r1
a1.sinks = s1
#channel
a1.channels.c1.type = memory
a1.channels.c1.capacity=100000
a1.channels.c1.transactionCapacity=50000
#source
a1.sources.r1.channels = c1
a1.sources.r1.type = spooldir
a1.sources.r1.spoolDir = /export/servers/intercept
a1.sources.r1.batchSize= 50
a1.sources.r1.inputCharset = UTF-8

a1.sources.r1.interceptors =i1 i2
a1.sources.r1.interceptors.i1.type =cn.itcast.iterceptor.CustomParameterInterceptor$Builder
a1.sources.r1.interceptors.i1.fields_separator=\\u0009
a1.sources.r1.interceptors.i1.indexs =0,1,3,5,6
a1.sources.r1.interceptors.i1.indexs_separator =\\u002c
a1.sources.r1.interceptors.i1.encrypted_field_index =0
a1.sources.r1.interceptors.i2.type = org.apache.flume.interceptor.TimestampInterceptor$Builder
#sink
a1.sinks.s1.channel = c1
a1.sinks.s1.type = hdfs
a1.sinks.s1.hdfs.path =hdfs://192.168.52.100:8020/flume/intercept/%Y%m%d
a1.sinks.s1.hdfs.filePrefix = event
a1.sinks.s1.hdfs.fileSuffix = .log
a1.sinks.s1.hdfs.rollSize = 10485760
a1.sinks.s1.hdfs.rollInterval =20
a1.sinks.s1.hdfs.rollCount = 0
a1.sinks.s1.hdfs.batchSize = 1500
a1.sinks.s1.hdfs.round = true
a1.sinks.s1.hdfs.roundUnit = minute
a1.sinks.s1.hdfs.threadsPoolSize = 25
a1.sinks.s1.hdfs.useLocalTimeStamp = true
a1.sinks.s1.hdfs.minBlockReplicas = 1
a1.sinks.s1.hdfs.fileType =DataStream
a1.sinks.s1.hdfs.writeFormat = Text
a1.sinks.s1.hdfs.callTimeout = 60000
a1.sinks.s1.hdfs.idleTimeout =60
- 上传测试数据
上传我们的测试数据到/export/servers/intercept 这个目录下面去,如果目录不存在则创建
mkdir -p /export/servers/intercept
测试数据如下
13601249301	100	200	300	400	500	600	700
13601249302	100	200	300	400	500	600	700
13601249303	100	200	300	400	500	600	700
13601249304	100	200	300	400	500	600	700
13601249305	100	200	300	400	500	600	700
13601249306	100	200	300	400	500	600	700
13601249307	100	200	300	400	500	600	700
13601249308	100	200	300	400	500	600	700
13601249309	100	200	300	400	500	600	700
13601249310	100	200	300	400	500	600	700
13601249311	100	200	300	400	500	600	700
13601249312	100	200	300	400	500	600	700
- 启动flume
cd /export/servers/apache-flume-1.6.0-cdh5.14.0-bin
bin/flume-ng agent -c conf -f conf/spool-interceptor-hdfs.conf -name a1 -Dflume.root.logger=DEBUG,console


