记录Kite的学习历程之AOP
Kite学习框架的第十天
1. 基于xml文件的AOP配置
1.1 首先创建一个业务层接口
package cn.kitey.service;

/**
 * 一个业务层的接口
 */
public interface AccountService {

    /**
     * 模拟账户的保存
     */
    void saveAccount();

    /**
     * 模拟账户的更新
     * @param i
     * @return
     */
    void updateAccount(int i);

    /**
     * 模拟账户的删除
     * @return
     */
    int deleteAccount();
}
1.2 创建业务层接口的实现类
其中有三个方法
1.没有返回值,无参数的返回方法
2.无返回值,有参数的方法
3.有返回值,无参数的方法
这三个方法主要用来检测:切入点表达式的写法
package cn.kitey.service.impl;

import cn.kitey.service.AccountService;

/**
 * 账户的业务层的实现方法
 */
public class AccountServiceImpl implements AccountService {
    public void saveAccount() {
        System.out.println("执行了保存方法");

    }

    public void updateAccount(int i) {
        System.out.println("执行了更新   "  + i);
    }

    public int deleteAccount() {
        System.out.println("执行的删除方法!");
        return 0;
    }
}
1.3 配置日志打印类
该类中包含:
1.前置通知
2.后置通知
3.异常通知
4.最终通知
5.环绕通知(这个通知比较特别,可以使用该通知完成上面的4中通知)
package cn.kitey.utils;


import org.aspectj.lang.ProceedingJoinPoint;

/**
 * 用于记录日志的工具类
 */
public class Logger {

    /**
     * 用于记录日志的方法,计划让其在切入点给方法执行之前进行执行(切入点给方法就是业务层方法)
     */
    public void beforePrintLog(){
        System.out.println("printLog 前置通知开始记录日志!");
    }

    /**
     * 后置通知
     */
    public void AfterReturnPrintLog(){
        System.out.println("printLog后置通知 开始记录日志!");
    }

    /**
     * 异常通知
     */
    public void ThrowPrintLog(){
        System.out.println("printLog 异常通知开始记录日志!");
    }

    /**
     * 最终通知
     */
    public void AfterPrintLog(){
        System.out.println("printLog 最终通知开始记录日志!");
    }

    /**
     * 环绕通知
     * 解析:
     *      Spring框架为我们提供了一个接口:ProceedingJoinPoint.该接口有一个方法proceed()
     *      此方法相当于明确的调用切入点给方法,该接口可以作为环绕通知的方法参数,程序执行时,
     *      Spring框架会为我们提供该接口的实现类供我们使用
     *
     *
     * @return
     */
    public Object aroundPrint(ProceedingJoinPoint pro){
        try {

            System.out.println("aroundPrint 环绕开始记录日志!--------前置!");
            //得到方法执行的所需要的参数
            Object[] args = pro.getArgs();

            System.out.println("aroundPrint 环绕开始记录日志!--------后置!");
            //明确调用的业务层方法(切入点方法)
            Object proceed = pro.proceed(args);

            return proceed;
        } catch (Throwable e) {
            System.out.println("aroundPrint 环绕开始记录日志!--------异常!");
           throw new RuntimeException(e);

        } finally {
            System.out.println("aroundPrint 环绕开始记录日志!--------最终!");
        }

    }
}
1.4 配置bean.xml文件
这个配置没有,配置环绕通知
1.首先应该将service配置进来,这样spring才可以对accountService使用动态代理
2.基于xml配置AOP
详细步骤可以见代码注释
<?xml version="1.0" encoding="UTF-8"?>
<beans xmlns="http://www.springframework.org/schema/beans"
       xmlns:xsi="http://www.w3.org/2001/XMLSchema-instance"
       xmlns:aop="http://www.springframework.org/schema/aop"
       xsi:schemaLocation="http://www.springframework.org/schema/beans
        http://www.springframework.org/schema/beans/spring-beans.xsd
        http://www.springframework.org/schema/aop
        http://www.springframework.org/schema/aop/spring-aop.xsd">


    <!--配置spring的ioc,把service对象配置进来-->
    <bean id="accountService" class="cn.kitey.service.impl.AccountServiceImpl"></bean>

    <!--
        spring基于XML中的AOP配置步骤
        1.把通知的bean交给spring进行管理
        2.使用aop:config标签剋是aop的配置
        3.使用aop:aspect标签表明切面的配置
                id:给切面提供一个唯一标识
                ref:指定通知类bean的id
        4.在aop:config标签的内部使用标签来配置通知类型
                我们这里配置的为前置通知
                aop:before:表示乔治通知
                    method:指定类中的那个方法作为前置通知
                    pointcut:用于指定切入点的表达式,该表达式表明对业务层的那些方法进行增强
        5.切入点表达式的写法:
                标准的写法:public void cn.kitey.service.impl.AccountServiceImpl.saveAccount()
                全通配写法:* *..*.*(..)
    -->

    <!--配置logger类-->
    <bean id="logger" class="cn.kitey.utils.Logger"></bean>


    <!--配置AOP-->
    <aop:config>
        <!--配置通用的切入点表达式-->
        <aop:pointcut id="print" expression="execution(* cn.kitey.service.impl.*.*(..))"></aop:pointcut>

        <!--配置切面  引用通知-->
        <aop:aspect id="logAdvice" ref="logger">
            <!--配置通知类型,并建立通知方法和切入点方法的关联-->
            <aop:before method="beforePrintLog" pointcut-ref="print"></aop:before>
            <aop:after-returning method="AfterReturnPrintLog"  pointcut-ref="print"></aop:after-returning>
            <aop:after-throwing method="ThrowPrintLog"  pointcut-ref="print"></aop:after-throwing>
            <aop:after method="AfterPrintLog"  pointcut-ref="print"></aop:after>


        </aop:aspect>
    </aop:config>
</beans>
1.5 创建测试类
注意:
一定要 AccountService接口获取对象,不能使用AccountServiceImpl获取,
因为该动态代理基于接口的动态代理
package cn.kitey.test;

import cn.kitey.service.AccountService;
import org.springframework.context.support.ClassPathXmlApplicationContext;

public class AOPtest {

    public static void main(String[] args) {
        ClassPathXmlApplicationContext context = new ClassPathXmlApplicationContext("bean.xml");
        //是基于面向接口的动态代理,所以只能获取接口对象
        AccountService accountService = context.getBean("accountService",AccountService.class);
        accountService.saveAccount();
//        accountService.updateAccount(1);
//        accountService.deleteAccount();

    }

}
1.6 这时我们配置环绕通知来代替上述的四种通知
这时注意删除前面四种通知的配置信息
<aop:around method="aroundPrint" pointcut-ref="print"></aop:around>
配置后的运行截图

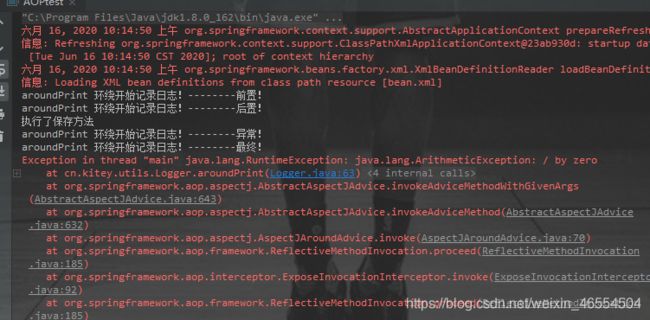
saveAccount()方法中含有错误的运行结果图(检测错误通知)

2.注解实现AOP
2.1 首先在bean.xml中配置注解信息
<?xml version="1.0" encoding="UTF-8"?>
<beans xmlns="http://www.springframework.org/schema/beans"
       xmlns:xsi="http://www.w3.org/2001/XMLSchema-instance"
       xmlns:aop="http://www.springframework.org/schema/aop"
       xmlns:context="http://www.springframework.org/schema/context"
       xsi:schemaLocation="http://www.springframework.org/schema/beans
        http://www.springframework.org/schema/beans/spring-beans.xsd
        http://www.springframework.org/schema/aop
        http://www.springframework.org/schema/aop/spring-aop.xsd
        http://www.springframework.org/schema/context
        http://www.springframework.org/schema/context/spring-context.xsd">


    <!--配置spring创建容器要扫描的包-->
    <context:component-scan base-package="cn.kitey"></context:component-scan>

    <!--配置spring开启注解的aop的支持-->
    <aop:aspectj-autoproxy></aop:aspectj-autoproxy>
</beans>
1.2 在logger类中添加上注解
主要的注解有:
1.@Component(“logger”)
2.@Aspect:表示当前类是一个切面类
3. @Pointcut(“execution(* cn.kitey.service..(…))”) :配置切入点
4. 还有的就是前置,后置通知的配置
package cn.kitey.utils;


import org.aspectj.lang.ProceedingJoinPoint;
import org.aspectj.lang.annotation.*;
import org.springframework.stereotype.Component;

/**
 * 用于记录日志的工具类
 */
@Component("logger")
@Aspect//表示当前类是一个切面类
public class Logger {

    //配置切入点表达式

    @Pointcut("execution(* cn.kitey.service.*.*(..))")
    private void prt(){}


    /**
     * 用于记录日志的方法,计划让其在切入点给方法执行之前进行执行(切入点给方法就是业务层方法)
     */
    @Before("prt()")
    public void beforePrintLog(){
        System.out.println("printLog 前置通知开始记录日志!");
    }

    /**
     * 后置通知
     */
    @AfterReturning("prt()")
    public void AfterReturnPrintLog(){
        System.out.println("printLog后置通知 开始记录日志!");
    }

    /**
     * 异常通知
     */
    @AfterThrowing("prt()")
    public void ThrowPrintLog(){
        System.out.println("printLog 异常通知开始记录日志!");
    }

    /**
     * 最终通知
     */
    @After("prt()")
    public void AfterPrintLog(){
        System.out.println("printLog 最终通知开始记录日志!");
    }

    /**
     * 环绕通知
     * 解析:
     *      Spring框架为我们提供了一个接口:ProceedingJoinPoint.该接口有一个方法proceed()
     *      此方法相当于明确的调用切入点给方法,该接口可以作为环绕通知的方法参数,程序执行时,
     *      Spring框架会为我们提供该接口的实现类供我们使用
     *
     *
     * @return
     */
    //@Around("prt()")
    public Object aroundPrint(ProceedingJoinPoint pro){
        try {

            System.out.println("aroundPrint 环绕开始记录日志!--------前置!");
            //得到方法执行的所需要的参数
            Object[] args = pro.getArgs();

            System.out.println("aroundPrint 环绕开始记录日志!--------后置!");
            //明确调用的业务层方法(切入点方法)
            Object proceed = pro.proceed(args);

            return proceed;
        } catch (Throwable e) {
            System.out.println("aroundPrint 环绕开始记录日志!--------异常!");
           throw new RuntimeException(e);

        } finally {
            System.out.println("aroundPrint 环绕开始记录日志!--------最终!");
        }

    }
}
1.3 在AccountServiceImpl类上添加注解
@Service("accountService")
public class AccountServiceImpl implements AccountService {
}
1.4 执行测试方法
package test;

import cn.kitey.service.AccountService;
import org.springframework.context.support.ClassPathXmlApplicationContext;

public class AOPtest {

    public static void main(String[] args) {
        ClassPathXmlApplicationContext context = new ClassPathXmlApplicationContext("bean.xml");
        //是基于面向接口的动态代理,所以只能获取接口对象
        AccountService accountService = context.getBean("accountService",AccountService.class);
        accountService.saveAccount();
//        accountService.updateAccount(1);
//        accountService.deleteAccount();

    }

}
没有配置环绕通知截图(注意spring注解自身产生了最终通知顺序问题)
测试结果截图:

使用环绕通知的结果(因为自己定义的位置,所以不会产生顺序错误)

以上就是AOP基于XML,注解的配置信息,希望我们一起加油,每天都有一些进步!
